Announcement

Collapse
No announcement yet.

What's wrong with this picture? Part 2

Collapse
X
 
  • Filter
  • Time
  • Show
Clear All
new posts

    What's wrong with this picture? Part 2

    OK, nothing difinitive yet on the cheery red pipes, but we had some other interesting finds today.

    Started by taking the carbs off, getting them ready to dip. Got the first carb into the dip, started working on the second one. Pilot jet is stuck, will have to try the heat and/or PB Blaster to remove, but have to be careful, as there is not much of a groove left for the screwdriver to grip. Set aside carb #2, proceed to #3.

    Oops.


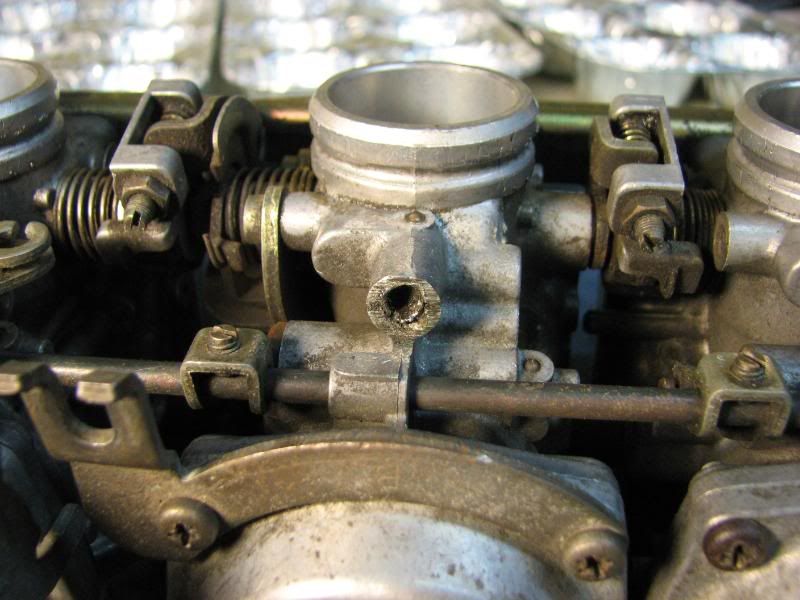
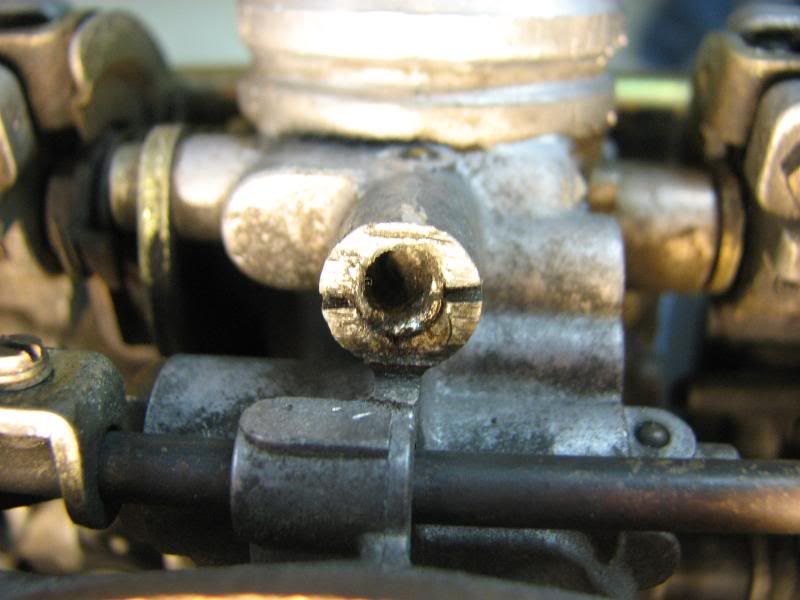
    Not sure what might have happened here. Looks like a miniature nuclear meltdown in the area of the idle mixture screw. There is no screw visible. The area it should thread into has been cut down, looks like someone tried to use a hacksaw to make a new groove to remove the jet. Also looks like they tried to drill the jet out, but the hole goes down at an angle, and no trace of the jet can be seen. I sprayed carb cleaner in the hole and nothing came out, so I guess there is something in there, but there is NO hope of ever getting it out.

    Carb #4 has two stuck jets, the pilot jet in the bottom and the air jet in the intake throat. Will have try more heat and/or PB Blaster.

    All the carbs are apart and The Cafe Kid is here, so let's move on to the valve adjustment. Found five valves that would not let my 0.0015" feeler through, and one that was only 0.0015", so it's now time to do the shim inventory to see what I can move around. The Suzuki valve shim tool is cocking sideways far too easily, so we move to the wire tie under the edge of the valve trick. Not too bad until we got to #3 intake. Moving the crank to open the valve, it stopped rather suddenly. Backed it up and tried again, but got the same results. Shining a light through the spark plug hole did not look promising, so we decided to remove the head.


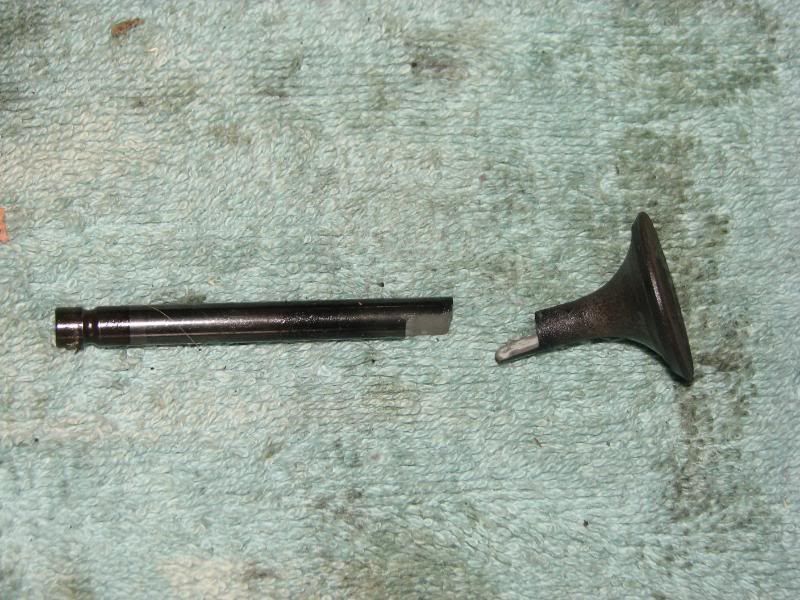
    Those are both pieces of #3 exhaust valve. I have seen very few broken valves in my experience as a mechanic, but have never seen one break like this.

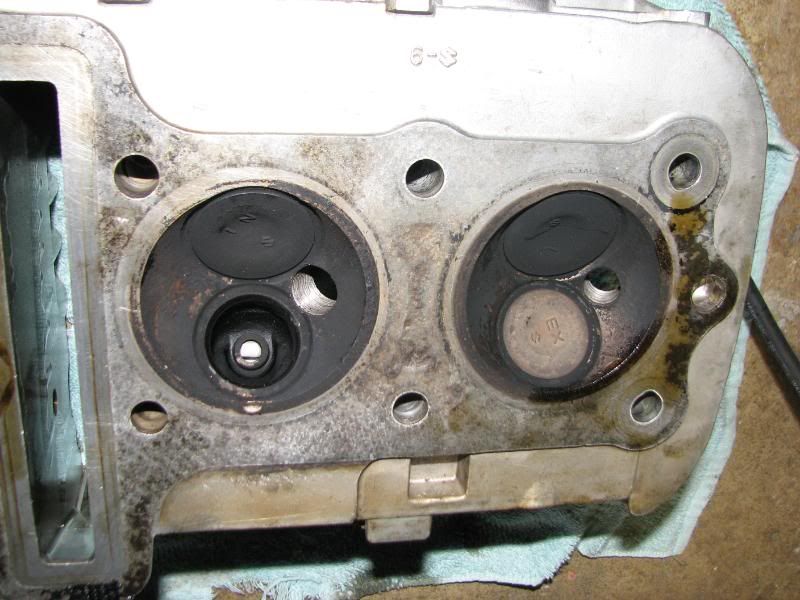
    If you are really sharp, you may have noticed that the spark plug hole is rather king-sized. That is because the Helicoil came out with the plug.

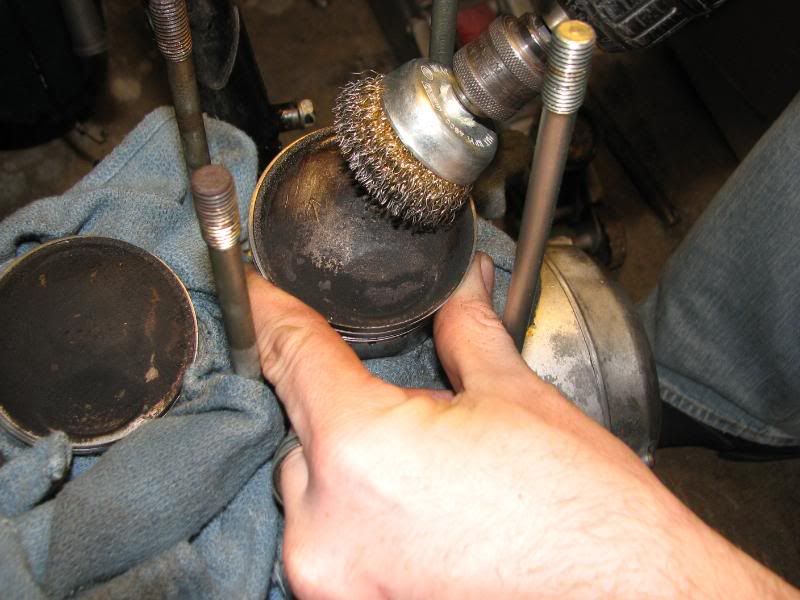
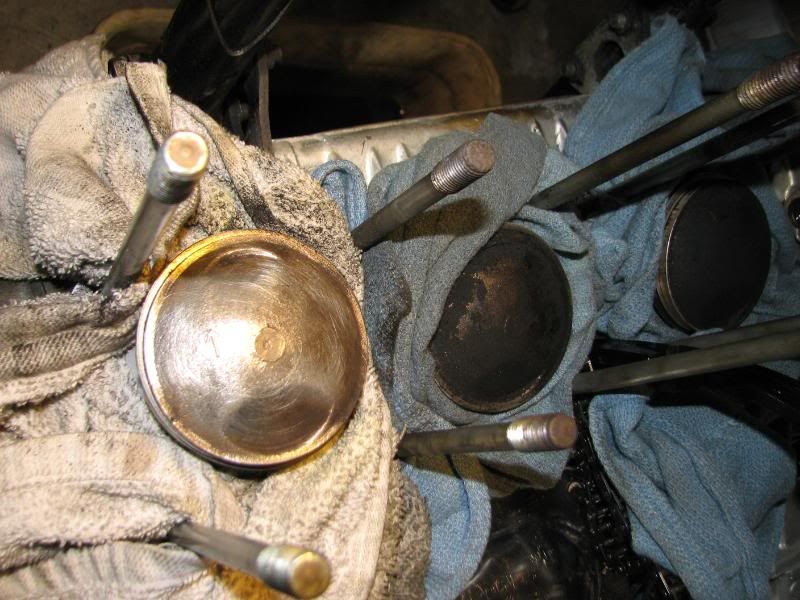
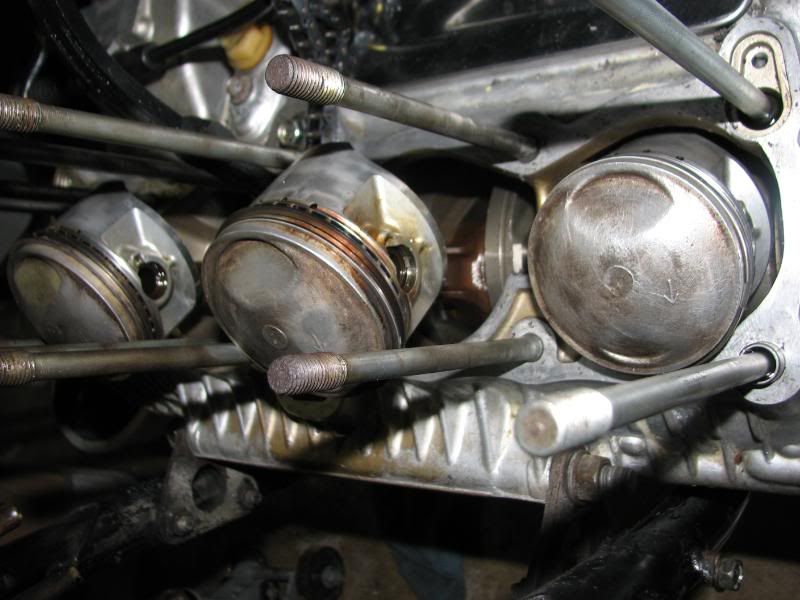
    To make a long story short (oops, too late), we have scraped all the gaskets off the cases, cylinder block and head, wire-brushed the carbon off the tops of the pistons and the combustion chambers, and will now be looking for a replacement valve and a complete gasket set. Might be cheaper in the long run, anyway, as we were going to be pulling many of the covers to polish them, and also needed exhaust gaskets and a valve cover gasket. Now they will all be included in one kit.

    .
    Last edited by Steve; 03-14-2008, 02:19 AM.
    sigpic
    mine: 2000 Honda GoldWing GL1500SE and 1980 GS850G'K' "Junior"
    hers: 1982 GS850GL - "Angel" and 1969 Suzuki T250 Scrambler
    #1 son: 1986 Yamaha Venture Royale 1300 and 1982 GS650GL "Rat Bagger"
    #2 son: 1980 GS1000G
    Family Portrait
    Siblings and Spouses
    Mom's first ride
    Want a copy of my valve adjust spreadsheet for your 2-valve per cylinder engine? Send me an e-mail request (not a PM)
    (Click on my username in the upper-left corner for e-mail info.)

    #2
    Twas indeed a fun day of learning however, if there is a plus side to all of this. Neither Steve, nor I have ever taken the head and jugs off, well now we have. I posted up in the parts wanted section, if anyone happens to have an exhaust valve and #3 BS32 carb. This bike is his sons, and his sons moolah, so needless to say, he's on a budget. If anyone has anything in good shape to sell, we sure would appreciate it PM me if ya do please.

    Anyway, Steve, while this extra work was not what you were hoping to have to do, it indeed was an excellent lesson for me, as now i feel pretty confident in at least taking my 8V motors apart (getting them back together will remain to be seen..lol) and as always a pleasure wrenching with ya! :-D

    Comment


      #3
      Steve what motor is this one.

      Comment


        #4
        Originally posted by Suzuki_Don View Post
        Steve what motor is this one.
        '81 850.

        Did you follow the link in the first line that takes you back to the original post?
        That is where the story started. 8-[

        .
        sigpic
        mine: 2000 Honda GoldWing GL1500SE and 1980 GS850G'K' "Junior"
        hers: 1982 GS850GL - "Angel" and 1969 Suzuki T250 Scrambler
        #1 son: 1986 Yamaha Venture Royale 1300 and 1982 GS650GL "Rat Bagger"
        #2 son: 1980 GS1000G
        Family Portrait
        Siblings and Spouses
        Mom's first ride
        Want a copy of my valve adjust spreadsheet for your 2-valve per cylinder engine? Send me an e-mail request (not a PM)
        (Click on my username in the upper-left corner for e-mail info.)

        Comment


          #5
          on the positive side, there's not that much carbon build-up on that other exhaust valve :-D
          GS850GT

          Comment


            #6
            Originally posted by psyguy View Post
            on the positive side, there's not that much carbon build-up on that other exhaust valve :-D
            Yeah, not much on the valves, but there was a light coating on the top of the combustion chamber and the tops of the pistons. A little work with the wire wheel and it all looks better now.


            .
            sigpic
            mine: 2000 Honda GoldWing GL1500SE and 1980 GS850G'K' "Junior"
            hers: 1982 GS850GL - "Angel" and 1969 Suzuki T250 Scrambler
            #1 son: 1986 Yamaha Venture Royale 1300 and 1982 GS650GL "Rat Bagger"
            #2 son: 1980 GS1000G
            Family Portrait
            Siblings and Spouses
            Mom's first ride
            Want a copy of my valve adjust spreadsheet for your 2-valve per cylinder engine? Send me an e-mail request (not a PM)
            (Click on my username in the upper-left corner for e-mail info.)

            Comment


              #7
              remember, Canada is your friend!
              I got a set of carbs from the great frozen north and their jetting is so much better than the EPA forced us to use.
              and best of all, the pilot bleed air screws are right up top easy to get to. no plugs to drill out!!!

              Comment


                #8
                Originally posted by Steve View Post
                '81 850.

                Did you follow the link in the first line that takes you back to the original post?
                That is where the story started. 8-[

                .
                Sorry Steve.

                Comment


                  #9
                  Did the valve break due to the nylon tie wedged in it to measure the valve clearance and the other valve smucked it when you were turning the motor over? Ted

                  Comment


                    #10
                    These are some great pics, way better than any of the manuals. Keep em coming! Good Luck!

                    Comment


                      #11
                      Wow Steve, you guys really have some project going on there! Was the valve already broken before you checked the clearances or did it break while you were checking them? -Chuck

                      Comment


                        #12
                        Not that Steve needs suggestions when it comes to mechanical stuff...but you guys might want to consider a threaded insert to replace those spark plug threads. Had one on a 450 I bought and it was very secure, unlike Helicoils that like to come out when the plug is removed.
                        Ed

                        To measure is to know.

                        Mikuni O-ring Kits For Sale...https://www.thegsresources.com/_foru...ts#post1703182

                        Top Newbie Mistakes thread...http://www.thegsresources.com/_forum...d.php?t=171846

                        Carb rebuild tutorial...https://gsarchive.bwringer.com/mtsac...d_Tutorial.pdf

                        KZ750E Rebuild Thread...http://www.thegsresources.com/_forum...0-Resurrection

                        Comment


                          #13
                          Originally posted by knotzilla View Post
                          Did the valve break due to the nylon tie wedged in it to measure the valve clearance and the other valve smucked it when you were turning the motor over? Ted
                          I would think that it would have happened sooner, if that was the case. We had already done cylinders 1&2, as well as exhaust #3. We were moving to intake #3 when we could not rotate the engine enough to get the cam to depress intake #3.


                          Originally posted by mortation View Post
                          These are some great pics, way better than any of the manuals. Keep em coming! Good Luck!
                          This was not intended as a tutorial, but we take a few pictures along the way, just for the kid's scrapbook.


                          Originally posted by Chuckster View Post
                          Wow Steve, you guys really have some project going on there! Was the valve already broken before you checked the clearances or did it break while you were checking them?
                          See the note above, but I think it broke after checking the shim size on exhaust #3 (the broken valve). We had checked all the clearances and were in the process of checking all the shim sizes to put into that spreadsheet that all you guys are bragging about. :-\"


                          Originally posted by Nessism View Post
                          Not that Steve needs suggestions when it comes to mechanical stuff...but you guys might want to consider a threaded insert to replace those spark plug threads. Had one on a 450 I bought and it was very secure, unlike Helicoils that like to come out when the plug is removed.
                          Hey, I'm always open to suggestions. :shock:
                          I was planning on re-installing a Heli-coil, but you say a threaded insert is better?
                          What is the difference and where do I get them?
                          Can I install one after an apparently failed Heli-coil install?

                          .
                          sigpic
                          mine: 2000 Honda GoldWing GL1500SE and 1980 GS850G'K' "Junior"
                          hers: 1982 GS850GL - "Angel" and 1969 Suzuki T250 Scrambler
                          #1 son: 1986 Yamaha Venture Royale 1300 and 1982 GS650GL "Rat Bagger"
                          #2 son: 1980 GS1000G
                          Family Portrait
                          Siblings and Spouses
                          Mom's first ride
                          Want a copy of my valve adjust spreadsheet for your 2-valve per cylinder engine? Send me an e-mail request (not a PM)
                          (Click on my username in the upper-left corner for e-mail info.)

                          Comment


                            #14
                            Originally posted by Steve View Post
                            Hey, I'm always open to suggestions. :shock:
                            I was planning on re-installing a Heli-coil, but you say a threaded insert is better?
                            What is the difference and where do I get them?
                            Can I install one after an apparently failed Heli-coil install?

                            .
                            Heli-coils tend to come out each time you take the bolt/plug loose. If you get a Time-sert put in, it won't come back out. Worth the money in my opinion although you may have to pay a machine shop to put it in as the tools are not cheap. http://www.timesert.com/
                            Ed

                            To measure is to know.

                            Mikuni O-ring Kits For Sale...https://www.thegsresources.com/_foru...ts#post1703182

                            Top Newbie Mistakes thread...http://www.thegsresources.com/_forum...d.php?t=171846

                            Carb rebuild tutorial...https://gsarchive.bwringer.com/mtsac...d_Tutorial.pdf

                            KZ750E Rebuild Thread...http://www.thegsresources.com/_forum...0-Resurrection

                            Comment


                              #15
                              Originally posted by Nessism View Post
                              Heli-coils tend to come out each time you take the bolt/plug loose. If you get a Time-sert put in, it won't come back out. Worth the money in my opinion although you may have to pay a machine shop to put it in as the tools are not cheap. http://www.timesert.com/
                              Yeah, I was looking at the site and found this in the FAQs:
                              14.Can I repair a stripped helicoil with a TIME-SERT insert? No, you cannot repair a helicoil with a TIME-SERT. The over-sized line in inserts available is called BIG-SERT. Please refer to catalog or web page for sizes available.
                              I will have to call them, but it appears that I might be stuck with using another Heli-coil.

                              .
                              sigpic
                              mine: 2000 Honda GoldWing GL1500SE and 1980 GS850G'K' "Junior"
                              hers: 1982 GS850GL - "Angel" and 1969 Suzuki T250 Scrambler
                              #1 son: 1986 Yamaha Venture Royale 1300 and 1982 GS650GL "Rat Bagger"
                              #2 son: 1980 GS1000G
                              Family Portrait
                              Siblings and Spouses
                              Mom's first ride
                              Want a copy of my valve adjust spreadsheet for your 2-valve per cylinder engine? Send me an e-mail request (not a PM)
                              (Click on my username in the upper-left corner for e-mail info.)

                              Comment

                              Working...
                              X