Announcement

Collapse
No announcement yet.

Poorly stored, trying to resurrect 1983 GR650 Tempter

Collapse
X
 
  • Filter
  • Time
  • Show
Clear All
new posts

    Poorly stored, trying to resurrect 1983 GR650 Tempter

    I was given (yes, given as in get it off my property and it's yours) a 1983 GR650 Tempter with 2948 miles on it. (Yes, with the clear title).

    I changed the oil, dropped some oil in the cylinders for a few weeks, moved the bike in gear, did it again sat for a few weeks, replaced the battery and cleaned out the gas tank and filter, including taking the petcock apart and cleaning that. New Plugs, gapped to the Clymer book spec. Assembled the bike again and it would turn over, but not start. A friend suggested I give it a spray of Starting fluid just to see if she will even run for a few seconds.

    And.. it did. Wonderful. 5 seconds of joy! And that's all I got out of it.

    I took the carb off, dropped the bowls and cleaned them and the floats (brown, clumpy stuff all over) took the carb to a dealer and got new float gaskets and had them take a look to see if a rebuild was needed. They told me that all it really needed was a detailed cleaning and the price the would charge for that. They would not do a rebuild, saying it was not needed. So far so good. I opened the diaphrams, cleaned them up (not much there), cleaned out the middle chambers, and took all the hoses off and cleaned them.

    Put the carb back on and in the middle of that opened the airbox. Found a nice little mouse nest in there (The mouse had since left). Closed that back up, Double checked my connections, put the gas tank back on and with expectation tried to start. and..

    Same thing.. cranks, nothing else. A spritz of starting fluid, she's running.

    I checked gasoline flow and plenty spilled from the hose onto my garage floor when I pulled it of the carb, so I think that's working.

    Can anyone give me some guidance as to where to go next with this other than a repair shop?

    I suspect she has spark - she runs.
    I suspect she has gas - it's going to the carb.

    Any help is appreciated. I'm by no means a mechanic, just an otherwise handy guy with some tools to get his bike running.

    Thanks

    Tim
    Brown Deer, WI

    #2
    unfortinitly you are going to have to clean the carbs again. They are going to need to soak in a container or carb cleaner and you will need to replace all the o-rings in it. Do you know what carbs are on your bike

    Comment


      #3
      At least I know how....

      The dealer told me they are the original factory carbs. Beyond that, I'm sorry, I don't have the answer. At least I know how to remove the carb bow..

      Comment


        #4
        Hee Haw Howdy!

        Hi Mr. 650BrownDeer,

        Here is a bunch of information, some of which should be applicable to your bike. It's my mega-welcome! \\/

        Let it be known that on this day you are cordially and formally welcomed to the GSR Forum as a Junior Member in good standing with all the rights and privileges thereof. Further let it be known that your good standing can be improved with pictures (not you, your bike)!

        Perhaps you've already seen these, but I like to remind all the new members. In addition to the
        carb rebuild series, I recommend visiting the In The Garage section via the GSR Homepage and check out the Stator Papers. There's also a lot of great information in the Old Q&A section. I have some documentation on my little BikeCliff website to help get you familiar with doing routine maintenance tasks (note that it is 850G-specific but many tasks are common to all GS bikes). Other "user contributed" informational sites include those of Mr. bwringer, Mr. tfb and Mr. robertbarr. And if your bike uses shims for valve adjustments, send an email to Mr. Steve requesting a copy of his Excel spreadsheet that helps you keep track of clearances, shim sizes and other service work.

        These are some edited quotes from one of our dear beloved gurus,
        Mr. bwringer, with ideas on basic needs (depending on initial condition), parts, and accessories.
        ***********Quoted from Mr. bwringer************

        Carburetor maintenance:

        Replace the intake boot o-rings, and possibly the intake boots. Here's the procedure:

        Here's an overview of what happens with this particular problem:

        You'll also want to examine the boots between the carbs and the airbox. There's a good chance these are OK, but check them over.
        And finally, if things still aren't exactly right, you'll want to order a set of o-rings for BS carbs from the GS owner's best friend, Robert Barr:
        http://cycleorings.com
        Once you receive these rare rings of delight, then you'll want to thoroughly clean and rebuild your carburetors. Here are step-by-step instructions that make this simple:

        ***********************************
        Every GS850 has (or had) a set of well-known issues that MUST be addressed before you have a solid baseline for further troubleshooting. It's a vintage bike, and it's quite common (as in, every single GS850 I have had contact with) that there are multiple problems that have crept up and slowly gotten worse over the years. It's not like a newer vehicle, where there's generally one problem at a time.

        These common issues are:

        1. Intake O-rings (install NEW OEM or Viton only - common nitrile O-rings will quickly deteriorate from heat)
        2. Intake Boots (install NEW -- these cannot be repaired)
        3. Valve clearances (more important than most people think)
        4. Carb/airbox boots
        5. Airbox sealing
        6. Air filter sealing
        7. Petcock (install a NEW one)
        8. On '79 models, install new points or Dyna electronic ignition (or at least verify that the old points are working correctly)
        9. On all models, it's fairly common to have problems with the spark plug caps. These are $3 or $4 each, and often worth replacing if you're keeping the stock coils/wires.
        10. Stock exhaust with NO leaks or holes -- good seals at the head and at the junctions underneath.
        ***************************************
        OEM Parts/Online Fiches:

        I would definitely double and triple the recommendations to use Cycle Recycle II and Z1 Enterprises as much as possible. These guys are priceless resources. Z1 tends to have slightly better prices, CRC2 has a wider range of goodies available. If you're near Indy and can bring in an old part to match, CRC2 has a vast inventory of used parts.
        http://denniskirk.com - Put in your bike model and see what they have.
        http://oldbikebarn.com - seems to be slowly regaining a decent reputation, but it's still caveat emptor. They don't have anything you can't get elsewhere at a better price anyway.
        http://www.babbittsonline.com/ - Decent parts prices. Spendy shipping. Don't give you part numbers at all. Useful cross-reference if you obtain a part number elsewhere. Efficient service.
        http://bikebandit.com - Fastest. Middlin' prices. Uses their own parts numbering system to obfuscate price comparisons -- can be very confusing for large orders. Cheapest shipping, so total cost usually isn't too bad.
        http://flatoutmotorcycles.com - Slow. Cheapest parts prices, crazy shipping costs. Don't expect progress updates or much communication. Real Suzuki part numbers.
        http://alpha-sports.com - Exorbitant parts prices. Different type of fiche interface that's quite useful at times, especially with superceded part numbers. Real parts numbers. Shipping cost and speed unknown due to insane, unholy pricing.

        Stainless Bolts, Viton o-rings, metric taps, dies, assorted hard-to-find supplies and materials, etc:

        http://mcmaster.com - Fast, cheap shipping, good prices. No order minimum, but many items like bolts come in packs of 25 or 50. Excellent resource.
        http://motorcycleseatcovers.com - Great quality, perfect fit (on original seat foam), and available for pretty much every bike ever made. Avoid the textured vinyl -- it's perforated.
        http://newenough.com - You DO have riding gear, don't you? Great clearances, always outstanding prices and impeccable service.
        ***************End Quote**********************
        Additional parts/info links:

        GSR Forum member Mr. duaneage has great used upgraded Honda regulator/rectifiers for our bikes. Send him a PM.
        New electrical parts:
        http://stores.ebay.com/RMSTATOR or http://www.rmstator.com/
        Aftermarket Motorsport Electrics parts for motorcycles, dirtbikes, atvs, motosport vehicles manufactured and distributed by Rick's Motorsport Electrics


        For valve cover and breather cover gaskets, I recommend Real Gaskets (reusable silicon):
        http://www.realgaskets.com
        The Rice Paddy (salvage/used)
        http://www.ricepaddymotorcycles.com
        Carolina Cycle
        http://www.carolinacycle.com
        Ron Ayers Motorsports
        http://www.ronayers.com
        MR Cycles
        http://www.mrcycles.com
        Moto Grid
        http://www.motogrid.com
        If all else fails, try this:
        http://www.used-motorcycle-parts.org/
        Used bike buying checklists:

        http://www.clarity.net/~adam/buying-bike.html
        Lots of good info/pictures here:
        http://www.suzukicycles.org


        Thanks for joining us. Keep us informed of your progress. There's lots of good folk with good experience here.

        Thank you for your indulgence,

        BassCliff
        (The unofficial GSR greeter)

        Comment


          #5
          Cliff , you are a prince among men, a highly educated man. Notice, I didn't say a gentleman and a scholar, cuz we all knoiw thats just a put down. Anyway, I have a question/suggestion for your new member thingy. How bout you put the main greeting as a header, then make the attachments into 3 attachments resources, links, and references.

          Comment


            #6
            congrats on the new bike. my dad had one. bought it in 84 and kept it until late 80s early 90s. he said it was a great bike.

            on to your problem. definitely clean your carbs. dip them in berrymans and make sure they are real clean.

            Comment


              #7
              Wow!

              Wow, well thanks for the warm welcome! Looks like I have to pull the carb out and give it a good soaking.

              I have two dealers within a 20 minute drive (Sadly not on the bike). One is at best described as stuffy; if you don't know exactly what you need, they wont help you. The futher drive is a very helpful place. I'm certain a phone call to them and I'll have the parts I need quickly. He said to me when I was in earlier not to believe that I could not get a part for this bike, it's all out there and they would help me find it. I know that means dealer price and the internet(s) is great source, but it's nice to know that someone is around here.

              I'll be around this forum quite a bit as I try to get this beast running.

              I noticed that this last bike has a black fender in the front. Mine are badly pitted and rusting at the pits. I've thought of stripping that off and painting them black rather then in invest in rechroming them. I like the look!

              Thanks for the help!

              Comment


                #8
                I have a brand new tank emblem for your bike. Let me know if you need it.
                1983 GS 1100E w/ 1230 kit, .340 lift Web Cams, Ape heavy duty valve springs, 83 1100 head with 1.5mm oversized SS intake valves, 1150 crank, Vance and Hines 1150 SuperHub, Star Racing high volume oil pump gears, 36mm carebs Dynojet stage 3 jet kit, Posplayr's SSPB, Progressive rear shocks and fork springs, Dyna 2000, Dynatek green coils and Vance & Hines 4-1 exhaust.
                1985 GS1150ES stock with 85 Red E bodywork.

                Comment


                  #9
                  your jets are most likely plugged with a solid nasty bit of varnish.

                  Oddly you can burnt he stuff out on a stove but no cleaner could remove it from mine
                  aceteone and all manner of poisons were tried so I gave up and bought new jets.

                  Like the guys say take off the carbs and dismantle and clean.

                  Comment


                    #10
                    Well...

                    First off, thank you everyone for your ideas and advise. I'm always impressed when I find helpful folks on a topic I don't know a lot about, and with great kindness. I hope to return the favor based on my own experience as I go along.

                    It was a productive day today. (Being Semi-retired has a benefit!)

                    I pulled the carb off again and did some work on it. I found the following as part of the molded portion on the side of the unit "Mikuni Corp" and faintly the numbers "551 F3". I don't know if that helps.

                    First off, here is the bowl and surrounding area as I found it yesterday when I opened it for the first time. (Its laying on a board under a tree next to my house, not to confuse the issue)
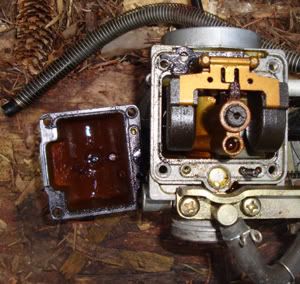
                    Nice looking Bowl and Float! Between the center post and the angle piece on the actual float there is a nice chunk of crud.

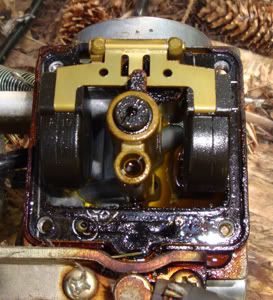
                    First look at the float area. I can already tell that I have a lot of work a head of me. The gasket was shot.

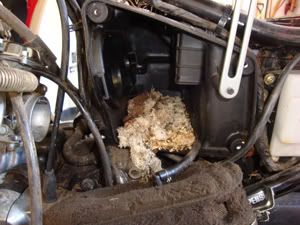
                    The mouse nest I found in the airbox.

                    Today I bought a soak solution for the carb and took it apart, with parts from the local cycle shop to replace rings and gaskets. All the the metal parts and the carb went into the solution. The carb body got some extra time. When it was done, the solution went from a Lite Beer color to close to Guiness (Mmm ... Guiness!) I found some nice small leaves floating in it as well.

                    Most telling in the disassembly was finding one bowl containing gasoline and the other as dry as when I put it together. The chamber for that side was also very wet and had some gasoline in it. I made sure before assembly that a shot of carb cleaner down the gas feed sprayed out both sides of the carb.

                    Some time later, again assembled (no extra parts.. a good sign!) the carb was back on the bike. I turned the petcock, no leaks, more good news.

                    I opened the choke, let her crank and nothing. I figured it might take a bit to get some gas in the system and cranked her in stop and starts for a few moments.

                    And then.. came a great moment, she fired and turned over on it's own twice. I heard it fire and some backfire. I think this is a good sign.

                    Thoughts?

                    I had to stop as my battery had worn down from all the cranking I've done. Its in the middle of a nice 8 hour charge at this moment.

                    A question, and I looked around for this answer. WHen I was re-assembling the carb I noticed that the two holes in the diaphram area for the choke are indepentendly set. I moved them so that they both opened the same amount as the same setting. Is that correct? Why are they able to be set like that?

                    I'm familiar with the basics of a carb and even fuel injection and turbo from my autoshop days, but does anyone know of a tutorial on how a carb like this works.

                    Thanks for everything. I feel smarter than I did yesterday!

                    Comment


                      #11
                      Those carbs were pretty nasty.
                      1983 GS 1100E w/ 1230 kit, .340 lift Web Cams, Ape heavy duty valve springs, 83 1100 head with 1.5mm oversized SS intake valves, 1150 crank, Vance and Hines 1150 SuperHub, Star Racing high volume oil pump gears, 36mm carebs Dynojet stage 3 jet kit, Posplayr's SSPB, Progressive rear shocks and fork springs, Dyna 2000, Dynatek green coils and Vance & Hines 4-1 exhaust.
                      1985 GS1150ES stock with 85 Red E bodywork.

                      Comment


                        #12
                        did you take all of the jets out when you cleaned them? sounds like you need to clean those jets.


                        have a little motivation:

                        Comment


                          #13
                          I have the same bike and similar dirty carbs. your jets look beyond salvation. I ordered all new jets from the dealer $30, cleaned all the passages and she fired right up!

                          Comment


                            #14
                            like i said and as your pics cealry show your jets are clogged

                            its a vanish that will not melt except when exposed to high heat which may soften the brass of the jet making it iffy to reinstall.

                            order new jets and be happy
                            to test em to see if they are passing fuel drip some car cleaner onto the orifice if it does not flwo down throught eh hole and disappear then the litle fellows are buggered.

                            you have any pics of the cleaned up carbs?
                            did you remove the jets to facilitate the soaking?

                            Comment


                              #15
                              Been through pretty similar stuff on my carbs, bike sat to long some got rusted some had old gas varnish, others just dirty.

                              First pass through the bike ran but not great, upon checking them again one of the main jets must have been so clogged it just broke off in the bowl.

                              Next round included a full set of jets, took them all apart, very carefully... those brass screws can strip easy so a lot of wd40 soaking before trying. Then put all the new jets in. I didnt break the assembly apart for this part since its overkill for round 2, and only replacing the jets.

                              Anyways still had issues and realized I made a big mistake, I left the old setting on the floats but the new parts made them sit way to high (low when its in the bike) so I dont think gas was filling up enough to hit the jets.

                              Pulled the carbs out again, and set the heights to the spec think i used 22 mm as I left the gaskets in. Installed the carbs and now am on standby for the battery to trickle charge... to many tries in between here as well.

                              Also to get it running I realized what the pri setting is for and how it can be your friend. It lets the gas gravity feed to the carbs and fill the bowls, to long is bad just open for about a minute and put it back to the on setting. This avoids the need for starter fluid. Oh and till you get the idle set right keep your hand on the throttle to give it just enough to turn and be ready with the kill switch.

                              Aside from the carbs whats your status on wheels and brakes? My tires sat for about 4 years and had great tread but where had cracks on the sides. I pulled the wheels to save 100 bucks on installing the tires and the brake pads that worked pretty decent on some test runs just fell to the ground in rust. So got a new set of front and backs of them as well.

                              Keep us updated, Im getting the pads and wheels back tonight and with any luck my carb issues will be gone as well.

                              Comment

                              Working...
                              X