Announcement
Collapse
No announcement yet.
Question on Carb Rebuild
Collapse
X
-
 Firebirdracer82
Question on Carb Rebuild
I've posted one other thread, but I have one more quick question if I decide to rebuild the carbs on my 1982 GS 550L. Does that bike have rubber diaphragms? Should I purchase those (very expensive) before I start the rebuild? Do they normally rot out? Thanks!Tags: None
-
Yes, your bike has CV carbs and thus the diaphragms. They do rot out / tear but if yours are neither there is no need to replace them.79 GS1000S
79 GS1000S (another one)
80 GSX750
80 GS550
80 CB650 cafe racer
75 PC50 - the one with OHV and pedals...
75 TS100 - being ridden (suicidally) by my father
-
Yes, your carbs have diaphragms. No, you probably don't need them.
The best thing is to follow the BS Carb Rebuild Series, remove the carbs, strip them down completely (keeping the parts for any particular carb so that they stay with that carb), dipping the mettalic parts in Berryman's carb cleaner dip, then re-assembling with new o-rings from cycleorings.com. There is about a 95% chance that this is all it will take to 'rebuild' your carbs. The brass jets seldom wear out, so just dip them and clean them.
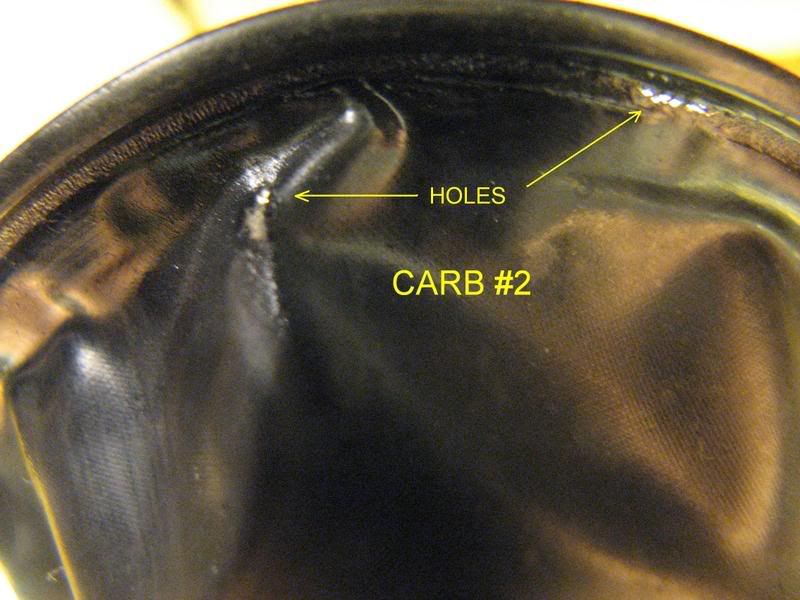
Inspect the diaphragms when you take them out. This is what you don't want to see:

I like to pull the diaphragm gently to make sure the holes are not hiding in any of the folds or creases.
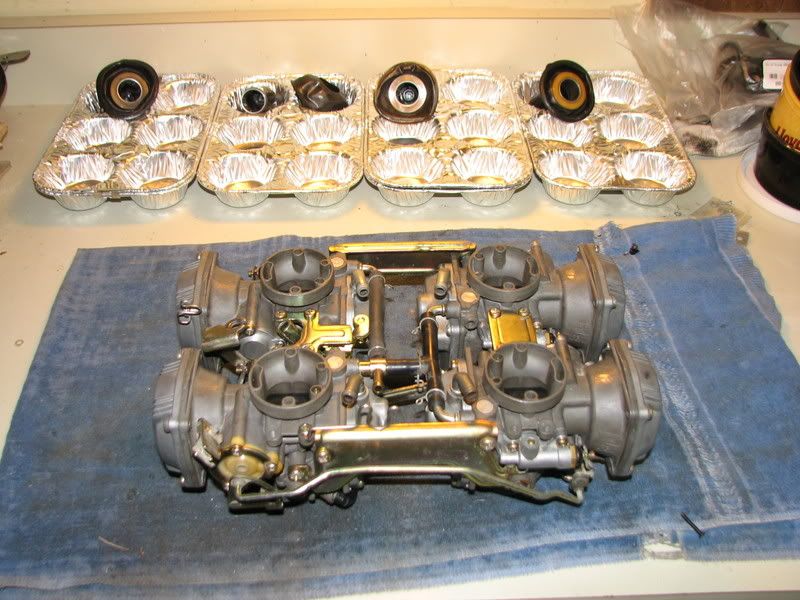
I did a set of carbs for my son's Yamaha Venture Royale. Three of the four carbs had either 2 or 3 holes like the ones pictures above. The fourth diaphragm was perfectly intact, but it had become separated from the slide (you can see it in position #2 below). Seeing what the insides of those carbs looked like, I am surprised that it ran at all, let alone as well as it did.
When you take your carbs apart, keep everything clean and in order. A set of disposable muffin tins helps a LOT.

.sigpic
mine: 2000 Honda GoldWing GL1500SE and 1980 GS850G'K' "Junior"
hers: 1982 GS850GL - "Angel" and 1969 Suzuki T250 Scrambler
#1 son: 1986 Yamaha Venture Royale 1300 and 1982 GS650GL "Rat Bagger"
#2 son: 1980 GS1000G
Family Portrait
Siblings and Spouses
Mom's first ride
Want a copy of my valve adjust spreadsheet for your 2-valve per cylinder engine? Send me an e-mail request (not a PM)
(Click on my username in the upper-left corner for e-mail info.)
Comment
-
 juicydangershow
I followed the Carb Cleanup series on this website to a T and it worked great. You shouldnt need new diaphragms, so hold off on that. Just take them out first and store them in a safe place until you are ready to reassemble. If they are ripped or you see any pin holes in them, they will need to be replaced. Its unlikely though.
Follow the Carb Cleanup series to the letter!! You wont be disappointed.
Additional tips:
Get the K&L rebuild kits from ebay for $60 for a set of 4. DON'T use all the parts. I used the gasket, the rubber plug, Idle needle springs (some of mine were corroded) and the 180 Pilot Air Jets. Two of mine got mangled on disassembly. The kit comes with 180's and 190's. My 1981 takes the 180, other years may take different. For $60 I thought the kit was well worth it even to NOT use most of the parts.
Get the o-rings from www.cycleorings.com, cheap and WELL worth it.
DO NOT SKIP THE CHEM DIP PART in the series. I used Gunk Carb and Throttle Body Dip and it worked great. I don't recommend soaking more than one hour (as some do). This step will make all the difference. As stated in the series. DO NOT put anything in there that isn't metal... it will be ruined. I did not soak the fuel inlet screens with the plastic clip on them or the choke plungers, I hand cleaned them. Don't put your floats in there either!
Use screwdrivers that fit PERFECT on brass fittings and don't force them. I ruined 2 Pilot Air Jets that way. The Idle Jet (not needle jet) was really tough to get out too. Be careful.
Buy the stainless allen bolt set from ebay for $10, another WELL worth it item. Use anti-seize on the threads. I shined up the tops and bowls with Mothers Polish and the bolt kit really makes it look GREAT.
Use Thread Locker on the carb rails, especially the bottom one that holds all the carbs together. Also use it on the tiny screws that hold the sliding rod for the choke mechanism.
Don't soak the rails or screws for those, it eats off the galvanizing (or whatever that yellowish protection is on them).
Lube all the outer springs around the outside throttle areas, the synching mechanisms and anywhere else that looks like it should have some (on the outside of the carb!) with lithium grease on a swab. Use it on all o-rings to be installed (lightly!) and on the bowl gasket (both sides). I also used lithium grease on the diaphragm mating surfaces (helps hold the diaphragm in the groove while you bolt it down).
Comment
-
 doctorgonzo
You can successfully patch diaphragms as well if they did have small tears or pin holes. Get the o-ring kit and a can of carb dip. Probably all you need.
Comment
.png)
Comment