Announcement

Collapse
No announcement yet.

Brake bleeding help

Collapse
X
 
  • Filter
  • Time
  • Show
Clear All
new posts

    Brake bleeding help

    I've done lots of searching and am reasonably competent when it comes to brakes. I believe I had a sticking piston on one of my front calipers so I removed and rebuilt them both today. When I put everything back together I followed Brian Wringer's instructions for bench bleeding the master cylinder below:

    Originally posted by bwringer
    You need to "bench bleed" any master cylinder before installing.

    Remove the lever and secure the MC in a vise, using some rags to avoid beating it up.

    Cover the outlet hole with your finger and put some brake fluid in the reservoir.

    Keeping pressure on your finger covering the outlet, use a dowel or something similarly harmless to slowly push the piston in and let it come back a few times.

    Brake fluid will squirt out around your finger, which is fine. Just don't allow any air to get sucked back in. You're basically priming a pump. Do this a couple of times, then mount and bleed the MC normally.

    I've never had much luck with bleeding motorcycle brakes manually -- a vacuum pump is about the only reliable way to quickly bleed the brakes.

    Also, if you're swapping master cylinders, make sure that the piston is the same size -- for a dual brake setup, they're usually marked 5/8" or 16mm.
    I then tried to bleed the brakes both manually and with a Mity-Vac. I am as sure as I can be that there is no air in the lines. I ran a couple pints of brake fluid through the system and haven't seen an air bubble in hours. I haven't been able to get the lever to be anywhere as far from the handlebars as it was before I started. The lever is solid and doesn't keep pulling in like there is a leak. I have stainless lines and my brake lever pull before tonight was very short. In fact, when I first installed the stainless lines I had to adjust the brake light switch because the lever no longer traveled far enough to make the switch.

    Does anyone have any idea what I might try mext to get my lever back?

    Thanks,
    Joe
    IBA# 24077
    '15 BMW R1200GS Adventure
    '07 Triumph Tiger 1050 ABS
    '08 Yamaha WR250R

    "Krusty's inner circle is a completely unorganized group of grumpy individuals uninterested in niceties like factual information. Our main purpose, in an unorganized fashion, is to do little more than engage in anecdotal stories and idle chit-chat while providing little or no actual useful information. And, of course, ride a lot and have tons of fun.....in a Krusty manner."


    #2
    I wouldnt worry about it there probably is not anything you can do. the reason that you have so much travel is because you have a new brake seal. these seals by design are suppose to pull the piston/brakes away from the disk after you apply the brakes. thus your old seal wasnt doing its job and now this one is. its the same thing with cars. Hope this solves your problem/Question

    Comment


      #3
      Joe, open up a bleeder, remove the brake lever and push the piston in with a screwdriver. The screwdriver will push the piston farther than the lever will, and will squeeze that last little bubble out of there. It might also help to open the banjo bolt when you do this, as sometimes a stubborn bubble gets stuck there.

      .
      sigpic
      mine: 2000 Honda GoldWing GL1500SE and 1980 GS850G'K' "Junior"
      hers: 1982 GS850GL - "Angel" and 1969 Suzuki T250 Scrambler
      #1 son: 1986 Yamaha Venture Royale 1300 and 1982 GS650GL "Rat Bagger"
      #2 son: 1980 GS1000G
      Family Portrait
      Siblings and Spouses
      Mom's first ride
      Want a copy of my valve adjust spreadsheet for your 2-valve per cylinder engine? Send me an e-mail request (not a PM)
      (Click on my username in the upper-left corner for e-mail info.)

      Comment


        #4
        Another thing to consider is the sliding action of the caliper. If the pins or the bores on the caliper holder bracket are worn, the caliper will not slide side to side properly which will keep the caliper from moving into the proper position relative to the disc. Member JC's bike had this issue and he had to order new pins and caliper holders. Don't forget the grease too.

        Good luck.
        Ed

        To measure is to know.

        Mikuni O-ring Kits For Sale...https://www.thegsresources.com/_foru...ts#post1703182

        Top Newbie Mistakes thread...http://www.thegsresources.com/_forum...d.php?t=171846

        Carb rebuild tutorial...https://gsarchive.bwringer.com/mtsac...d_Tutorial.pdf

        KZ750E Rebuild Thread...http://www.thegsresources.com/_forum...0-Resurrection

        Comment


          #5
          I had a similar problem and found a solution last weekend. After rebuilding both front calipers, the whole system was almost dry. I knew that bleeding would take more brake fluid than normal because both caliper pistons were fully retracted in the brake pot, and they would have to be pushed out with new fluid so the pads would meet the rotor. However, after running through about a pint and no bubbles in the lines, it still took about about half of the brake lever travel before it firmed up.

          It seemed like a lot of master cylinder stroke was used just getting the pads to meet the rotor. I also noticed that the caliper pads seemed to "retract" or at least move slightly when the lever was released. No matter how much brake fluid I ran through the system, the pads wouldn't firm up against the rotor without using a lot of brake lever.

          So here was my solution. I removed the caliper just barely off the rotor, without disconnecting the brake line. Then I squeezed the brake lever once to make the pads come closer together, so that they actually wouldn't fit over the rotor anymore. Then I used a screwdriver to wedge the pads apart so that the gap was JUST BARELY wide enough to fit over the rotor, and reinstalled the caliper mounting bolts. I did this on both calipers, and now the brake lever is rock hard after about a half inch of travel.

          There are a lot of brake bleeding nightmares out there, and this certainly won't fix them all, but at least this worked for me.

          Comment


            #6
            Joe, which bike is this on? Is it equipped with the chinzy Suzuki anti-dive valves?

            If so, then there is a specific procedure to follow. I've perfected bleeding my 700 with the anti-dive valves so that they don't "spongify" (a new word!) the lever.
            GS450E GS650E GS700ES GS1000E GS1000G GS1100G GS1100E
            KZ550A KZ700A GPZ750
            CB400T CB900F
            XJ750R

            Comment


              #7
              Originally posted by DPage View Post
              I had a similar problem and found a solution last weekend. After rebuilding both front calipers, the whole system was almost dry. I knew that bleeding would take more brake fluid than normal because both caliper pistons were fully retracted in the brake pot, and they would have to be pushed out with new fluid so the pads would meet the rotor. However, after running through about a pint and no bubbles in the lines, it still took about about half of the brake lever travel before it firmed up.

              It seemed like a lot of master cylinder stroke was used just getting the pads to meet the rotor. I also noticed that the caliper pads seemed to "retract" or at least move slightly when the lever was released. No matter how much brake fluid I ran through the system, the pads wouldn't firm up against the rotor without using a lot of brake lever.

              So here was my solution. I removed the caliper just barely off the rotor, without disconnecting the brake line. Then I squeezed the brake lever once to make the pads come closer together, so that they actually wouldn't fit over the rotor anymore. Then I used a screwdriver to wedge the pads apart so that the gap was JUST BARELY wide enough to fit over the rotor, and reinstalled the caliper mounting bolts. I did this on both calipers, and now the brake lever is rock hard after about a half inch of travel.

              There are a lot of brake bleeding nightmares out there, and this certainly won't fix them all, but at least this worked for me.
              Did you use OE seals in the calipers? I've seen problems caused by junky aftermarket caliper seals.
              Ed

              To measure is to know.

              Mikuni O-ring Kits For Sale...https://www.thegsresources.com/_foru...ts#post1703182

              Top Newbie Mistakes thread...http://www.thegsresources.com/_forum...d.php?t=171846

              Carb rebuild tutorial...https://gsarchive.bwringer.com/mtsac...d_Tutorial.pdf

              KZ750E Rebuild Thread...http://www.thegsresources.com/_forum...0-Resurrection

              Comment


                #8
                Originally posted by Nessism View Post
                Another thing to consider is the sliding action of the caliper. If the pins or the bores on the caliper holder bracket are worn, the caliper will not slide side to side properly which will keep the caliper from moving into the proper position relative to the disc. Member JC's bike had this issue and he had to order new pins and caliper holders. Don't forget the grease too.

                Good luck.
                Where did I forget to grease? Just put mine back together.

                Comment


                  #9
                  On the front calipers there are 2 pins that ride with into the holders that mount to the forks. Usually one has a rubber bushing. Or at least a 700E does. New pins and bushings are good for a restore if the pins have lost their plating.

                  Edit, This may be the area to grease that is mentioned. Not positive. Other areas usually should be free of grease on the brake caliper rebuilds. I do pins on the rear to help prevent corrosion in the holes.
                  Last edited by Guest; 05-11-2009, 11:00 PM.

                  Comment


                    #10
                    Originally posted by DPage View Post
                    I had a similar problem and found a solution last weekend. After rebuilding both front calipers, the whole system was almost dry. I knew that bleeding would take more brake fluid than normal because both caliper pistons were fully retracted in the brake pot, and they would have to be pushed out with new fluid so the pads would meet the rotor. However, after running through about a pint and no bubbles in the lines, it still took about about half of the brake lever travel before it firmed up.

                    It seemed like a lot of master cylinder stroke was used just getting the pads to meet the rotor. I also noticed that the caliper pads seemed to "retract" or at least move slightly when the lever was released. No matter how much brake fluid I ran through the system, the pads wouldn't firm up against the rotor without using a lot of brake lever.

                    So here was my solution. I removed the caliper just barely off the rotor, without disconnecting the brake line. Then I squeezed the brake lever once to make the pads come closer together, so that they actually wouldn't fit over the rotor anymore. Then I used a screwdriver to wedge the pads apart so that the gap was JUST BARELY wide enough to fit over the rotor, and reinstalled the caliper mounting bolts. I did this on both calipers, and now the brake lever is rock hard after about a half inch of travel.

                    There are a lot of brake bleeding nightmares out there, and this certainly won't fix them all, but at least this worked for me.
                    I'll have to try this. It has always seemed incredible to me how hard it is to bleed a set of motorcycle brakes.

                    Comment


                      #11
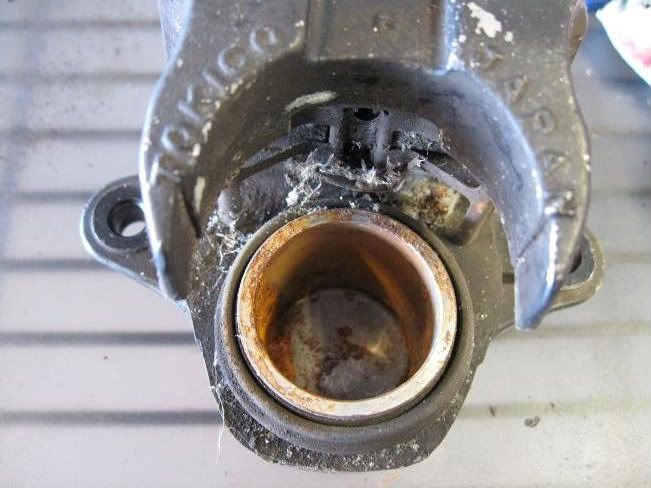
                      How would one go about rebuilding this? I didn't use it but it is what I uncovered on one of the front calipers. I actaully used some from a parts bike that were in much better shape. Just curious though, other than new pads, lines and cleaning out the cylinder what else should be done.

                      Comment


                        #12
                        Stuff a rag into the caliper and blow compressed air into the banjo port to get the piston out. Check for corrosion/pitting . A little can be cleaned up with some emery cloth.
                        Media blast, repaint and put it back together (grease the pins).
                        soak the rubber parts in brake fluid before assembly.

                        Comment


                          #13
                          Here is what I did on the brake system/caliper rebuild/restore for the 700E recently. The calipers were in about the same condition as the one pictured. The compressed air trick to pop out the pistons works well, the rear caliper can be tricky, but do-able.

                          Parts are optional to ones liking and preference. Just depends on the condition, but the piece of mind to know brakes are going to work when you need them. Suggest do it right if your mind even questions the condition of any part in this area.

                          First off, ordered new pads, OEM piston/seal kits, piston boots, pins, pin boots, pin bushings, springs, shims, indicator covers, bleeder valves, banjos, banjo bolts, crush washers, and new mounting bracket bolts for the front two. Also went with a new master cylinder.

                          The rear, new pads, OEM piston kit, piston boots, springs, bolts, indicator cover, shims, bleeder valve, banjo, banjo bolt, and crush washers. The pins, I turned some out of 17-4 SST, and the clips were SST, so reusable. New OEM master cylinder for the rear as well.

                          Scotchbrite pads to clean up the bore and seal groove, then polishing compound to get the bore pristine. Masked off the piston bore and seal groove, banjo crush washer seat, and bleeder valve threads. Media blasted the caliper bodies, cleaned, re-masked the bodies as mentioned before, but also used some o-rings to mask off the piston boot grooves. The rear halves were masked on the mating surfaces as well. Painted and baked them. Reassembled with DOT 3-4 on the piston seals, lubed the pins, and pretty sure the trick to installing the pistons is not to push the in until they bottom out. Gently work them in until the clearance is obtained when mounting them to the rotors.

                          Went with Russell SST lines, and just blocked off the anti-dives with new plates.


                          When bleeding the brakes, I usually pump them up to where the lever is tight, the open the bleeder valve to force the fluid through the system to remove air bubbles. The lever will bottom out to the handlebar, then continue holding the lever against the handlebar, and close off the bleeder valve. Release lever, pump up the system, and repeat until air bubbles have ceased. The lever has a considerable gap between the handlebar grip when pumped up and compressed when applying the brakes.

                          Comment


                            #14
                            I found that my Master cylinder piston traveled about 3mm up the bore before passing the relief hole and allowing pressure to build up (made a squirty fountain in the reservoir during this piston travel). about 35 to 40mm of lever travel occurred by this time before brakes engaged.

                            I made up a 2.5mm thick spacer and installed it between the end of the piston and the seal. Problem solved. Still have clear overflow relief and only about 12mm lever travel before brakes start working.

                            I understand that (at least to some degree) there is a marked difference in lever travel experienced when the caliper seals are replaced. The newer seals grip the pistons and are flexible so roll within the groove. When pressure is backed off, the new flexible seals roll back and drag the piston clear of the disc. This action results in an increase in fluid/lever travel required to push the pistons back out to the disc. Older less flexible seals tend to stay put and the piston doesn't return back into the bore.

                            Comment


                              #15
                              Joe, you can also try and elevate the M/C overnite and work the piston a few times and also tap the side lightly a to get air (if any) to bubble to the top of the system.
                              82 GS850L - The Original http://s224.photobucket.com/albums/d...ePics067-1.jpg
                              81 GS1000L - Brown County Hooligan http://s224.photobucket.com/albums/d...ivePics071.jpg
                              83 GS1100L - Super Slab Machine http://s224.photobucket.com/albums/d...t=DCP_1887.jpg
                              06 KLR650 - "The Clown Bike" :eek: http://s224.photobucket.com/albums/d...nt=SERally.jpg
                              AKA "Mr Awesome" ;)

                              Comment

                              Working...
                              X