Announcement

Collapse
No announcement yet.

1980 GS550 Camshaft Installation Question

Collapse
X
 
  • Filter
  • Time
  • Show
Clear All
new posts

    1980 GS550 Camshaft Installation Question

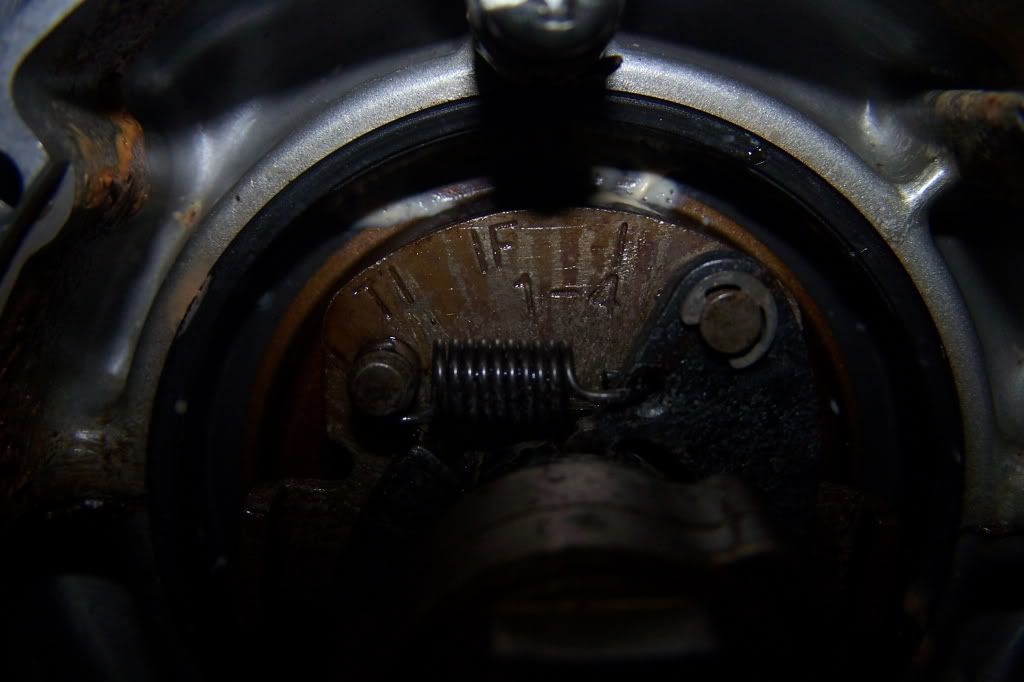
    I finally got my cylinder jugs on and head. I'm a little confused as to aligning everything properly to install the camshafts. There are radial lines at the signal generator about 10 degrees apart, next to the first one there is a T next to the second one there is an F there is nothing at the third one. Between the second and third lines are the 1-4 marks. I'm not sure how this is supposed to line up for TDC. Any advice would be appreciated.

    Also my camshafts don't sit flat when lined up with the 3-2-1 marks in the right position (that is some of the lobes are pointed downward). Of course this is with them just laying there not tightened down. Is this correct? If so how do you get them lined up properly with it cranked down, I don't see being able to turn them at that point.

    Hope that makes sense.

    #2
    Do you not have a manual? They all describe the process.

    Line up the crank with the T 1-4 mark, this puts the pistons at TDC. Pull the cam chain to remove slack, especially the front side. Line up the exhaust cam so the #1 mark is pointing at the edge of the head. It is the numbered marks that are critical, not the direction the lobes are pointing. Pull the cam chain into place over the exhaust cam. Count out the proper number of links from #2 on the exhaust cam to #3 on the intake cam, tighten the retainers on the intake cam. (Your manual will tell you the proper number of links.) Install the cam chain tensioner, rotate the crank clockwise (forward) at least two full turns, listening for any strange noises. Watch for the tensioner to remove more slack while you do this. Check your alignment marks to make sure nothing has moved out of place.

    .
    sigpic
    mine: 2000 Honda GoldWing GL1500SE and 1980 GS850G'K' "Junior"
    hers: 1982 GS850GL - "Angel" and 1969 Suzuki T250 Scrambler
    #1 son: 1986 Yamaha Venture Royale 1300 and 1982 GS650GL "Rat Bagger"
    #2 son: 1980 GS1000G
    Family Portrait
    Siblings and Spouses
    Mom's first ride
    Want a copy of my valve adjust spreadsheet for your 2-valve per cylinder engine? Send me an e-mail request (not a PM)
    (Click on my username in the upper-left corner for e-mail info.)

    Comment


      #3
      Ok - a bit tricky to explain this one but here goes.

      Looking in the ignition side set the mark immediately to the left of the T (next to F1.4) exactly in line with the mark on static plate. Cylinders 1 and 4 are now at TDC. Turn the engine forward to achieve this and feed the cam chain in carefully to avoid snagging.

      Now put the exhaust cam in to position. Without moving the bottom end pull the chain tight and engage on the sprocket so that the No 2 arrow is pointing up vertically and the No 1 arrow on the front of the sprocket is pointing directly at the top of the cylinder head.

      Using a clamp, hold the exhaust cam down in position and pop on the cam caps.

      Next position in the inlet cam. Count 20 pins across on the chain (no 1 is directly in line with the 2 arrow on the exhaust). It's easier if you mark that 20th pin with a bit of felt tip / nail varnish etc. Turn the inlet cam until the 3 arrow points at that 20th pin. Now pop on the inlet cam caps, again clamping down so that you tighten things up evenly and there is no stress anywhere.

      Insert the bridge guide and then the cam chain tensioner. Have a look at the manual for guidance on how to do this.

      You're right that the cams won't lie flat when the timing is right. There's always at least one cam lobe pointing down on these bikes.
      Last edited by hampshirehog; 11-30-2008, 05:13 PM. Reason: can't spell / can't type. I'm a lost cause...
      79 GS1000S
      79 GS1000S (another one)
      80 GSX750
      80 GS550
      80 CB650 cafe racer
      75 PC50 - the one with OHV and pedals...
      75 TS100 - being ridden (suicidally) by my father

      Comment


        #4
        The markings I have for the crankshaft are different from the manual (there is no F1.4 mark, just the ones I described). I will see if I can get a picture of them.

        Comment


          #5
          Pics are the best around here...everybody loves 'em. Especially when trying to explain something like this. Here's how via BassCliff's wonderful site.

          Larry D
          1980 GS450S
          1981 GS450S
          2003 Heritage Softtail

          Comment


            #6
            Here's a pic

            Comment


              #7
              That T mark just left of center is what you want to line up with the outer mark that is probably hidden in the shadow. Then tension your chain a bit, line up #1 on the cam with the edge of the head, etc.

              The T mark is Top Dead Center (abbreviated TDC).
              The F mark is where #1&4 should fire at idle speed.
              The mark over the 4 is where they should fire at higher speeds (I think that's over 3,500 rpm or so).

              .
              sigpic
              mine: 2000 Honda GoldWing GL1500SE and 1980 GS850G'K' "Junior"
              hers: 1982 GS850GL - "Angel" and 1969 Suzuki T250 Scrambler
              #1 son: 1986 Yamaha Venture Royale 1300 and 1982 GS650GL "Rat Bagger"
              #2 son: 1980 GS1000G
              Family Portrait
              Siblings and Spouses
              Mom's first ride
              Want a copy of my valve adjust spreadsheet for your 2-valve per cylinder engine? Send me an e-mail request (not a PM)
              (Click on my username in the upper-left corner for e-mail info.)

              Comment


                #8
                Thank you much. Hopefully I'll be firing this thing up soon, it's been along time coming.

                Comment


                  #9
                  You need to put the inner ignition plate on for the main timing mark.
                  1983 GS 1100E w/ 1230 kit, .340 lift Web Cams, Ape heavy duty valve springs, 83 1100 head with 1.5mm oversized SS intake valves, 1150 crank, Vance and Hines 1150 SuperHub, Star Racing high volume oil pump gears, 36mm carebs Dynojet stage 3 jet kit, Posplayr's SSPB, Progressive rear shocks and fork springs, Dyna 2000, Dynatek green coils and Vance & Hines 4-1 exhaust.
                  1985 GS1150ES stock with 85 Red E bodywork.

                  Comment


                    #10
                    Ed

                    To measure is to know.

                    Mikuni O-ring Kits For Sale...https://www.thegsresources.com/_foru...ts#post1703182

                    Top Newbie Mistakes thread...http://www.thegsresources.com/_forum...d.php?t=171846

                    Carb rebuild tutorial...https://gsarchive.bwringer.com/mtsac...d_Tutorial.pdf

                    KZ750E Rebuild Thread...http://www.thegsresources.com/_forum...0-Resurrection

                    Comment


                      #11
                      Be sure to count pins carefully on the cam chain. You are not counting pins between the cam marks, you need to include the pins at the cam marks, too. That is, #1 pin will be directly over the #2 mark on the exhaust cam and #20 pin will be directly over #3 on the intake cam.

                      .
                      sigpic
                      mine: 2000 Honda GoldWing GL1500SE and 1980 GS850G'K' "Junior"
                      hers: 1982 GS850GL - "Angel" and 1969 Suzuki T250 Scrambler
                      #1 son: 1986 Yamaha Venture Royale 1300 and 1982 GS650GL "Rat Bagger"
                      #2 son: 1980 GS1000G
                      Family Portrait
                      Siblings and Spouses
                      Mom's first ride
                      Want a copy of my valve adjust spreadsheet for your 2-valve per cylinder engine? Send me an e-mail request (not a PM)
                      (Click on my username in the upper-left corner for e-mail info.)

                      Comment


                        #12
                        Originally posted by Nessism View Post
                        My clymer manual does not have this picture (unless I missed it somehow). That sure would have been helpful. Thanks for the replies, this is a great forum.

                        Comment


                          #13
                          Old thread I know, but I have a question on this matter.

                          When tightning the camshaft lobes down should I apply a pressure to the raized part of the camshaft to help it compress the pistonsprings? I'm asking because I fear that the threads in the head will be damaged if I compress it with the bolts.

                          I hope this made sense
                          Last edited by Guest; 09-10-2009, 12:20 PM.

                          Comment


                            #14
                            The Suzuki service manual shows using a large set of vice grips to compress the cam into the head before installing the caps. I’ve used this method before and it works great.
                            Ed

                            To measure is to know.

                            Mikuni O-ring Kits For Sale...https://www.thegsresources.com/_foru...ts#post1703182

                            Top Newbie Mistakes thread...http://www.thegsresources.com/_forum...d.php?t=171846

                            Carb rebuild tutorial...https://gsarchive.bwringer.com/mtsac...d_Tutorial.pdf

                            KZ750E Rebuild Thread...http://www.thegsresources.com/_forum...0-Resurrection

                            Comment


                              #15
                              Originally posted by Nessism View Post
                              The Suzuki service manual shows using a large set of vice grips to compress the cam into the head before installing the caps. I’ve used this method before and it works great.
                              Okay thank you. Has anyone used something that I'm more likely to have in the general toolbox?

                              Comment

                              Working...
                              X