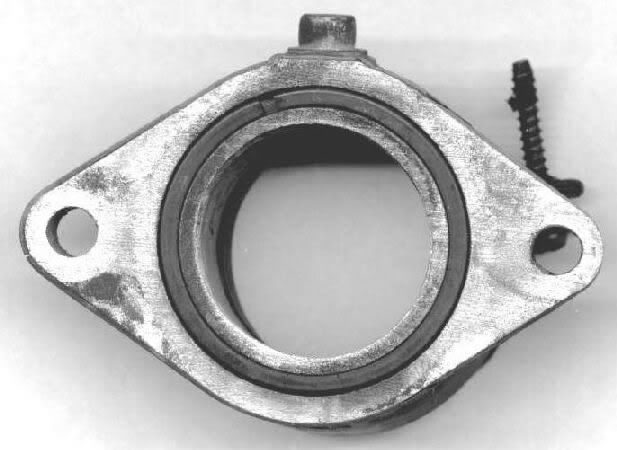
Not sure if your bike has these o-rings, but intake leaks on GS bikes are often from this source.
Announcement
Collapse
No announcement yet.
Cleaned carbs - now runs like crap and revs very slowly
Collapse
X
-
Forum LongTimerGSResource Superstar
Past Site Supporter
Super Site Supporter- Mar 2006
- 35712
- Torrance, CA
Originally posted by MrZig View Post
Not sure if your bike has these o-rings, but intake leaks on GS bikes are often from this source.
Last edited by Nessism; 03-12-2009, 09:39 AM.Ed
To measure is to know.
Mikuni O-ring Kits For Sale...https://www.thegsresources.com/_foru...ts#post1703182
Top Newbie Mistakes thread...http://www.thegsresources.com/_forum...d.php?t=171846
Carb rebuild tutorial...https://gsarchive.bwringer.com/mtsac...d_Tutorial.pdf
KZ750E Rebuild Thread...http://www.thegsresources.com/_forum...0-Resurrection
-
Originally posted by MrZig View PostSorry but I don't understand? How would not touching the idle mixture screw make it run 100x worse than before I cleaned them?
Originally posted by MrZig View PostAh, yeah, well I might take a look at them if everything else completley fails.
Originally posted by MrZig View PostEdit: Something to note, the last couple times I started the bike when it was warm, it would idle nicely and at a respectable RPM, and then slowly climb and climb and climb until what I can think is at least 5000 RPM (I don't have a working tach.)
Really sounds like a bad vacuum leak to me.
I just looked back through some of your previous posts, and it appears that you have only had the bike for about a month. Based on some of the questions you are asking, you are either new to motorcycles or just kinda new to being a mechanic. One of the things that is necessary when acquiring any 'new' old bike is to thoroughly go through it, making sure that everything is clean and works. There are not too many shortcuts that can be taken. If you take a shortcut, you will just end up coming back again to do it right. When you "cleaned the carbs" with your baking soda blast, all you did was make the outsides shiny again. Even the warm water bath did not do much to clean out the inside. I have seen some rather cruddy, crusty old carbs on rat bikes that worked perfectly because they were clean on the inside, where the fuel has to flow. The best way to ensure that the inside of the carbs are clean is to take them completely apart and dip them in carb cleaner, then re-assemble the carbs with all new o-rings. Dirty fuel passages (which are rather small) and cracked o-rings are the two biggest problems in the fuel systems on our bikes. Once you take care of that, your bike will run like new.
Please keep asking questions, that's the only way we learn new stuff. And, someone else might learn from your question, too. But, when suggestions are offered, please try them before you shoot them down. The collective wisdom on this board is rather phenomenal. We will get your bike running right.
by the way ... how much of a mess did the baking soda blast make? I have thought of doing that, but I have too much stuff that would need to be cleaned if it's a messy process.
.sigpic
mine: 2000 Honda GoldWing GL1500SE and 1980 GS850G'K' "Junior"
hers: 1982 GS850GL - "Angel" and 1969 Suzuki T250 Scrambler
#1 son: 1986 Yamaha Venture Royale 1300 and 1982 GS650GL "Rat Bagger"
#2 son: 1980 GS1000G
Family Portrait
Siblings and Spouses
Mom's first ride
Want a copy of my valve adjust spreadsheet for your 2-valve per cylinder engine? Send me an e-mail request (not a PM)
(Click on my username in the upper-left corner for e-mail info.)
Comment
-
MrZig
I never removed the pilot screws because I heard I had to drill the caps out, something I didn't want to do. Now that I know they're so important, I'll clean that circuit.
And I'm not new to being a mechanic, I've pretty much completley rebuilt my own vehicle, but I am incredibly new to bikes and carburetors. I don't have anyone at home to help me, no one, so these forums are all I've got and that's why I ask a lot of questions because I simply have no idea.
Oh and by the way, I didn't just clean the carb bodies with the baking soda. I also throughouly sprayed them with solvent and blew them out with shop air. I'll have to take a look at the pilot circuit though.
The plan is to buy new o-rings, make custom intake boots and to clean the pilot circuit. If that still fails in fixing the issue then I really don't know what's going on. This is why I made the thread, to give a newbie like me some ideas. I obviously overlooked some major issues that I shouldn't have, and that's part of learning.
Edit: The baking soda method is quite messy. You go through a lot of soda. I went through at least 8 of these boxes http://www.ohdeedoh.com/uimages/ohde...ing%20soda.jpg
I wouldn't do it in a shop, that's for sure.Last edited by Guest; 03-12-2009, 11:47 AM.
Comment
-
no worries mate. these gs carbs are very finicky, i had to dip mine twice to get them clean enough, i should have been more thorough the first time. it also took me 2 valve adjustments to get my #3 ppipe to warm up like it should. learning on your own is a pain. this forum, though, has impressed me time and time again with its patience for all of my stupid questions! thanks guys!1983 GS 1100 ESD :D
Comment
-
BassCliff
Originally posted by MrZig View PostThe plan is to buy new o-rings, make custom intake boots and to clean the pilot circuit.
It sounds like you are making progress on your bike and gaining valuable experience. I appreciate your patience with us as we try to help.
I found a parts fiche for the GSX400 here (but I don't know exactly what year yours is):
✓ Official Suzuki parts list ✓ Easy repairs with OEM diagrams ✓ Free acccess to parts fiches for Suzuki GSX400E 1984 (E) GENERAL EXPORT (E01)
The intake boots are #18 and #19 (different part#'s for the left and right boots), the O-rings are #20. See the picture below:
(Ignore the "Get these pars at..." message. I was just looking for any parts fiche with illustrations and part numbers. But this particular site seems to have a lot of non-US models. Handy.)
Does this look like your engine? Can your really fabricate those intake boots? Are the vacuum ports on the intakes in the head or in the boots? You'll need these vacuum ports on the intake to sync your carbs.
Or are you going to fabricate the airbox-to-carb boots?
Here is part of the mega-welcome that seems pertinent to your situation.
***********Quoted from Mr. bwringer************
Every GS850 [and most other models] has (or had) a set of well-known issues that MUST be addressed before you have a solid baseline for further troubleshooting. It's a vintage bike, and it's quite common (as in, every single GS850 I have had contact with) that there are multiple problems that have crept up and slowly gotten worse over the years. It's not like a newer vehicle, where there's generally one problem at a time.
These common issues are:
1. Intake O-rings (install NEW OEM or Viton only - common nitrile O-rings will quickly deteriorate from heat)
2. Intake Boots (install NEW -- these cannot be repaired)
3. Valve clearances (more important than most people think)
4. Carb/airbox boots
5. Airbox sealing
6. Air filter sealing
7. Petcock (install a NEW one)
8. On '79 models, install new points or Dyna electronic ignition (or at least verify that the old points are working correctly)
9. On all models, it's fairly common to have problems with the spark plug caps. These are $3 or $4 each, and often worth replacing if you're keeping the stock coils/wires.
10. Stock exhaust with NO leaks or holes -- good seals at the head and at the junctions underneath.
Carburetor maintenance:
Replace the intake boot o-rings, and possibly the intake boots. Here's the procedure:
Here's an overview of what happens with this particular problem:
You'll also want to examine the boots between the carbs and the airbox. There's a good chance these are OK, but check them over.
And finally, if things still aren't exactly right, you'll want to order a set of o-rings for BS carbs from the GS owner's best friend, Robert Barr:
http://cycleorings.com
Once you receive these rare rings of delight, then you'll want to thoroughly clean and rebuild your carburetors. Here are step-by-step instructions that make this simple:
*********End Quote******************
Keep up the good work. Keep us informed.
Thank you for your indulgence,
BassCliff
Comment
-
MrZig
Thanks basscliff. I use cmsnl all the time for diagrams and OEM part numbers. Super handy to just get the OEM numbers for what I need and take them down to the zuki dealership!
Also I meant that I'm going to fabricate my own airbox-to-carb boots. The ones I have are pretty gross looking and I can't afford to buy the proper airbox, nor do I even know if it would fit in my frame.
Any tips for getting the phillup-head screws out of the intake boots to replace the O-rings? Two weeks ago I went to take them out to have a look see but I just managed to round them off a bit, even with my best fitting screwdriver.
Edit: Also that is definitely my engine.Last edited by Guest; 03-12-2009, 06:03 PM.
Comment
-
BassCliff
Hi Mr. MrZig,
Those Japanese phillips head screws are different than ASE screws. There are special screwdrivers made for them. Or you could just use a decent impact driver. I read a thread recently where someone took a #3 screwdriver socket tip, pounded it into the screws, then used a ratchet to take them out. This is the thread:
Easy removal of intake head boots without a Jap screwdriver
It helps to soak the screws with PB Blaster or your favorite bolt loosening liquid. Once you get them out, it would be best to replace them with hex head screws. Mr. Robert Barr at http://cycleorings.com has the O-rings and screws for not a lot of money. He's a good guy.
Keep us informed.
Thank you for your indulgence,
BassCliffLast edited by Guest; 03-12-2009, 07:16 PM.
Comment
-
C.V.
Any tips for getting the phillup-head screws out of the intake boots to replace the O-rings?
Once you get them out, it would be best to replace them with hex head screws.
Comment
-
MrZig
I think I'll order the stuff from Robert Barr's site. First I gotta find out if the o-rings fit..
Comment
-
i know this might sound weird but i just got my vise grips on them and broke them loose and then used the screwdriver. definatly get you some hex screw head screws to replace them.I didnt do it I swear !!
--------------------------
http://i1210.photobucket.com/albums/...Picture003.jpg 1982 GS850G
http://i1210.photobucket.com/albums/...n1/Picture.jpg 1980 GS1100L
Comment
-
MrZig
If I don't order them from Rob, could I simply replace them with normal bolts? Or does the location somehow make getting a wrench on them difficult?
Comment
-
Regular bolts will work, but stainless steel "allen" heads show you love your bike.
I get my odds and ends bolts, including ss Allens, at Ace Hardware. Just be sure and take an original one along because of thread pitch.1978 GS 1000 (since new)
1979 GS 1000 (The Fridge, superbike replica project)
1978 GS 1000 (parts)
1981 GS 850 (anyone want a project?)
1981 GPZ 550 (backroad screamer)
1970 450 Mk IIID (THUMP!)
2007 DRz 400S
1999 ATK 490ES
1994 DR 350SES
Comment
-
Originally posted by Big T View PostRegular bolts will work, but stainless steel "allen" heads show you love your bike.
Comment
-
MrZig
Instead of posting a new thread, I'll ask it here.
What would the valve clearances be on my GSX400? The only numbers I can find are for the GS400's, GS450's, and the later model inline fours.
The 400 & 450's wouldn't really apply because they're not the same head design, nor are they 4 valve per cylinder engines.
The numbers I did find for the 400/450 is 0.03-0.08 mm on a cold engine. Extremely tight but apparently they loosen up when it warms up. Is it the same thing for the GSX400?
Comment
-
BassCliff
Hi,
The 4-valve per cylinder motors have a spec of .08mm - .13mm for the valve clearances.
Thank you for your indulgence,
BassCliff
Comment
Comment