Announcement

Collapse
No announcement yet.

Tool for Disassembling Forks - Question about the Nut

Collapse
X
 
  • Filter
  • Time
  • Show
Clear All
new posts

    #16
    [QUOTE

    i'll try the above method unless there are other suggestions?

    anyone know what's the factory procedure / tool for disasembling these forks?[/QUOTE]


    why not leave the springs and spacer in the fork for tension to hold the lower dampening rod? I hit the bottom allen bolt with an air impact gun while pushing the assy down on a padded board.

    no jam stick necessary.

    lord the previous owner stories - why my forks do not work!!
    still pulling splinters out of the forks???


    previous owner used red loctite??? get a propane torch and heat up the bolt itself to break the adhesive--then hit it with the impact gun while alternating pushing and pulling the fork assy.

    A set of soft jaws for the vise is a good tool accessory to have too.
    SUZUKI , There is no substitute

    Comment


      #17
      Originally posted by chef1366 View Post
      If you have an impact wrench put the fork caps back on and hit the bottom allen with that. Heat it a little first to loosen the old loctite.
      If you don't have one do a search. I know basscliff's site has a picture tutorial.
      Originally posted by trippivot View Post
      [QUOTE

      i'll try the above method unless there are other suggestions?

      anyone know what's the factory procedure / tool for disasembling these forks?

      why not leave the springs and spacer in the fork for tension to hold the lower dampening rod? I hit the bottom allen bolt with an air impact gun while pushing the assy down on a padded board.

      no jam stick necessary.

      lord the previous owner stories - why my forks do not work!!
      still pulling splinters out of the forks???


      previous owner used red loctite??? get a propane torch and heat up the bolt itself to break the adhesive--then hit it with the impact gun while alternating pushing and pulling the fork assy.

      A set of soft jaws for the vise is a good tool accessory to have too.[/QUOTE]
      Hmmmmmmmmmm
      1983 GS 1100E w/ 1230 kit, .340 lift Web Cams, Ape heavy duty valve springs, 83 1100 head with 1.5mm oversized SS intake valves, 1150 crank, Vance and Hines 1150 SuperHub, Star Racing high volume oil pump gears, 36mm carebs Dynojet stage 3 jet kit, Posplayr's SSPB, Progressive rear shocks and fork springs, Dyna 2000, Dynatek green coils and Vance & Hines 4-1 exhaust.
      1985 GS1150ES stock with 85 Red E bodywork.

      Comment


        #18
        i'm not a fan of any method that doesnt allow for a proper torque adjustment which is needed for the bottom allen key bolt.

        not everyone has an impact air gun either.

        i tried disassembling the fork with the spring in place but that puts a bugger all pressure on the bolt and the whole thing just rotates in place.

        broom/rake stick it is, i say, and definitely a metric one.


        but i'm still qurious to know what the factory tool looks like for this job.
        GS850GT

        Comment


          #19
          Originally posted by psyguy View Post
          i'm not a fan of any method that doesnt allow for a proper torque adjustment which is needed for the bottom allen key bolt.

          not everyone has an impact air gun either.

          i tried disassembling the fork with the spring in place but that puts a bugger all pressure on the bolt and the whole thing just rotates in place.

          broom/rake stick it is, i say, and definitely a metric one.


          but i'm still qurious to know what the factory tool looks like for this job.
          PSYGUY, I am off to cricket now, but will scan a picture when I come in this afternoon and put it up for you.

          Comment


            #20
            I've had the stock forks on my 700 as well as a set of '88 GSXR forks completely apart. I didn't use anything to hold the damper rods on either set. I simply used the allen wrench on the bolts on each set without holding anything in place. With both sets they came apart and reassembled with no problems.

            Comment


              #21
              Originally posted by psyguy View Post
              ...but i'm still qurious to know what the factory tool looks like for this job.
              Hoover Fence has been a supplier of fence and fencing related materials for over 40 years. We provide products to contractors, retailers, and homeowners throughout the United States. We strive to make your fence buying experience a great one.
              '85 GS550L - SOLD
              '85 GS550E - SOLD
              '82 GS650GL - SOLD
              '81 GS750L - SOLD
              '82 GS850GL - trusty steed
              '80 GS1100L - son's project bike
              '82 GS1100G - SOLD
              '81 GS1100E - Big Red (daily rider)

              Comment


                #22
                lol, do i need to buy the rake as well?
                i would like to save some money so i was thinking of buying the handle only.
                have you got that, hikermikem?
                GS850GT

                Comment


                  #23
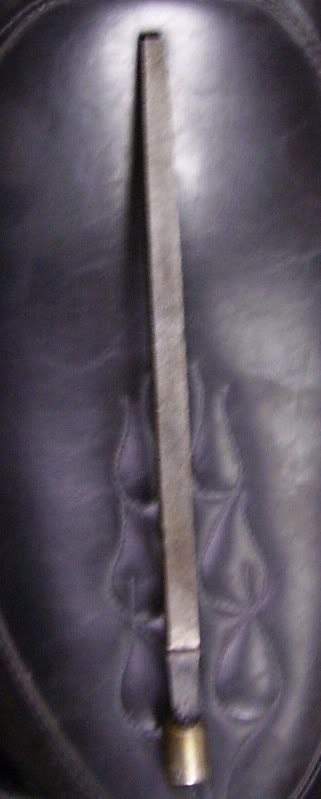
                  Now this is the REAL FACTORY TOOL. For 550 and 650s.

                  Comment


                    #24
                    Well, I just made one when I needed it- just found a square piece of metal, in this case, a ruined and used to death square file that I pulled out of the scrap metal bin at the university. Since it was tapered, I just kept cutting off bits of the end until it fit in the socket. Then I welded it to an old chinese made cheap socket. Viola'- Fork tool made for 0$ spent LOL, not to mention, I was able to finish the fork job in a couple hours instead of looking for a special tool.

                    Comment


                      #25
                      many thanks for the pics, don and cruisingram!
                      Last edited by psyguy; 01-24-2010, 05:39 AM.
                      GS850GT

                      Comment


                        #26
                        Personally, I'd rather use the broomstick method as that just puts pressure on the top of the damper rod to stop it from turning. And this pressure can be altered and increased if the damper rod still turns by turning the top fork nut in a couple of more turns.

                        The way I see it the factory tool (or file) made from hardened steel will cause damage to the inside of the damper rod which is made from aluminium.

                        Comment


                          #27
                          This is what I did. Except on my forks, the flats were all the way in the bottom of the oil tube...and I used a 5/16" nut. I had to use a 5/16" coupler on the end and threaded only halfway. The other half I drilled out so that the screw could be screwed in with out catching on the nut. Just saying that every fork is not the same. Some have the flat at the bottom of the tube.

                          Originally posted by Steve View Post
                          I see that this issue has basically been resolved, but thought I would add a bit for others that might read it.


                          Yes, it's 19 mm across the flats. You can make a tool using about $5 of parts from your hardware store and no welder.
                          Get a 2-foot length of 1/2" all-thread rod and four nuts. Put two nuts on each end, leave about an inch of rod sticking out, jamb the nuts together.
                          Put the 'tool' into the fork leg, the rod that is sticking out will help locate it in the damping rod. Use a wrench on the inner nut on the upper stack to remove the damper rod.


                          When re-assembling, remember it's the speed of the impact that will be doing the work. Be careful to not over-torque it.


                          I have not read BassCliff's directions, but can't imagine installing the seal first. The best way I have found is to assemble the inner and outer fork legs, lube the seal so it slides nicely, slide the seal into place. I use a piece of PVC tubing as you suggest. The fork tubes on my 850s will just barely fit into the PVC, but not slide easily, so I cut a slit down the length so the PVC can expand just a bit. Make sure that the end of the PVC is cut squarely and that it's longer than the inner fork tube. Tap on the end of the PVC (yeah, a cap on the end might help), the seal gets driven into place very nicely.


                          I have not worked on 550 forks for comparison, but I agree, the seal is almost the last thing to into the assembly.

                          Comment

                          Working...
                          X