.png "Powered by vBulletin")
Adjusting the chain, changing the rear wheel or other work entails wheel alignment. The common tip is usually to just sight with your eye but if your bike is like mine that is pretty much impossible. First off, the rear wheel is wider so it obscures the front. And looking to alternating sides might help you spot a huge misalignment, but it's not going to be very accurate.
But worry not, aligning properly is easy, rewarding and fun for the whole family. You need:
1. A centrestand, pit stand or other way of setting the bike upright.
2. A piece of string, 15-20 feet long. Only thing I found at the hardware store was expensive mason's string but it was excellent.
3. Two slightly heavy but easily movable things, i.e. anchors. Axle stands are perfect, a big bottle of water would work too.
4. Duct tape or similar.
5. A tape measure or caliper - but your eyeball is what will do most of the measuring!
Keep in mind you need to be able to stretch that string between the wheels, some centrestands interfere with that.
There's two parts to the process: Checking the alignment and adjusting the alignment. Checking is actually a bit trickier than adjusting, you'll see why.
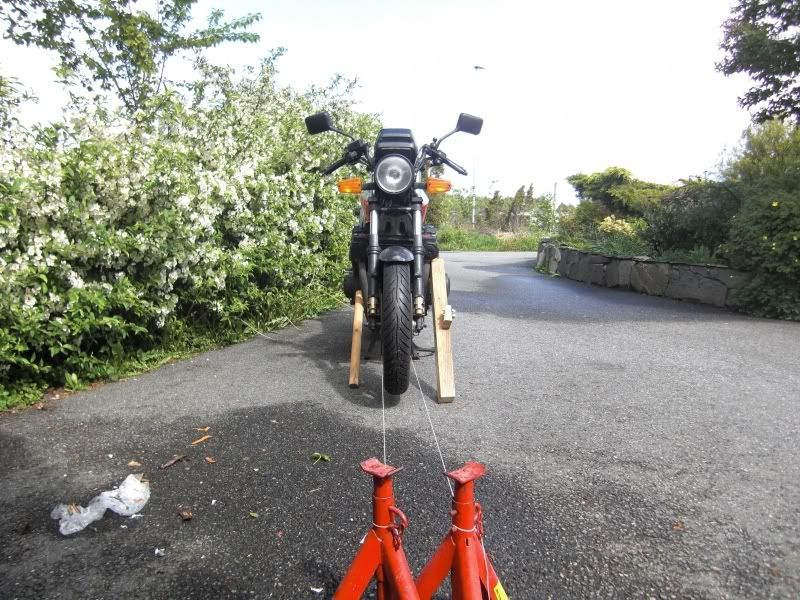
This is how we set it up:

The string in blue goes in one piece from anchor to anchor around the rear wheel. Duct tape the loop to your rear wheel, making sure that it's at an height where the string can reach the front wheel uninterrupted and that it's tied to your anchors at the same height.
Now you get to play the back and forth game. To figure out how the wheel is aligned we want to make each side of the string loop run perfectly parallel to the rear wheel and then extend this line forward, exaggerating the angle which makes it easier to compare to the front wheel.
Pull each line taut by moving its anchor, the mason's string was excellent for this, thin and strong. The string is already taut against the rear lip of the rear wheel due to the loop. What you now want to do is make it barely touch the front lip but not so taut that it bends. Thusly:

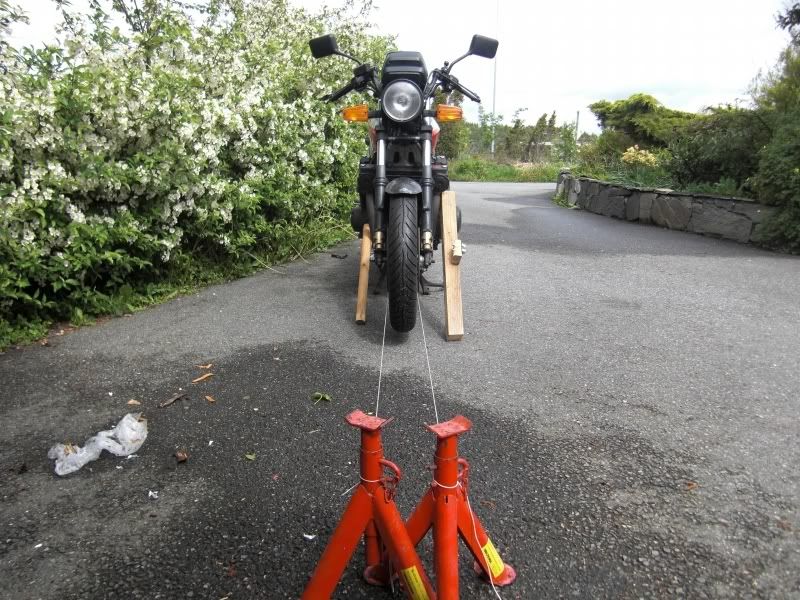
It takes a bit of walking back and forth, moving the anchor a tiny bit, pulling and pushing a little on the string and so on. You can check that the lines are parallel by measuring the distance between them. It should be equal to the width of the rear wheel, so get a good measurement on that.

But worry not, aligning properly is easy, rewarding and fun for the whole family. You need:
1. A centrestand, pit stand or other way of setting the bike upright.
2. A piece of string, 15-20 feet long. Only thing I found at the hardware store was expensive mason's string but it was excellent.
3. Two slightly heavy but easily movable things, i.e. anchors. Axle stands are perfect, a big bottle of water would work too.
4. Duct tape or similar.
5. A tape measure or caliper - but your eyeball is what will do most of the measuring!
Keep in mind you need to be able to stretch that string between the wheels, some centrestands interfere with that.
There's two parts to the process: Checking the alignment and adjusting the alignment. Checking is actually a bit trickier than adjusting, you'll see why.
This is how we set it up:
The string in blue goes in one piece from anchor to anchor around the rear wheel. Duct tape the loop to your rear wheel, making sure that it's at an height where the string can reach the front wheel uninterrupted and that it's tied to your anchors at the same height.
Now you get to play the back and forth game. To figure out how the wheel is aligned we want to make each side of the string loop run perfectly parallel to the rear wheel and then extend this line forward, exaggerating the angle which makes it easier to compare to the front wheel.
Pull each line taut by moving its anchor, the mason's string was excellent for this, thin and strong. The string is already taut against the rear lip of the rear wheel due to the loop. What you now want to do is make it barely touch the front lip but not so taut that it bends. Thusly:
It takes a bit of walking back and forth, moving the anchor a tiny bit, pulling and pushing a little on the string and so on. You can check that the lines are parallel by measuring the distance between them. It should be equal to the width of the rear wheel, so get a good measurement on that.

Comment