Announcement

Collapse
No announcement yet.

Adjusted jet needle no difference

Collapse
X
 
  • Filter
  • Time
  • Show
Clear All
new posts

    Adjusted jet needle no difference

    I was having a difficult time accelerating between 4-6k roughly. up to 4k it really flies and around 6-6.5K it takes off again.

    I was told that possibly the jet needles should to be adjusted. After pulling the spark plugs I noticed the signs of fouled plug. Just put new plugs in about 20 miles ago. Black dry dust on the plug. I leaned the needle by raising the clip one slot (now on the very top slot). Fe assembled the carb took it for a test ride. There was no difference.! Still dead in the mid range.

    I am wondering if the plug is getting fouled at low rpms and the mid range is actually lean?

    When idling and giving a blip on the throttle to 5-6k the rpms drop to 3.5 and then are quite slow to get back to idle (1100). My reading of the posts suggest that this is a lean condition.

    I am about ready to give up and buy a v-strom!

    Should my next step be to raise the needles 2 steps and see if I am lean in the midrange?

    #2
    1) RPMs have NOTHING to do with where you are or are not lean. It has everything to do with THROTTLE POSITION, as in which circuit of the carb the bike is using at that particular RPM. You can be cruising, minimal throttle input at 6K and not even be IN the needle circuit. So throw your RPMs out the window..

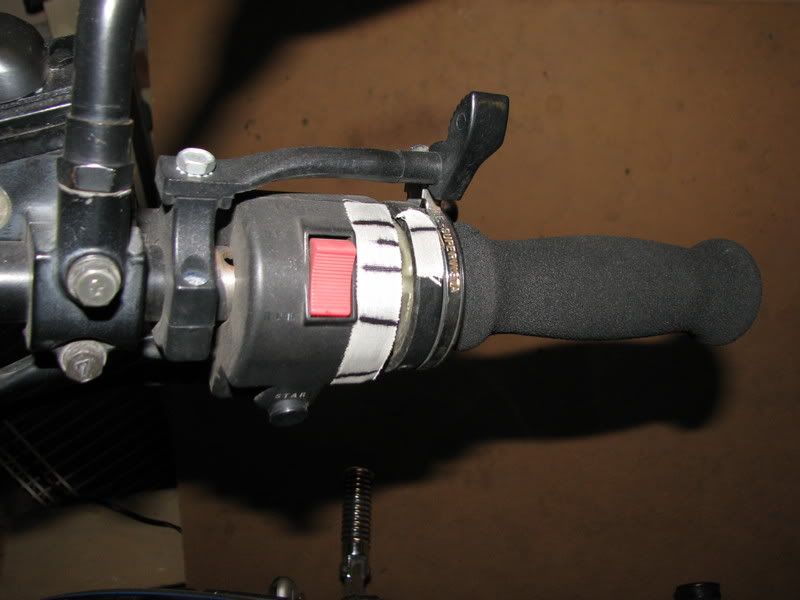
    2) The single most helpfull way, IMO, to gauge what circuit you are having the trouble in is to mark the throttle with tape in increments. 1/8 1/4 1/2 3/4 and WOT. up to about 1/8 or so of the throttle is nothing but the pilot circuit. Just beyond that, and you're transitioning from the pilot to the needle. Needle will take you to about 3/4 throttle and a little more, and then from there its MAIN JET.


    3) Moving the clip UP is LEANING the mixture. You have to think in backwards terms. If you move the clip up, its actually pushing the needle further down into the needle jet, there by delaying the time that it reaches that lovely taper and allows more fuel past it. If you think you are lean in the NEEDLE circuit, you need to move the needle clip DOWN. This will raise the needle, quickening the time it will get to the taper when the slides are lifted.

    4) With your bikes carbs, EVERY TIME you change the needle postion, you WILL have to resynch the carburetors. Just so ya know...

    Comment


      #3
      well what clip are you moving this could help my issue on my 78 750 im having im running rich and confused on how to lean it out??

      Comment


        #4
        Here is how to mark your throttle:


        .
        sigpic
        mine: 2000 Honda GoldWing GL1500SE and 1980 GS850G'K' "Junior"
        hers: 1982 GS850GL - "Angel" and 1969 Suzuki T250 Scrambler
        #1 son: 1986 Yamaha Venture Royale 1300 and 1982 GS650GL "Rat Bagger"
        #2 son: 1980 GS1000G
        Family Portrait
        Siblings and Spouses
        Mom's first ride
        Want a copy of my valve adjust spreadsheet for your 2-valve per cylinder engine? Send me an e-mail request (not a PM)
        (Click on my username in the upper-left corner for e-mail info.)

        Comment


          #5
          when adjusting a carburation problem the pilot/ idle NEEDS to be right before you move on the the needle circuit.

          the order is pilot then needle then main and maybe back to the needle for ultra fine tuning.

          you are still fighting a plug fouling problem and a lean condition at the same time??? listen to that out loud and rethink what you are doing.

          if there is no change in running condition when you do a needle height adjustment you have multiple problems.

          go back to float height, sync, mixture screw adjustment, with a NEW set of spark plugs. get it right then move on to midrange adjustment
          SUZUKI , There is no substitute

          Comment


            #6
            jet needle

            I adjusted the clip UP because I thought it was running rich. I think that I will adjust it "Down" to see what that does. The original position was second notch from the top. If that has no effect I will disassemble, clean adjust and replace o-rings.

            Comment


              #7
              Originally posted by kfb View Post
              I adjusted the clip UP because I thought it was running rich. I think that I will adjust it "Down" to see what that does. The original position was second notch from the top. If that has no effect I will disassemble, clean adjust and replace o-rings.
              Correct me if I'm wrong somebody but I believe a '78 750 comes from the factory with the jet needle e-clip in the 3rd position from the top. If your exhaust and air filter are stock then you should return the e-clip to the factory position. Check out the carb section here and I'm sure the '78 750 carb specs are available. The "-3" you may see after the jet needle size means "position 3". If position 2 is correct I apologize. My point is that I doubt the jet needle in your case is causing the richness.
              Be sure all factory plastic jet needle spacers are replaced in factory order too.
              You will then need to bench synch the carbs and after full warm up, vacuum tool synch.
              This all assumes the bike is in otherwise good tune. Good spark/timing, valve clearances, clean carbs with no intake leaks at the manifolds, clean filter...
              Last edited by KEITH KRAUSE; 07-03-2009, 10:32 AM.
              And on the seventh day,after resting from all that he had done,God went for a ride on his GS!
              Upon seeing that it was good, he went out again on his ZX14! But just a little bit faster!

              Comment


                #8
                Originally posted by KEITH KRAUSE View Post
                Correct me if I'm wrong somebody but I believe a '78 750 comes from the factory with the jet needle e-clip in the 3rd position from the top. If your exhaust and air filter are stock then you should return the e-clip to the factory position. Check out the carb section here and I'm sure the '78 750 carb specs are available. The "-3" you may see after the jet needle size means "position 3". If position 2 is correct I apologize. My point is that I doubt the jet needle in your case is causing the richness.
                Be sure all factory plastic jet needle spacers are replaced in factory order too.
                You will then need to bench synch the carbs and after full warm up, vacuum tool synch.
                This all assumes the bike is in otherwise good tune. Good spark/timing, valve clearances, clean carbs with no intake leaks at the manifolds, clean filter...
                Exactly what I was thinking! If everything is stock, do you need to mess around with moving the needle? On my 78 and 79 (both stock) engines run great with just your basic carb sync, air & fuel screw adjustments and timing.

                Comment


                  #9
                  Thanks guys

                  The PO "rebuilt" the carb. He may or may not have done it correctly. He is a mechanic at Hill AFB and works on f15's. The timing is good. I haven't messed with the Valves, but they sound good. The Air Cleaner is clean and reoiled. I will let you know how the adjustment goes this afternoon.

                  I really like classic UJM's. However, I was hoping to ride this thing sometime this summer. I am talking the wife into a V-strom next summer as my long-range ride.

                  Thanks

                  Comment


                    #10
                    OK. Good luck with it. When you take it apart be sure to note the installation of the factory plastic jet needle spacers.
                    Go to Bikebandit or a manual for your bike and verify the correct parts and their assembly order. I believe your model uses 2 plastic spacers. The thicker spacer goes on top the e-clip and the thinner one goes under the clip. If these spacers are reversed you will run richer than expected.
                    If all parts/assembly is correct and you return the e-clip to the 3rd position, any richness will not be the fault of the jet needles. To see rich plug reads with the needles adjusted leaner than stock suggests something else is wrong.
                    Throttle position is what's important in regards to your fouling plugs. The jet needles basically regulate the mixture between 1/5 and 3/4 throttle. Less than 1/5 throttle is regulated by the pilot jet/circuit. Over 3/4 throttle is the main jet. Float levels are important. Maybe they were adjusted wrong?
                    A slow to return idle may indicate a vacuum leak. Check the manifolds and their inner o-rings. Does the bikes idle rise significantly as it becomes fully warmed up? Classic intake leak.
                    You also need to verify good bluish spark using a clean/properly gapped plug. Plug lead ends can get corroded over time and effect spark. Check the coils for correct voltage. Check the battery too. If you still have points, check their condition for pitting or other problems.
                    And on the seventh day,after resting from all that he had done,God went for a ride on his GS!
                    Upon seeing that it was good, he went out again on his ZX14! But just a little bit faster!

                    Comment


                      #11
                      Good insights

                      "Does the bikes idle rise significantly as it becomes fully warmed up?
                      Yes it does raise after warming up 30 seconds. I probably have an intake leak.

                      The jet needle assembly was exactly as you described. I think that the PO may have counted the -3 from the bottom. That would explain the position that they were found at -2. I will put them at -3.

                      I would really like to get this thing running better before I really have to tear into it. The more issues that I can solve now will help later.

                      Thanks.

                      Comment


                        #12
                        Originally posted by kfb View Post
                        "Does the bikes idle rise significantly as it becomes fully warmed up?
                        Yes it does raise after warming up 30 seconds. I probably have an intake leak.

                        The jet needle assembly was exactly as you described. I think that the PO may have counted the -3 from the bottom. That would explain the position that they were found at -2. I will put them at -3.

                        I would really like to get this thing running better before I really have to tear into it. The more issues that I can solve now will help later.

                        Thanks.
                        Well, I'm not sure what the PO was thinking but the factory jet needle has 5 positions/grooves. If he did count UP 3 positions the clip would be in position 3 (the middle). Anyway, doesn't matter now since you know what to do.
                        Hopefully you won't need to get too involved to get the bike to run well but there are basic things that sometimes must be done. Instead of trying to find that one fix it's better to go over the basics. In most cases it will actually save time and frustration.
                        One of those basics (and since you describe a probable intake leak) is to inspect the manifolds while the carbs are out. Most common cause of intake leaks with your model is the o-rings that insert into your manifolds. If yours are older, they are probably crushed thin and cracking in places. If so, no way the bike will run well until the intake leaking is fixed. Get quality o-rings such as genuine Suzuki. No need to over-torque them (which is easy to do). About 7 ft/lb is fine. Apply some hi-temp bearing grease to help them last longer. You still have to inspect the manifolds themselves. If cracking, they'll need replacing. Be aware the manifold screws (if stock/Phillips heads) can be stuck and easy to strip off the heads. Use a GOOD fitting bit in an impact driver to crack them loose. REPLACE them with Allen/Hex bolts.
                        You'll also need to bench synch carefully. I made a detailed post how to bench synch your carbs but I'm not sure what topic it's at. Do a search if you want. It's in a large thread that is titled "78 GS1K Carb rejet attn Keith Krause". My reply is about #36.
                        At the very least you must carefully bench synch. I'm not trying to make work for you but in my opinion the bench synch is only for start up purposes and the bench synch must be followed by a vacuum tool synch. No other way to be sure if the vacuum is uniform to all cylinders. A poor synch will cause rough running and vibration.
                        Another thing to check is how the fuel screws (underneath) and the side air screws are adjusted. The fuel screws are sensitive to adjustment. On a stock bike they are generally 3/4 to 1 turn out from LIGHTLY seated. But this can vary a little bike to bike. Fine tuning can take time. It depends on how your bike is performing on the pilot circuit. The side air screws are always adjusted by using the highest rpm method. Initially, set them to 1 1/2 turns out. With the bike on the centerstand start up and fully warm it up and idling at the base 1,000 rpm's, slowly turn a screw in either direction until you hear the rpm's max out. You should hear at least a subtle change if the carb is operating correctly. Once set, return the idle to base by using the idle adjuster knob. Repeat to all carbs.
                        The above should get your basic fuel/air screw adjustments right and we know the needles will be right. You will also have no more intake leaks. The synch will be as good as you make it. Inspect the float levels while the carbs are apart. Check the main jet size too since you don't know the history of the carbs. Tell us what size you see. Check the pilot jets too. If you notice any of the small inner o-rings throughout the carbs getting hard/damaged, I suggest you buy the VM o-ring kit from Robert Barr (a member here). It's cheap and takes very little time.
                        Lots to do it seems but it's best to really inspect things closely and not assume anything. And clean the carbs as carefully as you can. Keep all parts as a unit for each carb. Be very careful of how each part assembles. That includes the thin brass plate at the inside bottom of the slide. Put it back "right side up".
                        Last edited by KEITH KRAUSE; 07-04-2009, 04:25 AM. Reason: add info
                        And on the seventh day,after resting from all that he had done,God went for a ride on his GS!
                        Upon seeing that it was good, he went out again on his ZX14! But just a little bit faster!

                        Comment

                        Working...
                        X