.png "Powered by vBulletin")
all my OEM shims have a minute bevel on both sides of them! Honest!
-
-
I guess I am going to have to get out the magifying glass and check my shims.
.sigpic
mine: 2000 Honda GoldWing GL1500SE and 1980 GS850G'K' "Junior"
hers: 1982 GS850GL - "Angel" and 1969 Suzuki T250 Scrambler
#1 son: 1986 Yamaha Venture Royale 1300 and 1982 GS650GL "Rat Bagger"
#2 son: 1980 GS1000G
Family Portrait
Siblings and Spouses
Mom's first ride
Want a copy of my valve adjust spreadsheet for your 2-valve per cylinder engine? Send me an e-mail request (not a PM)
(Click on my username in the upper-left corner for e-mail info.)Comment
-
Yes, the OEM ones have a small bevel or chamfer on the edge all the way round, makes them much easier to remove.
With the Z1 ones which are flat I take a file & run a small chamfer around the edge both sides before fitting (or at least "break the corner" in toolmaking terms), this makes them a lot easier to work with.
I vote for using Nessism's method too - it's what I would do in any case. Either way if it doesn't work you'll have to crack the engine same as you would now if you really wanted to analyse what was going on in there....
Dan 1980 GS1000G - Sold
1978 GS1000E - Finished!
1980 GS550E - Fixed & given to a friend
1983 GS750ES Special - Sold
2009 KLR 650 - Sold - gone to TX!
1982 GS1100G - Rebuilt and finished. - Sold
2009 TE610 - Dual Sporting around dreaming of Dakar..... - FOR SALE!
www.parasiticsanalytics.com
TWINPOT BRAKE UPGRADE LINKY: http://www.thegsresources.com/_forum...e-on-78-Skunk/Comment
-
I understand your concern. If you are certain your measuring methodolgy is correct, then it isn't logical for those clearances to be that large. Usually they shrink slightly over the miles. I would suspect the PO of inserting too small of shims, but the shims you need to bring the clearances into spec are pretty darn big. Too big I think.
I will throw this idea out and maybe others can comment. Is it possible the bolts holding the camshaft bearings in place have loosened? This would effectively lift the entire cam up every time the valve was pushed in, bumping up the clearance.Comment
-
My point in an earlier thread, that the PO erred on gaps being too big. Unless you did the previous measurement, I wouldn't rely on what someone else did prior.Originally posted by flyingace View Post
Good point. As a rule, I always check the 8 bolts one each cam (4 each side) to be sure they haven't loosened. I use the 2 finger setting (or you can use a torque wrench). You don't want to snap these bolts!!Comment
-
Actually, I'd imagine that a problem with the cam caps would not affect the clearances like that -- basically, in measuring position, the cam lobe is not pushing down against the valve spring. The positions of nearby valves could affect this, but I'd have to open up my engine and sit down with a beer and stare at it a while to ponder this.
Also, just to be contrary, I've never found a difference in valve clearances between following the Suzuki procedure exactly and simply rotating the engine until the cam lobe for the valve I want to check is in the right position. Some folks have. FWIW, YMMV, etc. I expect violent disagreements to erupt over this heresy...
To be fair, I haven't repeated this experiment (Suzuki Way vs. My Way) on every engine I've encountered, but usually I just set the #1 exhaust lobe to point straight away from the cylinder head, then do the same to #2, #3, #4, etc. and then do the intakes in the same order. It's easier in my mind to simply rotate the engine more times than to risk getting disorganized.
ANYWAY... back to the OP's problem:
It really sounds like either the engine has had work done in the past, and whoever was in there last just did the best they could with the commonly available shims. If the valve seats have been re-cut, many builders will grind the ends of the valve stems to match, and they may have gone a wee bit overboard. Not a problem if you can find shims large enough, and it sounds like you can. (Can you post which shims are in there now?)
The other possibility is that carbon buildup on the valves is propping them open. This is pretty uncommon, but I guess it's a possibility. How has the bike been running? Are the plugs black and gross, or are things pretty good mixture-wise?
And, um, the engine was room temperature (not run for at least 12 hours) when you measured the clearances, right?
So here's what I'd do, assuming it's running well:
Button it up, ride the living snot out of it for another 500 - 1,000 miles, and re-check the valves. If it was carbon buildup, the carbon will get hammered out of the way and you'll get the "true" clearances.
If it's just big clearances (they're all about the same as previously), drop in a larger shim on the #2 intake and don't worry about the others.
There's nothing at all wrong with using inch feeler gauges. I used them for years until I finally found a set of metrics. It's just a little easier mentally to work in mm. I dunno about you, but my mind needs all the help it can get. Also, the metric set has more feelers in this size range -- mine has one for every .01mm from .03 to .15. So there.
1983 GS850G, Cosmos Blue.
Also, the metric set has more feelers in this size range -- mine has one for every .01mm from .03 to .15. So there.
1983 GS850G, Cosmos Blue.
2005 KLR685, Aztec Pink - Turd II.3, the ReReReTurdening
2015 Yamaha FJ-09, Magma Red Power Corrupts...
Eat more venison.
Please provide details. The GSR Hive Mind is nearly omniscient, but not yet clairvoyant.
Celeriter equita, converteque saepe.
SUPPORT THIS SITE! DONATE TODAY!
Co-host of "The Riding Obsession" sport-touring motorcycling podcast at tro.bike!Comment
-
Good point on checking those bolts as I hadn't even thought of that.
2x 2.75, 2x2.80, 2x2.85, 2x2.90 although I would have to check my sheet at home to tell you which shim was in which valve. My math was telling me to buy 2x2.95s and rotate the other shims to get everything in tolerance.ANYWAY... back to the OP's problem:
It really sounds like either the engine has had work done in the past, and whoever was in there last just did the best they could with the commonly available shims. If the valve seats have been re-cut, many builders will grind the ends of the valve stems to match, and they may have gone a wee bit overboard. Not a problem if you can find shims large enough, and it sounds like you can. (Can you post which shims are in there now?)
Had dipped the carbs, got it running very rich then dialed back to jsut slightly rich. Was noticing that cylinder 4 seemed to be more lean than the others and decided that I was wasting effort until I knew the valve clearances were ok.The other possibility is that carbon buildup on the valves is propping them open. This is pretty uncommon, but I guess it's a possibility. How has the bike been running? Are the plugs black and gross, or are things pretty good mixture-wise?
Engine was a few days cold when i measured.And, um, the engine was room temperature (not run for at least 12 hours) when you measured the clearances, right?
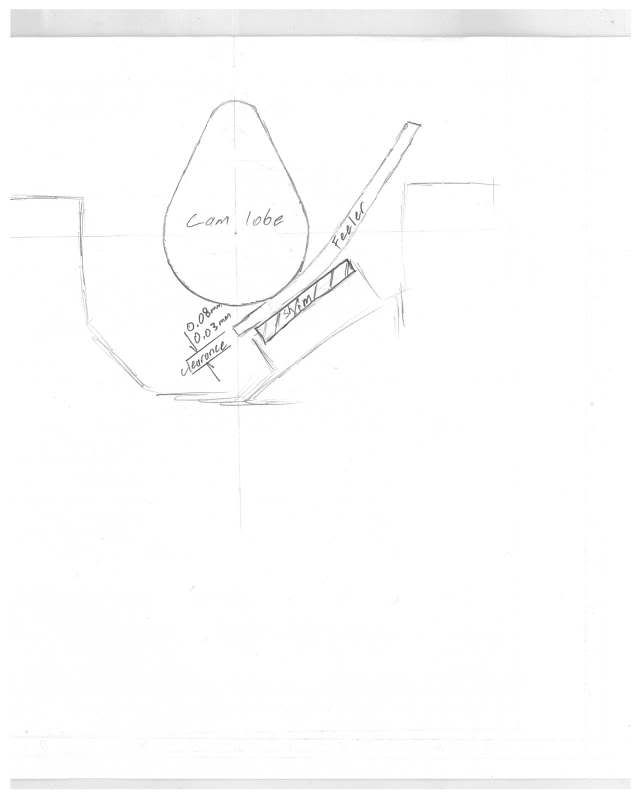
For clarification this is a sketch of how I am checking clearances. Camera is away so no pictures for now so hopefully this will help somebody explain how I can be messing this up.
 Last edited by Guest; 07-13-2009, 04:42 PM.
Comment
-
I have no doubt that your measurement are fine. I would chalk it up to a previous owner, re-shim to the proper clearances, button it up and go for a ride. Most of my shims had no numbers to read and I had to use a micrometer incremented in inches to read them. I then converted to mm. It's all good. I don't think Z1 would offer a fat shim if there wasn't a call for one now and again.Comment
-
Hey, with a "sketch" like that, if you feel you missed your calling as a mechanic, I think you will make it as an artist.
.sigpic
mine: 2000 Honda GoldWing GL1500SE and 1980 GS850G'K' "Junior"
hers: 1982 GS850GL - "Angel" and 1969 Suzuki T250 Scrambler
#1 son: 1986 Yamaha Venture Royale 1300 and 1982 GS650GL "Rat Bagger"
#2 son: 1980 GS1000G
Family Portrait
Siblings and Spouses
Mom's first ride
Want a copy of my valve adjust spreadsheet for your 2-valve per cylinder engine? Send me an e-mail request (not a PM)
(Click on my username in the upper-left corner for e-mail info.)Comment
-
I don't understand why you are not measuring per the suzuki method. Please explain your logic.Ed
To measure is to know.
Mikuni O-ring Kits For Sale...https://www.thegsresources.com/_foru...ts#post1703182
Top Newbie Mistakes thread...http://www.thegsresources.com/_forum...d.php?t=171846
Carb rebuild tutorial...https://gsarchive.bwringer.com/mtsac...d_Tutorial.pdf
KZ750E Rebuild Thread...http://www.thegsresources.com/_forum...0-ResurrectionComment
-
Ed, I don't think he knows the Suzuki method, probably going by the manual (some spec that way) or by common practice I guess....
Not sure where that link is to the Suzuki manual page, you got it anywhere?
Dan
1980 GS1000G - Sold
1978 GS1000E - Finished!
1980 GS550E - Fixed & given to a friend
1983 GS750ES Special - Sold
2009 KLR 650 - Sold - gone to TX!
1982 GS1100G - Rebuilt and finished. - Sold
2009 TE610 - Dual Sporting around dreaming of Dakar..... - FOR SALE!
www.parasiticsanalytics.com
TWINPOT BRAKE UPGRADE LINKY: http://www.thegsresources.com/_forum...e-on-78-Skunk/Comment
-
This in reference to me or bwringer?Originally posted by Nessism View Post
This is ultimately how I ended up measuring. I was pulling shims and recording thicknesses and just found it clearer to work through methodically. The clymer shows the measurement with the lobe pointing up so I hadn't thought that it would be 'wrong'.I just set the #1 exhaust lobe to point straight away from the cylinder head, then do the same to #2, #3, #4, etc. and then do the intakes in the same order. It's easier in my mind to simply rotate the engine more times than to risk getting disorganized.
For comparison. My lack of method is identical at
Exhaust #2 & #4
Intake #1 & #3(?)
I could believe that the other half of the measurements are 'skewed'. But, the 4 which were by the suzuki method were all over tolerance as well . Although the largest clearance WASn't by the suzuki method so I can try re-measuring.
For some more information
Cylinder==>Current Shim ==> proposed shim
#1 Exhaust=>2.90mm==> 2.95mm
#1 Intake => 2.75mm => 2.80mm
#2 Exhaust => 2.85mm => 2.90mm
#2 Intake ==> 2.75mm => 2.80mm worst clearance
#3 Exhaust => 2.85mm => 2.90mm
#3 Intake ==> 2.80mm => 2.85mm
#4 Exhaust => 2.90mm => 2.95mm
#4 Intake ==> 2.80mm => same
Also if I understand this correctly. I should be able to differentiate between OEM shims and replacement shims? I don't recall any bevels so maybe I am in the clear and the PO just went over big on my clearances.Comment
-
The suzuki method positions the cams in a way such that both adjacent valves are on the base circle - you adjust valves in pairs. This way is best since the adjacent valve is not pushing up on the cam and skewing it within the journal clearance.Ed
To measure is to know.
Mikuni O-ring Kits For Sale...https://www.thegsresources.com/_foru...ts#post1703182
Top Newbie Mistakes thread...http://www.thegsresources.com/_forum...d.php?t=171846
Carb rebuild tutorial...https://gsarchive.bwringer.com/mtsac...d_Tutorial.pdf
KZ750E Rebuild Thread...http://www.thegsresources.com/_forum...0-ResurrectionComment
-
Yeah. Half of my measurements still satisfied that condition though. I can remeasure but because of the consistency of my measurements being over tolerance I don't think that can be all of the answerOriginally posted by Nessism View Post
Comment
-
Originally posted by Nessism View PostThe Suzuki method is probably also the Clymer method, but I don't have a book in front of me to verify.Originally posted by Dreef1999 View Post
Using the Suzuki method, one of the two cam lobes on one side of the cam will be pointing UP. The other will be pointing forward or backward, depending on whether you are working on the exhaust or intake cam. When the lobes are in this position, you can measure BOTH valves under THAT cam without moving anything. Rotate the crank 180 degrees (using the 19mm nut on the right end of the crank), check the next pair of valves. Rotate another 180 degrees, check another pair. It is very easy to determine which pair valves are ready to be measured as neither lobe will be pushing on a valve. The hardest part is following a pattern. If I remember correctly, I do Exhaust 1&2, Intake 1&2, Exhaust 3&4, then Intake 3&4. Just checked the Suzuki manual, that is the correct order.
.sigpic
mine: 2000 Honda GoldWing GL1500SE and 1980 GS850G'K' "Junior"
hers: 1982 GS850GL - "Angel" and 1969 Suzuki T250 Scrambler
#1 son: 1986 Yamaha Venture Royale 1300 and 1982 GS650GL "Rat Bagger"
#2 son: 1980 GS1000G
Family Portrait
Siblings and Spouses
Mom's first ride
Want a copy of my valve adjust spreadsheet for your 2-valve per cylinder engine? Send me an e-mail request (not a PM)
(Click on my username in the upper-left corner for e-mail info.)Comment
Comment