Announcement

Collapse
No announcement yet.

Master Cylinder Problems...

Collapse
X
 
  • Filter
  • Time
  • Show
Clear All
new posts

    Master Cylinder Problems...

    Hey everyone,

    Newcomer here, but I've been on the forums for quite some time looking up tricks and ways to fix my 81' 850GL.

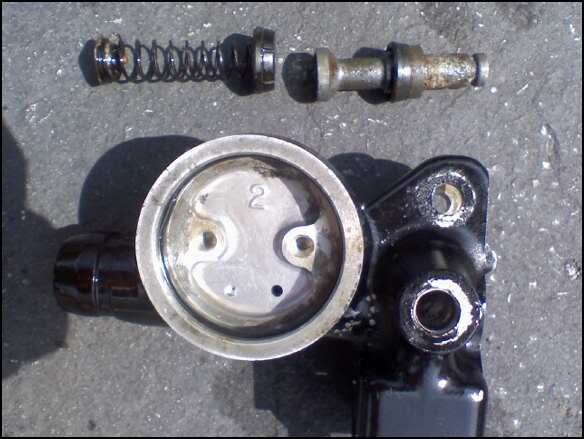
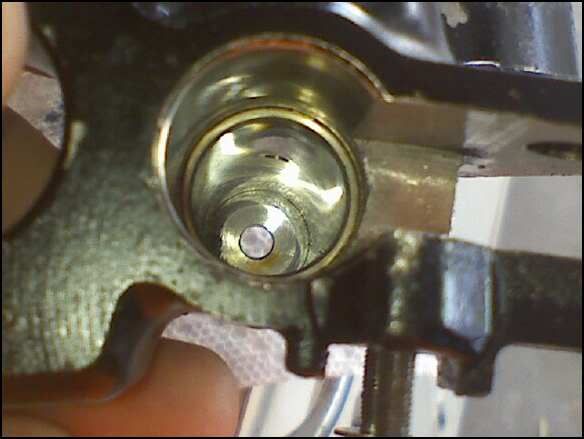
    I have been tryin to clean out my front brake system to replace the old rubber hoses with some new SS brakelines. I understand how to prime the MC and how to bleed and all of that jazz, but I do not know how to take the MC apart. I've read on Bass' site about how to take it apart, but I get lost at the rubber boot part. I don't see a wire holding it on or anything. Im trying to inspect this part because when I squeeze the lever, the piston stays stuck and I have to manually push it back out.
    I've cleaned the main reservoir and gotten all that gunk out of there already. And the small pin hole has been cleaned out as much as possible but using a sewing needle to unclug it. Seeing this isn't a good way to go while on the road, I want to fix it before I look into other options of buying a whole new one.

    Thanks for everyones help in advance.

    Kev
    Last edited by Guest; 07-26-2009, 03:52 PM.

    #2
    Hi and welcome to the nuthouse!

    The MC has 2 holes in the bottom - 1 you can see and 1 you can't (at least I can't - it's tiny). Have you managed to spot both and clean them?

    To remove the piston you have to pull the rubber boot that sits between the lever and the MC - it's only held in by a lip so comes out easily. Down in the depths behind it you should see a circlip ('snap ring' if you#re in the US. You need some fine long nosed pliers to get in and remove it - it's well down in there. Once you've got that out the piston can be removed - make sure you note everything else that comes out - in order and which way round.

    You need to inspect the cylinder for scoring - if it's bad you're gonna need a new MC. Hopefully it's just the crud of ages.....
    79 GS1000S
    79 GS1000S (another one)
    80 GSX750
    80 GS550
    80 CB650 cafe racer
    75 PC50 - the one with OHV and pedals...
    75 TS100 - being ridden (suicidally) by my father

    Comment


      #3
      The boot has a metal ring molded in that holds it in place. You need to take a small screwdriver and carefully work around to try to get the boot loose before you can go at the circlip. The boots tend to tear as they age so good luck with getting it out. If you need a kit to repair the master get OE parts, not aftermarket; the popular K&L kits are not up to the quality of the OE stuff.
      Ed

      To measure is to know.

      Mikuni O-ring Kits For Sale...https://www.thegsresources.com/_foru...ts#post1703182

      Top Newbie Mistakes thread...http://www.thegsresources.com/_forum...d.php?t=171846

      Carb rebuild tutorial...https://gsarchive.bwringer.com/mtsac...d_Tutorial.pdf

      KZ750E Rebuild Thread...http://www.thegsresources.com/_forum...0-Resurrection

      Comment


        #4
        The boots tend to tear as they age so good luck with getting it out.
        If you tear it, its really nothing more than a dust seal. The piston will not leak if it isn't installed.

        You can use a dental pick to remove the circlip if you don't have the long nosed pliers. The circlip holes are probably filled with rust that's why you can't see anything.

        Comment


          #5
          Do you have a brake vacume?

          Do you have a brake vacume? They only cost about $20.00 and they make 100% fluid changes a snap. Once I got mine I used it for lots of other stuff. Cleaned out a threaded hole in my cb750 cylinder head and double checked that I had my petcock rebuilt the right way just for two examples. One little pump on the petcock vacume line and I knew it was rebuilt properly.

          Comment


            #6
            so far..

            Hey guys,

            Thanks so far. I've gotten the rubber guy off without any damage. But your right about the rust thing filling the holes of the snap rings. Do you thing putting some WD40 in there would cause any problems? I was thinking it could loosen up some of that rust and crud. I don't have snap ring pliers, BUT randomley came across a compass (to make circles and all). Looks like its gonna be good in the morning when I start this project again.

            And I've thought about the vaccum pump, but I'm a Highschool senior and I'm gonna spend where I NEED too. Good idea anyways though.

            Kev

            Comment


              #7
              Do you thing putting some WD40 in there would cause any problems?
              WD40 or PB Blaster will both work. A compass point may work, but it probably won't be hard enough. You should be able to pick up a scribe or dental pick from a place like harbor freight. I usually hook the snap ring and get it to turn in the bore. Once you got it moving, you want to push it in toward the piston and pull up on it. If your lucky it will pop out of the groove. You can then work the other side loose.Sometimes the piston is really corroded in the bore so even if you get the snap ring out, the piston won't budge.

              If this happens look at these pictures


              It really works to free up a stuck piston without messing it up.

              Comment


                #8
                I've cleaned the reservoir before trying to deal with the piston inside. Using a brass brush, some WD40 (no brake or carb cleaner around), a tiny screwdriver, will do the job I think.

                This is what I started with..(The bike sat for 6 years, go figure)


                And I've got it to this
                Last edited by Guest; 07-27-2009, 10:58 AM.

                Comment


                  #9
                  Prepare yourself for some frustration trying to get that circlip out using picks, tiny screwdrivers, and similar. Motion Pro sells long nose circlip pliers designed for this purpose, or you might want to pick up some cheapo Harbor Freight circlip pliers or similar and grind them down until they will get at the clip.

                  Once you get the master apart, clean it out really well and look down the bore with a flash light to make sure there are not any pits in the metal. If corrosion has damaged the bore it’s time to start searching for a new one.
                  Ed

                  To measure is to know.

                  Mikuni O-ring Kits For Sale...https://www.thegsresources.com/_foru...ts#post1703182

                  Top Newbie Mistakes thread...http://www.thegsresources.com/_forum...d.php?t=171846

                  Carb rebuild tutorial...https://gsarchive.bwringer.com/mtsac...d_Tutorial.pdf

                  KZ750E Rebuild Thread...http://www.thegsresources.com/_forum...0-Resurrection

                  Comment


                    #10
                    getting there

                    Hey all,

                    I got the MC apart relitivley easily actually. I have some nice tools around that are small to get in spots like like cause of my dads train set down stairs. It actually doesn't look to bad all taken apart, which leaves my to question why it isn't working correctly...

                    I'll be able to clean the piston up I think


                    Doesn't look about normal? Quality isn't great, but I cant spot and scores or rust in there.

                    Comment


                      #11
                      Maybe it me..but I can't see any pictures

                      Comment


                        #12
                        Maybe this will work better..


                        As a test, could anyone see the 4 previous pictures?

                        Comment


                          #13
                          I could not see the other four pictures. The bore looks pretty good there are some dark spots in the end. The piston and innards looks like they should be replaced. The vent hole on the left side looks clogged. If you take a strand of wire from a wire brush, you should be able to poke it through both openings into the MC bore.

                          Comment


                            #14
                            If the rubber parts are clean and flexible with no discernable wear, just clean everything properly, lubricate with clean brake fluid and put it together.
                            If in doubt or just because you have it apart, replace with a repair kit.
                            From what the pictures show it seems to be in good condition except for the gunk on the piston.

                            Comment


                              #15
                              Be sure to not use WD40 or any other petroleum product when cleaning or assembling brake parts.
                              1978 GS 1000 (since new)
                              1979 GS 1000 (The Fridge, superbike replica project)
                              1978 GS 1000 (parts)
                              1981 GS 850 (anyone want a project?)
                              1981 GPZ 550 (backroad screamer)
                              1970 450 Mk IIID (THUMP!)
                              2007 DRz 400S
                              1999 ATK 490ES
                              1994 DR 350SES

                              Comment

                              Working...
                              X