Announcement
Collapse
No announcement yet.
Carb Tuners
Collapse
X
-
 doctorgonzo
"With my mindset, I would check for differences, even if they aren't adjustable."
That's what my set of instructions said to do. Hook each one, one at a time to the same carb. They should alll read the same. If they don't you can adjust for that when you read them (mine did read correct)
Comment
-
 C.V.
C.V.
Made my own
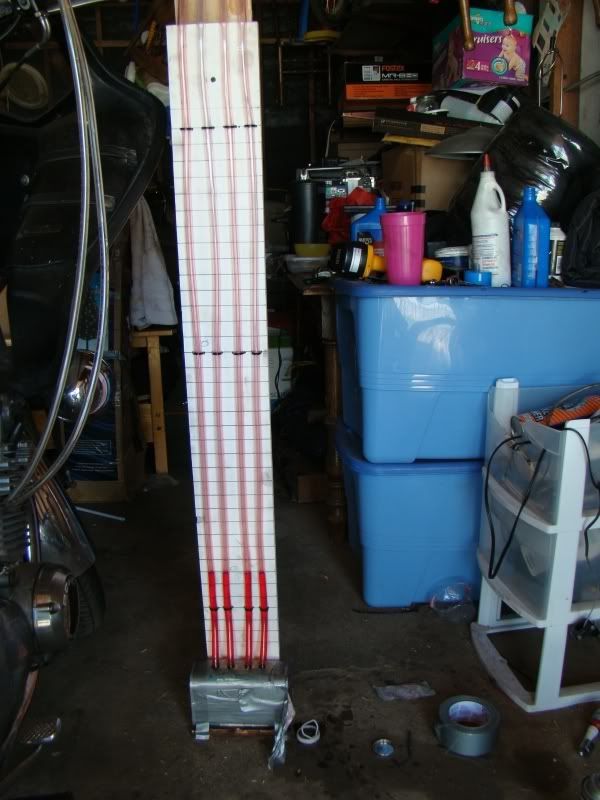
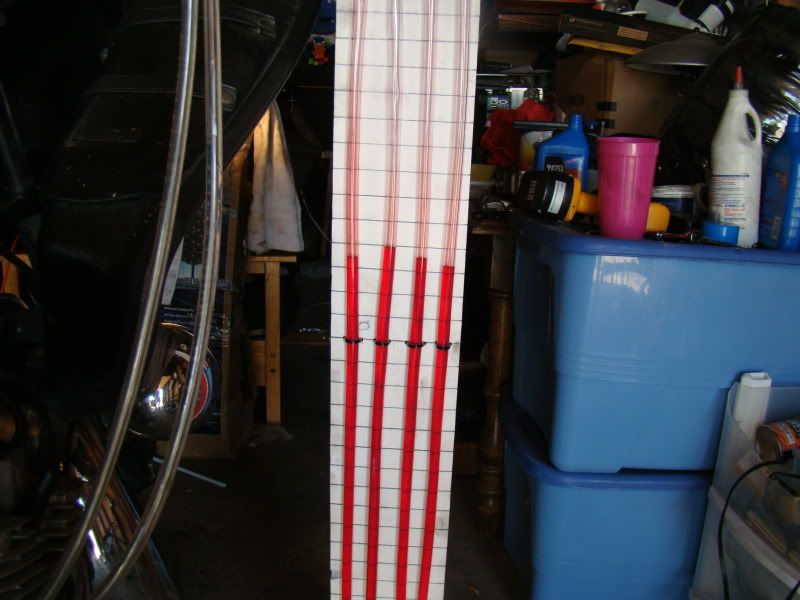
Ok, I'm one of the guys who made his own. I did more time researching than building, and the whole thing cost me less than 20 bucks. I have to say I did it as much for the fun of the project as i did to save money. I had the time, and the desire to make it work. And yeah, I had to make it 7 feet tall, but only because carb #1 was drawing much more than the other 3. Once I tamed #1 the original 4 feet would have been enough. It worked beautifully, after a little finagling!

Basically, 4 tubes terminating into a common tank, filled with ATF. I made whips out of smaller tube, connected with electrical butt conectors (which also acted as a vaccuum restictor). Carb adaptors generously donated by Baatfam!
another view after sync
 Last edited by Guest; 12-01-2009, 08:30 PM.
Comment
-
 GavinJuice
the reason i bought a morgan is for a couple reasons, one is your not dealing with mercury or special fluid. two, when syncing carbs (especially rebuilds) you might initially have one carb closed off more drawing a higher vacuum. with liquid it's gonna shoot to the top depending on how well they're dampened and how fast YOU can react and possibly suck into the engine. with the morgan the rod will shoot to the top but you have time to adjust things.
Comment
-
 Ricko19
Wow! Thanks for all the replies guys Looks like it will be a Morgan then when funds allow.
cheers
Comment
-
 Ola
Ola
Looks like you've decided already, just thought I'd post a little video clip of my Carbtune. I love it to bits!
 This video doesn't show the actual adjustment process, I just filmed the Carbtune Pro tool after doing the work so you all could have a look at it in motion ...
I didn't get it perfect, but it sure ran smooth afterwards. It would have been an absolute pain to do it without the carb tool that Morgan also sells. It's a long screw driver that goes through a shaft with a hex piece at the end, makes it much easier to tighten the lock nut after adjusting without screwing up the setting.
Comment
-
 doctorgonzo
I need one of those. That's the biggest PIA of the whole process.Originally posted by Ola View PostLooks like you've decided already, just thought I'd post a little video clip of my Carbtune. I love it to bits!
 This video doesn't show the actual adjustment process, I just filmed the Carbtune Pro tool after doing the work so you all could have a look at it in motion ...
I didn't get it perfect, but it sure ran smooth afterwards. It would have been an absolute pain to do it without the carb tool that Morgan also sells. It's a long screw driver that goes through a shaft with a hex piece at the end, makes it much easier to tighten the lock nut after adjusting without screwing up the setting.
Comment
-
 Ricko19
 -
Originally posted by Ola View PostIt would have been an absolute pain to do it without the carb tool that Morgan also sells. It's a long screw driver that goes through a shaft with a hex piece at the end, makes it much easier to tighten the lock nut after adjusting without screwing up the setting.Don't expect miracles with that tool, though. Depending on your bike, it's still a pain to get to the center adjuster. I am currently working on "Freebie", an 81 850, and there is NO WAY you will get that tool down to the center adjuster. Yes, I have used one several times in the past and thought I needed to get one, but was frustrated by that center adjuster every time, so have not (yet) acquired one.Originally posted by doctorgonzo View PostI need one of those. That's the biggest PIA of the whole process.
A tip: if you are starting with a rebuild, therefore the carbs are off the bike, loosen the locknuts before you put the carbs on. I have always thought that over half the battle is loosening those suckers, so do it while you can reach them. There is no need to tighten them quite as tight, so that's not usually a problem.
.sigpic
mine: 2000 Honda GoldWing GL1500SE and 1980 GS850G'K' "Junior"
hers: 1982 GS850GL - "Angel" and 1969 Suzuki T250 Scrambler
#1 son: 1986 Yamaha Venture Royale 1300 and 1982 GS650GL "Rat Bagger"
#2 son: 1980 GS1000G
Family Portrait
Siblings and Spouses
Mom's first ride
Want a copy of my valve adjust spreadsheet for your 2-valve per cylinder engine? Send me an e-mail request (not a PM)
(Click on my username in the upper-left corner for e-mail info.)
Comment
-
 Ricko19
 -
Good tip Steve - another one I have is to take your time & do the best bench sync you can possibly do. This will translate into the bike starting easily after you install your "squeaky clean" carb rack back on the bike.Originally posted by Steve View PostA tip: if you are starting with a rebuild, therefore the carbs are off the bike, loosen the locknuts before you put the carbs on. I have always thought that over half the battle is loosening those suckers, so do it while you can reach them. There is no need to tighten them quite as tight, so that's not usually a problem.
.
I use a thin strip of metal (.100" w x .020" thick) as my bench sync tool. I slip it in & out underneath the butterfly while adjusting the sync screw to attain a slight resistance - then match that feel to all the carbs. Gets you VERY close.'85 GS550L - SOLD
'85 GS550E - SOLD
'82 GS650GL - SOLD
'81 GS750L - SOLD
'82 GS850GL - trusty steed
'80 GS1100L - son's project bike
'82 GS1100G - SOLD
'81 GS1100E - Big Red (daily rider)
Comment
-
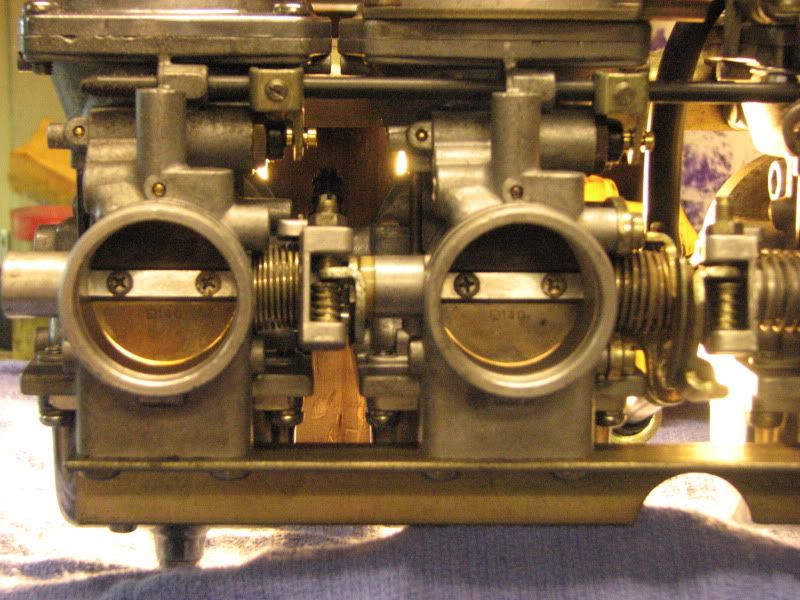
To get even closer, use LIGHT. I gave up trying to match the drag from one carb to another because I might not have the device placed in exactly the same spot on each carb. By simply holding the carbs up to a light, you can visually inspect the size of the gap under the throttle butterfly. Since I have started doing that, there has been no problem starting a bike, and only minimal tweaking once I connect the gauges.

.sigpic
mine: 2000 Honda GoldWing GL1500SE and 1980 GS850G'K' "Junior"
hers: 1982 GS850GL - "Angel" and 1969 Suzuki T250 Scrambler
#1 son: 1986 Yamaha Venture Royale 1300 and 1982 GS650GL "Rat Bagger"
#2 son: 1980 GS1000G
Family Portrait
Siblings and Spouses
Mom's first ride
Want a copy of my valve adjust spreadsheet for your 2-valve per cylinder engine? Send me an e-mail request (not a PM)
(Click on my username in the upper-left corner for e-mail info.)
Comment
-
 doctorgonzo
 -
Yeah, the light method works well also, but I seem to have more "repeatability" with the shim myself... to each his own.Originally posted by Steve View PostTo get even closer, use LIGHT. I gave up trying to match the drag from one carb to another because I might not have the device placed in exactly the same spot on each carb. .
In the end, it pays to take your time & really get the bench sync nailed down, no matter what your method of doing it is. '85 GS550L - SOLD
'85 GS550E - SOLD
'82 GS650GL - SOLD
'81 GS750L - SOLD
'82 GS850GL - trusty steed
'80 GS1100L - son's project bike
'82 GS1100G - SOLD
'81 GS1100E - Big Red (daily rider)
Comment
.png)
Comment