Announcement

Collapse
No announcement yet.

Help me with my buffing technique

Collapse
X
 
  • Filter
  • Time
  • Show
Clear All
new posts

    Help me with my buffing technique

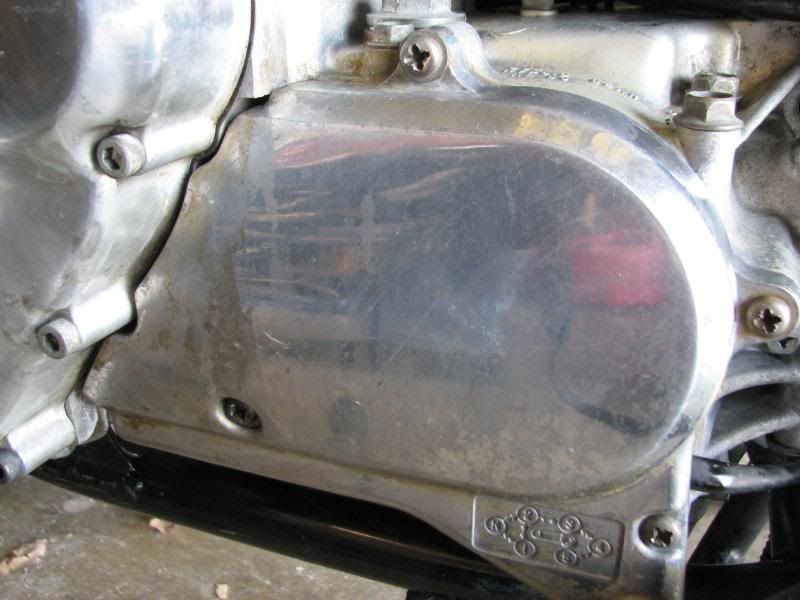
    Ok so after seeing the pictures of what buffing can do in the thread "brilliant shine" I went out and bought some stuff to take a crack at it. I bought an assortment of coarse and fine wire wheels and also a buffing kit they sell. All of these are attachments you can chuck in a drill. My first attempt was the bottom fork slider. Using the fine wire wheel, it came out pretty good and looks awesome out in the sun, but under fluorescent lighting, you can see all of these blemishes. It almost looks like a bunch of finger smudges but I cleaned them so damn well I know it's not that. I tried to use the buffing kit thinking that it would smooth everything out but I couldn't get it to do a darn thing. Which brings us to my problem.

    The kit came with three different buffing wheels and some different buffing compounds. The buffing compounds are as hard as a rock and I don't see how I can get it onto the wheel. I tried soaking them in hot water but that didn't do anything. Is this how they are supposed to be or are these bad? Also it seem that the wheels have a grain. In one direction the fibers will pull up and the other you are going with them. Which direction should i have the wheel spinning? Anything else I should know?
    Thanks
    -Theo

    My setup:


    The compounds:


    The results so far:

    #2
    Not an expert, since all I've done is a touch-up on my exhaust can, but you press the compound stick to the surface of the spinning cloth wheel for a couple seconds, essentially melting some of it off, when it adheres to the wheel. You need to apply a fair amount of pressure when putting the case/fork leg or whatever against the wheel, or it won't do anything. I think Caswell, Eastwood and other companies that sell polishing supplies have good info on their websites, to guide you re. the appropriate wheels and compounds to use, and the sequence, so read up before attacking it.

    EDIT: I did moisten the wheel, before applying the compound stick. Also worth mentioning is the safety aspect....make sure the drill is secured properly, not sure if that C-clamp method will be enough to hold it. And use safety eye wear, since there will be a fair amount of debris flying everywhere.
    Last edited by Mysuzyq; 01-08-2010, 02:58 PM.
    '82 GS1100E


    Comment


      #3
      First of all, forget the wire wheels. The wires will really gouge the soft aluminum and it will take forever to smoothe it out enough to polish

      The fabric wheels will have all you need to do, but you really need to get a bench grinder, instead of the clamped-down hand-held drill. A bench grinder has a LOT more torque to keep a larger wheel spinning when you push the part against it. I am using a Craftsman grinder, I think it's a 1/2 horse motor. It's meant to spin a 6" wheel, but I have the guards off on the buffing wheel end and have an 8" wheel mounted. The larger the wheel, the faster the edge speed will be, that's what does the polishing.

      No bench to mount it on? No problem. I don't have bench space, either.
      I had some scrap lumber sitting around, so I took some plywood (3/4" thick, about 1' x 1') to mount the grinder on, then got some 2x4s about 3' long, screwed two of them together to make a 4x4 and screwed the plywood to the end of the screwed-together 4x4. That assembly was supported in a 5-gallon bucket that I then filled with cement. If I remember correctly, I might have even put some screws partially into the sides of the 4x4 so they would stick out, into the cement, so it would not lift out of the cement. There is enough weight to keep it stable will all but the most aggressive grinding/buffing pressures, yet is still light enough to move across the garage floor, if necessary.

      It may take a bit of trial and error to find exactly what works best for you, but you should have a different wheel for each grade of compound. To apply the compound to the wheel, just hold it up to the spinning wheel. It won't take a whole lot of effort, but the moving wheel will heat up the wax in the compound enough to transfer some of it to the fabric. Hold the part you want to polish up to the wheel, press it in until the wheel starts to slow just a little, keep the part moving so you don't gouge it with the wheel.

      Even with careful polishing, you might still see some swirl marks, you can remove those with some hand polishing. Many different polishes are available, including Mother's, Never-Dull, etc. I am currently using Truck-Brite polish from Lowe's. Yeah, Lowe's. Found right next to the diamond-plate truck boxes, next to the lumber aisle.

      .
      sigpic
      mine: 2000 Honda GoldWing GL1500SE and 1980 GS850G'K' "Junior"
      hers: 1982 GS850GL - "Angel" and 1969 Suzuki T250 Scrambler
      #1 son: 1986 Yamaha Venture Royale 1300 and 1982 GS650GL "Rat Bagger"
      #2 son: 1980 GS1000G
      Family Portrait
      Siblings and Spouses
      Mom's first ride
      Want a copy of my valve adjust spreadsheet for your 2-valve per cylinder engine? Send me an e-mail request (not a PM)
      (Click on my username in the upper-left corner for e-mail info.)

      Comment


        #4
        I’ve played around with all kinds of different finishing methods including hand sanding, small drill motor type buffing pads, white/red compounds, etc., and without a doubt the easiest method I’ve found is to get a sisal wheel and heavy gray cutting compound. The bigger the wheel the better but you need a motor big enough to drive it. I’ve never had any success using those fluffy unstitched buffing wheels and polishing compounds like the white/red bars. Go for the heavy stuff and get some thick gloves because those aluminum parts get HOT when you are hammering on them with that sisal wheel. The finish will turn out nice and shiny even with the heavy compound so I stop there, no need to waste time with anything finer unless you are trying to compete with the Harley bling bling boys.
        Ed

        To measure is to know.

        Mikuni O-ring Kits For Sale...https://www.thegsresources.com/_foru...ts#post1703182

        Top Newbie Mistakes thread...http://www.thegsresources.com/_forum...d.php?t=171846

        Carb rebuild tutorial...https://gsarchive.bwringer.com/mtsac...d_Tutorial.pdf

        KZ750E Rebuild Thread...http://www.thegsresources.com/_forum...0-Resurrection

        Comment


          #5
          320 grit wet/dry sandpaper for casting marks and deep scratches, 400 grit and 600 grit to remove scratches from the previous sandpaper, Brasso, and then it's ready for the polishing wheel. http://picasaweb.google.com/lh/photo/IUQ2Ay81RHSftBL7jRLgVw?authkey=Gv1sRgCKTzwsyJve6w9 gE&feat=directlink
          http://www.thegsresources.com/_forum...ine=1440711157'78 GS1000E, Dyna-S ignition, Dyna Green Coils, K&N pods, Delkevic SS 4-1 exhaust, Dynojet Stage 3 jet kit, Russell SS Brake Lines, Progressive suspension, Compu-Fire series Regulator 55402 and Advmonster cree LED headlight conversion.

          Comment


            #6
            most aluminum is so much easier to polish if you have it media blasted FIRST. (media at 80 grit)
            sand it just like wood 150 grit then 220 and 320 etc..

            cutting or sanding in 1 direction totally over the part and then alternate at a 90 degree for the cross cut.

            after you get to 600 wet sanding cut and cross cut.
            now you are ready for the cotton polisher. black/gray is good for general aluminum.
            the white is after you get finished with the black/gray. wash the part with soap and water not to contaminate the clean finish buff you use the white rouge on.

            grey and white are all you need for aluminum.
            SUZUKI , There is no substitute

            Comment


              #7
              Okay so that helps some. Yeah I know the drill with the C clamp is not the best setup but I'm wearing all of my protective gear so I feel confident that I won't get hurt. I had a feeling the wire wheel was to aggressive for the aluminum but being impatient I did it anyways.

              I'm going to ask around and see if anyone I know has a bench grinder I can borrow. I'm also going to go back to home depot and get some other buffing wheels. I was doing some reading on caswell plating's site and it seems that I should start off with a sisal wheel, then a spiral sewn, and then a loose cotton wheel for the final polish. The kit I bought only came with loose cotton wheels.

              So the compounds being hard is normal. I think when I was at home depot I saw some individually packaged compounds that were more like a paste consistency. Well I think they were, I wasn't really paying that much attention. If they are like that though, should I pick up some of those or just stick with what I have now. Thanks.
              -Theo

              Comment


                #8
                SUZUKI , There is no substitute

                Comment


                  #9
                  Originally posted by OldVet66 View Post
                  320 grit wet/dry sandpaper for casting marks and deep scratches, 400 grit and 600 grit to remove scratches from the previous sandpaper, Brasso, and then it's ready for the polishing wheel. http://picasaweb.google.com/lh/photo/IUQ2Ay81RHSftBL7jRLgVw?authkey=Gv1sRgCKTzwsyJve6w9 gE&feat=directlink
                  Wow...just...wow

                  Comment


                    #10
                    Originally posted by Nessism View Post
                    I’ve played around with all kinds of different finishing methods including hand sanding, small drill motor type buffing pads, white/red compounds, etc., and without a doubt the easiest method I’ve found is to get a sisal wheel and heavy gray cutting compound. The bigger the wheel the better but you need a motor big enough to drive it. I’ve never had any success using those fluffy unstitched buffing wheels and polishing compounds like the white/red bars. Go for the heavy stuff and get some thick gloves because those aluminum parts get HOT when you are hammering on them with that sisal wheel. The finish will turn out nice and shiny even with the heavy compound so I stop there, no need to waste time with anything finer unless you are trying to compete with the Harley bling bling boys.

                    Okay so this sounds like what I'm going for, at least with the forks. I just want a nice looking brushed aluminum finish. So I'll try to borrow a bench grinder and get a sisal wheel and some gray cutting compound. When I get to the engine covers however, I think I'm going to go for a nice smooth shine.

                    Comment


                      #11
                      I've done a lot of pieces over the years and as mentioned, the easiest way to do it is with a powerful high speed device like a bench grinder or 1/2" drill. I've always done it the hardway i.e. progressive wet and dry grits followed by black, brown, red and white 'rouge" using an assortment of felt bobs and cotton wheels.

                      I always wondered about sisal wheels and now i know that's what I'll try next.

                      If you go to flea markets, you may come across an old bench grinder for cheap or even a half horse or three quarter horse electric motor. If you mount an arbour to the shaft you can put on the cotton or sisal wheels.

                      I have an old 1/4 horse that I have mounted a brass wire brush to which I use for cleaning the grungy and rusty metal parts with. Works a treat.

                      I find polishing a bit tedious but very satisfying. Its also kind of addicting when you see how nice parts start looking.

                      Good luck with it and keep showing us what you accomplish.

                      Cheers,
                      Spyug

                      Comment


                        #12
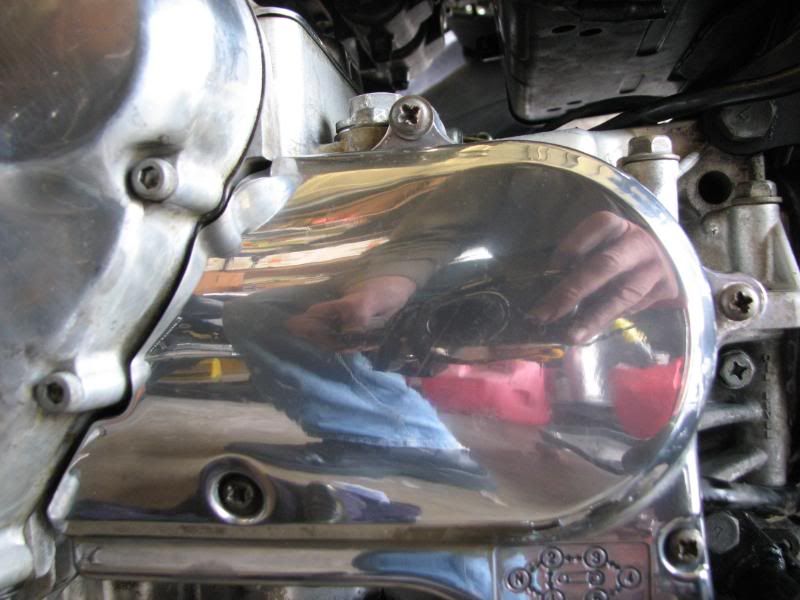
                        These engine covers were done with a sisal wheel and heavy gray cutting compound. Matches the factory finish pretty well and didn't take all day to do.


                        Ed

                        To measure is to know.

                        Mikuni O-ring Kits For Sale...https://www.thegsresources.com/_foru...ts#post1703182

                        Top Newbie Mistakes thread...http://www.thegsresources.com/_forum...d.php?t=171846

                        Carb rebuild tutorial...https://gsarchive.bwringer.com/mtsac...d_Tutorial.pdf

                        KZ750E Rebuild Thread...http://www.thegsresources.com/_forum...0-Resurrection

                        Comment


                          #13
                          As others have mentioned a bench grinder is the best way to go. I have never had any luck with strippers on the old clearcoat so just I start with the 400 or 600 paper depending on the surface and will go 800, 1000, 1500, & 2000 before buffing. It is not the quickest way but seems to work pretty well for me.
                          82 GS850L - The Original http://s224.photobucket.com/albums/d...ePics067-1.jpg
                          81 GS1000L - Brown County Hooligan http://s224.photobucket.com/albums/d...ivePics071.jpg
                          83 GS1100L - Super Slab Machine http://s224.photobucket.com/albums/d...t=DCP_1887.jpg
                          06 KLR650 - "The Clown Bike" :eek: http://s224.photobucket.com/albums/d...nt=SERally.jpg
                          AKA "Mr Awesome" ;)

                          Comment


                            #14
                            Well, I have posted these before, but y'all are forcing me to do it again:


                            .
                            sigpic
                            mine: 2000 Honda GoldWing GL1500SE and 1980 GS850G'K' "Junior"
                            hers: 1982 GS850GL - "Angel" and 1969 Suzuki T250 Scrambler
                            #1 son: 1986 Yamaha Venture Royale 1300 and 1982 GS650GL "Rat Bagger"
                            #2 son: 1980 GS1000G
                            Family Portrait
                            Siblings and Spouses
                            Mom's first ride
                            Want a copy of my valve adjust spreadsheet for your 2-valve per cylinder engine? Send me an e-mail request (not a PM)
                            (Click on my username in the upper-left corner for e-mail info.)

                            Comment


                              #15
                              Originally posted by Nessism View Post
                              These engine covers were done with a sisal wheel and heavy gray cutting compound. Matches the factory finish pretty well and didn't take all day to do.


                              Hi Ed, those cases look great however, Iam drooling on the keys at the block paint!!!! What paint did you use and what was your surface preperation and application proceedure? If I can get even someway towards the quality of finish you have there I'll be happy, cheers.
                              Badgezz, we don need noh stinkin' badgezz!
                              Shin-Ken 1074
                              1982 GSX1100SXZ Wire Wheel Katana - BOM Nov 2011
                              1981 GSX1135 Katana Build completed Mar 2024, Curb Weight, all fluids and 21 lt fuel = 206 kg.

                              Comment

                              Working...
                              X