 ??? read through the guides on basscliff's site and decided I should heed the warnings from you all and just do it. Once i got the cover off, it all made sense. Easy Peasy... Glad I did. The smallest feeler guage on my set is .04mm and it didn't fit for ANY of the valves. I'm 99% sure I did the procedure correctly so that means that I've been running with horrible clearances. Just wondering what I should look out for that may have gotten damaged as a result of this. also, there was a lot of oil around where the shims are, so much that I couldn't see to get them out and had to feel my way around. I don't know if this has anything to do with it, but I plan on replacing the valve seals anyway, but I was wondering if this was an indication of something wrong or is that normal? checked the compression (with the engine cold) before I ripped it apart and had these #'s #1- 135 psi, #2- 110 psi, #3- 110psi, #4 135 psi. the bike never lacked for power and ran good, so I was surprised by the compression#'s I got... in the "here we go again" category, I decided to just go for the plunge and do a complete top end rebuild, and while I'm at it, accel coils, dyna-s ignition, carb rebuild, seal up the airbox....
Announcement
Collapse
No announcement yet.
while I'm in there.... plus a valve question
Collapse
X
-
 sam78gs750
while I'm in there.... plus a valve question
investigated a small oil leak which turned out to be the valve cover gasket... I was hesitant to mess with the valves themselves because with every other bike I ever had, valve adjustment just involved a screw and locknut. Shims? tappet tool? ZIP TIES in the cylinder ??? read through the guides on basscliff's site and decided I should heed the warnings from you all and just do it. Once i got the cover off, it all made sense. Easy Peasy... Glad I did. The smallest feeler guage on my set is .04mm and it didn't fit for ANY of the valves. I'm 99% sure I did the procedure correctly so that means that I've been running with horrible clearances. Just wondering what I should look out for that may have gotten damaged as a result of this. also, there was a lot of oil around where the shims are, so much that I couldn't see to get them out and had to feel my way around. I don't know if this has anything to do with it, but I plan on replacing the valve seals anyway, but I was wondering if this was an indication of something wrong or is that normal? checked the compression (with the engine cold) before I ripped it apart and had these #'s #1- 135 psi, #2- 110 psi, #3- 110psi, #4 135 psi. the bike never lacked for power and ran good, so I was surprised by the compression#'s I got... in the "here we go again" category, I decided to just go for the plunge and do a complete top end rebuild, and while I'm at it, accel coils, dyna-s ignition, carb rebuild, seal up the airbox....
-
There's nothing wrong with your top end, those numbers are fine. It's a low compression engine.
Spin the shim in the bucket with your finger, if it turns freely there is at least SOME clearance, hopefully enough to prevent any damage. Swap shims to adjust the clearances, and ride.
There is supposed to be oil inside the head, it has nothing to do with valve seals. If it wasn't smoking before, don't worry about the seals, they are working.
-
If the buckets spin you still have some clearance.
You'd know if you burnt a valve. Really low compression #s.1983 GS 1100E w/ 1230 kit, .340 lift Web Cams, Ape heavy duty valve springs, 83 1100 head with 1.5mm oversized SS intake valves, 1150 crank, Vance and Hines 1150 SuperHub, Star Racing high volume oil pump gears, 36mm carebs Dynojet stage 3 jet kit, Posplayr's SSPB, Progressive rear shocks and fork springs, Dyna 2000, Dynatek green coils and Vance & Hines 4-1 exhaust.
1985 GS1150ES stock with 85 Red E bodywork.

Comment
-
 sam78gs750
I was able to spin the buckets to line up the notches and get the shims out, so I guess the valve clearances aren't as bad as I thought. I checked the service manual, and it seems my compression readings are in the serviceable range, but they still seem low to me... like I said the bike has plenty of power, but it does run rough until it warms up. Usually starts up easy enough with full choke, but idles very low for a couple of minutes until the rpm's pick up... if I try to give it gas it bogs down. as it warms up i can slowly back off the choke. once it's warm though the engine idles steadily at around 1200 rpms and takes a snap of the throttle without flinching. I figured this was normal with a bike this old. it's running rich, brand new plugs with about 15 miles on them are black with carbon, and what I can see of the tops of the pistons through the plug holes are pretty dirty as well. I plan on rebuilding the carbs and tweaking them after I get the valve situation straightened out. I'm not sure if the valve seals are bad or not. can I pull the valves through the top or do I have to take the head off to change the valve seals? If i have to take the head off, I might as well just do piston rings, hone the cylinders, deck the heads, etc while I'm in there... but I don't want to dig that deep if I don't have to. If I don't have to take the heads off, what's the best way to clean the pistons and cylinders up with the heads still on. a buddy recomended pouring baking soda in the plug holes and running the bike like that. He said he's done that with cars before, but it just doesn't seem kosher to me. has anyone done this and is it safe? This is my 3rd bike and I'm good with general maintenance. I've rebuilt dozens of carbs, electrical work, ignitions, etc... but this is my first time ever doing anything that involved opening the engine. I did help a buddy replace a head gasket on his kawi one time, but that ended with a bike that blew bubbles in the gas tank and still ****ed oil after the fact...Originally posted by chef1366 View PostIf the buckets spin you still have some clearance.
 If I sound like I don't know what I'm doing here, it's because this is new territory for me... thanx for reading this novel of a post, and any advice is greatly appreciated.
Comment
-
 waterman
If it was my bike, I would finish adjusting valve clearance, thoroughly clean and replace Orings in carbs and then see how it runs. Then run it hard and see if it giving you any problems. From what you have described, it sounds like your engine is mechanically fine. Please don't worry about the carbon build up on your pistons and don't listen to your buddies.
The "excess" oil around the valves is a good indicator that most likely your valve seals aren't shot. Does the engine smoke, and not just a little, on startup? If it will fill a garage, then it is most likely valve seals.
It is possible to replace valve seals without removing head, but it usually is a better idea to also look at the valves themselves which means the head has to come off.
If you have good power, adequate compression, and no other indicators of engine trouble other than black plugs and a slow to warm up, your troubles are likely only a matter of tuning as Tkent says.
Comment
-
 sam78gs750
that sounds like the best course of action right now.Originally posted by waterman View PostIf it was my bike, I would finish adjusting valve clearance, thoroughly clean and replace Orings in carbs and then see how it runs. Then run it hard and see if it giving you any problems.
yeah, that running with baking soda in the cylinders "trick" just sounded like bad business to me...Originally posted by waterman View Postdon't listen to your buddies.
it does smoke a very little on startup, but definitely nowhere near enough to fill a garage, and it stops smoking as soon as the choke is cut all the way, so I never paid that much mind...
As far as valve clearances go, is it better to go closer to the lower end of the clearance between the shim and cam lobe (.03mm) or more towards the higher end (.08mm) of the clearance range?
Comment
-
 GSJim69
It is better to be closer the the upper end of the tolerance range. The clearance decreases over time.Originally posted by sam78gs750 View Post
As far as valve clearances go, is it better to go closer to the lower end of the clearance between the shim and cam lobe (.03mm) or more towards the higher end (.08mm) of the clearance range?
Comment
-
 sam78gs750
that makes sense... now i just need to get my hands on some spare shims. I can swap out a few, but need mostly ones I don't have...
Comment
-
Call around and see if there is a bike shop that trades old zook shims.1983 GS 1100E w/ 1230 kit, .340 lift Web Cams, Ape heavy duty valve springs, 83 1100 head with 1.5mm oversized SS intake valves, 1150 crank, Vance and Hines 1150 SuperHub, Star Racing high volume oil pump gears, 36mm carebs Dynojet stage 3 jet kit, Posplayr's SSPB, Progressive rear shocks and fork springs, Dyna 2000, Dynatek green coils and Vance & Hines 4-1 exhaust.
1985 GS1150ES stock with 85 Red E bodywork.

Comment
-
 sam78gs750
quick update and a quick question...
finally got the right shims to adjust the valves. decided not to go any deeper into the engine at this point. I know the valve cover gasket and tach cable were leaking. not sure if the head gasket was or not so I'm gonna put her back together, find out and go from there. also, the PO did a real number on the valve cover gasket with sealer all over the place. baked on, caked on, came off in pieces. I did a few searches on here and got some good ideas for how to get the old gasket off. had the most success with permatex and a plastic putty knife but I can't seem to get all the little bits off...slow going.
Now for the question: once I get all the old gasket off what's safe to use to clean off the permatex and make sure the all the little bits of gasket are out of there? I used simple green and brakekleen on the cover, but I'm hesitant to use these on the engine itself, as it seems if any of it got into the engine oil it would be bad business.... the cams are still in, but I stuffed rags in and all around them....
Comment
-
Forum LongTimerGSResource Superstar
Past Site Supporter
Super Site Supporter- Mar 2006
- 35645
- Torrance, CA
Adjusting the valves is easy compared to getting the old gasket off. Just take your time and clean off all the little chunks around the cams and valve buckets before you button up the engine (use a flashlight and some q-tips or similar). Some paint stripper or gasket remover sprayed in a cup, and applied with a q-tip, will help soften the gasket for easier removal. For the final clean up of the gasket surface a razer blade works well but be careful to not gouge out the almuinum surface. Again, take your time and you should be okay.Ed
To measure is to know.
Mikuni O-ring Kits For Sale...https://www.thegsresources.com/_foru...ts#post1703182
Top Newbie Mistakes thread...http://www.thegsresources.com/_forum...d.php?t=171846
Carb rebuild tutorial...https://gsarchive.bwringer.com/mtsac...d_Tutorial.pdf
KZ750E Rebuild Thread...http://www.thegsresources.com/_forum...0-Resurrection
Comment
-
 sam78gs750
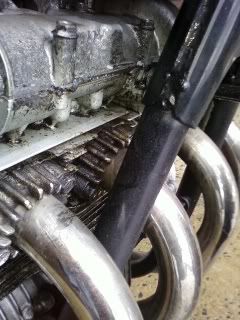
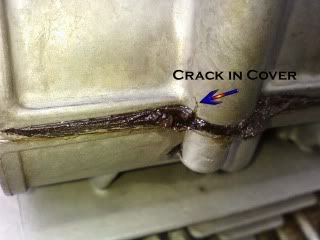
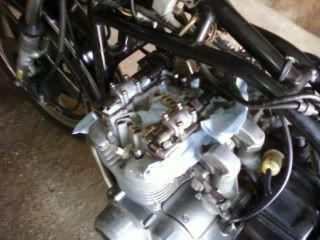
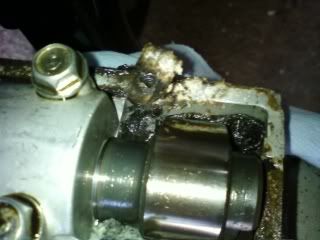
While I was cleaning up the gasket mess yesterday, I found a hairline crack in the valve cover... luckily a couple of guys on this lovely forum have already come up with spares. I was worried about being able to find one, and thanks to this site I have a selection to choose from. in the meantime, here's some pics of my current mess.
the mess

the culprit (after some cleaning)

I noticed the crack while cleaning and looked back at the pic and sure enough there was oil creeping through at that spot. notice the gobs of sealer creeping out from under the tore up gasket
here's where I'm at now

what a mess!

hours of scraping and many coats of WD-40 and Permatex later, I'm almost done cleaning all this SH!$%# off!!! in the time it's taking me to replace this gasket I could've built an entire bike by now...
Comment
-
Forum LongTimerGSResource Superstar
Past Site Supporter
Super Site Supporter- Mar 2006
- 35645
- Torrance, CA
Yup, you're now part of the club.Originally posted by sam78gs750 View Post
hours of scraping and many coats of WD-40 and Permatex later, I'm almost done cleaning all this SH!$%# off!!! in the time it's taking me to replace this gasket I could've built an entire bike by now...
 Being mechanically sympathetic has its rewards so it's all good.

 Ed
Ed
To measure is to know.
Mikuni O-ring Kits For Sale...https://www.thegsresources.com/_foru...ts#post1703182
Top Newbie Mistakes thread...http://www.thegsresources.com/_forum...d.php?t=171846
Carb rebuild tutorial...https://gsarchive.bwringer.com/mtsac...d_Tutorial.pdf
KZ750E Rebuild Thread...http://www.thegsresources.com/_forum...0-Resurrection
Comment
.png)
Comment