Announcement

Collapse
No announcement yet.

Skunk tank salvage underway

Collapse
X
 
  • Filter
  • Time
  • Show
Clear All
new posts

    Skunk tank salvage underway

    S


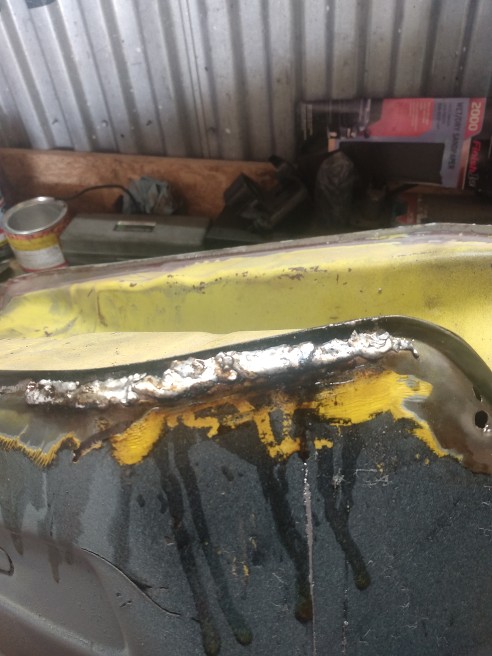
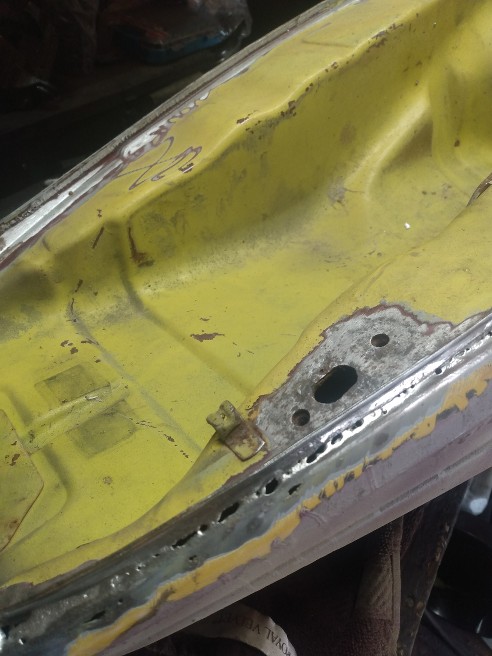
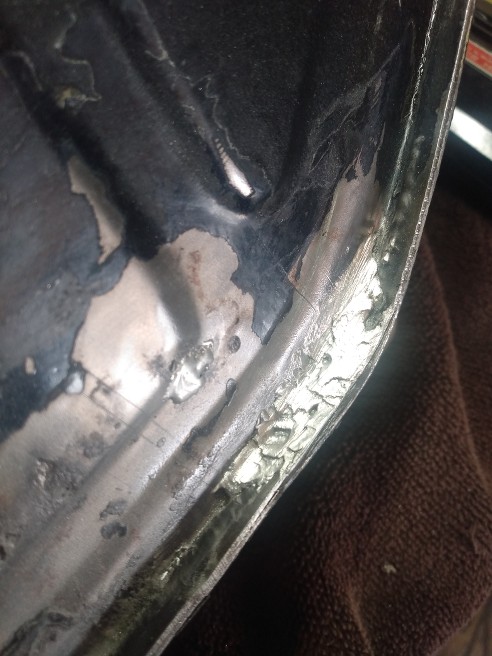
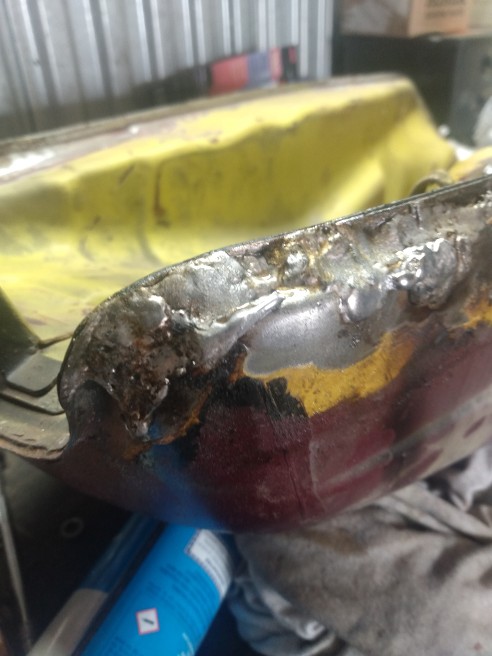
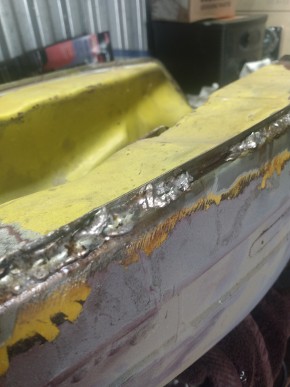
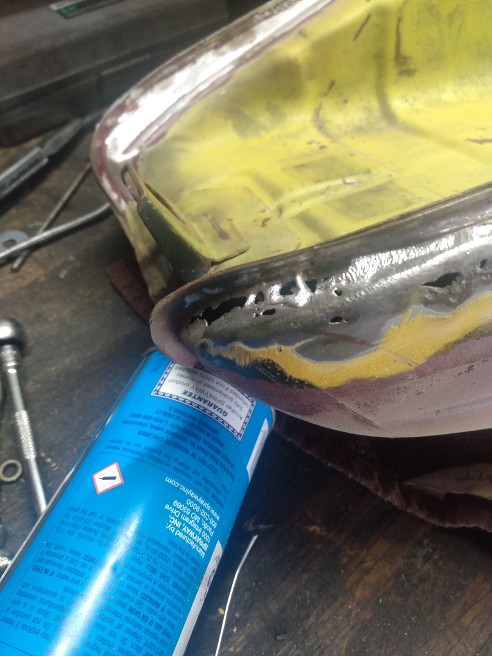
    Pics of first step of the recovery procees. ill make a post detailing my steps


    MY BIKES..1977 GS 750 B, 1978 GS 1000 C (X2)
    1978 GS 1000 E, 1979 GS 1000 S, 1973 Yamaha TX 750, 1977 Kawasaki KZ 650B1, 1975 Honda GL1000 Goldwing, 1983 CB 650SC Nighthawk, 1972 Honda CB 350K4, 74 Honda CB550

    NEVER SNEAK UP ON A SLEEPING DOG..NOT EVEN YOUR OWN.


    I would rather trust my bike to a "QUACK" that KNOWS how to fix it rather than a book worm that THINKS HE KNOWS how to fix it.

    #2
    Please give us details! I've attempted repairing a tank that looked like that and failed miserably! (Maybe I just need more practice?)
    Ron
    When I die, just cremate me and put me in my GS tank. That way I can go through these carbs, one more time!https://www.thegsresources.com/_forum/core/images/smilies/cool.png
    1978 GS750E - November 2017 BOTM
    1978 GS1000C - May 2021 BOTM
    1982 GS1100E - April 2024 BOTM
    1999 Honda GL1500SE

    Comment


      #3
      There was a time that you would just throw a tank like that in the garbage but they're so rare now as you know. You got your hands full, Chuck. After you get it all welded up, maybe take it to a radiator shop and get it boiled out, tested and sealed. I've had great success with that.

      How's the S clone coming along..?
      1979 GS1000S,

      1982 Honda CX500 Turbo, 1982 Honda MB5 w/CR80 motor, 1977 Honda "nekid" Goldwing, 1976 Honda CB550F cafe', 1972 Honda XL250 cafe'

      Comment


        #4
        This is the famed 78 1000 tank rot. Ive talked much about salvaging them but never took pics so here it is;

        First thing is to use die grinder with wire wheel to super clean the metal and also tear thin spots unseen by you away.
        Second,, Smear flux along the tank and into holes
        Third... Get the propane torch and adjust it down really low till just a little blue flame tip is seen.
        Forth.. Get solder at the hole and apply the flame. WATCH CLOSELY FOR SOLDER TO MELT. Just as it melts quickly move the torch. Youll most likely overheat it and the solder will fall in...dont worry. Just let it cool 30 seconds and retry. May have to reclean the area and reflux it too. It will take a bit to perfect your form and get the hang of it. Small pinhols can be done with electric soldering gun.

        Just keep at it and slowly work all the holes shut. This took me over 5 hours to do and ive done more than a few tanks in my day.
        Once the soldering is done you ca use a shop vac to suck debris out of the tank and then just go about derusting and applying tank liner as you normally would. Seeing the largeness of some of the holes o filled this tank will get the Caswell 2 part tank liner. HOWEVER i will be saving a little of each chemical and doing a second application down the repaired seam to ensure a good thick patching job. Let forst coating set 3 or hours and do round 2

        Last thing is to use several sizes of double cut carbide burrs in the die grinder to remove tge heavy solder and reshape the tank profile. Work at this slowly and carefully because solder is softer and it wont take much to go too deep and risk going into tank liner. Get it 'GOOG ENOUGH' and finish sand it with some 380... again carefully. Fill it with water and set it on some clean cardboard for a day or two to leak test it.
        Last edited by chuck hahn; 04-11-2022, 07:40 PM.
        MY BIKES..1977 GS 750 B, 1978 GS 1000 C (X2)
        1978 GS 1000 E, 1979 GS 1000 S, 1973 Yamaha TX 750, 1977 Kawasaki KZ 650B1, 1975 Honda GL1000 Goldwing, 1983 CB 650SC Nighthawk, 1972 Honda CB 350K4, 74 Honda CB550

        NEVER SNEAK UP ON A SLEEPING DOG..NOT EVEN YOUR OWN.


        I would rather trust my bike to a "QUACK" that KNOWS how to fix it rather than a book worm that THINKS HE KNOWS how to fix it.

        Comment


          #5
          Larry... S clones about to get some CPR, Spent a few months doing a Frame off on a 80 1000G. Its about done less paint so ill soon be back to MY junk...lol
          MY BIKES..1977 GS 750 B, 1978 GS 1000 C (X2)
          1978 GS 1000 E, 1979 GS 1000 S, 1973 Yamaha TX 750, 1977 Kawasaki KZ 650B1, 1975 Honda GL1000 Goldwing, 1983 CB 650SC Nighthawk, 1972 Honda CB 350K4, 74 Honda CB550

          NEVER SNEAK UP ON A SLEEPING DOG..NOT EVEN YOUR OWN.


          I would rather trust my bike to a "QUACK" that KNOWS how to fix it rather than a book worm that THINKS HE KNOWS how to fix it.

          Comment


            #6
            Originally posted by chuck hahn View Post
            This is the famed 78 1000 tank rot. Ive talked much about salvaging them but never took pics so here it is;

            First thing is to use die grinder with wire wheel to super clean the metal and also tear thin spots unseen by you away.
            Second,, Smear flux along the tank and into holes
            Third... Get the propane torch and adjust it down really low till just a little blue flame tip is seen.
            Forth.. Get solder at the hole and apply the flame. WATCH CLOSELY FOR SOLDER TO MELT. Just as it melts quickly move the torch. Youll most likely overheat it and the solder will fall in...dont worry. Just let it cool 30 seconds and retry. May have to reclean the area and reflux it too. It will take a bit to perfect your form and get the hang of it. Small pinhols can be done with electric soldering gun.

            Just keep at it and slowly work all the holes shut. This took me over 5 hours to do and ive done more than a few tanks in my day.
            Once the soldering is done you ca use a shop vac to suck debris out of the tank and then just go about derusting and applying tank liner as you normally would. Seeing the largeness of some of the holes o filled this tank will get the Caswell 2 part tank liner. HOWEVER i will be saving a little of each chemical and doing a second application down the repaired seam to ensure a good thick patching job. Let forst coating set 3 or hours and do round 2

            Last thing is to use several sizes of double cut carbide burrs in the die grinder to remove tge heavy solder and reshape the tank profile. Work at this slowly and carefully because solder is softer and it wont take much to go too deep and risk going into tank liner. Get it 'GOOG ENOUGH' and finish sand it with some 380... again carefully. Fill it with water and set it on some clean cardboard for a day or two to leak test it.
            Chuck,

            What type/brand flux and solder are you using? Or does it matter?
            Ron
            When I die, just cremate me and put me in my GS tank. That way I can go through these carbs, one more time!https://www.thegsresources.com/_forum/core/images/smilies/cool.png
            1978 GS750E - November 2017 BOTM
            1978 GS1000C - May 2021 BOTM
            1982 GS1100E - April 2024 BOTM
            1999 Honda GL1500SE

            Comment


              #7
              just off the shelf flux and solder for elecrical use. nothing special
              MY BIKES..1977 GS 750 B, 1978 GS 1000 C (X2)
              1978 GS 1000 E, 1979 GS 1000 S, 1973 Yamaha TX 750, 1977 Kawasaki KZ 650B1, 1975 Honda GL1000 Goldwing, 1983 CB 650SC Nighthawk, 1972 Honda CB 350K4, 74 Honda CB550

              NEVER SNEAK UP ON A SLEEPING DOG..NOT EVEN YOUR OWN.


              I would rather trust my bike to a "QUACK" that KNOWS how to fix it rather than a book worm that THINKS HE KNOWS how to fix it.

              Comment

              Working...
              X