Announcement

Collapse
No announcement yet.

1979 GS1000L build

Collapse
X
 
  • Filter
  • Time
  • Show
Clear All
new posts

    1979 GS1000L build

    Somehow somewhere I lost the thread I had going in the GS Owners forum..
    Guess I'll start a new one here..

    The $100 wonder bike.. If I only knew the trouble hidden inside..


    It's seen a few changes along the way..


    #2
    I'll try to just post new things and not rehash how I got here.

    I mounted a FH008 Rectifier/Regulator where the old Regulator goes.

    First I made a mounting plate for it


    It fits OK but makes accessing the solenoid a PIA. Turn signal relay is a bit crowded but it'll live.

    Comment


      #3
      I got a box of goodies from Z1 today..
      530 chain, sprockets and new front wheel bearings.

      Comment


        #4
        Turns out the only way to replace the neg battery cable is to remove the cabs and air box.. It sucks but it had to be done since the PO had spliced the cable.

        I got to use my new crimp tool last night.. This thing is awesome!


        One shiny new brass open barrel bullet connector.


        Wire stripped, crimper loaded.. time to squeeze!


        The finished crimp looks like it came right from the factory.


        I got all the rear turn signals wired up.


        New connectors for the Rectifier/Regulator


        Last edited by Guest; 03-25-2010, 12:32 AM.

        Comment


          #5
          I'm getting tired at looking at your posts. They are everywhere! Lol

          Comment


            #6
            Originally posted by coastiepete View Post
            I'm getting tired at looking at your posts. They are everywhere! Lol
            yea but ya got to love the pictures... nice buy! let me know if ya need help.cliff

            Comment


              #7
              Originally posted by coastiepete View Post
              I'm getting tired at looking at your posts. They are everywhere! Lol

              hehe I gota spread the love People outside the PNW might be interested too..

              Your build is turning out way cool..

              Comment


                #8
                I must ask. Where did you get it and how much? Not the bike, the Crimp tool?

                Comment


                  #9
                  Originally posted by Go Mifune View Post
                  I must ask. Where did you get it and how much? Not the bike, the Crimp tool?
                  Vintage Connections..

                  It's at the bottom of the price list page, Section 10 Hand Tools
                  RTL Crimper $35

                  You can also get the crimper in one of their repair kits.

                  If it matters the new wire I used is TXL wire. It has OEM looking tracer lines and insulation good to 280°f. The same wire GM uses in it's new cars.
                  It came from EFI Connection
                  http://www.eficonnection.com/eficonnection/wire.aspx


                  Last edited by Guest; 03-25-2010, 12:26 PM.

                  Comment


                    #10
                    Small progress. Chain on and riveted. Looks like I should have gone with the 114 link chain..
                    I'll probably knock off a few links later but I'll need a new master link first.


                    I got bored waiting on some parts soaking in the carb dip and killed time by polishing the crush drive and spacers.

                    Comment


                      #11
                      Just a few setbacks..

                      The Garage was flooded from a slow driveway drain and my wife's aggressive all day lawn watering campaign.. No big deal.. she did it last year too so I already had most things up off the floor or in plastic tubs. It just takes forever to dry out..

                      I got e-screwed..
                      I won a GS1000L tank on Ebay from a seller with good feedback.
                      2 days after the auction ends the seller started racking up tons of Neg feedback for non-delivery and no response to messages..

                      So I guess the fight is on to get my $$ back..
                      We'll see how good Paypal buyer protection is.

                      Enough ranting.. I got a new set of buffing wheels and plan to take on the corroded chain cover.

                      Comment


                        #12
                        Can't wait to see the finished project!! Looking good so far.

                        Comment


                          #13
                          Man I haven't updated in awhile..

                          I'm getting close to firing up the bike..

                          All the electrical work is done.

                          Tank has been de rusted and had the rear tab welded back on.

                          This weekend I pulled the forks (AGAIN!!) to install new seals..
                          I got a bit carried away and it's turned into polishing the lower legs..
                          I'm almost done with that.. I'll roll it out tomorrow and take pics..


                          Now my hands are sore from sanding and buffing for hours

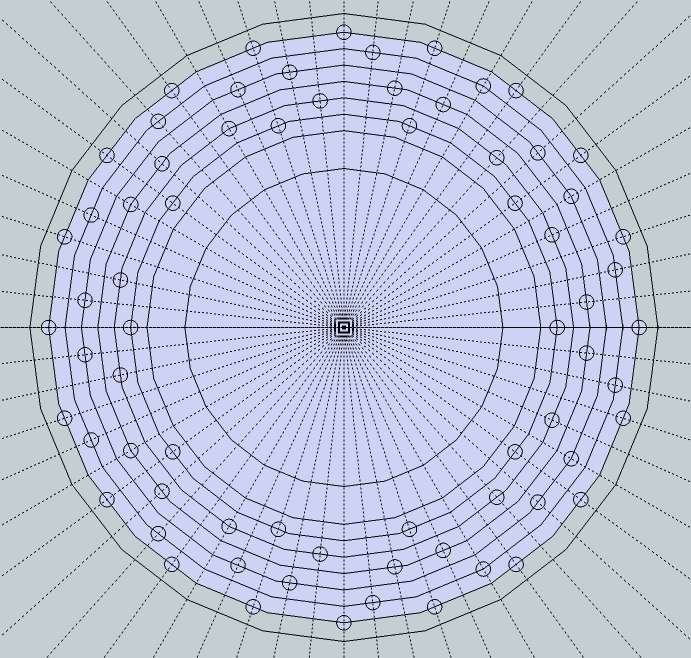
                          I got a bit inspired by ScottyChop's drilled rotors and drew up a template for my GS in Sketchup.. It's a non directional Brembo pattern so I can't screw up the left or right side

                          Comment


                            #14
                            I don't know why my bike spends more time like this than on it's wheels..


                            Not perfect but a hell of a lot better than old pitted yellow clear coat.
                            It only takes a few hours to strip, sand and buff em out. New seals and wipers installed..

                            Comment


                              #15
                              I wonder what else I can polish.. Those calipers are looking sad now..

                              Comment

                              Working...
                              X