Announcement

Collapse
No announcement yet.

1983 GS550L, rebuild?

Collapse
X
 
  • Filter
  • Time
  • Show
Clear All
new posts

    1983 GS550L, rebuild?

    Hello everyone. I can't tell you how happy I was to find such a good forum to go along with the free bike I picked up. I'm going to need your help for sure.

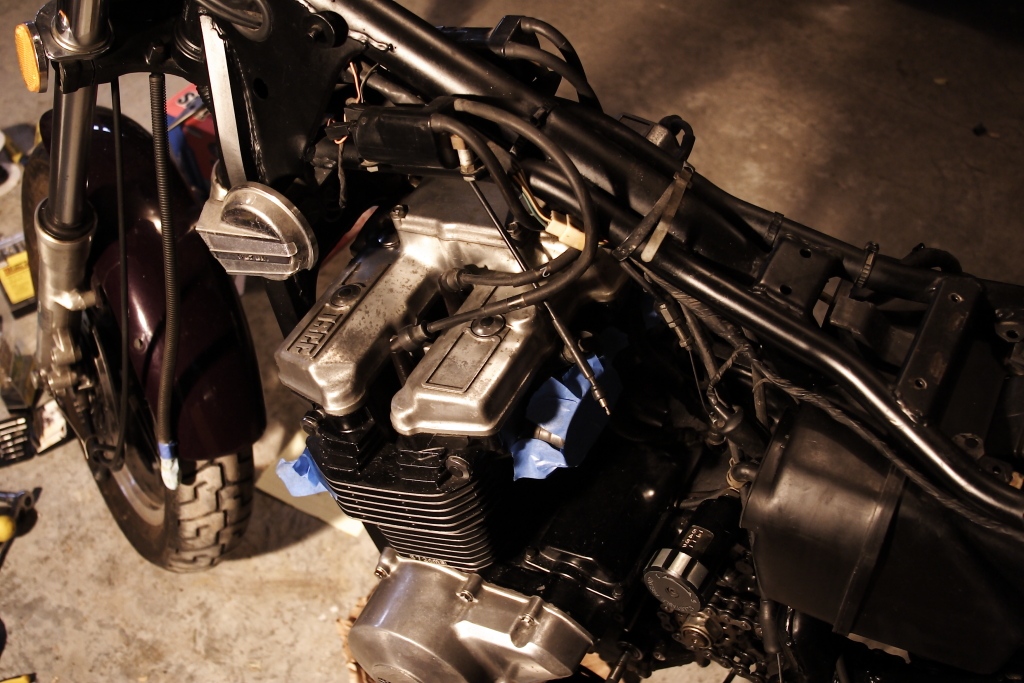
    I picked up my 1983 GS550L about a month ago. I don't know it's history or when it was last running. There are 15,000 miles on the clock. Most everything was there, except the carbs which I picked up off ebay. The airbox door and side covers are missing too. After examination, I realized that the bike has been dropped multiple times, maybe crashed. There are scratches on the cases, bent levers, and a definite twist to the front forks.


    I have never done any serious wrenching before and with this bike I am sure getting in over my head. I have the Clymer manual and downloaded the Suzuki manual from BassCliff's website. I'm slowly building up my collection of tools as I'm tearing into it and as I can afford them.

    I'm approaching the project in stages. Step 1 is to get the bike cleaned and running. Step 2 is to get it road worthy. Step 3 is to make the bike pretty and set up the way I want it. I have a budget of about $500 for each stage. If I run out of money, or run into something that cant be fixed I'll part it out. The priority is for me to learn, a running bike is secondary.

    My plan for step 1: clean the carbs, adjust the valves, fab a door for the airbox, change the oil.
    Step 2: The front forks are my primary concern. I'm not sure how straight they are. The brake is siezed and I really don't like the buck horn style bars anyhow. Maybe a fork swap is in order.
    Step 3- not sure what I want yet.

    There's some light corrosion but most of the bolts are coming off smoothly. It looks like this bike's been garaged for it's whole life. The tires are old, but look like they will do for initial road tuning. Once I cleaned all the gunk off the chain and sprockets look really good. A little rust on the plates and a little wear on the leading edge of the pins.


    I think it's the factory chain.

    The carbs I picked up from ebay look like they've never been opened. They didn't come apart easy.

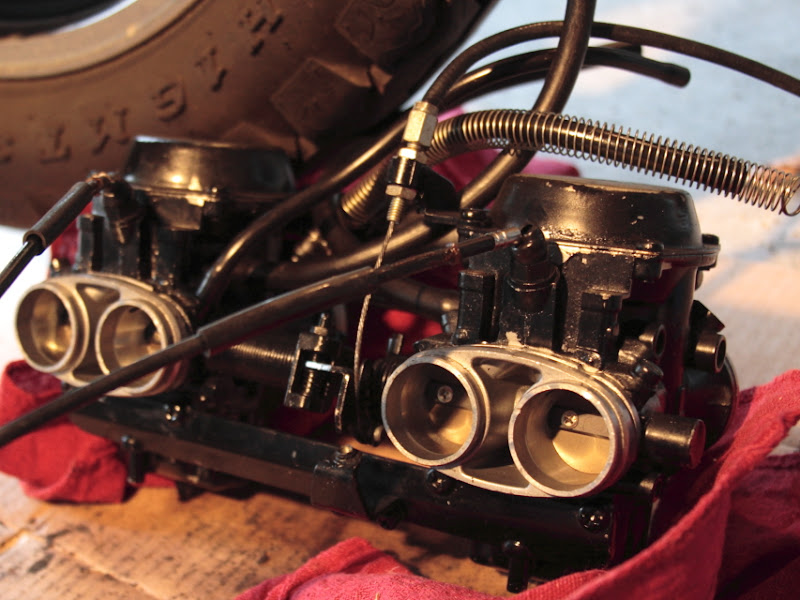
    I had to use extractors on at least 5 screws and tore one of the float bowl gaskets. There is some varnishing on the inside and the slides are a little sticky. The diaphragms both look great. I need to buy o-rings, some carb dip, bowl gaskets, fresh screws and some spare screw drivers to grind down to the right size for extracting jets. The budget is tight until after year end so things will develop slowly until then.
    Looks like the car is going to be sitting out in the snow this winter.

    #2
    Welcome to the nut house, looks like a nice project you have there, and something to keep you busy during the big freeze, just go through all of the maintenece items listed on Basscliff's site and she will be a reliable rider, you do have quite a bit of wrenching ahead of you, no getting away from it, that is part of owning a classic bike, but no rocket science involved, stick with it and of course you have all the help you could possibly need, right here.
    I really hope you stick with it ad see it through, looks like you have a really nice bike there, and pretty good shape as well, considering, it would be a shame to see her parted out.

    Comment


      #3
      Congratulations on the find and I hope you are able to get it running. Be sure to ask lots of questions AFTER you give this place a thorough search and definitely keep posting pictures of the project as you progress.

      Good luck.
      Cowboy Up or Quit. - Run Free Lou and Rest in Peace

      1981 GS550T - My First
      1981 GS550L - My Eldest Daughter's - Now Sold
      2007 GSF1250SA Bandit - My touring bike

      Sit tall in the saddle Hold your head up high
      Keep your eyes fixed where the trail meets the sky and live like you ain't afraid to die
      and don't be scared, just enjoy your ride - Chris Ledoux, "The Ride"

      Comment


        #4
        Potential.
        A budget is a good first step haha.

        Comment


          #5
          Congrats, i like the seat

          Comment


            #6
            Thank you everyone. Yes, I think the budget might get a little fluid. I'm already exempting tool spending as not necessarily being tied to the GS project.
            I picked up some carb dip today and have taken apart the carbs as much as I could. Im going to replace all the o- rings so I left them all in place for an initial soak. I couldn't get the pilot jets to move. I'm hoping the dip will help free them. I reshaped a screwdriver to be the right size, got out the calipers and went to the grinder.

            I drained the oil today too. It was thick creamy black and smelled a little of gas. Ominous. I think that investigation will wait until after I get to hear the motor fire up.

            Comment


              #7
              Free is a great price. Looks like a fun project, and on the car outside bit ... welcome to the club!

              I havent parked in my garage in ....... years. The garage is my "shop", and sees all kinds of fun projects

              Cars have weatherstripping for a reason, and ours are tested yearly by the rain and nastiness outside .. Ha!

              Comment


                #8
                I've got two. One (85) I've resurrected and got on the road. The other is still in process (83). If you have any questions, shoot me a pm. I'd be glad to help. I've rebuilt two sets of those weird Siamese carbs now. I have spare carb parts if you need some.

                Make sure you pop out the needle seats and clean them real well. Make sure the needles seat all the way to the bottom without sticking. Clean the float needles real well. Install the floats and flip the carbs over. Blow through the fuel line and you should have to put moderate breath into it to get them to force open.

                The synchronizer ports are #6 threads I believe. I check tonight.

                My 85 rides smoother than my 79. Easy riding bike.

                Good luck.
                -Dan
                Last edited by Guest; 11-17-2011, 04:16 PM.

                Comment


                  #9
                  I had some trouble with the carb cleaning. I haven't been able to get the pilot air jet, main air jet, or pilot fuel jet out of the carbs. The air jets are clear and I don't see any big reason that they have to come out. I'm going to be using the stock air box, just need to fabricate the access door. Three of the 4 pilot fuel jets seem to be clear but one of them is still blocked. The carbs have been in the dip twice and I've soaked them with a carb cleaning spray many times.


                  I'm going to my father in law's house tomorrow to try and blow them clear with compressed air. Sadly, I tried too hard to get it out and stripped the head of the pilot fuel jet. Is it worth going after it with an extractor and replacing it?
                  I took the valve cover off today and found no major issues. Learned that I had to take the breather cover off before the valve cover would clear the frame. A detail that Clymer forgot to tell me about.


                  I don't have the special tool for adjusting the valves but they all seem to be gapped correctly.


                  The spark plugs had carbon build up but look good. After hitting them with the wire brush they should be fine for now.


                  By the way, does anyone know the trick to get the airbox out of the frame without destroying it? I'm stumped.

                  Last edited by Guest; 11-27-2011, 12:14 AM. Reason: fixed pictures

                  Comment


                    #10
                    Greetings and Salutations!!

                    Hi Mr. TimCC,

                    Sometimes you can drop the rear fender and get a little more room for the airbox.

                    Anyway, let me dump a TON if information on you and share some GS lovin'.

                    I just stopped by to welcome you to the forum in my own, special way.

                    If there's anything you'd like to know about the Suzuki GS model bikes, and most others actually, you've come to the right place. There's a lot of knowledge and experience here in the community. Come on in and let me say "HOoooowwwDY!"....

                    Here is your very own magical, mystical, mythical, mind-expanding "mega-welcome". Please take notice of the "Top 10 Common Issues", "Top 15 Tips For GS Happiness", the Carb Cleanup Series, and the Stator Papers. All of these tasks must be addressed in order to have a safe, reliable machine. Now let me roll out the welcome mat for you...


                    Please click here for your mega-welcome, chock full of tips, suggestions, links to vendors, and other information. Then feel free to visit my little BikeCliff website where I've been collecting the wisdom of this generous community. Don't forget, we like pictures! Not you, your bike!

                    Thanks for joining us. Keep us informed.

                    Thank you for your indulgence,

                    BassCliff

                    Comment


                      #11
                      Take an old screwdriver and grind off the tip until it fits perfectly inside the slot on the main jet. Apply some heat from a propane torch and try to get them unstuck.

                      The problem is, under the pilot jet is a washer. That washer keeps the needle seat inside the carb bore. The needle seat has a bunch of small holes which, in both sets of carbs I've taken apart, were gunked up. The needle seats need to be completely clean. You need to remove the jet, remove the washer, re-install the jet and pop it out the seat through the top with the back of a screwdriver.

                      As for the pilot jet, just take a single bristle from a wire brush and clean them out. As long as you can shoot fluid through them they should be ok.

                      Pilot jets are the tiny ones down in the holes, the main jets are the ones on the pedestal. If you need replacements, take a scotchbrite and clean the surface of the jet carefully. A number should appear. Send me that number and I'll see if I have some on my spare parts carbs. I doubt I could rescue any pilot jets but I'll try if you are desperate.

                      Also, make sure that the Fatter main jets get installed on the 2 and 3 cylinders. The leaner ones go in the 1 and 4 positions.

                      Also, this link from Bikeclif's website is about 70% applicable to the Siamese BSW30 twins. Pretty much the same stuff as a BSW32, just the 30s share one diaphragm and fuel bowl.

                      -Dan

                      Comment


                        #12
                        Progress continues slowly. Thank you for the welcome BikeCliff. I've spent a lot of time reading your website. Thanks for your efforts in preserving all that knowledge.
                        Dan, I got the emulsion tubes out and cleaned. I'm glad you urged me to do so. They were filled with sludge. Nice and clean now.


                        I put in new O rings from Rober Barr. Ordered a bunlde of stainless steel socket head cap screws. Here they are finally reassembled.


                        The pilot fuel jets never came out but I think that I have them clear. The pilot and main air jets didn't come out either but I'm confident that they are clear.
                        I spent a lot of time cursing at the carbs as I tried to push them into the frame and onto the intake boots. I banged my knuckles and pinched a finger but finally persuaded them in. Then I realized that I hadn't connected the throttle cable. Pulled them out, hooked it up and pushed it back in. Easier the second time.


                        I poured some gas into the carbs and hooked up my scooter's battery to the GS with some jumper cables. I tried to get it to fire. No luck. The scooter battery is dead from old age and wouldn't turn the starter motor enough to get it to catch. I'll give it another try soon.

                        Comment


                          #13
                          I have a 55a car charger. I use it when working on the bike. I hook an older battery up to it as ballast. At the 10a setting, it can turn the bike over all day long.

                          Looking good. Let me know what you end up setting your idle mixture screws at. I started at 2.5 but I had cold start problems. I think the choke on these carbs is crappy. I ended up turning them out to 3.5 or 4. Which might be too rich. Starts right up cold now though. I'm having a weird drifting idle issue as well. Very frustrating.

                          Comment


                            #14
                            Welcome aboard. I also have an 83 550 project that I intended on getting done this year but unfortunately it has stalled. It came to me as a basket case and while I can normally refurb something like that in 3 or 4 months, it has fought me all the way. All the way to the point that I haven't touched it in several months. Maybe it will come together next year.

                            Being fairly experienced at this game let me offer a few hints.

                            When removing or reinstalling carbs and airboxes, you will usually find the original rubber boots on either side to be rigid and hard to work with. If you warm them up with a powerful hairdrier or better yet an electric paint stripper (looks like a hairdryer) they become pliable again. Using some silicon spray or WD40 to lube the mouths also helps the carbs to slip in

                            Getting the carbs back into the head manifolds can be a lot easier if you use a ratchet strap. Put the strap around the head and back of the carb and lever away. A quick 'bonk" with a rubber mallet usually will seat them. Again warm up and lube the boots ( manifolds) first.

                            With bike electrics, you will find a battery in the harness is necessary as 88 has mentioned. Even a half dead one will work. To provide the cranking power if you don't have a charger like his, use a regular automotive battery, even the one in your car, just don't turn the car on as things can fry with all that juice flowing. I keep a deep cycle marine battery for cranking.

                            You will see there is tons of info on the bike's electrics on this site and through out the internet and one piece of advice tops them all. Make sure your grounds are clean and tight. Without good grounds you'll be chasing your tail when it comes to electrical gremlins.

                            You have made good progress so far and we'll be following along to see how it comes together.

                            Good luck and enjoy the project.

                            Cheers,
                            Spyug

                            Comment


                              #15
                              You have a nice bike there.
                              The valves and cam were so nice and clean and showing no wear. The cases sho no signs of corrosion this waas an indoor sheltered bike.

                              Do you have a gas tank?
                              That engine is so new and unsullied it even has the little rubber plugs in the rocker gallery caps.
                              the seized brakes on the front can be compressed with a c-clamp but you will need to separate the halves of the caliper. I had one stuck on the front and it freed up this way. A bugger to get em separated though. I woould leave em bolted to the fork and wrench on em that way.
                              Last edited by Guest; 12-12-2011, 01:54 PM.

                              Comment

                              Working...
                              X