Announcement

Collapse
No announcement yet.

'85 GS700e restoration

Collapse
X
 
  • Filter
  • Time
  • Show
Clear All
new posts

    #16
    Originally posted by soundsource View Post
    Considering she started first time I think I'm on to a winner - these engines must be bullet-proof! Thanks for the tip on the paintwork, what kind of papers should I use a) on the paintwork and b) on the aluminium covers etc.? In terms of the glass I might just go for some perspex, unless you think glass is that much better?

    I just finished clearing some crap out of the garage to give me some space to work... Looking at pulling the carbs over the weekend (It's 4am here at the moment so can't be making too much noise right now), so I need a bit of room and a clear bench-top!


    When I took this picture just now I noticed another scratch on the front mudguard and it looks like the headlight bracket is bent too. Another couple of jobs on the list...


    Good to have you along for the ride Bill, I'm sure your knowledge will be invaluable! Just read on your signature that you've got some GSXR bits on your beauty, I'll have to check through your restoration pages again to see what I might benefit from for mine... Thanks for the tip on the 750s as well!
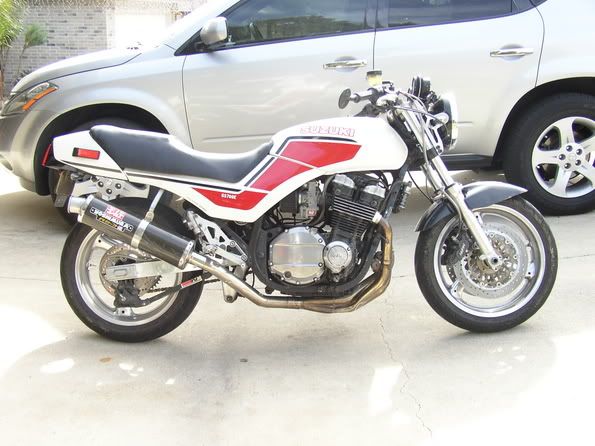
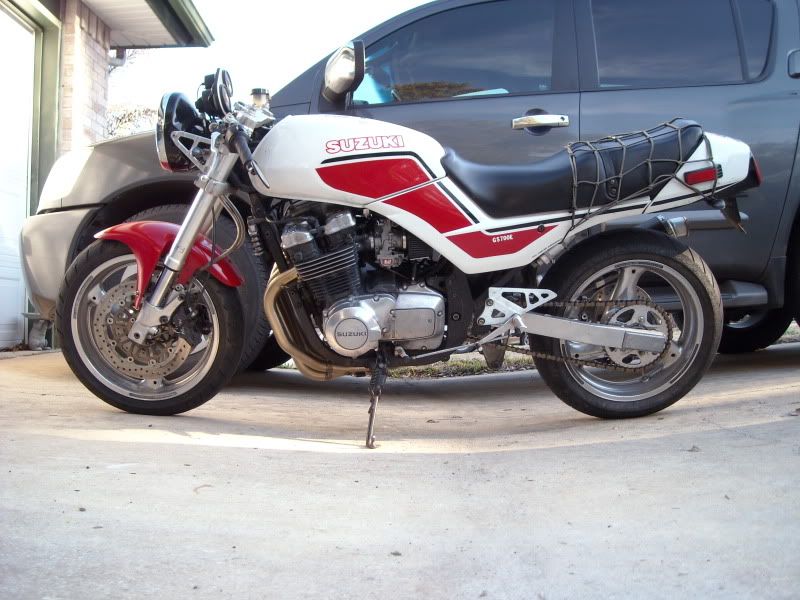
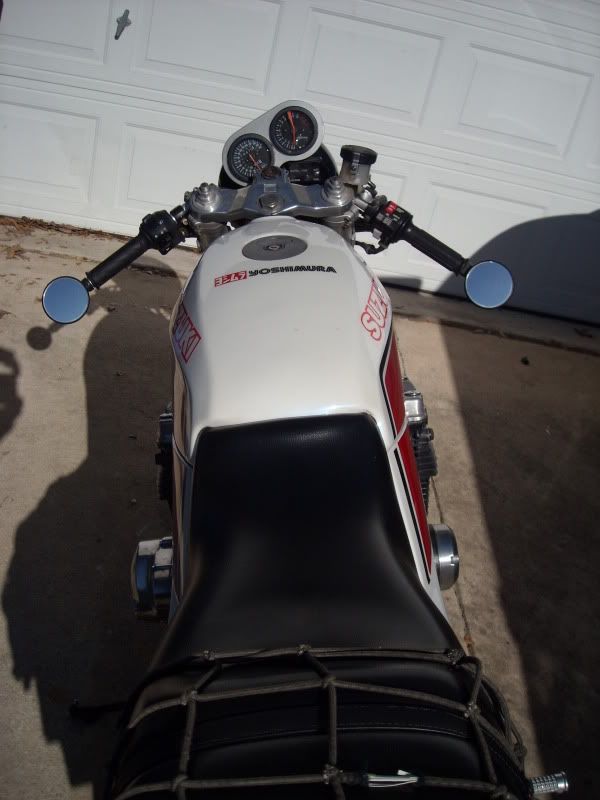
    Sorry, I never did a build thread, most of my stuff was done pre GSR. The headlight problem is just bent ears. The turn signals are gone too. The stalks on them get brittle and fall apart. I just use some Lockhart Short Stalks on my bike. I'll post a few pics so you can see some of the things I've done.

    As for sanding use some 600 grit wet and dry paper. Go over the entire surface but when you get to spots where the clear is in bad shape be careful with the decals underneath. Hit it lightly and try to feather the edges where the clear is in better shape. Use a good automotive clear if you have access to spray equipment. If not there is a two part clear that comes in an aerosol can.

    You can use a coarser grit on the aluminum that needs to be cleaned up. 400 would be fine. As you sand on the aluminum it's going to wear down to 1000 or finer anyway. I have about 60 hours of hand sanding on my wheels alone. The spokes were a rough sand cast finish with factory paint. I sanded one spot just for grins and kept going. After you have the oxidation sanded off use a foam polishing wheel on a drill with some aluminum polish and go nuts. You'll have it looking good in no time.

    This is my bike with the '88 forks.


    Left side with newer forks.


    Doggie style.


    Right side.

    Last edited by Guest; 08-25-2012, 12:36 AM.

    Comment


      #17
      Originally posted by GateKeeper View Post
      Restores are so much fun.....

      best of luck on this one, your off to a fine start...

      Cheers
      Thanks GateKeeper! Looks like you had fun with yours, she's a beauty! I am in awe, considering where you started... I'm a little afraid as well, because I'm at the point where you were in the beginning: Do I just clean her up so I can ride or go all-out and do a full restore?

      Guess we'll find out soon enough. The truth is though I need her on the road as soon as I can.

      Comment


        #18
        Thanks for the invaluable tips Billy, I had a good few hours on her today so some more photos coming up. Looking forward to starting the cleaning process, just having to consider how far to go! From where I am now it seems like it wouldn't be too much more trouble to drop the engine out, wheels and forks and start from a clean frame.

        I'm just worried about how long it would take and how much money too as I don't have either! Has anyone on GSR ever gone back to do a full restore after first doing a semi-restore? Got to weigh up whether its better to strip her fully now or just a preliminary and then go back to bare frame when I've got the cash to do her justice!

        Your beast looks lovely, how does she ride?

        Comment


          #19
          Striptease

          So I got started on the strip down today and so far it has been a breeze. The only snag was a couple of bolts on the bracket that holds the airbox to the frame. I'm going to have to buy an impact-driver to get them out.

          Now I know WD-40 isn't the proper thing to use but I've been spraying all bolts with this every day for the last few days now and they've all been really easy to pop out so far, even the exhaust manifold bolts, which I've read just now can be a pain to remove.

          So here's some pictures of progress:


          Everything ready to go...


          Tank and seat come off really easy, just the turn of a key and a couple of bolts...


          Next up, the headlight, which holds a bunch of electrical connections


          Took apart what needed to to get the casing off, was suprised that the bracket on the forks is free and just twists around each fork. Once it's bolted onto the casing a guess it's nice and rigid...


          Next up, footpegs and whatever you call it that holds them in place, chain guard and exhaust, then finally clutch cover and side stand (had to take the sensor for the side stand off as my ring spanner wouldn't reach and I couldn't find my 8mm socket).


          Exhaust doesn't look too bad, nothing a good sand and polish won't fix anyways...


          Ditto under the clutch cover, though it's really nasty inside:


          Plus it looks like the front sprocket is worn, though thankfully chain and rear sprocket look pretty healthy.


          Going to check this rust tomorrow, hope it's not too deep...


          Same here, hopefully not too much of a problem. Soaked with WD-40 again anyway...

          Comment


            #20
            Plugged the exhaust manifolds with plastic bags (cheap and in plentiful supply), then gave the sump plug a few squirts of WD-40 (No I don't work for them) because I'm draining the oil tomorrow...


            Few spots of rust around the frame and fins here - I think I check this all round


            Well it's not rust, but some pretty nasty gouges have appeared. Hope I can sand them out without changing the shape of the fins too much. Further confirmation of a drop at speed by PO.

            And that's it for today! Feel pretty good about how easy it's been so far. Not looking forward to tackling the carbs tomorrow but on a slightly different note, my mate Dave at Warpspeedracing who I told about my new bike and showed a picture sent me a shot of some work he did for another mate's 750 and told me he'd made a brace to fit a GSXR-1100 engine into the frame! Is this a common mod?

            Anyway, here's the billet work by Dave:


            Beautiful stuff. Think I might just be able to afford those SS hoses!

            Comment


              #21
              Wow, that billet stuff is sweet! Wish I had the funds to have some of that beautiful stuff. Your friend does amazing work.
              1982 GS550M Rebuilt Winter '12 - 550 to 673cc engine conversion.
              1989 Kawasaki ZX-7 Ninja
              2016 Ducati Scrambler Full Throttle

              Comment


                #22
                Please understand that WD40 is not a penetrating agent and really should not be used as such. PB Blaster or similar will do what you are wanting better.
                Cowboy Up or Quit. - Run Free Lou and Rest in Peace

                1981 GS550T - My First
                1981 GS550L - My Eldest Daughter's - Now Sold
                2007 GSF1250SA Bandit - My touring bike

                Sit tall in the saddle Hold your head up high
                Keep your eyes fixed where the trail meets the sky and live like you ain't afraid to die
                and don't be scared, just enjoy your ride - Chris Ledoux, "The Ride"

                Comment


                  #23
                  Originally posted by cowboyup3371 View Post
                  Please understand that WD40 is not a penetrating agent and really should not be used as such. PB Blaster or similar will do what you are wanting better.
                  +1 on this.A good penetrating oil is way better than WD40.

                  Comment


                    #24
                    Another build thread that might be helpful

                    Put any information that you have to make your bike look great in here.

                    Comment


                      #25
                      Originally posted by Sci85 View Post
                      Wow, that billet stuff is sweet! Wish I had the funds to have some of that beautiful stuff. Your friend does amazing work.
                      Hi Sci85, isn't it! Years of practice I'm told... Dave and I used to ride together, back when I had my GS250X. He's doing great stuff now restoring bikes and making these billet cases and covers. Shame he doesn't live close to me any more.

                      Comment


                        #26
                        Originally posted by cowboyup3371 View Post
                        Please understand that WD40 is not a penetrating agent and really should not be used as such. PB Blaster or similar will do what you are wanting better.
                        Hi cowboyup3371! Thanks for the tip, and may I say what a great user name you have sir! Just ran out of WD-40 today so might have to take your advice. I wonder if I can get PB Blaster in the UK? We'll have to see. Thanks again for the tip!

                        Comment


                          #27
                          Originally posted by SVSooke View Post
                          +1 on this.A good penetrating oil is way better than WD40.
                          Hi there Mr SVSooke! I've been reading through your Old Yeller threads and hope to benefit from your wealth of experience. Thanks for reinforcing the cowboy's concern with the WD-40. It's all I had to hand at the time but have just ran out so time to take your advice!

                          Comment


                            #28
                            Originally posted by jwhelan65 View Post
                            Another build thread that might be helpful

                            http://www.thegsresources.com/_forum...d.php?t=135310
                            Hi Joe, I've probably read through this thread three times straight now - she really is a beauty and an inspiration. Thanks for staying in touch... Now back to reading your thread for the fourth time!

                            Comment


                              #29
                              Striptease Day II

                              Well, as ever I had a lot planned for today but life just seemed to get in the way! Got a few bits done:

                              Drained the Oil


                              Which I could tell straight away has been severely contaminated by gasoline a) because it was far too runny and b) it stank the place out! It came out so quick it was all over my driveway before I could even get my neatly cut container underneath it! I'm amazed she started and ran with such a mix in the crankcase. I assume the fuel is in there because I left the petcock on "prime" the first night I got her. On the plus side I can now see through the little observation window that you use to check the oil level. I though it was soiled and dirty but must have just been obscured by a whole heap of dirty gasoline!


                              Now that's better! I can see through there now... Next up, took the oil filter housing off and removed the oil filter which by now was sparkling due to being soaked in oily gasoline!


                              Drained what was left of the oil/gasoline and got started on removing the carbs. I was expecting this to be more difficult than it actually was, I feel like the job so far has been so free from problems I'm in line for a whole heap of s**t any time soon. Let's hope not! Anyway, I got stuck on the Intake boots as I don't have an impact-driver. It's a national holiday here tomorrow so I doubt I'll get one before next weekend now. Think I'll replace these screws and many others with stainless steel allen bolts as so many of you have done and recommend. Save a lot of trouble next time!


                              I managed to loosen them pretty easily once the circlips were undone a few turns then it just popped out. Fiddled a little bit with the throttle cable and even more with the choke but eventually got the whole unit free. Success! I was slightly apprehensive about this but seemed to pull it off without any major hitches.


                              I think they look pretty clean. If you're wondering about the carpet tile I just use that to save my knees from the gravel on the driveway, plus I'm sure you've heard about the somewhat changeable weather here in the UK so it should make sense that I don't want soggy knees either!

                              Next I thought I'd try for myself to get the infamous airbox out of the frame. Guess what? It doesn't work. I still don't have the intake boots off and I suppose I could take the air outlet boots off as well though I wanted to save them because they look pretty healthy. We'll see when I get the impact-driver. It looks like there's not much in it in terms of space needed to complete the job. What a terrible design flaw! Suppose this is where I start to think about whether or not to install pods and re-jet?


                              Lastly, I took a look at BassCliff's guide to bleeding the brakes thinking I'd have time to get that sorted but like I said, life sometimes takes over and this is when it did.

                              On another note I checked the worst spots of rust I could find (both on the shock) and gave them a quick rub with a wire brush and a light sand. They both came up pretty good so all in all very pleased with progress so far! Looking forward to another day off tomorrow and whatever comes with it!


                              Comment


                                #30
                                Here is something you might find useful if you do the frame. http://www.por15.com/CHASSIS-COAT-BL...oductinfo/CHG/ I think Nessism has used it a had good things to say about it. They have a line of products that are cheap to use and yield great results, especially the tank liner. If the spring is toast I have one I could send you for shipping. I have the whole shock but that would be costly to ship. The linkage I can't help you with but the '83 and up 750E is the same so if that's toast it will make one easier to find. It looks like the battery puked some acid down on the suspension. I'd pull the swingarm and all the shock linkages and check the bearings.

                                Comment

                                Working...
                                X