Announcement

Collapse
No announcement yet.

1980 GS850GLT Road-worthiness Project

Collapse
X
 
  • Filter
  • Time
  • Show
Clear All
new posts

    #16
    To properly clean those carbs you MUST separate them and then follow the procedures outlined in Nessism's Carb Rebuild Guide found on Basscliff's site (http://members.dslextreme.com/users/bikecliff). Failing that you'll be doing this again later since every passage you can't see won't be cleaned.

    Otherwise looks like a typical PO job. Get rid of the fuel filter - you don't need it. You can get a piston and cup set for the master cylinder just pay real close attention to the bore when you yank that piston out. It's usually pretty difficult as some are stuck in there so really soak it good first. You'll need a set of circlip pliers as there's one clip in there that's hard to see.

    Good luck...this will be fun.
    Cowboy Up or Quit. - Run Free Lou and Rest in Peace

    1981 GS550T - My First
    1981 GS550L - My Eldest Daughter's - Now Sold
    2007 GSF1250SA Bandit - My touring bike

    Sit tall in the saddle Hold your head up high
    Keep your eyes fixed where the trail meets the sky and live like you ain't afraid to die
    and don't be scared, just enjoy your ride - Chris Ledoux, "The Ride"

    Comment


      #17
      I making a little progress here and there over the holiday break. Managed to sneak out to the garage in between various groups of relatives visiting. And some of my parts arrived! Woo!


      Cleaned out the airbox as well as I could. Since it doesn't open up, and my hands are only so big, I can only get it somewhat clean inside. Three different hardware stores and I couldn't find a wire brush small enough to clean the rusted crankcase breather tube. Instead, I rolled up some sandpaper and went at it for awhile. It's not perfect, but it looks a lot better now. I have to remember to squirt some paint in there to help keep the rust at bay. This will unfortunately be a semi-regular maintenance item. Made more annoying by the fact that there's no way at all to clean the rest of the area in the top of the airbox. If I were restoring a bike with this airbox, I'd seriously look into seeing what it would take to fab one of these up in plastic. (Vacuum formed or 3D printed?)


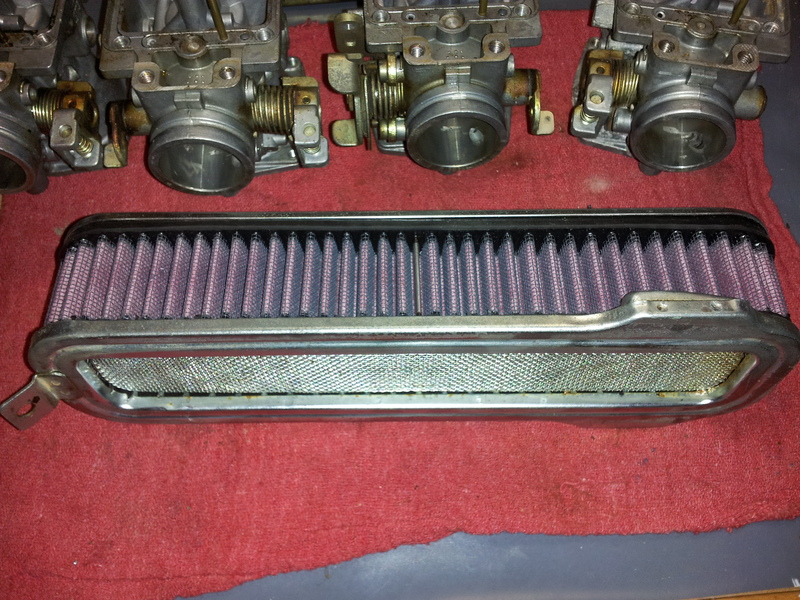
      New K&N air filter oiled up and ready to go. Fits perfectly in the filter cage. I'm going to apply the weather stripping to this rather than the air box because I can't clean the air box well enough inside to get adhesive to stick to it. This will be a ton easier.


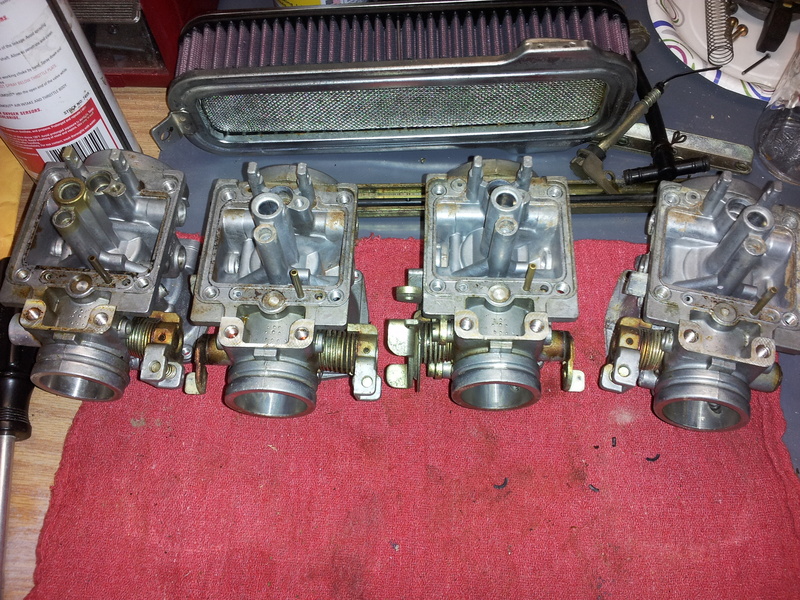
      Carbs disassembled and ready for cleaning. Remains of an old o-ring can be seen. I did decide to ungang the carbs for cleaning after all. The main reason was because I couldn't see a good way to remove the float pins without risk of breaking them otherwise. One of the brackets came off without too much fuss, but the other one (with the larger screws) was a total PITA. All eight screws were seized in. I had to use my new impact driver for the first time and I was scared poopless that I was going to break something by whacking them with a hammer. All the screws eventually came out okay. I should replace them with stainless steel hex-head screws but I'm not sure A) If I'll be able to make it to the hardware store before the carbs are put back together and B) that the hardware store will even have the right ones in stock.


      Carb gubbins. Didn't take a post-cleaning picture, but these are all cleaned up now and ready to go back in the carbs. The consistent theme here is that the #1 carb was utterly filthy while 2-4 were not a far cry from brand-new. I almost wonder if PO replaced #1 at some point and didn't bother to clean it out first?


      Holy Moses, you call that an o-ring?! While I had the carbs off, I thought it would be best to remove the intake boots and change out the o-rings since I had the replacement parts anyway. (And because everyone on the forum lists this as a must-do item.) So now I have new o-rings and new stainless-steel screws (with anti-seize!) installed.

      Next steps:

      - Finish up airbox
      - Re-assemble carbs
      - Check spark plugs
      - Fire this puppy up! I'm dying to hear it run...
      Charles
      --
      1979 Suzuki GS850G

      Read BassCliff's GSR Greeting and Mega-Welcome!

      Comment


        #18
        Originally posted by eil View Post
        Next steps:

        - Finish up airbox
        - Re-assemble carbs
        - Check spark plugs
        - Fire this puppy up! I'm dying to hear it run...
        Aren't you forgetting something rather important?
        Originally posted by eil View Post
        Here's the short list of todo items:
        • New battery
        • Clean air filter and inspect airbox
        • Clean carbs
        • Check/gap spark plugs
        • Fix fuel line (new hose)
        • Change crankcase oil and filter
          • Inspect clutch and clutch plates (possily new springs)
        • Change gear/drive oil
        • Check compression
        • Valve lash adjustment
        • New front tire
        • Rebuild front master cylinder and reservoir
        • Inspect front calipers and brake pads (need new bleeder screws)
        • Flush, fill, and bleed front and rear brakes (and inspect pads, new bleeder screws)
        • Fix tach cable (or replace tach)
        • Lube/inspect clutch cable
        • Lube/inspect throttle cable
        • New handlebars (mini ape-hangers not doing it for me)
        • Buy or rig up new battery strap
        • Reattach:
          • Mirrors
          • Headlight
          • Front and rear turn signals
          • Fenders
          • Airbox covers and side covers
          • Rear seat bar thing (may leave it off, we'll see)
        Haven't seen your request for a spreadsheet, either.

        .
        sigpic
        mine: 2000 Honda GoldWing GL1500SE and 1980 GS850G'K' "Junior"
        hers: 1982 GS850GL - "Angel" and 1969 Suzuki T250 Scrambler
        #1 son: 1986 Yamaha Venture Royale 1300 and 1982 GS650GL "Rat Bagger"
        #2 son: 1980 GS1000G
        Family Portrait
        Siblings and Spouses
        Mom's first ride
        Want a copy of my valve adjust spreadsheet for your 2-valve per cylinder engine? Send me an e-mail request (not a PM)
        (Click on my username in the upper-left corner for e-mail info.)

        Comment


          #19
          Ace Hardware will sell most of the socket or hex head bolts you will need. Or, you can order a set from Robert Barr when you order your orings from his web site (www.cycleorings.com)
          Cowboy Up or Quit. - Run Free Lou and Rest in Peace

          1981 GS550T - My First
          1981 GS550L - My Eldest Daughter's - Now Sold
          2007 GSF1250SA Bandit - My touring bike

          Sit tall in the saddle Hold your head up high
          Keep your eyes fixed where the trail meets the sky and live like you ain't afraid to die
          and don't be scared, just enjoy your ride - Chris Ledoux, "The Ride"

          Comment


            #20
            Steve: Yes, I should have clarified that I'm doing this in two phases:

            Phase I: Get it to run
            Phase II: Get it to run well

            I'm still in Phase I. Valve clearance is definitely still on the agenda, but I have yet to order the valve cover gasket and a few tools that I'll need. (And I was specifically waiting until after the new year for that purchase.) Your spreadsheet, does it require Microsoft Excel?

            Cowboy: I swung by the local ACE today but it's small and in the city, so their selection isn't all that great. (I need to find one a little ways out in the country where their patronage is mainly farmers. Those ACE stores sell every nut, bolt, and doo-dad under the sun.) I was able to find regular metric bolts (not stainless, but I used anti-seize...) for the lower rail. I did get the stainless bolts for the intake boots from Robert.

            Anywho, I managed to get the carbs all put back together and bench synced today so tomorrow all I have to do is put everything back on the bike (sans seat, I guess), check the plugs, and see if she'll come to life.
            Last edited by eil; 12-30-2012, 02:11 AM.
            Charles
            --
            1979 Suzuki GS850G

            Read BassCliff's GSR Greeting and Mega-Welcome!

            Comment


              #21
              Looks like you're making good progress. Keep us posted.

              Comment


                #22
                Originally posted by eil View Post
                Your spreadsheet, does it require Microsoft Excel?
                Yes, it is written in Excel, but is saved as a '97-2003 document, so you don't need the latest version (or even the one before that) to run it.

                If you don't have Excel, you can download Open Office (it's free ) and use that. Several people on this forum have done that.

                If you have a Mac, sorry, I have no idea what it will take, but I do know that there is a version of Excel for you.

                .
                sigpic
                mine: 2000 Honda GoldWing GL1500SE and 1980 GS850G'K' "Junior"
                hers: 1982 GS850GL - "Angel" and 1969 Suzuki T250 Scrambler
                #1 son: 1986 Yamaha Venture Royale 1300 and 1982 GS650GL "Rat Bagger"
                #2 son: 1980 GS1000G
                Family Portrait
                Siblings and Spouses
                Mom's first ride
                Want a copy of my valve adjust spreadsheet for your 2-valve per cylinder engine? Send me an e-mail request (not a PM)
                (Click on my username in the upper-left corner for e-mail info.)

                Comment


                  #23
                  To clean the airbox better, grab a 5 gal bucket or something big enough to submerge it in.
                  Remove any metal from the box
                  fill bucket enough to cover box, weight box down with brick.
                  Throw in 2-3 bottles of works bathrooms cleaner from dollar store.
                  That stuff will take off just about anything with enough time. Dont splash it on skin, carpet, eyes, etc
                  But it is corrosive to aluminum and will oxidize steel somewhat.

                  Check Mcmaster Carr for bolts, they do small quanities and have a hub in OH, so shipping is quick.
                  1984 GS550ES
                  Rebuild in progress....

                  1983 GS750ES
                  4700 miles

                  1978 GS1000E...Resto-mod to come

                  Comment


                    #24
                    Mista M, thanks for the tips. I thought about soaking it in Simple Green (or even just dish soap and water) for awhile, but ultimately decided that wiping it down as best as I could will be fine for now. My biggest worry is the rusting crankcase breather tube and area in the top of the box. I sprayed some rustoleum in there but I'll just have to keep an eye on it as part of regular maintenance.

                    I'll check out McMaster's for bolts. (I've ordered from them before, but it was a long time ago.) Someone mentioned Fastenal in another thread and I see that there's one on Ellsworth, do you know if that's worth checking out?
                    Charles
                    --
                    1979 Suzuki GS850G

                    Read BassCliff's GSR Greeting and Mega-Welcome!

                    Comment


                      #25
                      Hey mister Eil,
                      Great thread! I'm doing the same thing as you are with a gs1100gk, just make it roadworthy. I'm pretty far in my roadworthiness and just bled the brakes, now it's syncing the carbs, mounting the fairing and other plastics back on and it's testdrive time
                      Good luck on the build!!

                      Comment


                        #26
                        Thanks, Biggie, I'll be sure to check out your threads.

                        So the big news is: as of today Phase I complete. It's alive! I tried to take a video, but of course my phone ate the file or something. (As it usually does when I want to save something important. Grr.) Perhaps I'll try again later. For posterity.

                        So anyway, yes, now it runs and idles. Doesn't sound perfect, of course, but not too shabby all things considered.

                        It needs a good carb sync yet and I'm sure I have massive vacuum leaks. Those air box boots that I made the judgement call on? Yeah, upon further consideration: they're toast. They've shrunk and don't make a good fit with the air box or the carbs. I have to order new intake boots as well. Those aren't nearly as bad, but it was a huge PITA getting the carbs back on. I had to have a heat gun and a strong nephew just to do the reinstall. Also need a new petcock. I thought the one I had was still good (enough) after tearing it down and inspecting, but now that I have the tank half full of gas, it appears to be seeping.

                        Next steps:

                        - Order up around $150 in parts to complete the fuel/air box/carb side of things
                        - Get started on the front brakes again
                        - Do a valve clearance check/adjustment

                        I've been weak on pictures lately, so I apologize for that. It just hasn't seemed to me that any of this basic stuff would be interesting to most of you with your shiny non-L models, but let me know if I'm wrong.
                        Charles
                        --
                        1979 Suzuki GS850G

                        Read BassCliff's GSR Greeting and Mega-Welcome!

                        Comment


                          #27
                          Originally posted by eil View Post
                          It needs a good carb sync yet and I'm sure I have massive vacuum leaks. Those air box boots that I made the judgement call on? Yeah, upon further consideration: they're toast. They've shrunk and don't make a good fit with the air box or the carbs. I have to order new intake boots as well. Those aren't nearly as bad, but it was a huge PITA getting the carbs back on. I had to have a heat gun and a strong nephew just to do the reinstall.
                          New boots will do wonders for the ease of installation. Just so you know, the 850 is probably the EASIEST bike to remove/re-install the carbs, when the boots are in good shape.


                          Originally posted by eil View Post
                          Next steps:

                          - Order up around $150 in parts to complete the fuel/air box/carb side of things
                          Exactly what parts are you planning on buying and where do you plan on getting them? We might be able to help you with parts selection and vendor to save you some money.


                          Originally posted by eil View Post
                          Next steps:

                          - Do a valve clearance check/adjustment
                          When you are ordering your carb boots, get a valve cover gasket, too. Might also want the breather cover gasket, but that one is not as critical, and usually comes off OK, and can be re-used.

                          While you are doing this job, you should also get that free spreadsheet from the guy that offers it in his signature.

                          Keep in mind that you should always sync your carbs after a valve adjustment, not before.

                          .
                          sigpic
                          mine: 2000 Honda GoldWing GL1500SE and 1980 GS850G'K' "Junior"
                          hers: 1982 GS850GL - "Angel" and 1969 Suzuki T250 Scrambler
                          #1 son: 1986 Yamaha Venture Royale 1300 and 1982 GS650GL "Rat Bagger"
                          #2 son: 1980 GS1000G
                          Family Portrait
                          Siblings and Spouses
                          Mom's first ride
                          Want a copy of my valve adjust spreadsheet for your 2-valve per cylinder engine? Send me an e-mail request (not a PM)
                          (Click on my username in the upper-left corner for e-mail info.)

                          Comment


                            #28
                            Actually, I do have one picture. Accompanied by a very newbie question. After running it for a couple minutes (not too long: air cooled), I took a look at the oil sight window and saw this:


                            To me, it looks a little... frothy. Is that normal? I haven't changed the oil myself yet, because when I got the bike the oil level was okay and didn't look dirty. (I will change it before it hits the road, though.) Opened the fill cap and it doesn't smell of gas. Could be from condensation?

                            I think it's okay, but I'm new enough to all of this that I thought I would ask the GS Resources Hive Mind to be sure.
                            Last edited by eil; 01-01-2013, 10:28 PM.
                            Charles
                            --
                            1979 Suzuki GS850G

                            Read BassCliff's GSR Greeting and Mega-Welcome!

                            Comment


                              #29
                              Originally posted by Steve View Post
                              New boots will do wonders for the ease of installation. Just so you know, the 850 is probably the EASIEST bike to remove/re-install the carbs, when the boots are in good shape.

                              Exactly what parts are you planning on buying and where do you plan on getting them? We might be able to help you with parts selection and vendor to save you some money.
                              Right now the short list is:

                              - Fuel petcock
                              - Air box boots
                              - Intake boots
                              - Valve cover gasket
                              - Shim removal tool
                              - Battery strap

                              Soon enough I'll be adding brake parts to the list as well but I need to do some research first. I've spent more on tools than bike parts so far and that trend will continue as I get ready to look into torque wrenches and a carb sync tool. Have to budget this stuff and space out the purchases a bit to keep from setting my bank account on fire!

                              I was planning on ordering most of the bike parts from Z1 since they come highly regarded around here.

                              When you are ordering your carb boots, get a valve cover gasket, too. Might also want the breather cover gasket, but that one is not as critical, and usually comes off OK, and can be re-used.

                              While you are doing this job, you should also get that free spreadsheet from the guy that offers it in his signature.
                              Email sent, thanks!

                              Keep in mind that you should always sync your carbs after a valve adjustment, not before.
                              Understood. I may put off the carb sync until it warms up a little outside (two months, at least) since I'll have to do it with the garage door open...
                              Charles
                              --
                              1979 Suzuki GS850G

                              Read BassCliff's GSR Greeting and Mega-Welcome!

                              Comment


                                #30
                                Originally posted by eil View Post
                                I'll check out McMaster's for bolts. (I've ordered from them before, but it was a long time ago.) Someone mentioned Fastenal in another thread and I see that there's one on Ellsworth, do you know if that's worth checking out?
                                I've never gone to the fastenal, even though its down the road from my apartment. Not sure if they sell in small quantities. Did you try Stadium Hardware?
                                1984 GS550ES
                                Rebuild in progress....

                                1983 GS750ES
                                4700 miles

                                1978 GS1000E...Resto-mod to come

                                Comment

                                Working...
                                X