Announcement

Collapse
No announcement yet.

1980 GS850GLT Road-worthiness Project

Collapse
X
 
  • Filter
  • Time
  • Show
Clear All
new posts

    #61
    No pics today, but the nice 65 degree (F) weather had me itching to get some maintenance done so I can hopefully have this thing on the road ASAP.

    Boy am I going to be disappointed when I finally get it all running like a top and have to spend every spare weekend traveling for weddings, graduations, and the like. :/

    Anyways, I mounted up the new tach that I bought from another GSR member (sorry, I don't recall your username off the top of my head.) Perfect replacement, although it makes my old speedo look all manky by comparison.

    I also took a stab at swapping some shims around so I don't have to replace as many. Easier said than done... the ones I was hoping would swap, don't. I thought I would have to step down two shim sizes on the ones which measure < 0.02mm in clearance but on each one that I tried, it put the clearance well above 0.08. I've been in contact with Ray from the shim club, but I'm not sure how I'm going to go about removing 5 shims without removing the camshafts. Grumble, grumble. I may just buy the ones I need from Z1 and hope for the best.

    Next big thing to tackle was the front brakes. I've had everything necessary to put the lines together for some time, just hadn't had the opportunity yet. I put the new 850G handlebars on, the front wheel back on, and mounted the calipers.

    So, I set about making the brake lines from the Earl's parts and boy, that was a hassle. Lots of people have said that they made their own lines with no trouble at all, but I didn't find it to be terribly easy. I'm switching from a three-line setup in the front to a two-line setup: one line goes from the master cylinder to the left caliper, and the second line loops over the wheel from the left caliper to the right. First of all, cutting the line with a chisel didn't work well for me. It seemed to cut without much effort but both times that I tried, it creased the soft teflon tube enough to cause a longitudinal cut where the olive goes. The dremel method worked a lot better, at the cost of one cut-off disk per cut.

    Then I had a ridiculously hard time getting the olive over the teflon on the first line. Not sure what I was doing wrong, the teflon just seemed too thick for some reason. No similar issues on the second line, though. However, getting the connectors "clocked" properly was an exercise in futility. I thought I could save a couple of bucks by getting non-adjustable fittings for each end and tightening them down on the bike but I found out the hard way that it doesn't work like that. Once the nut end of the fitting "bites" into the SS braid, it wants to turn the braid. So they're installed now, but twisted about 90 degrees from what they should be. I'm not sure what the long-term effects will be. I might buy adjustable fittings when I buy the parts to do the second brake, or I might just scrap the whole experiment and buy a set premade SS lines.

    Things started looking up a bit once everything was finally assembled. I was able to bleed the brakes and get a nice firm handle with very little effort, which was a pleasant surprise after reading all the difficulties that more experienced people have had with bleeding. Even though the brake handle was pretty firm, I felt that there was still room for improvement so I tied the handle back and left it for an hour. Came back an hour later to find that the connector on the right caliper was weeping. Grr, that was one of the "easy" ones too. Maybe I can just tighten it, but that's going to twist the line further. Bugger!

    Next steps:

    - Order parts
    - Wait
    - Wrap up the valve clearance adjustment
    - Replace leaky tach drive seal
    - Buy or build new rear brake line
    - Drain old oil
    - Inspect clutch
    - Replace leaky shift shaft seal
    - Drain/refill secondary and final drive units
    - Order new tires
    - Wait
    - Mount new tires
    - Lube/adjust all cables
    - Balance carbs (if my budget has not been thoroughly murdered too much to import a CarbTune)
    - Go for a ride?
    Charles
    --
    1979 Suzuki GS850G

    Read BassCliff's GSR Greeting and Mega-Welcome!

    Comment


      #62
      you should have gone this route...

      Are you doing a restoration project of some kind on a GS? Let everyone see what you are doing by posting the details here.


      making your own likes can be fun, but a challenge, and if they get messed up, your going to have to do it all over again, and it's gonna cost you once again...

      but it is fun trying something new....

      .

      Comment


        #63
        Yeah, I'm very much a DIY person. Whole reason I started this project to begin with. But I'm learning that my threshold of frustration when things that don't go my way is inversely proportional to the temperature outside.

        I bit the bullet and ordered a few more parts from AN plumbing to finish the brake lines up. This will give me adjustable fittings for the front lines and a fitting to do the rear line (since I can reuse a non-adjustable from the front).

        Next project bike--if there is one--will very likely use premade SS lines.
        Charles
        --
        1979 Suzuki GS850G

        Read BassCliff's GSR Greeting and Mega-Welcome!

        Comment


          #64
          Busy day!

          All of my valve shims finally came in, so now I'm sportin' proper valve clearances all around. Had to replace 6 shims, one of which dropped down two sizes. So that job is finally done, but I can't button it up properly until my breather cover gasket comes in.

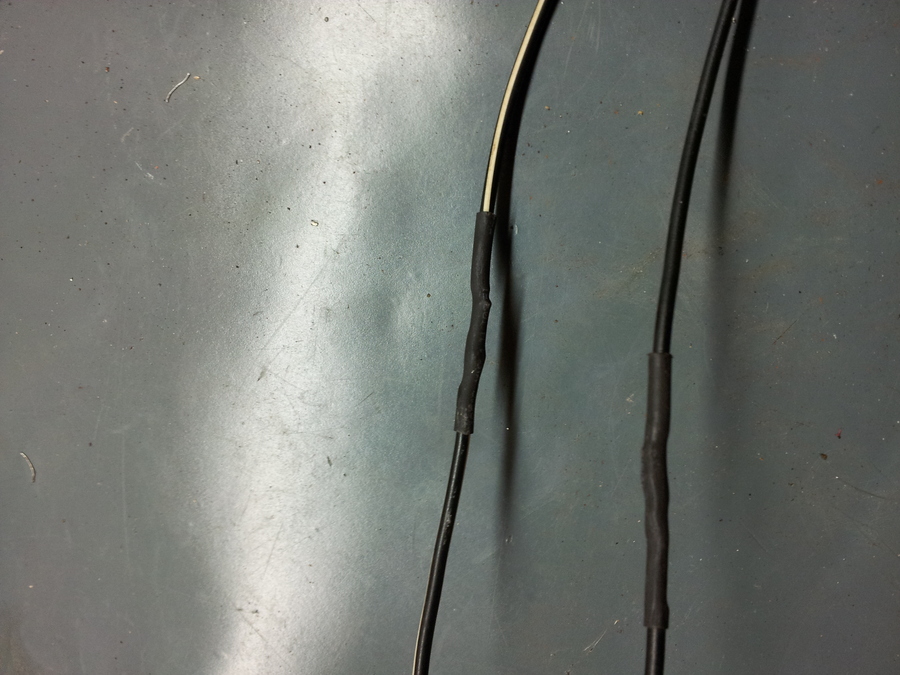
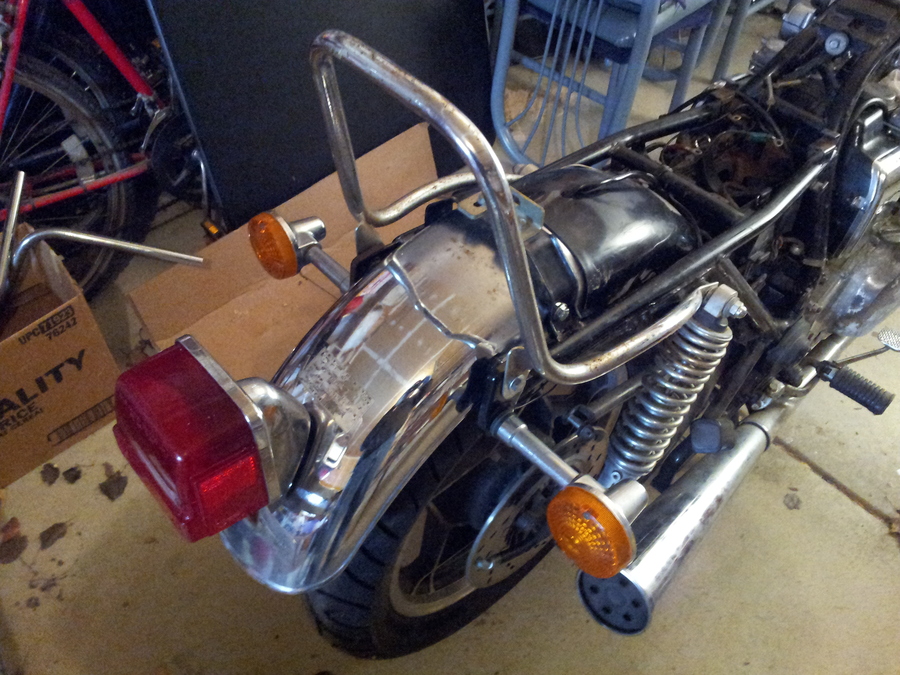
          Next up was hooking up the electric doo-dads. As you may recall, this bike came to me with the turn signals, fenders, and brake lights cut because PO was going to chop it. So I soldered the turn signal and brake light wires back together and reattached them to the bike.

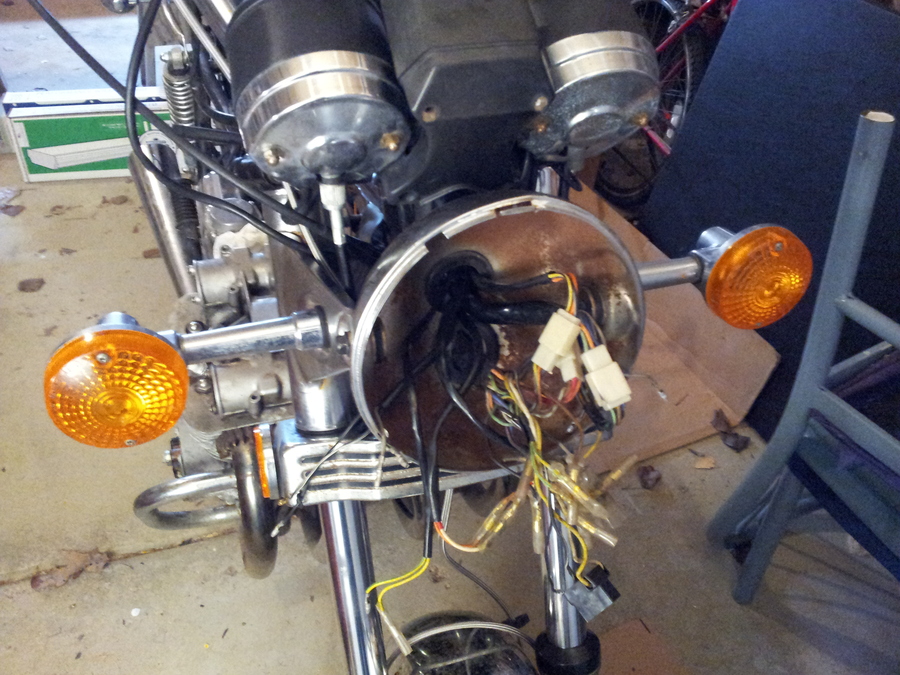
          Also, I made a bonehead move and disconnected everything in the headlight bucket because I thought I had to remove it for something else. I had to reconnect all of those back together, madly hoping I wasn't going to fry something upon turning the key.


          An example of my splicing jobs:


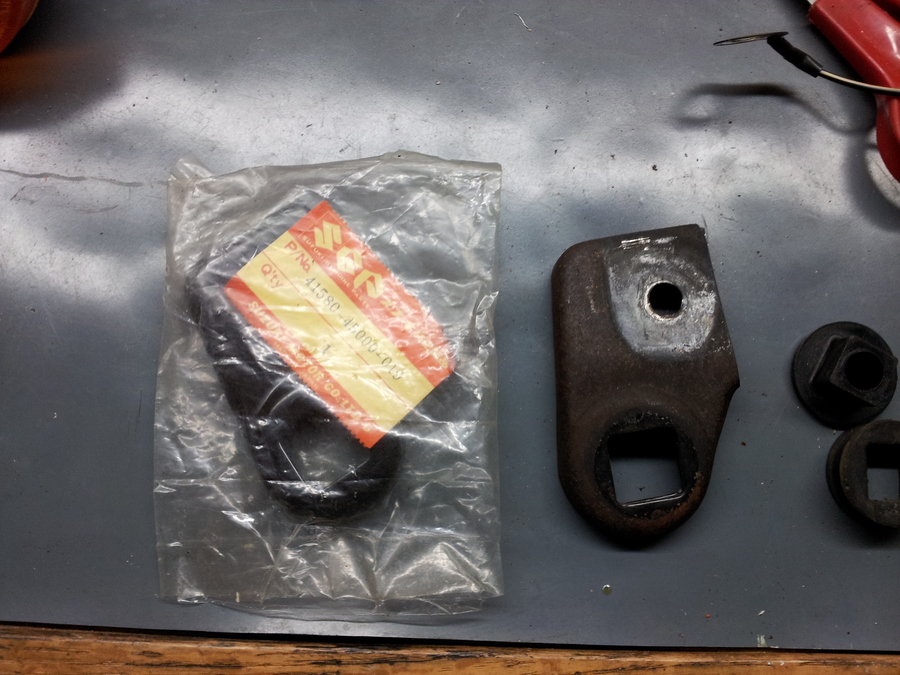
          Upon putting the rear end together, I notice the right rear turn signal seemed a little... droopy. Seems that something or someone bent the bracket earlier in the bike's life. And I don't have the tools to straighten it. This would look ridiculous going down the road, so I set out to the Parts Wanted forum here with my hat in my hands. I was just about to click the Post button when, on a lark, I decided to check eBay. Good thing I did, there were tons of these on there for cheep! I got a NOS bracket for practically the price of shipping:


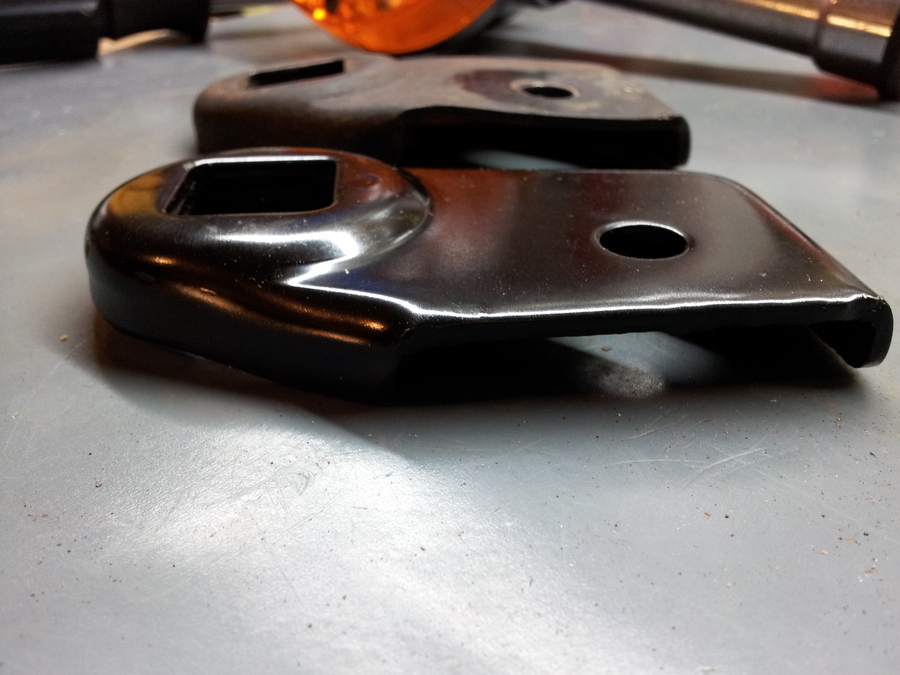
          This the first NOS part I've bought for the bike. Another view, comparing old and new:


          The right turn signal stalk looks good and straight now. Everything put together:


          So now that all the lights are back on the bike, I dropped the battery in to do a functional check.

          What worked:
          - Speedo/tach backlights
          - Gear indicators
          - Rear brake running/license plate light

          What didn't:
          - Headlight (both high and low beam)
          - Turn signals
          - Rear brake switch

          The headlight puzzled me because it worked fine before I took it off the bike. Inspected the bulb and the filaments looked fine. Tested the plug, but I wasn't getting voltage from either wire. Started tracing though the wiring diagram, but I didn't see any likely culprit so I just started checking all the connectors. The problem ended up being an orange wire in the vicinity of the coils. Apparently the bullet connector for it had come undone somehow amongst other maintenance.

          Then it came time to tackle the turn signals. Neither side came on or flashed with the button pushed. No idea if they worked before since, as mentioned a few times already, they came in a box with the bike. I checked the Suzuki repair manual for guidance, but the system they describe is different from what I have. My turn signal control unit has seven wires coming out of it, theirs has ten. My turn signal relay has three wires, theirs has two. Weird, maybe there are some differences in the model years that aren't accounted for in the manual. I did manage to find a much more accurate (and readable) diagram here in the forums for a 1980 GS1000.

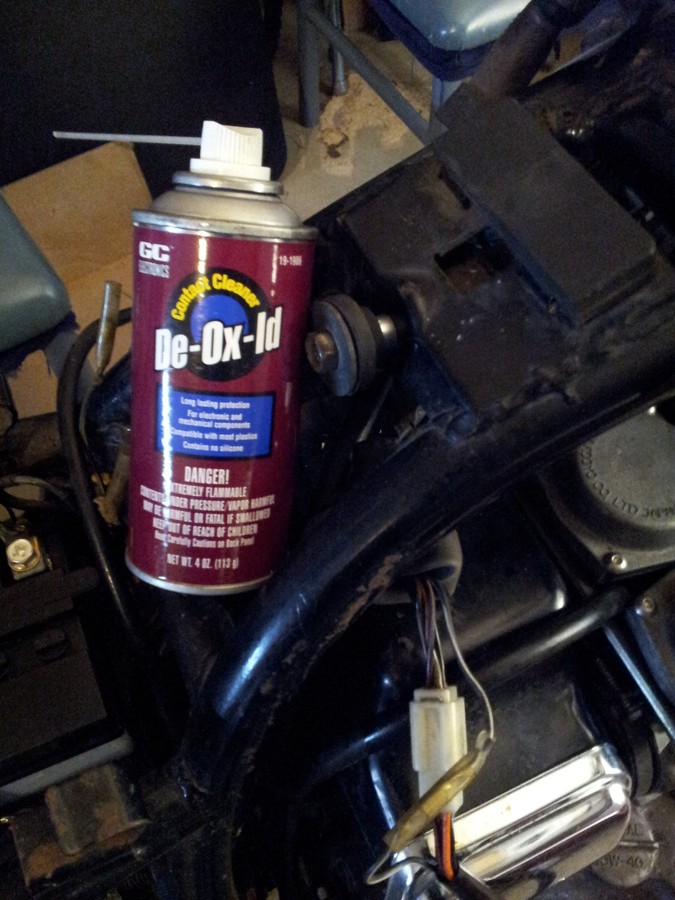
          Unfortunately, it still wasn't a whole lot of help because I wasn't sure exactly what to test and what kind of signals I should be getting out of the control unit. So I decided to try the GSR Forum's standard advice of cleaning every connector I could find. First one I did was the connector for the control unit. Sprayed some de-ox-id on both sides, cleaned them out as best as I could, let them dry for a few minutes, and put them back together. Eureka! The turn signals worked perfectly!

          Here's the product I used as well as the offending connector:


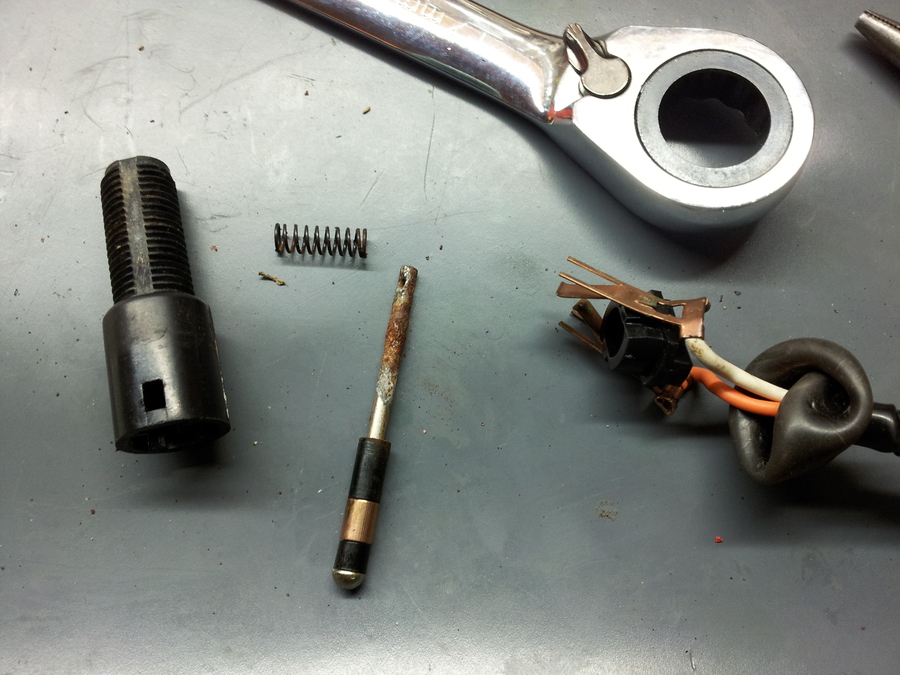
          And finally, the rear brake light switch. Removed it from the bike and noticed that I couldn't pull it out at all. The shaft was rusted right in. This is what it looks like all torn apart:


          Cleaned up the shaft with a bit of sandpaper, put it back on the bike and it works great now. Probably should have painted it or something, as it certainly *will* rust again. For now, i just lightly coated it in grease to keep it somewhat protected.

          My parts from Boulevard should arrive tomorrow, so next weekend I'll probably be putting the valve and breather covers back on, draining the oil, inspecting the clutch and replacing clutch springs, replacing the shift shaft seal, and replacing the tach drive seals.

          Then I'll get some tires sometime in April and (assuming there's nothing wrong with the transmission or shaft drive), it will be road test time. I can't wait!
          Charles
          --
          1979 Suzuki GS850G

          Read BassCliff's GSR Greeting and Mega-Welcome!

          Comment


            #65
            I was hoping that from here on out, the only major things left this old girl back on the road was an oil change and new tires. Alas, it'll be awhile longer still.

            One of the fittings that I needed for my rear brake line has been on backorder for three weeks. Getting tired of waiting, so I cancelled the order and just bought a new line from Rennsport. Haven't seen it yet, but I'm sure it will be here in a few days as it was supposed to ship the day after I placed the order.


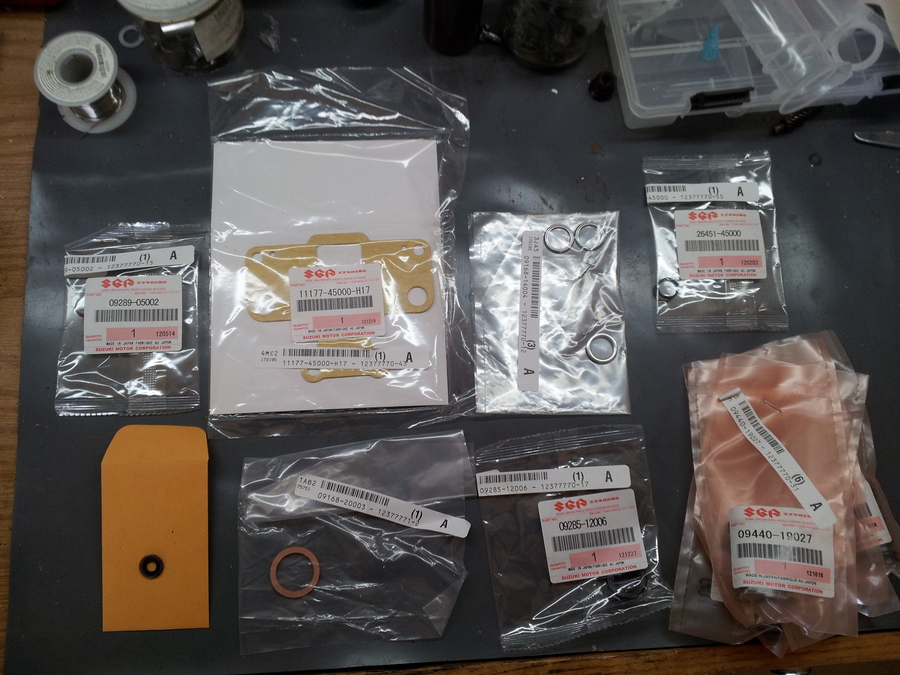
            Yet another shipment of parts. Mostly seals and gaskets and washers and whatnot. For reasons unknown, I also got some kind of bonus mystery washer in a little envelope. It's metal on the outside and rubber on the inside. Didn't order this. Anyone know what it's for?

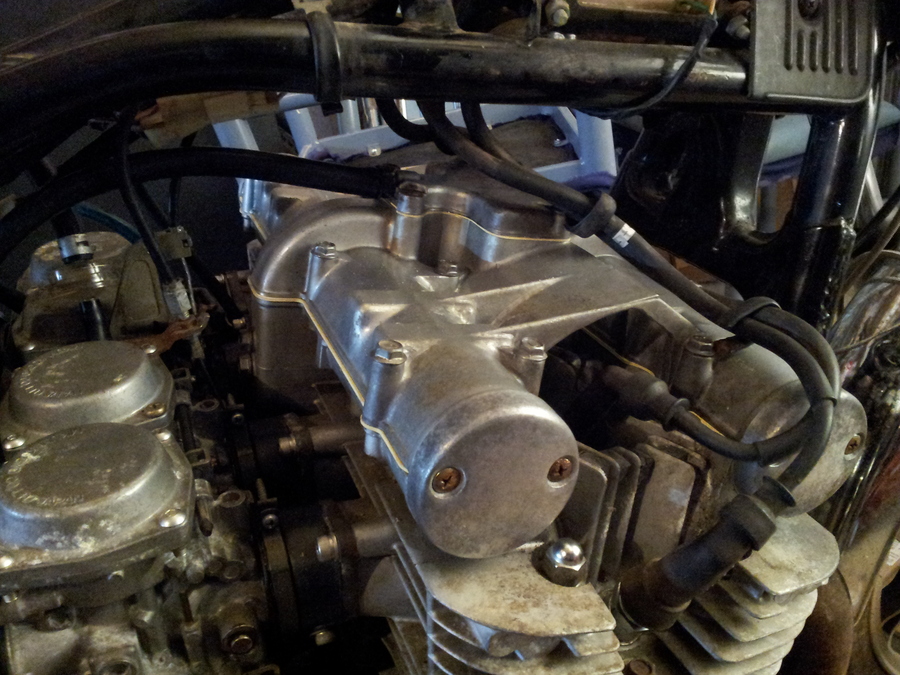
            I finally got the last shim that I needed for the valves, so I set about putting the valve cover back together and buttoning everything up.


            Gave the valve cover and breather cover a nice soapy bath. Scrubbed the cam end covers with a scotchbrite. Still not pretty but at least it's a little cleaner.

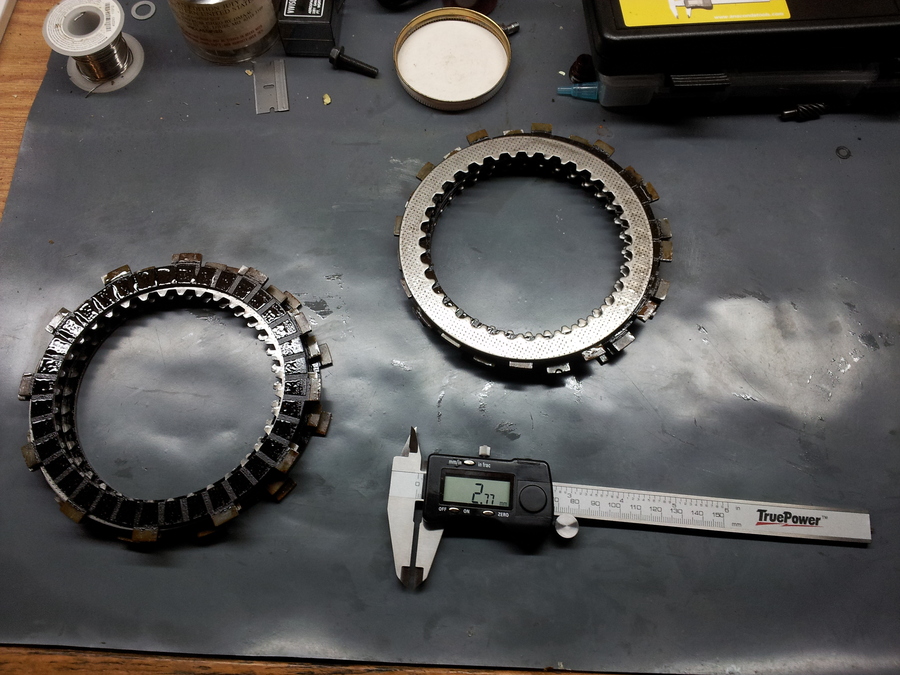
            Next step was to start the clutch inspection. Took a little while to figure out how the cable comes off the cover.


            Measured the friction plates, they're all good. That's good news to me, these are horrendously expensive for what they are.


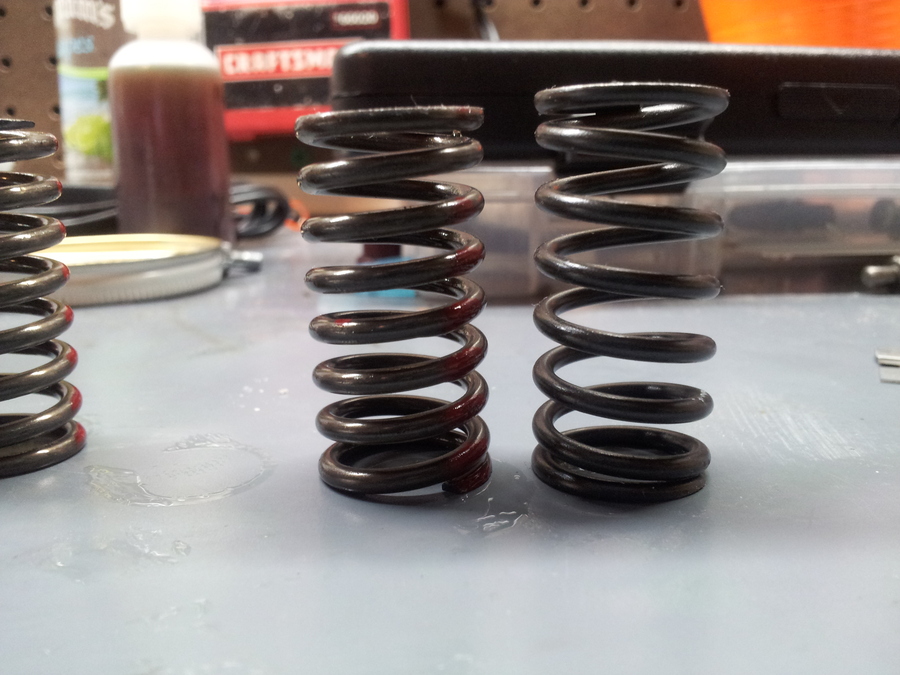
            Old spring on the left, new spring on the right.

            I had bought a set of replacement springs because I noticed that replacing them seemed to be a very common thing to do on these bikes regardless of mileage. Well, that was a waste of money. I measured the free length of mine and they're just fine. They're about 1mm shorter than the brand-new ones, but they have about 1mm to go before they're out of spec. I'll be keeping the old ones for now.

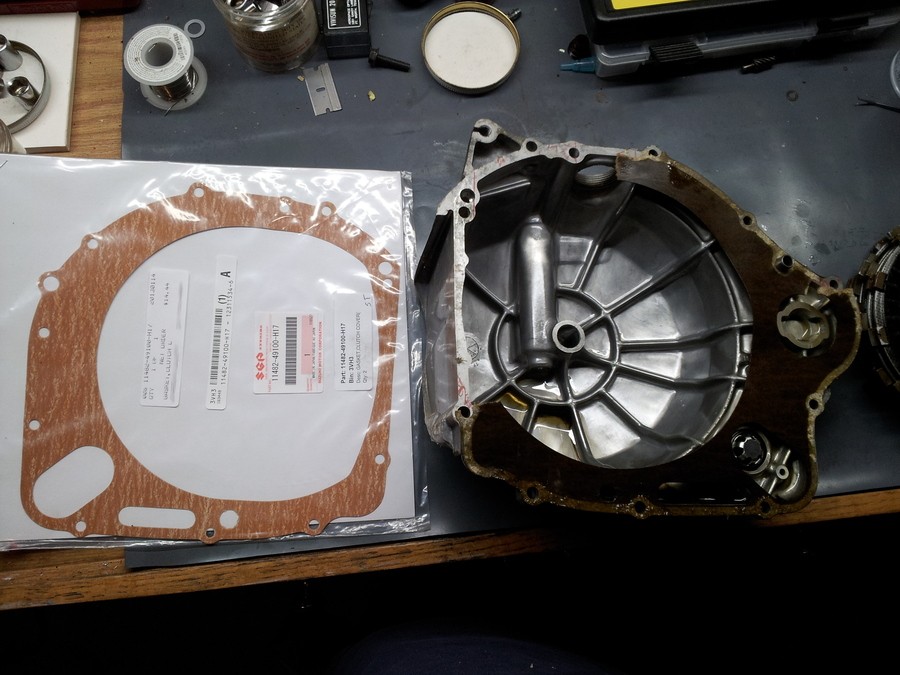
            Now that the clutch is good, we can button it all back up now, right? Nope...


            I must have ordered the clutch cover gasket for a 1981 GS850, which lacks the obsolete kickstart bump. Wonderful. This will mean another two weeks of waiting of parts.

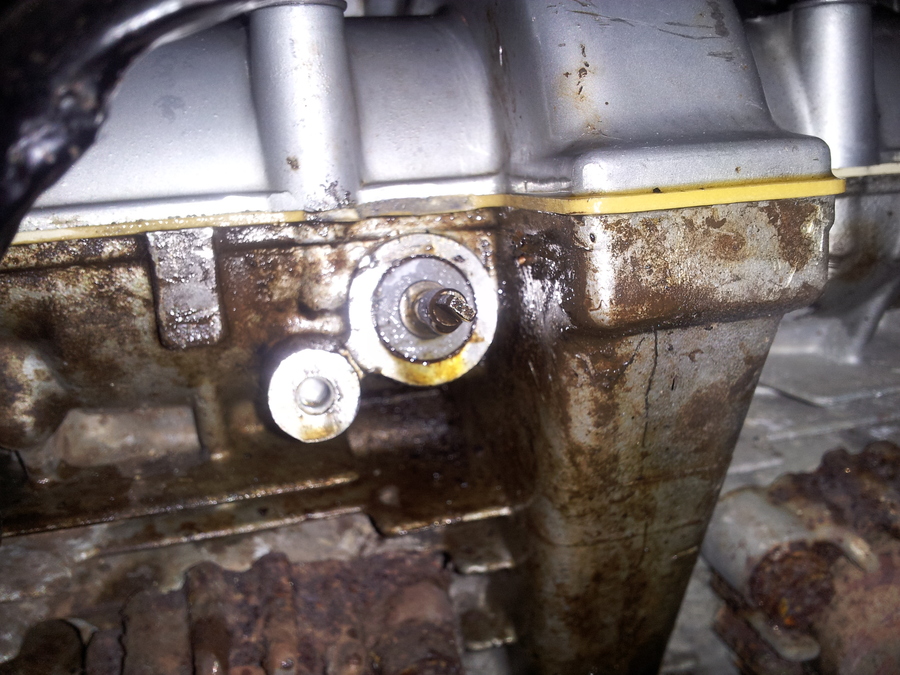
            Although it looks like I'll be waiting a bit longer still. I set out to replace the seals in the tach drive because it was obviously leaking. Guidance in the service manual and here on the forums says this guy just pops right out. Well, it didn't for me. After a whole lot of struggling, it just sort of ****ing broke.


            Not sure what to do about this. I guess I'll take the valve cover off and see if it can be banged out from inside (what I should have done in the first place). But from memory, I don't recall a whole lot of room up to work in up there, which is probably why I didn't even try when I had the valve cover off.
            Charles
            --
            1979 Suzuki GS850G

            Read BassCliff's GSR Greeting and Mega-Welcome!

            Comment


              #66
              The mystery washer looks like one of the washers used on the petcock mount screws. I think it's also used on the float bowl drain screws. If there's a part number on the envelope, you can use that to find farts fishes that reference it. I can't remember off the top of my head which retailers' sites can do that.

              That tach drive shaft housing shouldn't be stuck like that. If you're going to drive the rest out, find a way to support the wall of the camshaft oil gallery. I'm thinking a C-clamp with a couple sockets: A small one inside to drive the broken part, and a large one on the outside to support the head casting. I don't know how you'll get the tach shaft out, though.

              The dark line around the output housing makes me think a PO tried to seal it with silicone. That really sucks.
              Dogma
              --
              O LORD, be gracious to me; heal me, for I have sinned against you! - David

              Skeptical scrutiny is the means, in both science and religion, by which deep insights can be winnowed from deep nonsense. - Carl Sagan

              --
              '80 GS850 GLT
              '80 GS1000 GT
              '01 ZRX1200R

              How to get a "What's New" feed without the Vortex, and without permanently quitting the Vortex

              Comment


                #67
                Hey Dogma,

                Turns out I did order the washer, but danged if I can remember what for. I was mostly surprised that it came in an unmarked envelope instead of the familiar SGP packaging. All I can find on the fiche is that it's used on the petcock bolts and somewhere in the crank case. Neither of which I bought it for. Oh well, I'll hold onto it until I remember. (Could also be that I copied a part number down wrong and am now short on some other washer or seal now...)
                Good call on the C-clamp idea, I'll definitely give that a try. I was hoping to not have to remove the camshaft, but it's doubtful I'll be that fortunate.
                Charles
                --
                1979 Suzuki GS850G

                Read BassCliff's GSR Greeting and Mega-Welcome!

                Comment


                  #68
                  The washer may go somewhere on the crankcase... How about on the fluid level check screw for the secondary drive? I think that uses one.
                  Dogma
                  --
                  O LORD, be gracious to me; heal me, for I have sinned against you! - David

                  Skeptical scrutiny is the means, in both science and religion, by which deep insights can be winnowed from deep nonsense. - Carl Sagan

                  --
                  '80 GS850 GLT
                  '80 GS1000 GT
                  '01 ZRX1200R

                  How to get a "What's New" feed without the Vortex, and without permanently quitting the Vortex

                  Comment


                    #69
                    Ah, I think you're right. I ordered all the seals and crush washers I could find for the engine and drive oil changes because I had no idea what the condition of the existing ones might have been. Probably a wise move.. the crush washer for the engine oil drain plug was squished so bad I thought it was part of the plug at first!

                    With the exception of the tach drive sleeve, I think I now have in my possession everything I need to get this thing on the road for a test ride. Rear brake line, clutch cover gasket, and two Shinko tires arrived on my doorstep today. Woohoo! Thank you Rennsport Auto, Z1 Enterprises, Motorcycle Superstore, and various random eBay sellers for your one-of-a-kind, "holy **** that was fast" order fulfilment and shipping!
                    Charles
                    --
                    1979 Suzuki GS850G

                    Read BassCliff's GSR Greeting and Mega-Welcome!

                    Comment


                      #70
                      The TODO list is getting considerably shorter... If all goes according to plan, and there are no other emergencies happen, I could very well be tooling around the neighborhood this weekend. Woohoo!

                      I've been too busy getting crap done in lieu of stopping to take pictures or notes of it all, so I'll make this brief.

                      The new tach drive sleeve hasn't arrived yet so I'm simply going to say eff it, and deal with it another weekend. Just means I'll have to survive without a tach for a little while.

                      Tried to get the shift shaft seal out using the poke-and-pull method on BassCliff's site. Didn't work, the seal was in there too well. Which meant I had to remove the shift shaft. According to the service manual, the only way to do this involves removing the clutch hub and basket. And I'm ill-prepared for that, since: A) I don't have a impact gun B) I don't have the special tools to remove them and am not up to fabricating them C) I don't have the larger torque wrench required to re-torque the nut(s) upon reinstallation.

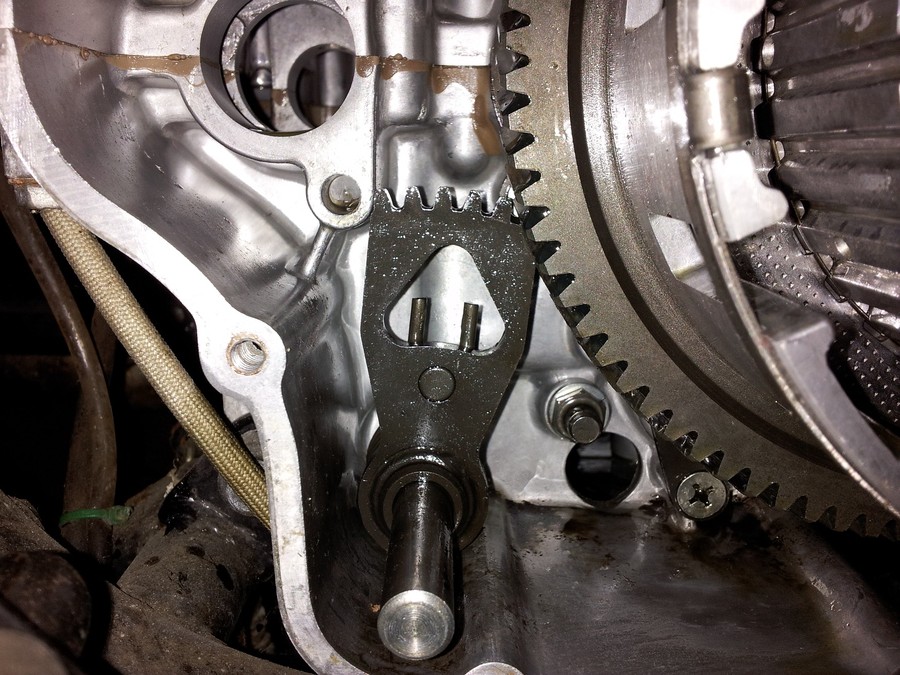
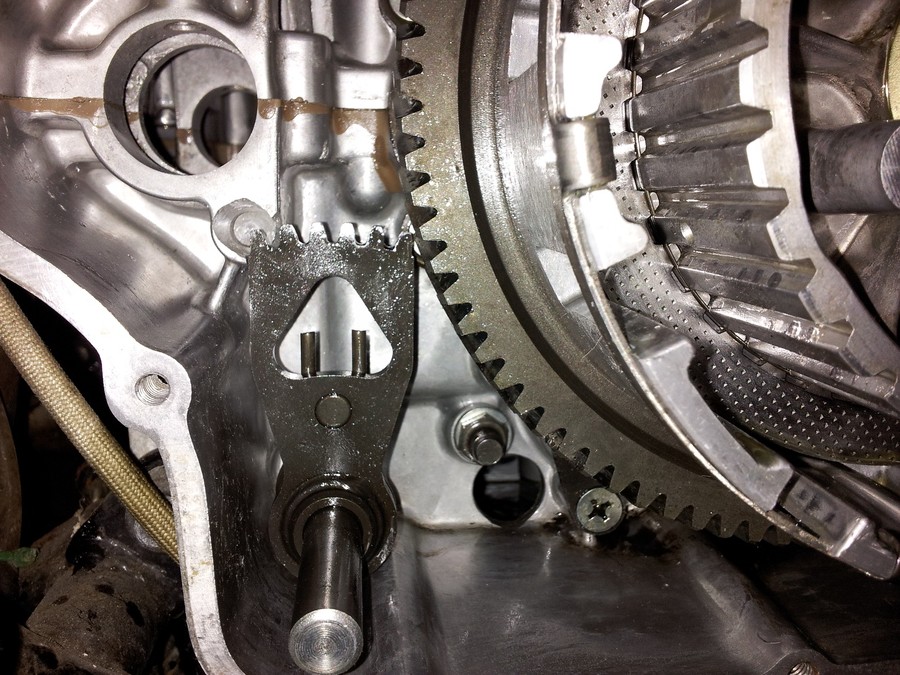
                      So did some more looking and noticed that the gear ear (or whatever it's called) really only needed a few more mm to clear the drive gear:


                      The metal part of the case that it bumps into seems to be a bolt hole for some part of the kickstarter that's no longer part of this engine. Hmm....


                      A little poorly-aimed drilling, some filing, and before you know it, I had enough room to pull the shift shaft out. (And yesh, I was extremely careful about catching the metal shavings and cleaning the whole area thoroughly afterward.)

                      The shift shaft seal still took some doing to get out. Reminded me of the fork seal debacle. One of these days, I'll get the hang of removing spring-cored seals. It looked like the seal had been replaced at least once before because there were pits and gouges in the case. Gee, I wonder if that's why it was leaking? I put a thin layer of blue RTV in the seat before pushing the seal home and hope that it's not me who has to replace it next time.

                      After that, I drained the secondary drive oil and replaced with new. While it was draining, I got the clutch put back together (decided to use the new springs after all), cables seemingly adjusted properly, etc.

                      The rest of my todo list is out in the garage, but it's basically:

                      replace oil filter and refill engine with oil
                      new tires, front and rear
                      put speedo drive back together
                      connect and bleed rear brake

                      All achievable by mid-afternoon, I hope.
                      Charles
                      --
                      1979 Suzuki GS850G

                      Read BassCliff's GSR Greeting and Mega-Welcome!

                      Comment


                        #71
                        Looking forward to seeing more. I too haven't done alot as I'm waiting on parts to arrive but it's great to see other's progress.
                        Cowboy Up or Quit. - Run Free Lou and Rest in Peace

                        1981 GS550T - My First
                        1981 GS550L - My Eldest Daughter's - Now Sold
                        2007 GSF1250SA Bandit - My touring bike

                        Sit tall in the saddle Hold your head up high
                        Keep your eyes fixed where the trail meets the sky and live like you ain't afraid to die
                        and don't be scared, just enjoy your ride - Chris Ledoux, "The Ride"

                        Comment


                          #72
                          Well I thought I was on a roll Saturday. Refilled the engine with oil, got the secondary gear oil changed, Drained the final drive oil... hang on, where'd I put my crush washers? I tore apart the garage looking for them... only thing I can think of is that I threw away the baggie they were in by accident. Oh well, no biggie. I can probably pick up a suitable substitute from the hardware or auto parts store.

                          Okay, let's tackle the tires. Took the front wheel off. Then went into full idiot mode and left the bike held up by the hydraulic jack under the engine while I went in for lunch. The jack slowly fell and let the forks touch the ground and I almost dropped the thing trying to lift it back up and correct the situation... Now it's sitting sturdy as a rock with a jackstand under each case saver.

                          Crisis averted, I started on the front tire. Man, those YouTube guys make changing a tire look so easy. It was like a half an hour getting that thing off and what do I find inside? An inner tube! Nobody told me this bike with mag wheels had inner tubes! I guess it's my fault for not checking... So I'm off to order inner tubes as we speak.

                          Won't be able to ride it even after they get here, though, as I still need a new tach drive. Upon further consideration, I can't let the old one just sit in there while I ride it around because without that inner oil seal, it's probably going to spew oil all over the place. Le sigh...
                          Charles
                          --
                          1979 Suzuki GS850G

                          Read BassCliff's GSR Greeting and Mega-Welcome!

                          Comment


                            #73
                            Haven't posted in awhile, but that doesn't mean I've been sitting idle. In fact, it's been a very productive and exciting couple of weeks!

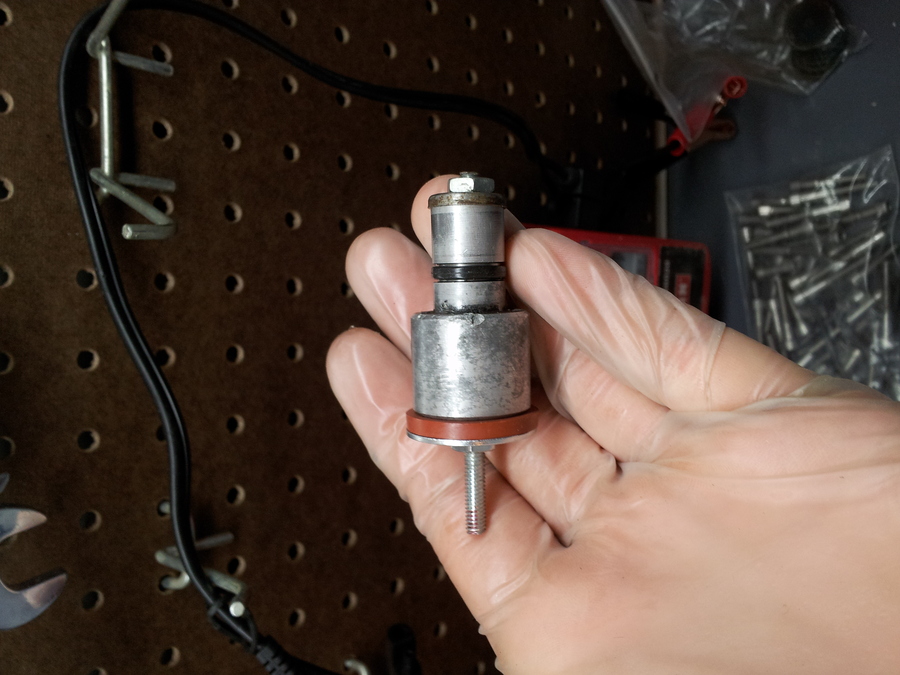
                            I ran into the first big issue with the bike, trying to remove a broken tach drive gear sleeve. That ordeal is documented over here: http://www.thegsresources.com/_forum...d.php?t=206905 Thankfully, with the advice of helpful forum members, I prevailed. After knocking it out, I danced a little jig and celebrated with a Smirnoff Ice Triple Black (i.e., lady's drink). Here's what I put in its place until the tach drive gear shows up:


                            It leaks a bit of oil around the nut on the end, but I'm not super worried about it. That problem sorted, I refilled the final drive oil (with crush washers purchased at great expense from Advanced Auto Parts).

                            I then set about changing the rear tire. No pics of this unfortunately. My mom was visiting and she pulled up a chair to chat and watch me work. I realized quite quickly that yanking off the rear wheel wasn't going to be quite as simple as the front because the mufflers on either side of the wheel interfered with pulling out the axle. Took a closer look... the exhaust is welded all the way up to the engine on one side and clamped to the crossover tube on the other. WTF, I thought. This far, and I have to remove the whole friggen exhaust just to change a tire? There's got to be a better way, but I couldn't see it. So I grumbled a lot while Mom sat there, poked at her iPad, and offered occasional sympathy.

                            I had part of the left exhaust undone (sweating a lot because the thing that would REALLY put me over the edge would be breaking an exhaust bolt) when Mom piped up and said, "Hon, come take a look at this, do you think it would help?" While I was just getting more and more angry at the additional work I found myself doing, she had Googled "How to remove the rear wheel on a Suzuki Motorcycle". And what do you think she found? Only BassCliff's tutorial entitled "Rear Wheel Removal" (http://members.dslextreme.com/users/...el_removal.pdf). I was dumbfounded. But gratefully so. After skimming it, I realized that I had already read the PDF and simply forgotten about its existence. Removing the shocks and lifting the rear wheel made it rather simple to get the wheel off. (After this, Mom asked whether she qualified as a motorcycle mechanic now. I think she certainly does!) So thanks Mom and BassCliff!

                            Wheel off, I found out that even though the front tire required an inner tube, the rear one did not. As soon as I removed the wheel I saw "Tubeless tire applicable." Damn. Oh well. (Of course, I had already purchased the tube...) The rear tire came off and went back on MUCH easier than the front one did. Are larger tires just easier to handle? No problems seating the bead. The drive shaft splines looked excellent, no wear at all. I put the recommended Honda moly grease on them. I did forget to balance the wheel before I put it back on. Oops. If I get vibration at speed, then I'll try those Dyna Beads or whatever they're called and see if they're a waste of money or what.


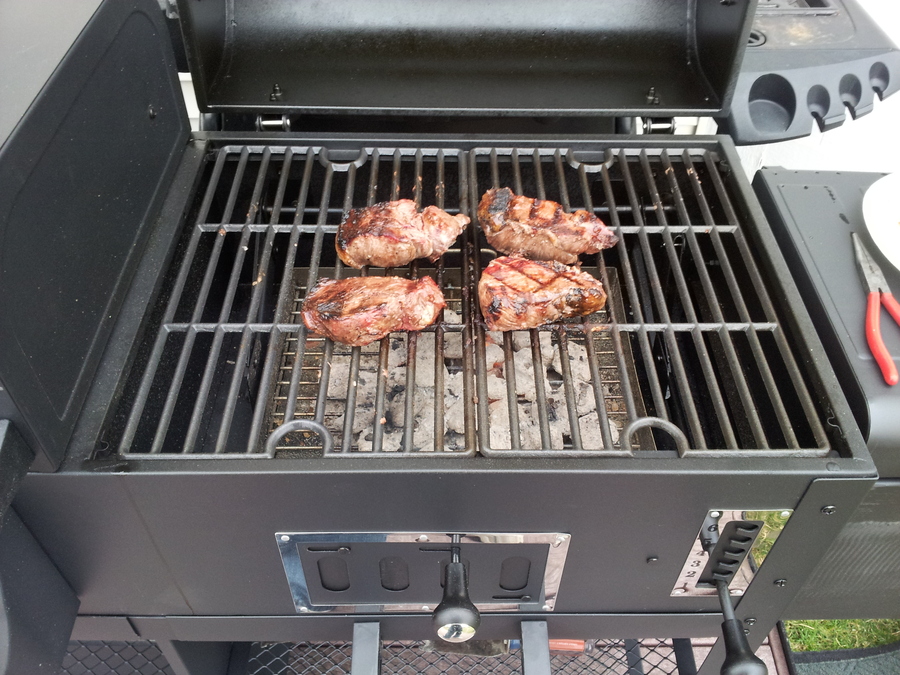
                            Capped off the day with the first Brazilian Beef of the season. This is a small batch, we normally make enough to fit the whole grill. For those who haven't had this, it is the single best way to grill meat ever invented by the human mind. Once you've tried this stuff, all other forms of cooked beef will taste completely disgusting. And it's extremely simple to do:

                            - Almost any cut of beef will work, but top sirloin is best. Must be cut at least 1 inch thick. 1.5" is about the sweet spot for me. Larger chunks can be done too, you just grill them for awhile, cut off a layer of "done" meat, and then continue grilling the rest.

                            - The secret ingredient is rock salt. That's it. You "marinate" the meat in a light layer of rock salt for around 20 minutes prior to grilling. It must be food-safe (obviously). It's usually labelled "ice cream salt". We get the Morton brand in the grocery store, it comes in a red box. Sea salt or other coarse-style salt does not work.

                            - Grill over charcoal only. Gas or electric does not work. You sear the meat with high heat first to seal in the juices (this is why you need a thick cut of meat) and then drop the coals a bit to finish cooking the inside for a few minutes. Cook rare to medium. This is the most critical part. Well done is overcooked. If there's no blood when you cut into it, you've ruined the beef.

                            I've grilled beef this way for lots of people over the years, many who weren't even fans of steak. Everyone loves it. They usually can't believe that rock salt is the only thing on the beef. (Leftovers reheat extremely well and go in omelets the next morning.) My wife often bakes up a batch of cheese bread called pao de queijo to go with the beef.

                            If you're in my neck of the woods and are jonesin' to try this, PM me and I'll invite you over to show you how it's done.
                            Last edited by eil; 04-23-2013, 11:26 AM.
                            Charles
                            --
                            1979 Suzuki GS850G

                            Read BassCliff's GSR Greeting and Mega-Welcome!

                            Comment


                              #74
                              Nice job. Just as an aside, I'm running front and rear on my 1100G and 850GLT tubeless, no problems yet, and I put on a whole of road miles, including gravel and questionable roads here in "the frozen 'nort".

                              Comment


                                #75
                                I figured this: if I'm going through all of this trouble to make my motorcycle road-worthy, I myself should be road-worthy as well. To that end, I decided to take the MSF Basic Rider Course again this spring.

                                Now, I took the BRC a year and a half ago, passed with flying colors, got the "cycle" endorsement on my driver's license, and then did nothing with it since I was commuting 140 miles a day during that time frame thanks to a combination of new job and ****ty housing market. Last summer we finally moved and I bought this project bike when things finally started to settle down.

                                Here in Michigan, the BRC is only $25 since the majority of it is subsidized by revenue from vehicle registrations. Once you've passed the BRC, you just take your certificate down to the Secretary of State (our version of the DMV), take a super-easy written test, and bang, you're licensed.

                                If you've never taken the BRC before, there's quite a lot to learn and a very small amount of time to learn it in. You sit in a classroom Friday evening and skim over the MSF handbook for a few hours and then spend most of Saturday and Sunday doing various riding exercises in a parking lot.

                                In both classes that I took, most of the bikes were Suzuki GZ250's. Our fleet had a couple of Yamaha dual-sports, a couple of newer TU250's (those were nice), and at least one vintage GN250. One of the instructors dumped the GN250 by jump starting it and then letting go of the clutch while it was in first. A younger girl also dropped her bike during the evaluation performing an emergency stop. (Weirdly enough I didn't hear or see it... I saw her take off, I looked at something else for a few seconds, turned back and her bike was on the ground with her standing over it.)

                                I must say I had a blast, even though it was cold, snowing, and I couldn't feel most of my fingers in the morning sessions.

                                For the evaluation rides, I only got dinged for one thing: not braking when going into one of the curves. I was going slow enough that I didn't feel I had to brake and didn't realize I'd get dinged for it. Oh well. Like I said before, I'm already licensed, so I didn't care one way or the other if I passed or not. (Although it would have bruised my ego quite a bit.) A couple of guys who had been riding for years without their endorsement did not pass, that was a little surprising.

                                The instructors were awesome, even though the two in our group really didn't get along with each other very well...

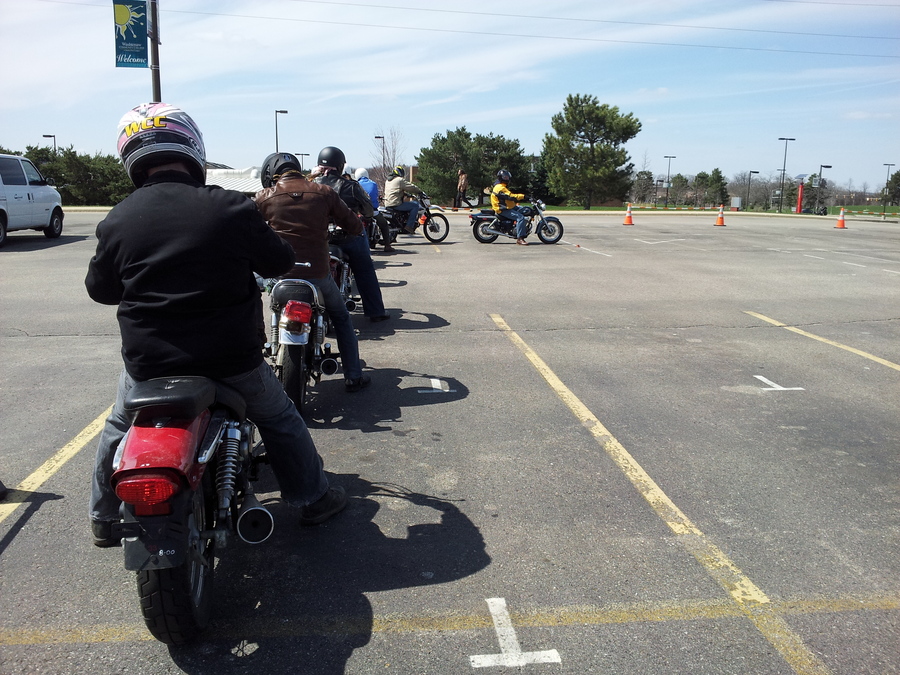
                                Here's the only decent photo I managed to take, we're all lined up ready to take one of the evaluation rides:


                                This parking lot is only a 10-minute ride from my house, so once my bike is insured and registered, I can see myself spending a few spare evenings trying to knock out the S-Box on my GS850.

                                I also have an undeveloped subdivision right behind my house. It's barricaded off such that cars can't (typically) get down there so it's the ideal place to practice low-speed maneuvers. I'll be taking advantage of that in the coming weeks.
                                Charles
                                --
                                1979 Suzuki GS850G

                                Read BassCliff's GSR Greeting and Mega-Welcome!

                                Comment

                                Working...
                                X