
Announcement
Collapse
No announcement yet.
1980 GS1000S Reluctant Rebuild
Collapse
X
-
I hear ya. Those areas that need attention might require using something as aggressive as a Dremel followed by 80 grit to smooth the damage from tire spoons, then 180 and 400 then the scotch brites. Never easy, for sure, but they would clean up. I've spent many hours sanding on aluminum parts and wheels are especially hard. It's always a daunting task, but it feels good to get em done, too. 1979 GS1000S,
1982 Honda CX500 Turbo, 1982 Honda MB5 w/CR80 motor, 1977 Honda "nekid" Goldwing, 1976 Honda CB550F cafe', 1972 Honda XL250 cafe'
-
Thanks Rich, means a lot to get compliments from you, as I've seen the very nice work you have done on your rebuild.Originally posted by Vmass View PostHey David........... I just caught myself up on your rebuild thread.
Very impressive work, congratulations!
Not to mention the work you did to score all those NOS parts which are no longer available through the regular channels.2018 Honda Africa Twin AS
2013 DR 650 Grey, sold 1981 GS 650E Silver,
1980 GS1000ST Blue & White, X2
2012 DL650 Vstrom Foxy Orange, in storage
1981 CT110 X2 "Postie Bikes" Gone to a New Home.
2002 BMW 1150 GS Blue & White - Sold
1975 BMW R90/6 Black - Sold 1984 GS1150EF Sold
1982 BMW R100 Africa trip, Stolen - Recovered- Sold
1977-1980 Suzuki GS550, GS1000E, GS1000S GSX750, GSX1100,s
Hondas ST90, CR125 CB175 , CB350 CB750, NSU Quickly, Yamaha RD's 350/400,
Comment
-
Switched the wheels
So last night I got some time in the garage and switched over the wheels from the Canadian Cooley to the Boise Beauty.
When I tightened up the axel nut I noticed the rear wheel no longer rotated freely.
I checked the spacers were installed in the correct manner and nothing wrong there, I mucked around for a good while and it seemed better but not right.
As I had both bikes apart I couldn't check the other one to see if I had it together correctly.
This evening I took it for a ride and checked the rear disk after about 2-3KM. It was quite warm in fact it was too hot to touch.
I searched the forum and found nothing that was obvious, so I went back out to look at it some more.
Being naturally lazy, I didn't want to start ripping into the brake caliper as I didn't think it was that, as it worked before and knew the PO had told me the shop had gone over the bike including the brakes, so I figured everything should be OK there.
It also had new looking Stainless Steel Lines so that confirmed something has been done recently.
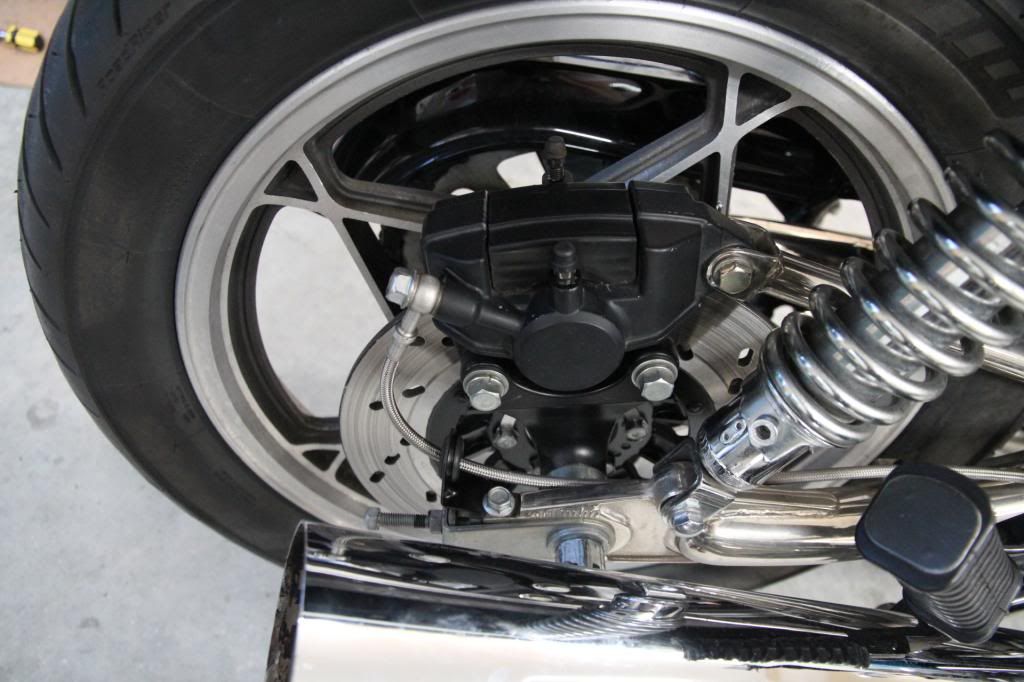
Well, you probably can already guess what came next, and yes I did pull the rear caliper and yes one of the pistons was stuck, so I got to rebuild the rear caliper tonight.
It actually only took me 45 mins to pull it and rebuild it, and about 20 freaking minutes to get the split pin back in the castle nut that holds the stay to the rear caliper.
I think I will change them out to Nylock nuts as that is a difficult place to install a spilt pin and being on the inside and blind.
After that I bled the brakes and pumped a good amount of new fluid through to flush out the older discoloured stuff.
Much better now, so I will test ride in the morning.
Now I can get those 20 year old tires off and install my new set of Avon Road Riders and get the nice pristine wheels onto the Canadian Cooley.
BTW when I picked up a new set of Road Riders from my local Suzuki dealer last week, I didn't check the date codes on them until I got home.
The front tire was already 2 1/2 years old so I called them back and asked them to get me a newer one.
They reordered one for me and this time I got a "1013" so March 2013, which is pretty good for a tire made in the UK.
All bolted back together and ready to ride.
 2018 Honda Africa Twin AS
2013 DR 650 Grey, sold 1981 GS 650E Silver,
1980 GS1000ST Blue & White, X2
2012 DL650 Vstrom Foxy Orange, in storage
1981 CT110 X2 "Postie Bikes" Gone to a New Home.
2002 BMW 1150 GS Blue & White - Sold
1975 BMW R90/6 Black - Sold 1984 GS1150EF Sold
1982 BMW R100 Africa trip, Stolen - Recovered- Sold
1977-1980 Suzuki GS550, GS1000E, GS1000S GSX750, GSX1100,s
Hondas ST90, CR125 CB175 , CB350 CB750, NSU Quickly, Yamaha RD's 350/400,
Comment
-
Cleaning were the sun doesn't shine
Call me picky, (some already have) but I like to clean stuff.
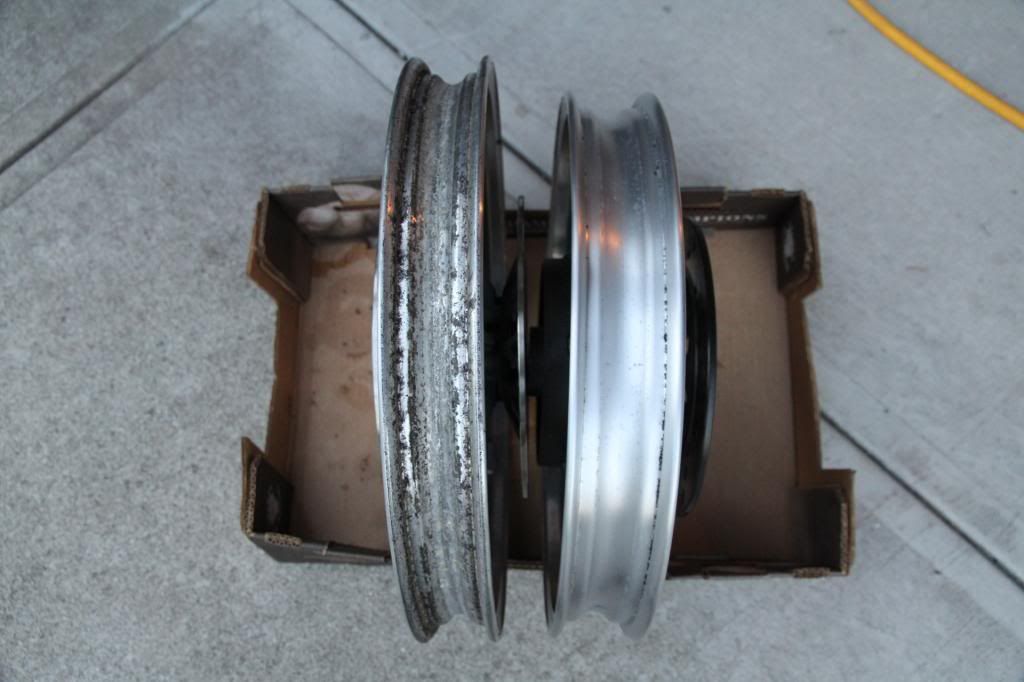
Including were no-one will ever see, like inside the rims.
I took the wheels into a local shop to get the old tires off because I have trouble getting tires off without leaving a few marks on the rims.
Once I got them back I cleaned them up and installed a new set of Avon Road Riders.
Here’s the first one cleaned and ready to start the tire install.
Thought I would try to describe how I install tires without using tire irons.
First I figure out the rotation of the tire and then install the rim into the tire at about 45 degree angle making sure the non disk side will face down when finishing the install. (on the front I usually remove one disk or use blocks of wood to keep the disk off the ground.)
I then use leverage to pull the rim into the tire, usually 1 hand on the rim and one on the inside of the tire.
I don’t use any lube just yet, as the tires seem to slip on OK just with the release agent from the moulding process.
Here's what it looks like
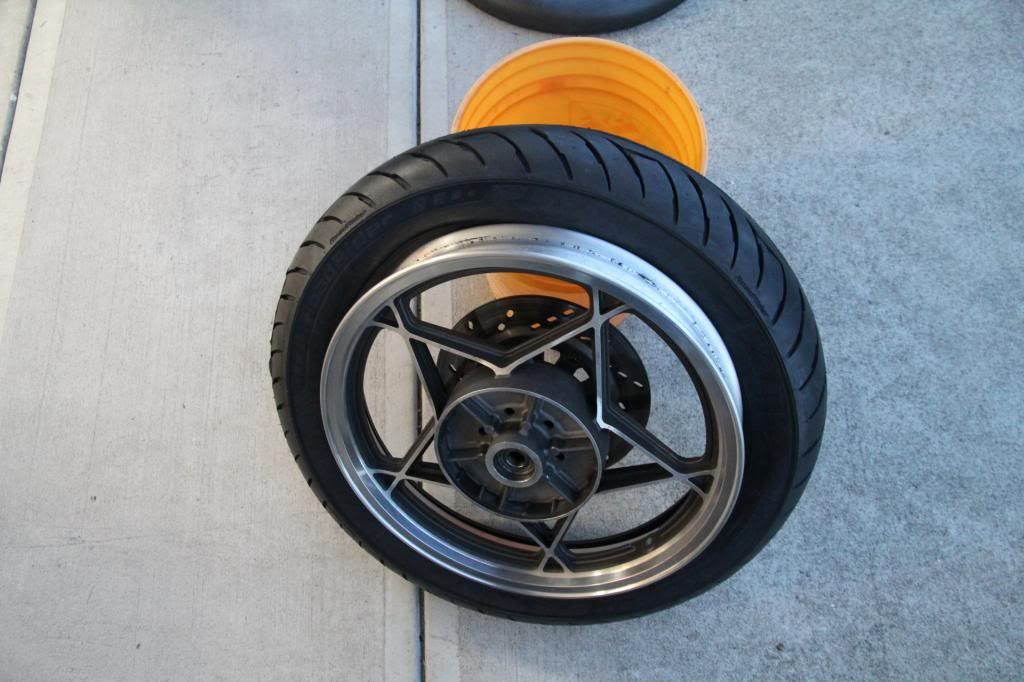
I just work it a little at a time and try not to make too much progress, just a little on each side at a time, 2 minutes and the first side is on.
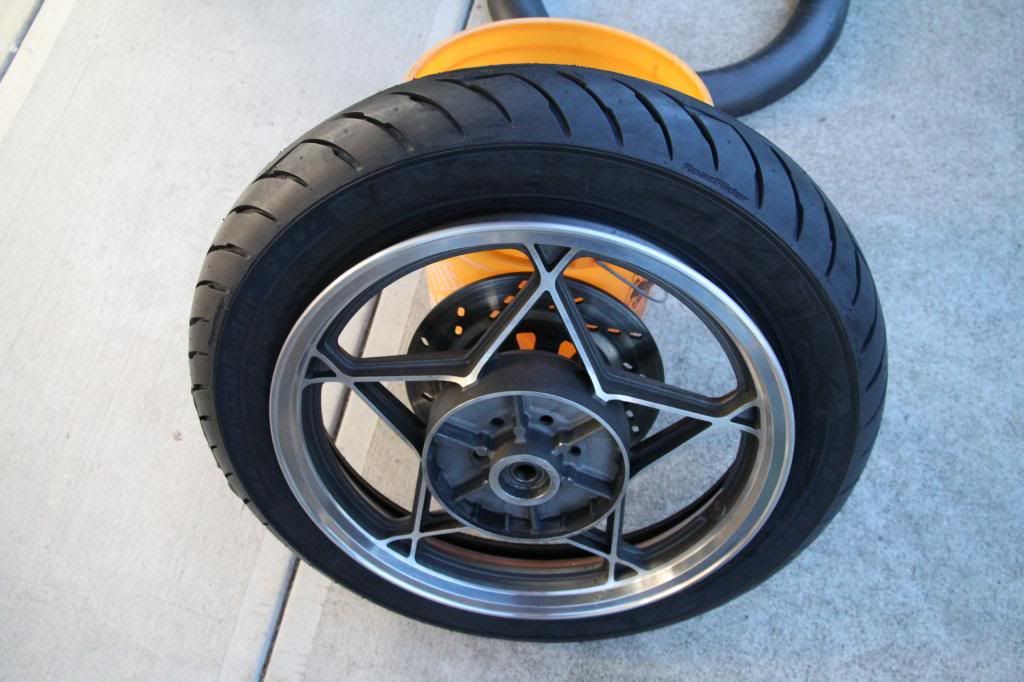
I now install the tube, add a little air to help with the install and make sure the tube isn’t twisted or folded in there.
I install the valve stem last and just let it drop into place.
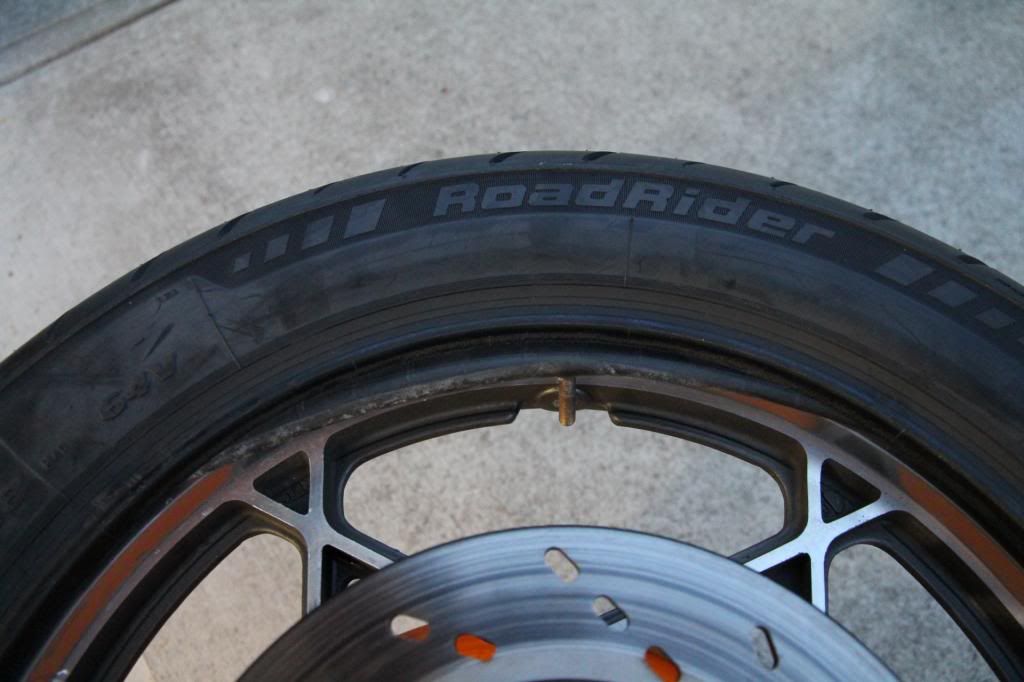
I insert the end of an Allen key into the hole in the rim and into the valve stem in the tube (remove the valve beforehand) to help keep it aligned with the hole in the rim as I reach into the tire and give it a push, it should pop out if all went well. Install the ring nut to stop it from slipping back in, but only a few threads as you will need the tube to move back so the tire will slip onto the rim easier.
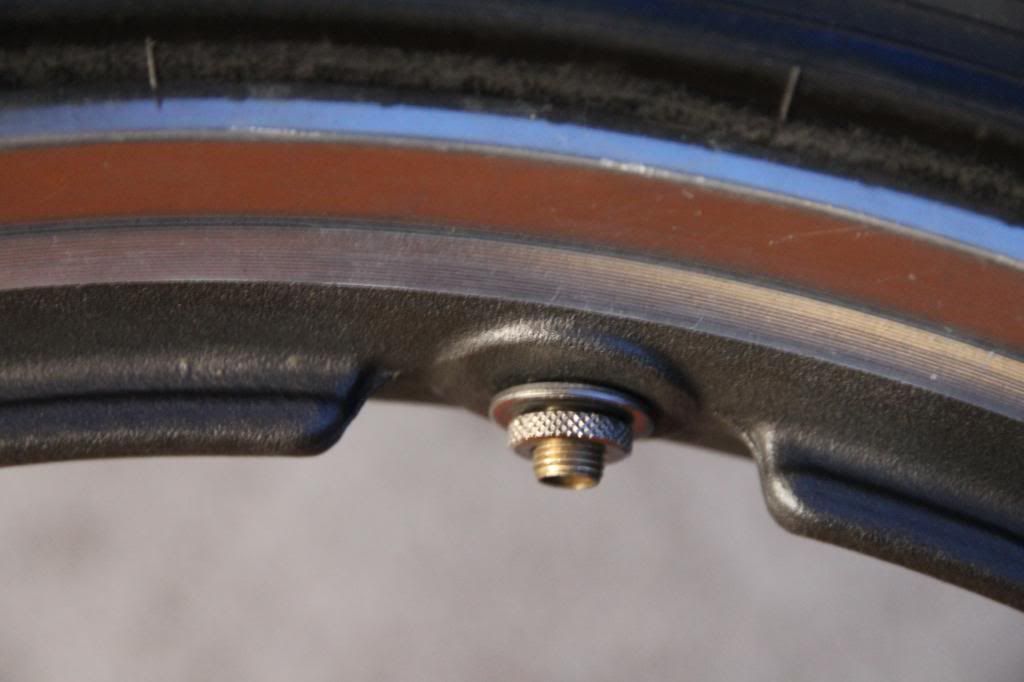
Now comes the fun part, lay the wheel down on something soft to protect the rim, I use packing foam sheets, and then place a piece of wood under the part I’m doing the business on.
Use the heal of your shoe or boot to start the tire onto the rim, start opposite the valve stem and work toward it evenly, a bit on each side at a time, again just a little at a time, too much and nothing will happen.
I’m using shoes here but I needed to put my boots on as this one was a little stubborn.
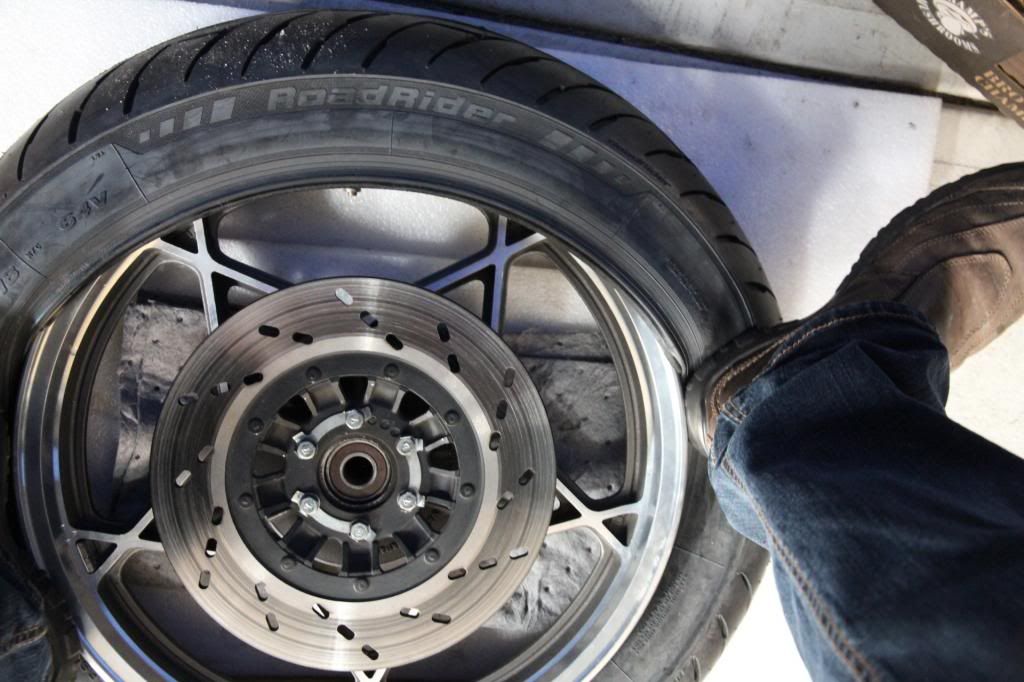
Keep working it around, little by little with both feet on the wheel and something close by to hold onto for balance.
I still have not added lube as it causes the side not being pressed on to ride out and you end up just chasing the tire around the rim.
After about 3-4 mins you should be pretty close to done and the last bit just pops on.
A quick stop in the action to put my motorcycle boots on and back to it.
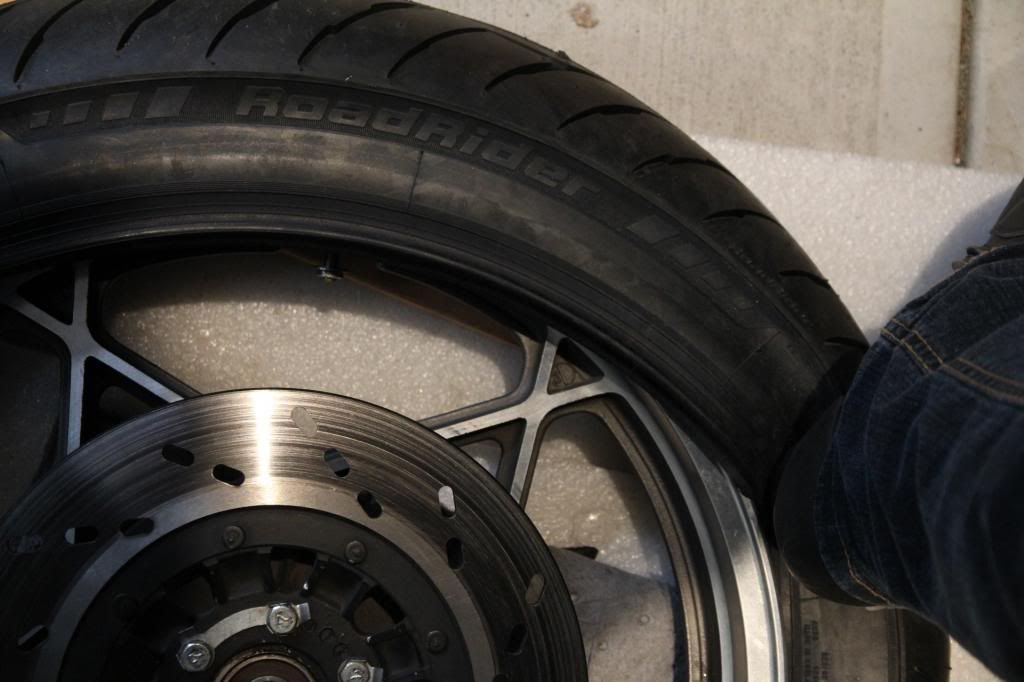
Almost done.
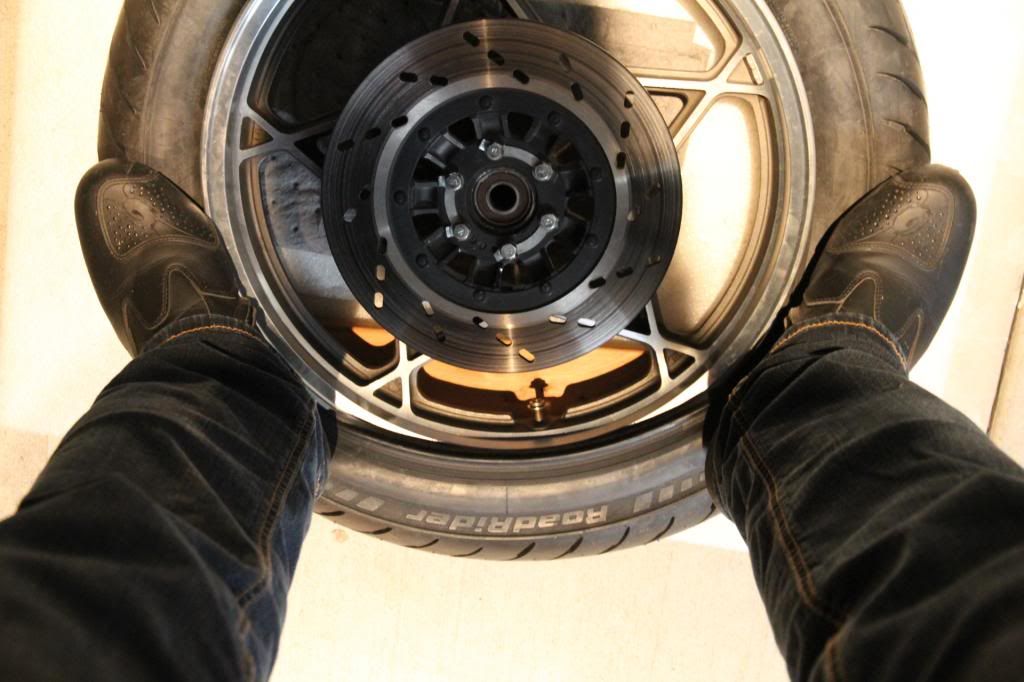
Done. Now I will add lube and inflate to approx. 60 PSI to seat the tire on the rim.
EDIT. Some manufacturers do not recommend inflating the tire past 40PSI to seat the bead, use more good quality lube rather than more pressure.
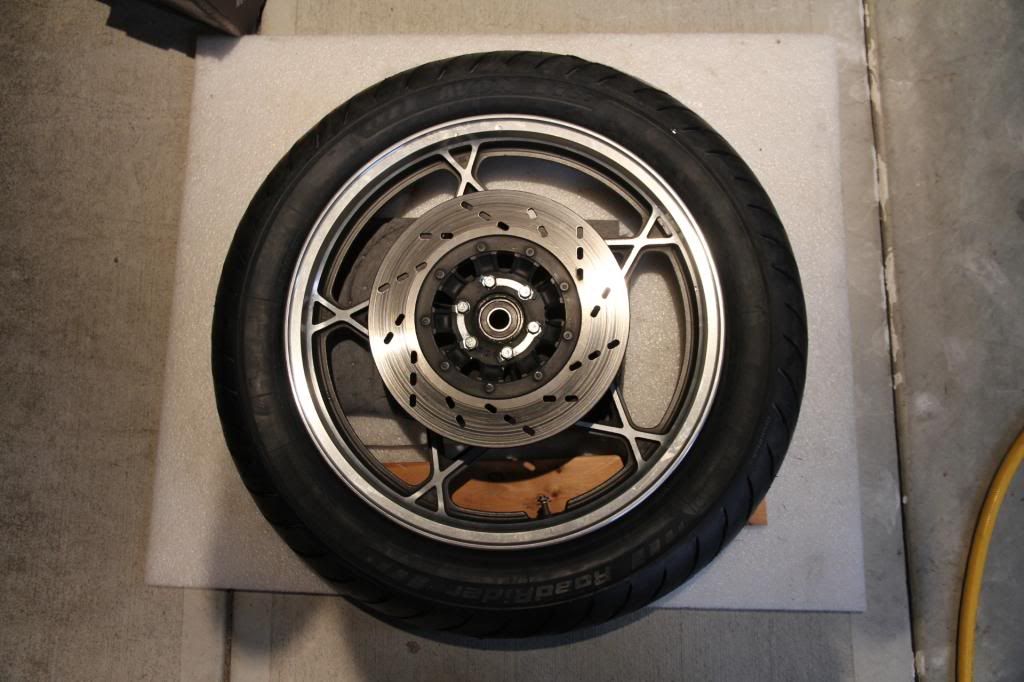
In the past I used a rubber hammer to help get the tire on but I find it is quite fast with this method and no damage to the rim.
I need to buy some rim protectors that work so I can do the whole job myself.
BTW I weight about 185lbs so you don't need to be 300lbs to use this method, it's more technique than brute force.2018 Honda Africa Twin AS
2013 DR 650 Grey, sold 1981 GS 650E Silver,
1980 GS1000ST Blue & White, X2
2012 DL650 Vstrom Foxy Orange, in storage
1981 CT110 X2 "Postie Bikes" Gone to a New Home.
2002 BMW 1150 GS Blue & White - Sold
1975 BMW R90/6 Black - Sold 1984 GS1150EF Sold
1982 BMW R100 Africa trip, Stolen - Recovered- Sold
1977-1980 Suzuki GS550, GS1000E, GS1000S GSX750, GSX1100,s
Hondas ST90, CR125 CB175 , CB350 CB750, NSU Quickly, Yamaha RD's 350/400,
Comment
-
Appreciate the descriptive write up David, I'll have to try that out.Rob
1983 1100ES, 98' ST1100, 02' DR-Z400E and a few other 'bits and pieces'
Are you on the GSR Google Earth Map yet? http://www.thegsresources.com/_forum...d.php?t=170533
Comment
-
I had corrosion grow inside my gs750 rims grow until I had persistent leaks. This was with new tires. Removed tires again cleaned the insides of the wheels and coated with a silicone to impede reoccurance ; leaks stoppedOriginally posted by Charlie G View PostYes , thanks for theinformation. I find cleaning the inside like you did sure makes a tubless tire seal better,
cg
Comment
-
ebay Spree
I took the time last week to track down a few items I needed to complete the restoration and have both bikes on the road instead of swapping parts everytime I wanted to run either one of the Cooleys.
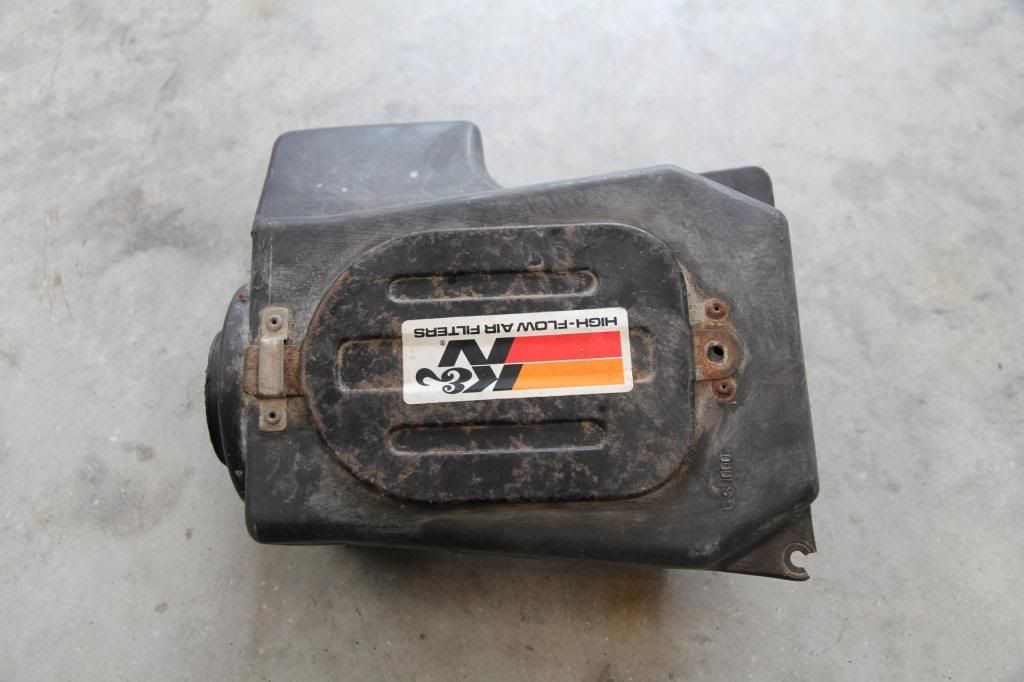
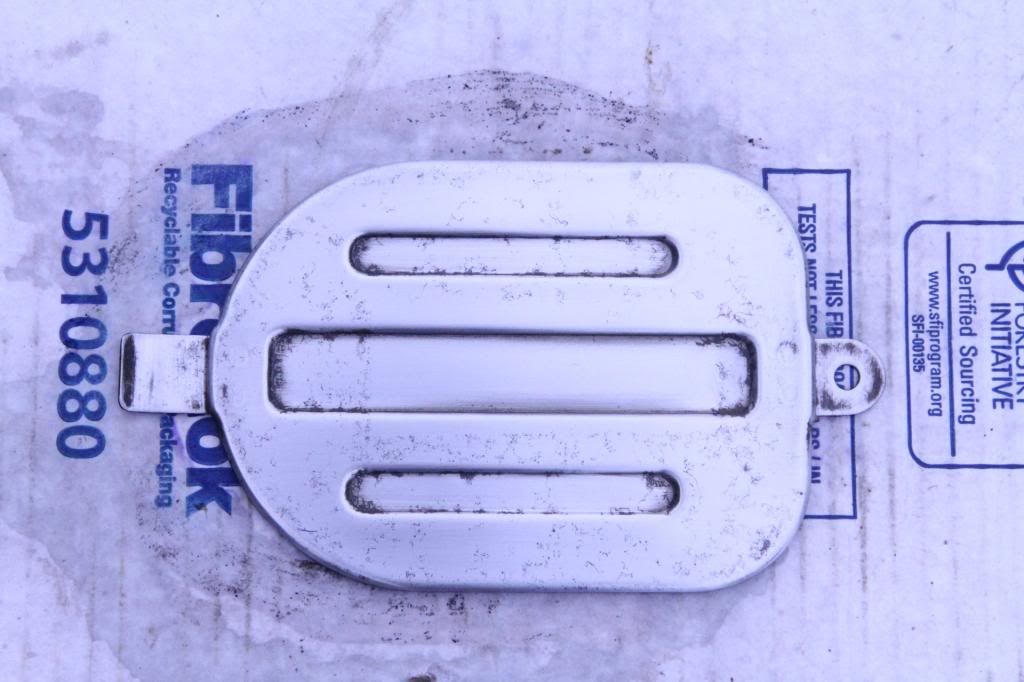
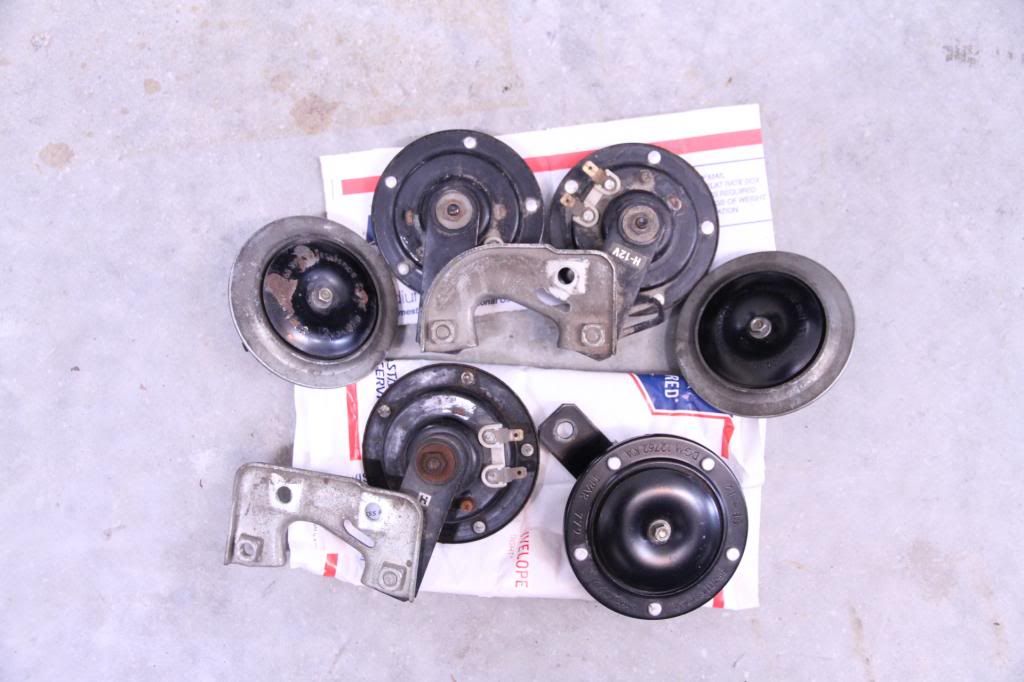
I managed to find a complete airbox with a lid on ebay and bid the princely sum of $8.99 and won it, I also got a set of horns and a bracket as both bikes are missing something in the horn department.
Here's the airbox.
After a little paint stripper.
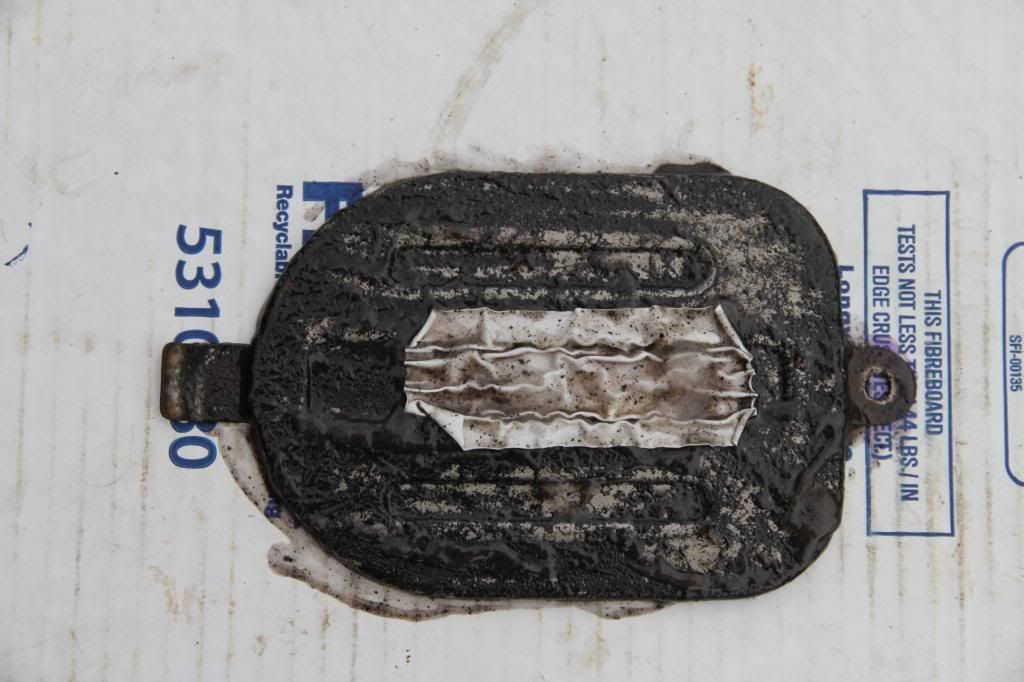
And some sanding, (not sure what I changed on the camera setting but must have pushed something as these pictures are a bit purple and washed out.)
Here is a gaggle of horns I got from ebay, the top pair in the picture has the incorrect bracket for a 1980 GS1000, but one other horn I got had the correct bracket.
I think they advertised as coming off a 1978 GS1000 but can not remember for sure.
Hopefully I can get 2 sets out of that lot, I already have one other horn bracket painted and awaiting installation.
 Last edited by Kiwi Canuck; 09-06-2013, 10:06 PM.2018 Honda Africa Twin AS
2013 DR 650 Grey, sold 1981 GS 650E Silver,
1980 GS1000ST Blue & White, X2
2012 DL650 Vstrom Foxy Orange, in storage
1981 CT110 X2 "Postie Bikes" Gone to a New Home.
2002 BMW 1150 GS Blue & White - Sold
1975 BMW R90/6 Black - Sold 1984 GS1150EF Sold
1982 BMW R100 Africa trip, Stolen - Recovered- Sold
1977-1980 Suzuki GS550, GS1000E, GS1000S GSX750, GSX1100,s
Hondas ST90, CR125 CB175 , CB350 CB750, NSU Quickly, Yamaha RD's 350/400,
Comment
-
2018 Honda Africa Twin AS
2013 DR 650 Grey, sold 1981 GS 650E Silver,
1980 GS1000ST Blue & White, X2
2012 DL650 Vstrom Foxy Orange, in storage
1981 CT110 X2 "Postie Bikes" Gone to a New Home.
2002 BMW 1150 GS Blue & White - Sold
1975 BMW R90/6 Black - Sold 1984 GS1150EF Sold
1982 BMW R100 Africa trip, Stolen - Recovered- Sold
1977-1980 Suzuki GS550, GS1000E, GS1000S GSX750, GSX1100,s
Hondas ST90, CR125 CB175 , CB350 CB750, NSU Quickly, Yamaha RD's 350/400,
Comment
-
Chain Tool
OK so if you ride a "G" you may not understand this part.
I ordered a chain tool to complete the riveting of my new chain.
I had ordered a 630 chain and new sprockets as I wanted to keep things stock on the Canadian Cooley and when it came to choosing master link or rivet type I figured I'll go with the same as the factory supplied.
That meant I needed a tool to rivet the chain and it was easy to borrow one so no problem except my friend who has one is lousy at returning calls, so I finally got frustrated and ordered one online as they are only $30.
So here's the unit I got.
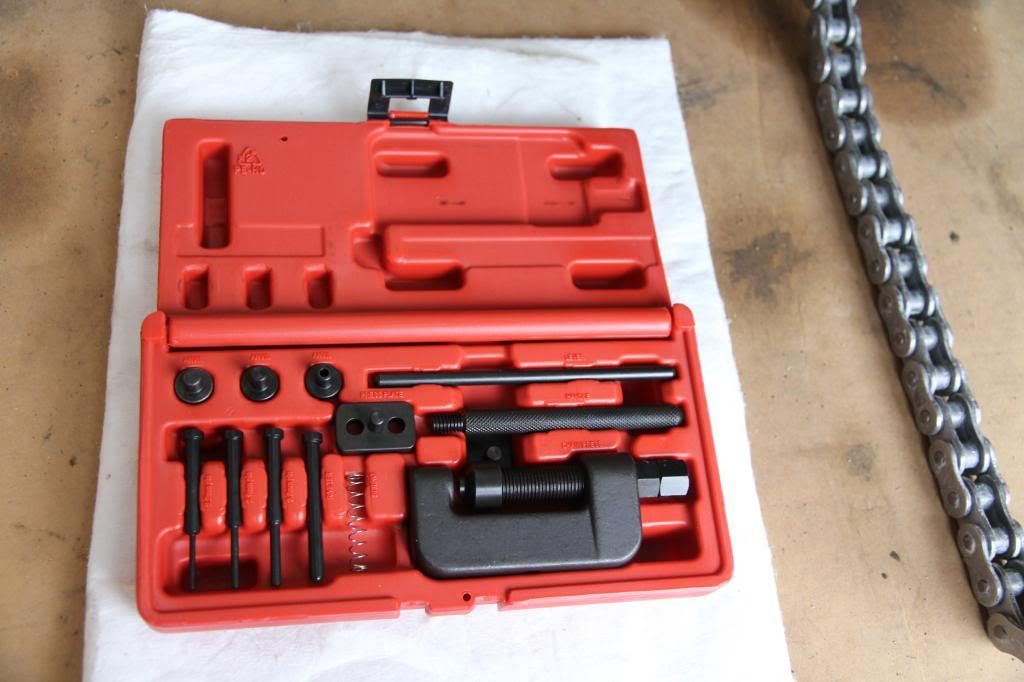
The instructions that didn't come with it are difficult to follow, I fumbled around and managed to compress the rivet but not sure if I got it done enough as the riveting tool adapter wanted to make the tool go off to the side and risk damaging the tool.
I think the tool may not be designed to handle 630 chain as the separate parts seem to be too small to fit this size chain.
Check these out and tell me what you think, am I using correctly?
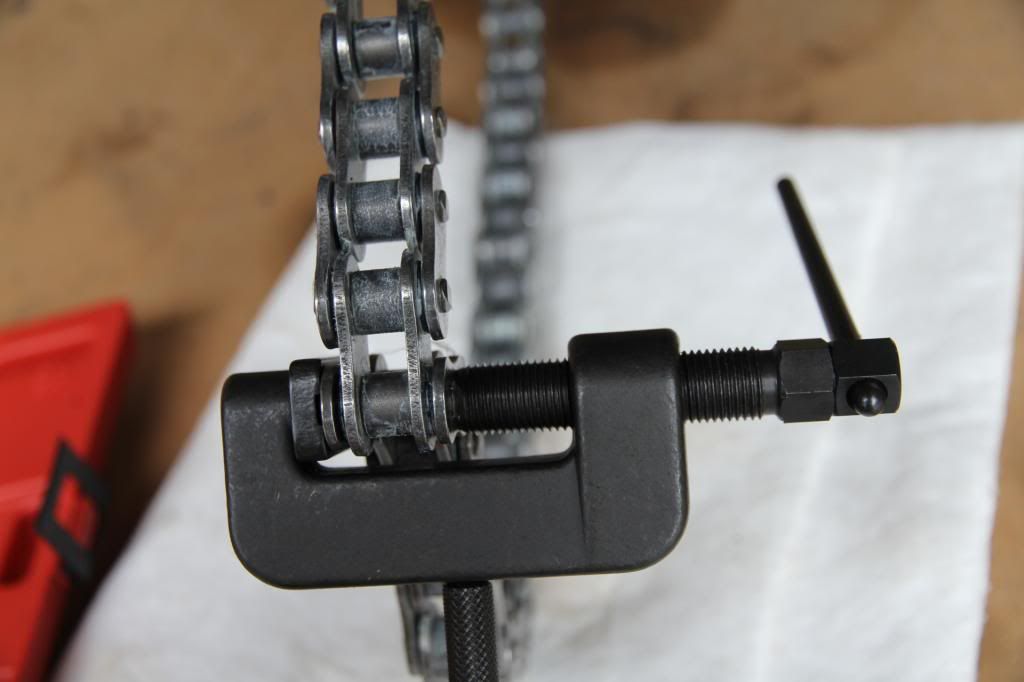
Tool got stuck on the rivets, needed to pry it off.
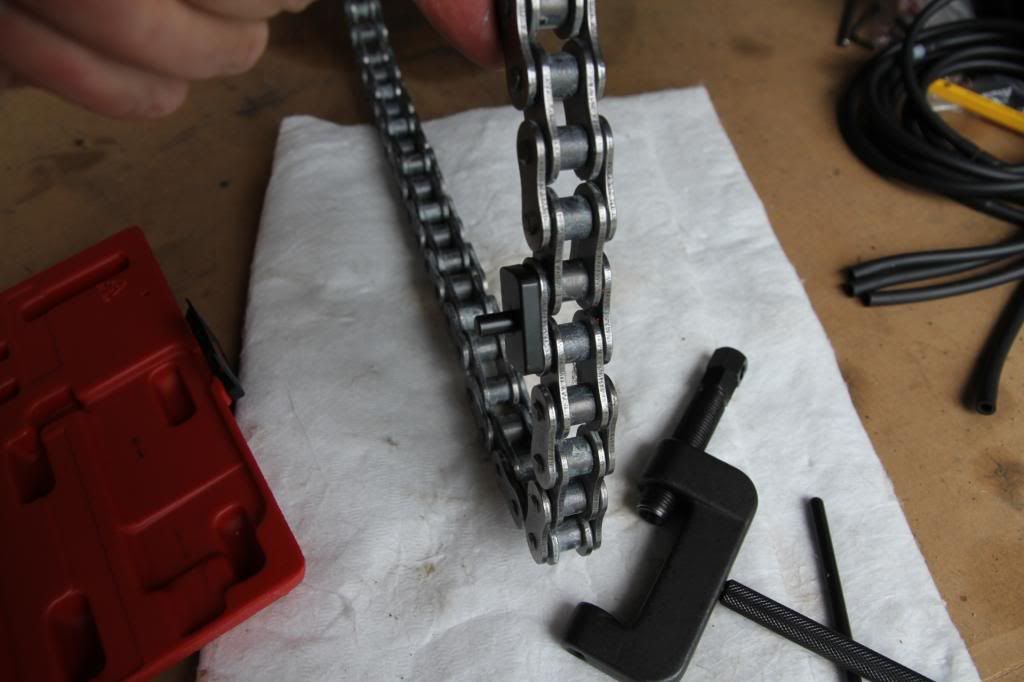
Opps don't have any pictures of the riveting adapter tool, will post some in next batch.
Time for night time stories for the boys back soon.Last edited by Kiwi Canuck; 09-07-2013, 12:10 AM.2018 Honda Africa Twin AS
2013 DR 650 Grey, sold 1981 GS 650E Silver,
1980 GS1000ST Blue & White, X2
2012 DL650 Vstrom Foxy Orange, in storage
1981 CT110 X2 "Postie Bikes" Gone to a New Home.
2002 BMW 1150 GS Blue & White - Sold
1975 BMW R90/6 Black - Sold 1984 GS1150EF Sold
1982 BMW R100 Africa trip, Stolen - Recovered- Sold
1977-1980 Suzuki GS550, GS1000E, GS1000S GSX750, GSX1100,s
Hondas ST90, CR125 CB175 , CB350 CB750, NSU Quickly, Yamaha RD's 350/400,
Comment
-
I think I'm going to open up a parts and tool store and send you a credit card........ Old age and treachery will beat youth and skill every time1983 GS 750
https://c1.staticflickr.com/5/4256/3...8bf549ee_t.jpghttps://c1.staticflickr.com/5/4196/3...cab9f62d_t.jpg
Comment
-
Why would you need to do that I already have most of your tools at my place.Originally posted by bccap View PostI think I'm going to open up a parts and tool store and send you a credit card........
 2018 Honda Africa Twin AS
2013 DR 650 Grey, sold 1981 GS 650E Silver,
1980 GS1000ST Blue & White, X2
2012 DL650 Vstrom Foxy Orange, in storage
1981 CT110 X2 "Postie Bikes" Gone to a New Home.
2002 BMW 1150 GS Blue & White - Sold
1975 BMW R90/6 Black - Sold 1984 GS1150EF Sold
1982 BMW R100 Africa trip, Stolen - Recovered- Sold
1977-1980 Suzuki GS550, GS1000E, GS1000S GSX750, GSX1100,s
Hondas ST90, CR125 CB175 , CB350 CB750, NSU Quickly, Yamaha RD's 350/400,
Comment
-
Hi David,Originally posted by Kiwi Canuck View PostOK so if you ride a "G" you may not understand this part.
I ordered a chain tool to complete the riveting of my new chain.
I had ordered a 630 chain and new sprockets as I wanted to keep things stock on the Canadian Cooley and when it came to choosing master link or rivet type I figured I'll go with the same as the factory supplied.
That meant I needed a tool to rivet the chain and it was easy to borrow one so no problem except my friend who has one is lousy at returning calls, so I finally got frustrated and ordered one online as they are only $30.
So here's the unit I got.

The instructions that didn't come with it are difficult to follow, I fumbled around and managed to compress the rivet but not sure if I got it done enough as the riveting tool adapter wanted to make the tool go off to the side and risk damaging the tool.
I think the tool may not be designed to handle 630 chain as the separate parts seem to be too small to fit this size chain.
Check these out and tell me what you think, am I using correctly?

Tool got stuck on the rivets, needed to pry it off.

Opps don't have any pictures of the riveting adapter tool, will post some in next batch.
Time for night time stories for the boys back soon.
I bought the exact same tool as yours
Not sure if I ever used it on a 630 chain?
The manual says it's OK for this size chain IF the rivet heads are ground off first
I believe you should not use the piece of metal you had to pry out!
Start with the first link pin with the 3.8 mm breaking tip installed but without the lower and without the upper guides in place.
Then you go to the next link pin.
Should come out easily sigpicJohn Kat
My bikes: CB 77, GS 1000 ST Cafe Racer with GSXR 1052 engine, GS 1000 ST, XR 41 Replica with GS 1085 engine,
GS 1100 SZ Katana with GS 1135 EFF engine, KTM Superduke 1290 R 2020
Comment
-
John, I am assembling the chain, not trying to break it.Originally posted by John Kat View PostHi David,
I bought the exact same tool as yours
Not sure if I ever used it on a 630 chain?
The manual says it's OK for this size chain IF the rivet heads are ground off first
I believe you should not use the piece of metal you had to pry out!
Start with the first link pin with the 3.8 mm breaking tip installed but without the lower and without the upper guides in place.
Then you go to the next link pin.
Should come out easily
I have the riveting tool pin installed and when I try to tighten it up, the tool twists and goes off square causing it to bind and it feels like it will bend the riveting adapter if I keep tightening it..
None of the supplied anvils will sit on the rivet head squarely which is why it wants to slide off the head and twist.
I did not get a manual with the tool, so maybe I'm not using it correctly.
Any chance you could scan the appropriate page from the manual and post it or send it to me via email?
Thanks,
David2018 Honda Africa Twin AS
2013 DR 650 Grey, sold 1981 GS 650E Silver,
1980 GS1000ST Blue & White, X2
2012 DL650 Vstrom Foxy Orange, in storage
1981 CT110 X2 "Postie Bikes" Gone to a New Home.
2002 BMW 1150 GS Blue & White - Sold
1975 BMW R90/6 Black - Sold 1984 GS1150EF Sold
1982 BMW R100 Africa trip, Stolen - Recovered- Sold
1977-1980 Suzuki GS550, GS1000E, GS1000S GSX750, GSX1100,s
Hondas ST90, CR125 CB175 , CB350 CB750, NSU Quickly, Yamaha RD's 350/400,
Comment
.png)
Comment