Announcement
Collapse
No announcement yet.
Progress!!! 1978 GS1000E Restoration/Performance Rebuild
Collapse
X
-
How much do you estimate you have invested in the initial setup? I most concerned about the chemical and metal investment costs. I'm thinking of doing a setup myself so a complete cost breakdown would be much appreciated.http://img633.imageshack.us/img633/811/douMvs.jpg
1980 GS1000GT (Daily rider with a 1983 1100G engine)
1998 Honda ST1100 (Daily long distance rider)
1982 GS850GLZ (Daily rider when the weather is crap)
Darn, with so many daily riders it's hard to decide which one to jump on next.;)
JTGS850GL aka Julius
GS Resource Greetings
-
WOW, very nice work sir.
I have seen this thread pop up from time to time but I just got around to reading the entire thread, inspiring and nice work on the documentation and descriptions, impressive.
That Caswell Plating kit looks like a nice addition to the shop equipment list for my next project.
Nothing worse than all new shiny parts and ratty old bolts/screws holding it together.
Look forward to seeing the progress.
Cheers,
David2018 Honda Africa Twin AS
2013 DR 650 Grey, sold 1981 GS 650E Silver,
1980 GS1000ST Blue & White, X2
2012 DL650 Vstrom Foxy Orange, in storage
1981 CT110 X2 "Postie Bikes" Gone to a New Home.
2002 BMW 1150 GS Blue & White - Sold
1975 BMW R90/6 Black - Sold 1984 GS1150EF Sold
1982 BMW R100 Africa trip, Stolen - Recovered- Sold
1977-1980 Suzuki GS550, GS1000E, GS1000S GSX750, GSX1100,s
Hondas ST90, CR125 CB175 , CB350 CB750, NSU Quickly, Yamaha RD's 350/400,
Comment
-
Azr,Originally posted by azr View PostHow long is it take to do that last bunch? If you're doing a few bolts at a time I'm thinking it will get a bit long in the tooth after awhile?
The actual plating process only takes about 15 to 30 minutes, depending on the thickness of plating you wish to have on the part. I have been plating my parts for approximately 20min. In the previous photos, I did all of the small parts in one batch and the axle itself in one batch. So, if you add 10min of prep time to teach batch, that's approximately 30min per go-around. I can plate a batch of parts that requires a maximum cumulative amperage of 5A, with .14A per square inch of surface area. However, I don't like to run my rectifier at full capacity, so 4A is the most I like to go.
The plating isn't that difficult - its the prep work that requires attention, otherwise, your finish will not come out looking pretty. Thus far, I have settled on the following process and it is working well:
ITEMS OF IMPORTANCE:
Parts must be free of heavy grease and oil - if not, use mineral spirits, brake cleaner, a parts washer, etc to perform an initial degrease
Use Caswell's online tools to calculate the surface area and amperage required for each part BEFORE going through the prep stage
1. Immerse part in a 50/50 mixture of pool-grade muriatic acid and distilled water to dissolve existing zinc plating and rust
2. Once parts stop fizzing, remove and IMMEDIATELY dip in a mixture of baking soda and tap water - this is essential to neutralize any remaining acid on the part, otherwise, it will flash rust very quickly.
3. Rinse parts in hot tap water
4. Buff parts with wire wheel until shiny
5. Scrub parts with a toothbrush in a 50/50 micture of either simple green/water or purple power/water to remove any residual oils/grease. WEAR GLOVES and DO NOT touch the part with your bare hands
6. Rinse the part in hot tap water
7. Rinse the part with distilled water
8. Hang the part on copper wire from a copper bar and put it in the bath
9. Attach the positive lead to the zinc anodes and negative lead to the copper bar from which the part hangs
10. Turn on your rectifier and adjust the amperage
11. Set your timer for 15 to 30 min
12. When the time is up, shut off the power supply and remove the parts
13. Rinse parts in distilled water over your "plating rinse" bucket - this water can then be re-added to your plating tank when the level diminishes
14. Dip parts in a 1.5% sulfuric acid/distilled water solution for 3 to 4 seconds - this will brighten the part significantly and eliminate the need for buffing
15. Rinse the part in distilled water
16. Dip the part in blue chromate for 15 to 30 seconds, depending on depth of color desired
17. Let parts air dry for 4hrs minimum, overnight preferred.
Some of the things that are also important are: keeping the bath around 80 to 95 degrees using an aquarium heater (some people don't bother and still have good results). Also, agitating the solution during plating using a miniature aquarium pump is key to avoiding hydrogen spots on your pieces.
Long story short, I had some difficulty with my parts coming out of the bath slightly dull, even with the appropriate amount of brightener added to the plating bath - this dullness was easily buffed away with some 000 steel wool. However, I wanted to eliminate the buffing step. After a few phone calls to Caswell and picking the brain of the tech support guy, he suggested the 1 to 1.5% sulfuric acid "brightening dip" before the chromate step. This works amazingly well, as it really clears up the zinc. The nitric acid in the chromate will brighten up the part the rest of the way. Although I will maintain adding brightener to the plating bath every 3 to 4 plating sessions, the sulfuric dip makes using brightener less critical.
Does this help?
PS: I forgot to mention - when you are done plating for the day, remove your anodes from the bath and rinse them with distilled water and then let them dry. If you leave the anodes in the bath overnight or for several days (like I did), they can oxidize and impart a dirty look to your parts. If this happens, take them out, scrub them down with a scotch-brite pad in some degreaser, and then rinse them with distilled. I soda-blasted mine to clean them off. Then, Remove your heater and pump, rinse them with distilled, and then cover the bucket - buckets with airtight lids are very helpful in this situation.Last edited by philosopheriam; 05-01-2015, 07:48 PM.Cogito ergo sum - "I think, therefore I am"
René Descartes
Comment
-
Thank you, sir! This project has been a labor of love, and as of now, I can see the light at the end of the tunnel. All of the big purchases are made except for the following:Originally posted by rustybronco View PostI must say your attention to detail brings a tear to my eye! I'm impressed.
Headlight bucket + brackets
Petcock + mounting adapter
Control switches
Misc hardware
All thats really left is finishing the engine assembly, re-plating all the hardware, then actual bike assembly. I am going to redo the electrical harness with Deutsch connectors, a modern fuse panel, and some new circuits with relays (main, ignition, etc). I will post pics as I do this.
More to follow, as always! Cogito ergo sum - "I think, therefore I am"
René Descartes
Comment
-
JTG,Originally posted by JTGS850GL View PostHow much do you estimate you have invested in the initial setup? I most concerned about the chemical and metal investment costs. I'm thinking of doing a setup myself so a complete cost breakdown would be much appreciated.
Here is a *rough* breakdown of things I have purchased - please bear in mind that as you experiment with the system, there will be additional cost, i.e. additional acids, buckets, copper wire, etc. Nobody starts zinc plating like a pro, and the learning curve has a small amount of expense until you get a process down that you like.
All costs include shipping unless otherwise noted:
Chemicals from Caswell
GRAND TOTAL FOR THIS SECTION $242.82Copy Cad® & Zinc Concentrate 1.5 Gal ZN15C 1$59.13Copy Cad® & Zinc Brightener 4 oz ZNBRADD 1$11.83Blue Chromate - 8oz Makes 1 Quart BCC8 1$20.90Yellow Chromate YCHRC5G 1$31.93Subtotal$123.79Shipping & Handling$12.15
Grand Total (Excl.Tax)$135.94
Plating Rectifier - EBAY
New 30V 5A 110V Precision Variable DC Power Supply Digital Adjustable Lab w/clip Paid on Jun-02-14 $58.99 Free 1 $58.99FedEx SmartPost Estimated delivery: Thu. Jun. 5 - Fri. Jun. 13
Aquarium Pump - EBAY
300L/H 3W 80GPH Aquarium Submersible Water Pump For Fresh/Salt Water Aquarium Paid on Jun-02-14 $9.99 Free 1 $9.99Economy Shipping Estimated delivery: Wed. Jun. 4 - Tue. Jun. 17
Aquarium Heater - EBAY
Zinc Anodes - Rotometals50W Aquarium Heater Anti-Explosion Submersible Fish Tank Water Adjustable Paid on Jun-03-14 $6.95 Free 1 $6.95USPS First Class Package Estimated delivery: Sat. Jun. 7
Code Item Qty Price Grand Total ZINCPLATECopperWire1lb Zinc Anode - 2.5" x 4.5" Hang Overboard with Copper Wire
[Wire Length:1 foot Copper Wire]4 $4.99 $19.96 Subtotal:$19.96 Tax:$0.00 Shipping Cost:$10.99 Grand Total:$30.95 Last edited by philosopheriam; 05-01-2015, 07:36 PM.Cogito ergo sum - "I think, therefore I am"
René Descartes
Comment
-
JTG - (continued post, more costs)
Various buckets and measuring cups from McMaster Carr: $30
Muriatic & Sulfuric acids: $20
Misc Supplies & Distilled water: $20
Copper wire: $10
GRAND TOTAL FOR THIS SECTION: $80
Where I didn't spare the expense - and some do - is the constant current plating rectifier. Some people jig rig batteries, light bulbs, and rheostats to achieve the proper current for plating. I had zero desire to do any of that, so I purchased the rectifier from Ebay. Attach the leads, set your current, and the power supply manipulates the voltage to maintain your set current. Easy as pie, and worth the $60 in my opinion.
Although $300 for a proper plating setup may seem expensive, there are numerous parts on our bikes (brackets, chain adjusters, spacers, axles, etc) that either aren't available anymore or buying them new is very expensive. Buying a new axle, chain adjusters, and spacers, can easily be $150 or more. The setup pays for itself quickly.
Although the chemicals from Caswell work great, I wouldn't buy any of their other kit supplies such as anodes, power supplies, etc. Equivalent items can be found for far cheaper, especially the anodes, on the internet. Rotometals.com is an EXCELLENT source for large zinc anodes with an integral copper wire. Caswell will charge you an arm and a leg for a flimsy sheet of zinc.
Overall, I'm actually enjoying the hell out of plating stuff - I'm like a kid with a new toy!!! In a weird way, its fun!Last edited by philosopheriam; 05-01-2015, 07:44 PM.Cogito ergo sum - "I think, therefore I am"
René Descartes
Comment
-
Word! Stay in touch!Originally posted by JS750 View PostI have drooled quite a bit over this thread and I just realized you're in Aurora, IL. I would LOVE to see the bike when you're done, it looks amazing so far. I'm in Loves Park (Rockford area).Cogito ergo sum - "I think, therefore I am"
René Descartes
Comment
-
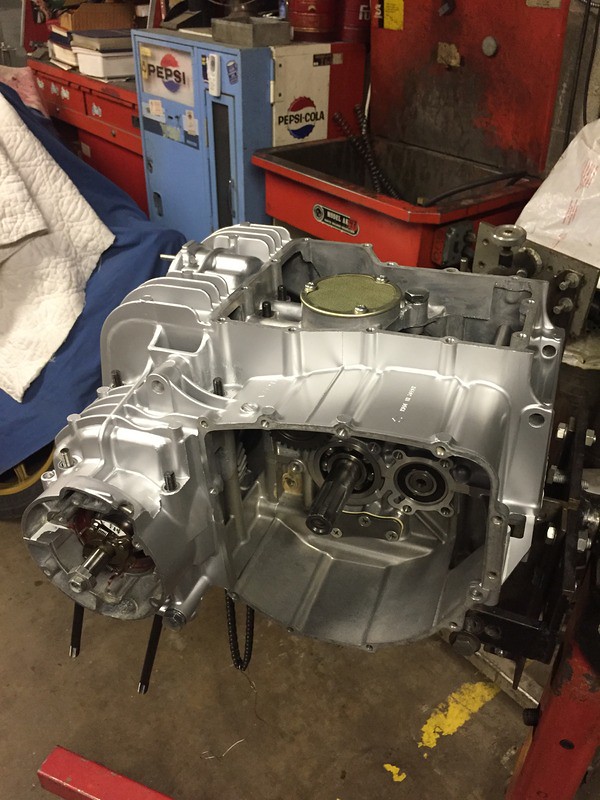
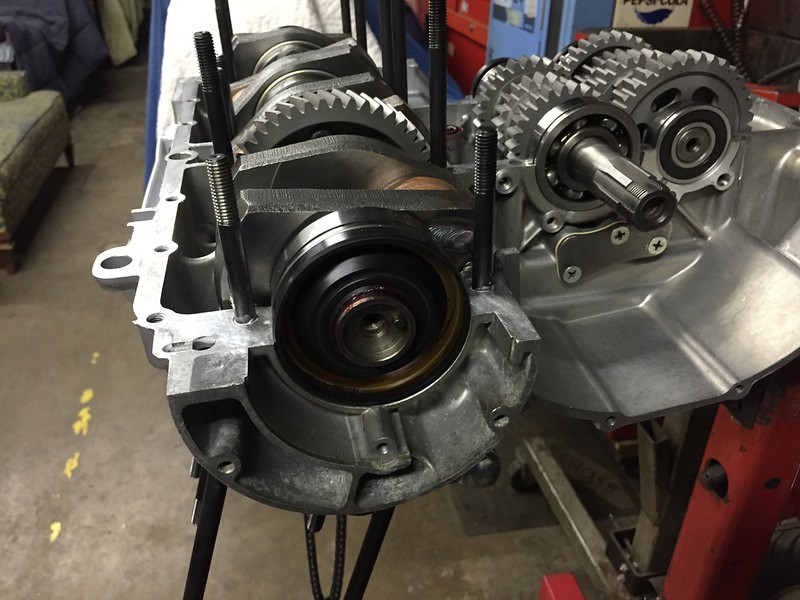
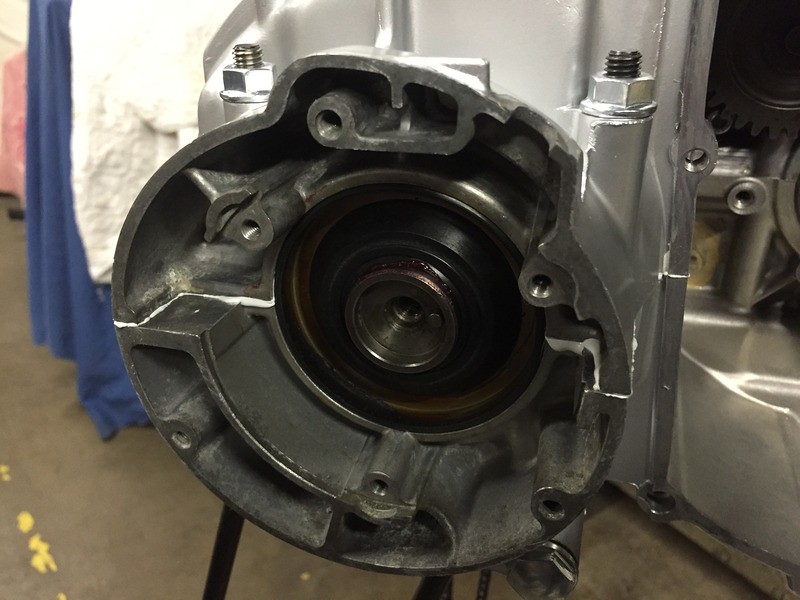
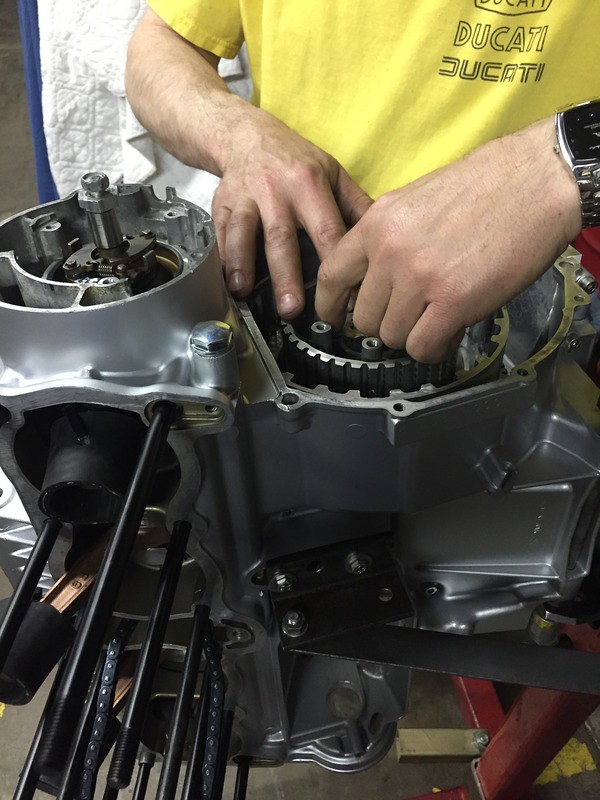
Engine assembly, splitting/joining the cases to properly install seals, ROUND 2... (arrgh, waves fist in indignation at motor )
)
 IMG_1286 by Anthony Monteleone, on Flickr
 IMG_1288 by Anthony Monteleone, on Flickr
 IMG_1289 by Anthony Monteleone, on Flickr
 IMG_1287 by Anthony Monteleone, on Flickr
 IMG_1290 by Anthony Monteleone, on Flickr
 IMG_1292 by Anthony Monteleone, on Flickr
 IMG_1291 by Anthony Monteleone, on Flickr
 IMG_1293 by Anthony Monteleone, on Flickr
 IMG_1294 by Anthony Monteleone, on Flickr
Last edited by philosopheriam; 08-07-2017, 06:59 PM.Cogito ergo sum - "I think, therefore I am"
René Descartes
Comment
-
I was looking at the detail in this rebuild and it struck me... What do you intend to do with this bike with it's done? Show piece or a daily rider? All this work on the cosmetics and one rain storm... You get what I'm saying? Just curious as to where this project will end up.
On my bike I kept the detailing to a minimum just because I didn't want to see all my work go south by using the bike for what it was intended... RIDING!!!
Don't get me wrong here. I admire the work you're putting into this project.Last edited by JTGS850GL; 05-04-2015, 01:48 PM.http://img633.imageshack.us/img633/811/douMvs.jpg
1980 GS1000GT (Daily rider with a 1983 1100G engine)
1998 Honda ST1100 (Daily long distance rider)
1982 GS850GLZ (Daily rider when the weather is crap)
Darn, with so many daily riders it's hard to decide which one to jump on next.;)
JTGS850GL aka Julius
GS Resource Greetings
Comment
-
I was referring to all of the detailed cleaning and newness that gets... well... less new. Once you've begun to ride her she'll never be as perfect as the day you first put her on the road. After a ride in the rain (at least here in Georgia) you can spend hours trying to get all the road grime off, but you'll never be completely successful. I guess it's a little like right after buying a new bike. Except in your case you have much more hard earned blood and sweat involved. Maybe a little like getting that first door ding on the new car. The next ding doesn't seem to feel as bad.
Great job so far!http://img633.imageshack.us/img633/811/douMvs.jpg
1980 GS1000GT (Daily rider with a 1983 1100G engine)
1998 Honda ST1100 (Daily long distance rider)
1982 GS850GLZ (Daily rider when the weather is crap)
Darn, with so many daily riders it's hard to decide which one to jump on next.;)
JTGS850GL aka Julius
GS Resource Greetings
Comment
-
Thank you sir :-) As for detailing and maintenance, I have a 2007 FZ6 that still looks like its new - I go overboard on maintenance and cleaning. Perhaps that was evident in the meticulousness of this restorationOriginally posted by JTGS850GL View PostI was referring to all of the detailed cleaning and newness that gets... well... less new. Once you've begun to ride her she'll never be as perfect as the day you first put her on the road. After a ride in the rain (at least here in Georgia) you can spend hours trying to get all the road grime off, but you'll never be completely successful. I guess it's a little like right after buying a new bike. Except in your case you have much more hard earned blood and sweat involved. Maybe a little like getting that first door ding on the new car. The next ding doesn't seem to feel as bad.
Great job so far! Cogito ergo sum - "I think, therefore I am"
René Descartes
Comment
-
Small parts - BACK FROM THE POWDERCOATER!!!
 IMG_1300 by Anthony Monteleone, on Flickr
 IMG_1304 by Anthony Monteleone, on Flickr
 IMG_1302 by Anthony Monteleone, on Flickr
 IMG_1301 by Anthony Monteleone, on Flickr
 IMG_1303 by Anthony Monteleone, on Flickr
 IMG_1305 by Anthony Monteleone, on Flickr
Last edited by philosopheriam; 08-08-2017, 06:26 AM.Cogito ergo sum - "I think, therefore I am"
René Descartes
Comment
-
I just want to be able to find this thread again, along with its links.Tons of valueable info.Current Rides: 82 GS1100E, 00 Triumph 955 Speed Triple:twistedevil:, 03 Kawasaki ZRX1200, 01 Honda GL1800, '15 Kawasaki 1000 Versys
Past Rides: 72 Honda SL-125, Kawasaki KE-175, 77 GS750 with total yosh stage 1 kit, 79 GS1000s, 80 GS1000S, 82 GS750e,82 GS1000S, 84 VF500f, 86 FZR600, 95 Triumph Sprint 900,96 Triumph Sprint, 97 Triumph Sprint, 01 Kawasaki ZRX1200, 07 Triumph Tiger 1050, 01 Yam YFZ250F
Work in progress: 78 GS1000, unknown year GS1100ES
Comment
.png)


Comment