Announcement

Collapse
No announcement yet.

Just bought non-running GS850

Collapse
X
 
  • Filter
  • Time
  • Show
Clear All
new posts

    Just bought non-running GS850

    Hi everyone, I'm in New England. Just bought a 1980 GS850 GL. At least I think that's what it is. Has a broken front turn signal lamp and lens assembly. Has a 4 into 1 exhaust, not sure if it's stock. Has new spark plugs !!!

    Was put away 2 years ago after sitting for 3 years ?!?! Shop said it needed a 25$ part, never fixed it for 3 years. Delivered it to owner unfixed where it sat for another 2 years. Owner showed me the broken 25$ part - fuel gauge sending unit. I know better but never disagree with a prospective seller.

    Now the 850 is mine and sitting here, at home with me. Apparently it died one night and the diagnosis was "no spark".

    Not in bad shape, good tires, seat, exhaust, fuel tank. Very little play from the rear wheel on the center stand, in all gears. Starter works well and engine sounds like it has good compression. Oil ight extinguishes quickly when cranking - in less than 2 seconds. I'm sure I'll need to get the gum out of the carbs and fuel lines. I can smell that smell in the fuel tank too but I do not see rust inside. At least not where I can see.

    Have done this type of work before and looking for insight about Suzukis specifically. Is there a standard procedure to diagnose the ignition system by starting at the pickup coils ? I understand the wiring harness connectors can cause issues and I know what to do if they are making poor electrical connections. I've done much work on British machinery and am very aware of poor electrical connections and the oddball problems that crop up.

    Is there a page on this sight that lists specific ohms readings for various components in the ignition system ? Is the Clymer or Haynes manual worth getting or should I settle for nothing less than the Factory Service Manual ? I don't want to sink a lot into theis bike. I just want to use it for an hour comuute twice a week.

    Any help will be gratefully acknowleged.

    #2


    Everything you need to know, you will find right HERE.

    .
    sigpic
    mine: 2000 Honda GoldWing GL1500SE and 1980 GS850G'K' "Junior"
    hers: 1982 GS850GL - "Angel" and 1969 Suzuki T250 Scrambler
    #1 son: 1986 Yamaha Venture Royale 1300 and 1982 GS650GL "Rat Bagger"
    #2 son: 1980 GS1000G
    Family Portrait
    Siblings and Spouses
    Mom's first ride
    Want a copy of my valve adjust spreadsheet for your 2-valve per cylinder engine? Send me an e-mail request (not a PM)
    (Click on my username in the upper-left corner for e-mail info.)

    Comment


      #3
      Hello! We have the same bike!

      The factory service manual is here: http://www.mtsac.edu/%7Ecliff/storag...nual_HiRes.pdf Read it, live it, breathe it.

      Do you know for sure it has no spark, or are you just guessing that based on the previous owner's comments?

      I wouldn't go any further until you've drained and discarded the old gas, cleaned the carbs (no, I mean really actually clean them), replaced the o-rings under the intake boots, sealed up the airbox, and replaced both sets of rubber boots that connect to the carbs if they are not 100% perfectly pliable. Then, only after you've cleaned all the electrical connections and refilled the tank with fresh gas are you ready to crank it over for the first time. Skip any of this and you are setting yourself up for pain and frustration.

      Then once it's running, somewhat, you get to make it road-worthy. See the link in my sig for a preview of what's involved there.

      Also, we like pics!
      Charles
      --
      1979 Suzuki GS850G

      Read BassCliff's GSR Greeting and Mega-Welcome!

      Comment


        #4
        WOW ! Hey thanks guys - Steve, Charles. Now I don't have to wait for a service manual to arrive before diving into this project. I will endeavor to include pictures as I go.

        Charles, I'm with you on do all of the typical replacement to start with i.e. rubber seals, O-rings, boots. I've been around air-cooled motorcycles enough to know the headaches that vulcanized rubber can cause. One good thing is the tank is dry inside and looks as if it had been drained - for the most part. Still, it has "That smell" of years old gummed-up gasoline so I'm sure there will be some work to get it operational.

        I have done no other diagnosis except what I mentioned, crank it on the starter to hear the rhythm of the compression - all even - and watch how long the oil light stays on - only two seconds on the starter. One other thing, I bought a battery but when I took out the old one, I noticed it was dry as a bone. Filled it with tap water and put it on my old trusty trickle charger. I doubt it will regain any life but it never hurts to try.

        No cracks in the battery case or evidence of leaking anywhere around or below the battery. In fact the battery box/tray/holder still has the rubber mat on the bottom and foam taped around the sides all 100% intact !!! so I am anticipating a bad voltage regulator or some other charging system work. Maybe just cleaning all the wire terminals and connectors will sort this out, time will tell and a fair amount of work to find out. I did not check for spark ... yet. I'll be perusing vendors webpages. I have already learned that the rear turn signals are probably not stock. I'll probably replace both fronts to match the rears if I can't find a cheap used stock front one. Wouldn't mind putting on an entire set to keep the bike stock all around. I'm not sure but I think the seat is original and th fuel tan khas the original pinstriping as do the side covers.

        Steve, I'll see if this bike has valve adjust shims or not. May take you up on your offer to get the spreadsheet.

        I did notice some greasy/oily residue on the front tire and forks. Bad fork seals maybe or brake caliper leaking. Does not feel like brake fluid although the front brake is very soft even though the cailper does grab. Front tire was flat too but held air when I filled it. Will check that to see if it's a slow leak or normal leakeage from a tire that has been sitting for so long. Rear tire was filled. Maybe when the bike was put up for sale by the seller who has now become the previous owner.

        I'm aiming to get this on the road in two weeks. Hopefully it won't make me laughing stock for saying that. Will be posting more questions over the next two weeks. Thanks again and in advnace for any other help anyone can offer.

        Jeff

        Comment


          #5
          Hi Jeff, Glad to see you picked up a nice 850! 4into1 exhaust is not factory, it may have issues with carb jetting due to lean conditions. It does have valve adjust shims, trust me, I have had the same bike (just gave it to my son-in-law a week ago while on vacation in California). Have fun, get her running, you'll enjoy it.

          Comment


            #6
            Welcome to the forum from another New England 850 owner! I love mine more and more every day. Also - pictures are practically required for a thread like this one

            Comment


              #7
              Originally posted by tirebiter View Post
              Steve, I'll see if this bike has valve adjust shims or not. May take you up on your offer to get the spreadsheet.

              Jeff
              Hi Jeff. Welcome to the Asylum.

              YES - your bike (and mine) has the 'ol shim-and-bucket setup. Get Steve's spreadsheet. Add valve adjustment to the list of those things that MUST be done.

              As to tires - personally, I'd replace 'em. Blowouts/flats at speed can get real interesting real quick.

              Good luck!

              Comment


                #8
                I forgot to mention: get your carburetor rebuild kit here: http://cycleorings.com/

                One other thing, I bought a battery but when I took out the old one, I noticed it was dry as a bone. Filled it with tap water and put it on my old trusty trickle charger. I doubt it will regain any life but it never hurts to try.
                I don't think that will work. They say to put distilled water into a battery to top it off, tap water is explicitly verboten as it contains impurities that will damage the battery and/or short-circuit the plates. I don't know if you can start off with distilled water, charge it up a bunch, and end up with sulfuric acid in the end, but I suspect not. (Distilled water is not conductive.)

                Maybe your battery could be saved by rinsing it out with distilled water and adding sulfuric acid, but at this point, I would say take that battery in for the core charge against a new one and spend your time somewhere more productive.

                Front tire was flat too but held air when I filled it. Will check that to see if it's a slow leak or normal leakeage from a tire that has been sitting for so long.
                Check the date codes on those tires. If they are more than about five years old, junk 'em and get Shinko Tourmaster 230s.

                I'm aiming to get this on the road in two weeks. Hopefully it won't make me laughing stock for saying that.
                That's pretty ambitious! Two weeks is generally the minimum turn-around time for a single OEM parts order to arrive. So it can theoretically be done if you lock yourself in the garage for a weekend, do a fairly thorough strip down of the bike, order all the parts you _think_ you might need, and then spend another full weekend on reassembly when they arrive.

                In practice, however, you always find something you didn't expect that requires waiting another week or two. I think the only way you could get away with the two-week plan is if you already knew the bike very well.
                Charles
                --
                1979 Suzuki GS850G

                Read BassCliff's GSR Greeting and Mega-Welcome!

                Comment


                  #9
                  Ok, it's been a couple of days since I brought this bike home. So far I have spent a very small amount of time with it but that is about to change.

                  I think I got lucky ! The battery held a charge all day after getting the trickle charger treatment overnight. Now I wish I had used distilled water. Oh well... I pulled out all 4 spark plugs and they look new !!! The battery spun the engine over easily as I watched for spark. Good healthy blue spark on all 4 plugs !!! So much for the "no spark" problem.

                  Tried to get one of the aircleaner housing screws out. No go and it was late so i didn't try any others. Philips head screws have got to go. I'll have to resort to vice-grips to check for mouse-nest debris and see what the air filter looks like.

                  Carb intake tubes all feel soft enough while in place. I have had some experience with hardened and dried out rubber intake tubes on an old Kawasaki triple I used to own. I am very tempted to bypass all the correct procedures and go straight to seeing if the carbs are clogged up or not. All it would take to find out would be to run some fuel into them. This brings me to my next discovery.

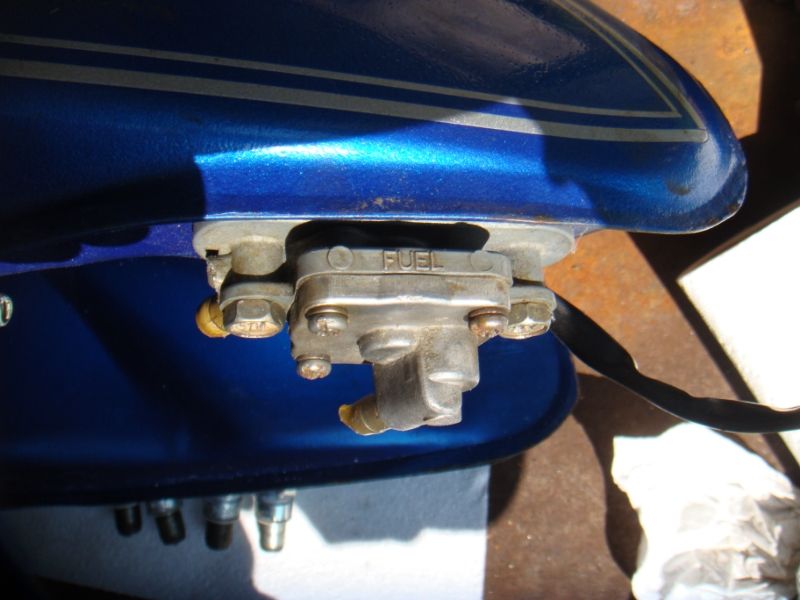
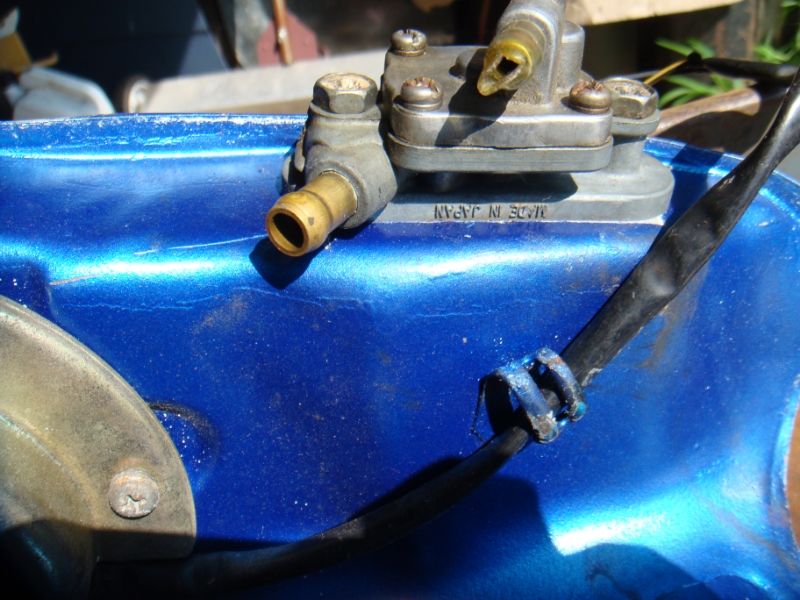
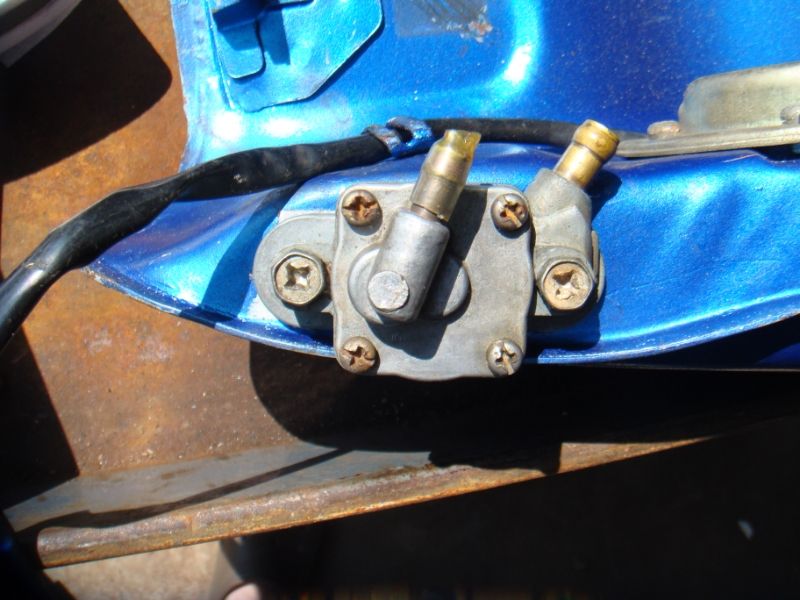
                  After looking at photos of new/used parts I'll need to get I realize the fuel petcock has been replaced already. This one does not have a lever to shut off the fuel or to prime the float bowls. It has one large fitting and one small fitting. The carbs have two large hoses and one small hose. I'm fairly certain the large ones go between carbs 1/2 and 3/4 but there was no "T" on either one. It was not easy to see for sure where they went last night in the dark.

                  I'm beginning to think the original problem was not from "no spark" but maybe from the petcok failing and shutting off the fuel supply. It seems as though an attempt was made to fix the problem by replacing the stock petcock with an aftermarket one. Trouble is, the number of fuel supply hoses and fittings. If the guy doing the work did not know about the vacuum opeartion of these petcocks I can see why he would have given up.

                  The tank was not mounted when I got the bike. None of the three hoses were conencted either. The previous owner showed me the fule gauge sending unti saying that was the culprit but time may have clouded his memory ... Maybe the problem all along was a bad fuel petcock. If that is the case, the engine stopped running once ALL the fuel had been pulled out of the carbs. I'll know later today just how lucky I got, with this bike.

                  I'll be checking other items and pulling off the damaged turn signal light assembly. I noticed one of the headlight brackets got bent when the turn signal got broken. Pretty sure I can straighten out the bent headlight bracket. The other one looks like it rotated a little on the fork tube.

                  Had my camera and took some video of the ignition test but the camera battery was not charged enough. It is now and I'll get something to post during my work on it today. Keeping my fingers crossed.

                  I want to say how thankful I am to everyone who has jumped in to offer advice and helpful comments. If I don't do exactly as you tell me to please don't think I am ignoring what you said. It's great that you guys have been through all this and want to help me. I especially appreciate the absolute certainty that everyone is expressing. No mistaking exactly what you suggest.

                  2 weeks to be roadworthy does seem unlikely but we'll see how lucky I get.

                  More later ...

                  Comment


                    #10
                    Originally posted by tirebiter View Post
                    Philips head screws have got to go. I'll have to resort to vice-grips to check for mouse-nest debris and see what the air filter looks like.
                    Just so you know, those are NOT "Phillips head screws", they are "JIS" head screws. Yeah, they look like "Phillips", but the shape of the cavity is different. Proper drivers will do wonders for your maintenance experience.


                    Originally posted by tirebiter View Post
                    Carb intake tubes all feel soft enough while in place. I have had some experience with hardened and dried out rubber intake tubes on an old Kawasaki triple I used to own.
                    Good that you have that experience, but know that you really need to check the condition of the o-rings that are between those intake tubes and the cylinder head. Replacement o-rings for those and the carbs (which you WILL need to rebuild can be purchased at cycleorings.com. The owner of that wonderful site is a member here.


                    Originally posted by tirebiter View Post
                    I am very tempted to bypass all the correct procedures and go straight to seeing if the carbs are clogged up or not. All it would take to find out would be to run some fuel into them.
                    Please be very careful what you choose to ignore and/or bypass. If the valves are mis-adjusted (VERY common on a "new-to-you" bike), the engine will not start. You will not know whether it's valves or carbs. You NEED to address BOTH items.


                    Originally posted by tirebiter View Post
                    After looking at photos of new/used parts I'll need to get I realize the fuel petcock has been replaced already. This one does not have a lever to shut off the fuel or to prime the float bowls. It has one large fitting and one small fitting.
                    Sorry, but that sounds like the stock petcock for your bike. There should be an insert with a slot that can be turned with a screwdriver. With the slot vertical ( | ), you are in the PRIme position. With the slot horizontal ( - ), you are in the RUN position. With your petcock, PRIme will not flow freely until it receives a brief pulse of vacuum, then will continue flowing until the slot is turned or it runs out of gas.


                    Originally posted by tirebiter View Post
                    The carbs have two large hoses and one small hose. I'm fairly certain the large ones go between carbs 1/2 and 3/4 but there was no "T" on either one. It was not easy to see for sure where they went last night in the dark.
                    There should be a total of FOUR hoses on the carbs. One will be on the vacuum nipple on carb #2, one to the fuel "T" between #2 and #3, one to each vent "T" between #1/#2 and #3/#4.


                    Originally posted by tirebiter View Post
                    I'll be checking other items and pulling off the damaged turn signal light assembly. I noticed one of the headlight brackets got bent when the turn signal got broken. Pretty sure I can straighten out the bent headlight bracket. The other one looks like it rotated a little on the fork tube.
                    Rotation on the fork tube is normal. If you need a replacement bracket, I have a pair available.


                    Originally posted by tirebiter View Post
                    Had my camera and took some video of the ignition test but the camera battery was not charged enough. It is now and I'll get something to post during my work on it today. Keeping my fingers crossed.
                    OK, you have a camera, let's see some pictures. Get some pics of that carb rack and its hoses, as well as the petcock.


                    Originally posted by tirebiter View Post
                    2 weeks to be roadworthy does seem unlikely but we'll see how lucky I get.
                    Very optimistic there. It usually takes 2 weeks just for diagnosis.

                    .
                    sigpic
                    mine: 2000 Honda GoldWing GL1500SE and 1980 GS850G'K' "Junior"
                    hers: 1982 GS850GL - "Angel" and 1969 Suzuki T250 Scrambler
                    #1 son: 1986 Yamaha Venture Royale 1300 and 1982 GS650GL "Rat Bagger"
                    #2 son: 1980 GS1000G
                    Family Portrait
                    Siblings and Spouses
                    Mom's first ride
                    Want a copy of my valve adjust spreadsheet for your 2-valve per cylinder engine? Send me an e-mail request (not a PM)
                    (Click on my username in the upper-left corner for e-mail info.)

                    Comment


                      #11
                      An illustrated guide to what hoses go where: http://members.dslextreme.com/users/...locations.html
                      Charles
                      --
                      1979 Suzuki GS850G

                      Read BassCliff's GSR Greeting and Mega-Welcome!

                      Comment


                        #12
                        Lunch break !

                        Compression readings all very low and big differences between the 4 cylinders. Sprayed a little WD-40 and readings went up a little.

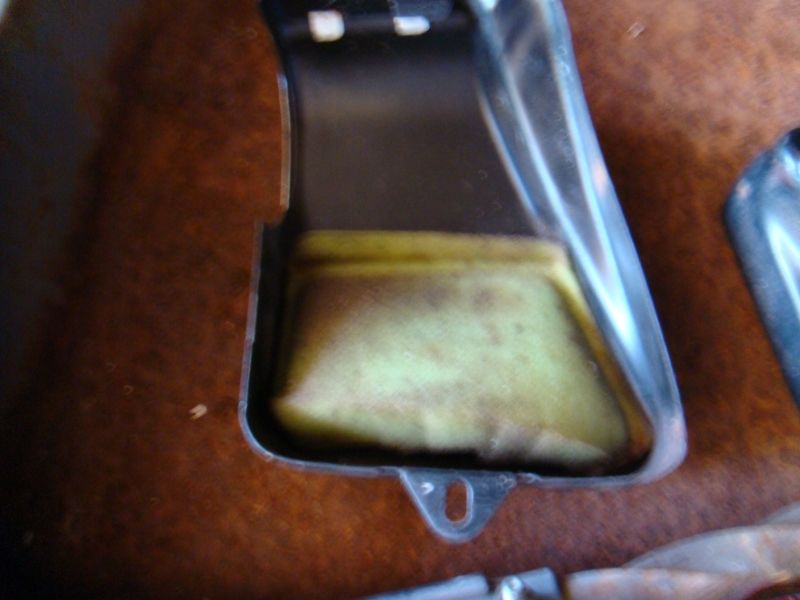
                        Pulled off the airbox - no element, just two pieces of green foam, one at each end under the chrome trimmed end-caps.


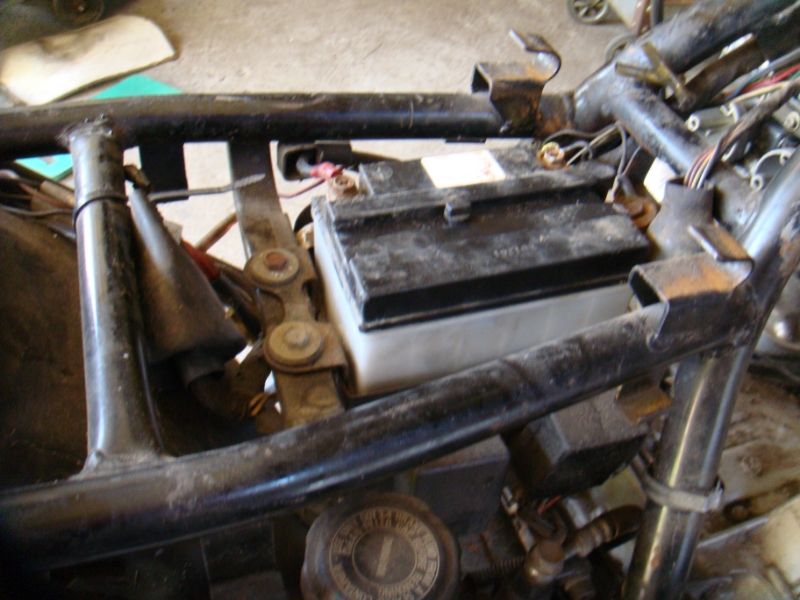
                        Battery is too tall - mystery piece will not fit above it.


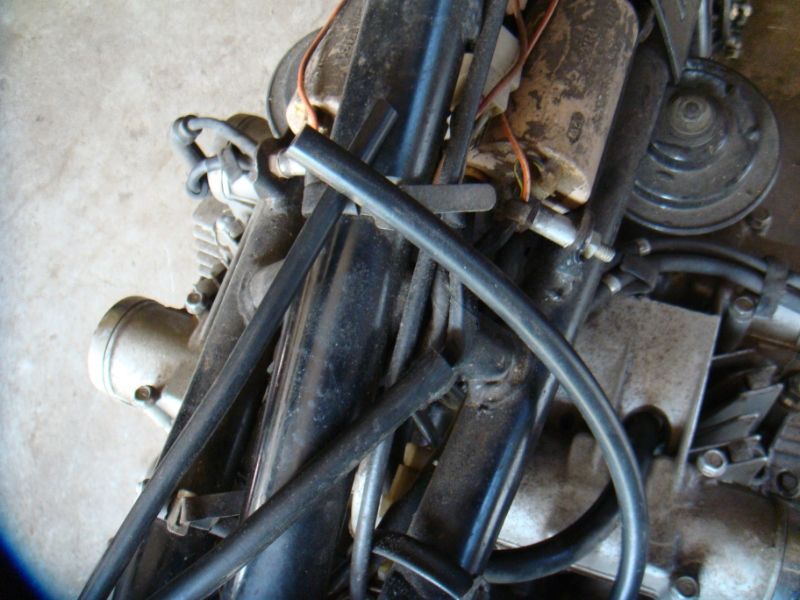
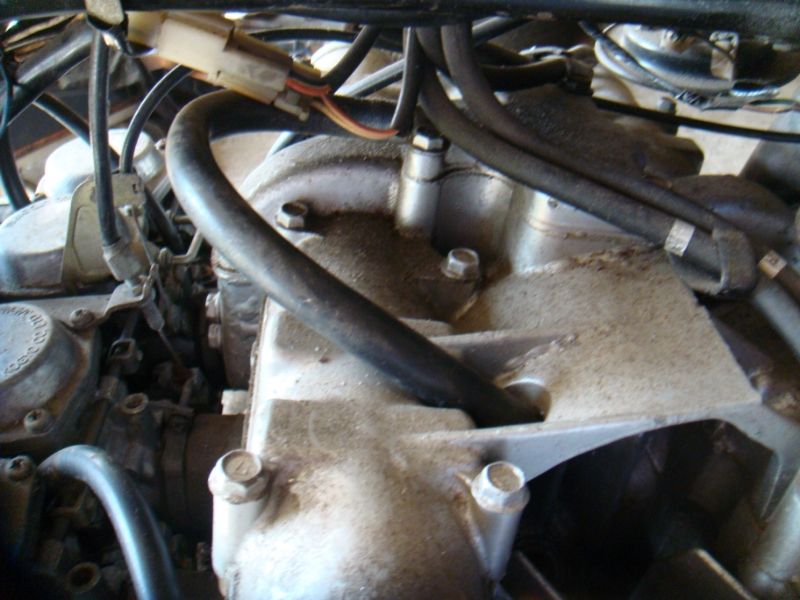
                        Rechecked hoses to carbs. 1 x fuel line has inline filter (too dark to see it last night). Runs down to fuel rail "T" next to idle speed adjuster. 2 x vent hoses where shown in the diagram linked in preceeding post. Not sure where the vents hoses go. 1 x breather hose bent around and stuck through a hole, aimed down towards spark plug #3. It's apparent where it's supposed to go on the top front of the airbox.


                        Pulled off the drain plug from #4 carb float bowl. No GOO !!! Stuck a wire up and was able to determine the float moves. Put the drain plug back in. Siphoned fuel into the filter to fil lthe carb bowls. Carbs #4 and #2 immediately started ****ing fuel all over the top of the crankcase/transmission - what a surprise ... NOT ...

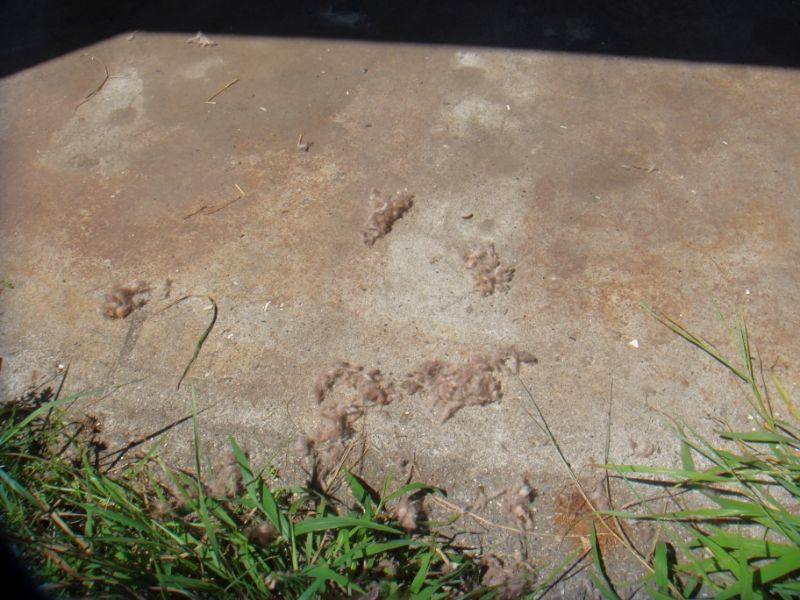
                        Sopped up fuel from the low spots and dried things up. Put the aprk plugs back in and gave it a try. Nope did not start. Pulled out the choke, quite literally and tried again. WHAMMO ! It was running !!! No plume of oil smoke. A snow storm of sorts instead. Insulation from the muffler or a mouse nest. Ran it dry. Pulled #4 plugs and rechecked compression - 60 PSI - better than before but I was hoping for more.


                        There is nothing to set or adjust that I can see, on the fuel petcock. The airbox rubbers are very pliable. I'll take off the carbs this afternoon so I can ID what jets it has now and make sure the needle-and-seat assemblies are usable, floats float, etc. Want to start the engine one more time just to measure the charging system ouput, before I take the carbs off.


                        I checked through all the stuff that came with the bike. I discovered a pair of turn signal lamp assemblies just like the rear ones.

                        At this time my additional list of parts includes an air cleaner element, maybe a choke knob/cable assmbly a JIS screwdriver (although I still like hex drive bolts with lock washers better) and whatever I find I need inside the carbs, O-rings etc. Forgot to count how many nuts on the valve cover. Was checking out the silicon VC gaskets. May not buy one if I can save what's on there now and use Permatex when I put cover back on. Definitely need a fork seal. I guess I should do both since the fork will be apart anyway (I think), to do the job on one side. Still no front brake but it did grab the other day although with some pumping. No leaks at the master so I'll be checking into the caliper this afternoon also.

                        Front tire valve stem core was loose ! I got about 3/4 turn on it. Tire might hold air just fine now.

                        I'm not sure how to tell date codes on tires. There is some dry rot cracking in the front tire from sitting flat and age. Rear tire looks like it's barely used.

                        I'm noticing Intermittant starter button operation. Am I supposed to hold the brake or anything to make it work ? I do not have an owner's manual. Am I experiencing the first of many poor connections in the entire harness ?

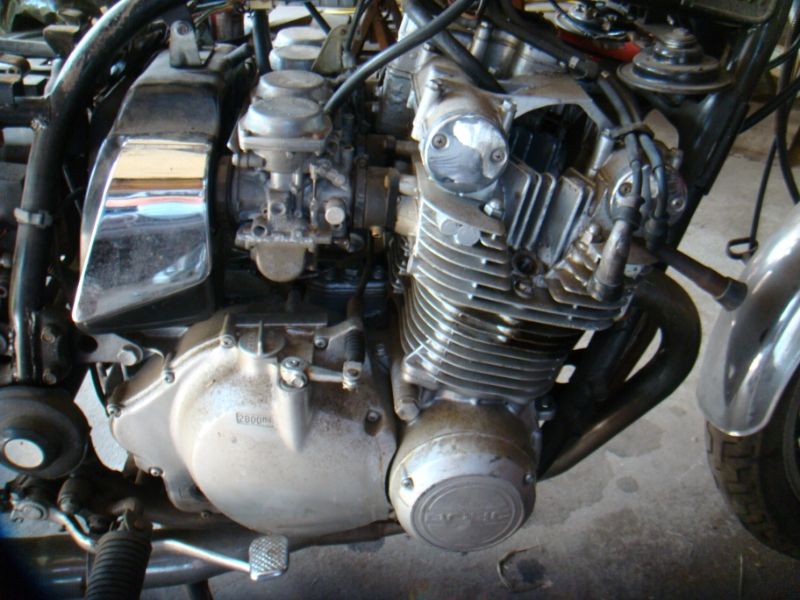
                        Not sure what carbs these are. Same as in photos on another website of the hose routing, it seems. I assuem they are stock. Here is a side view :


                        Done typing. Time to get my hands dirty again. Will be back with more, later on.
                        Last edited by Guest; 08-10-2014, 01:13 PM. Reason: putting in photos and changing links to hypertext

                        Comment


                          #13
                          I have tried uploading photos. They fail everytime. Maybe I need to reduce the file size. Will try that tomorrow.

                          Bled the front brakes. Front tire seems to be holding air now.

                          Drove the 850 up and down a dirt road this afternoon - about a half mile total. Got all the lights and inspection items sorted out. Want to place a parts order tomorrow. VC gasket, air filter, carb bowl gaskets, intake "O"-rings, petcock. Carbs seem to be working very well but I still want to ID all the jets. Idles at 650 smoothly, when warmed up.

                          Will commence going through all the electrical connectors once I have placed the parts order. So far it seems like I am still on track to get this on the road soon. Valve shims will hold me up but the bike will get inspected and be ready to go, by then at least.

                          My compression gauge may not be the most accurate.

                          Comment


                            #14
                            Originally posted by tirebiter View Post
                            Pulled off the airbox - no element, just two pieces of green foam, one at each end under the chrome trimmed end-caps.
                            Basically, you have no filtration there. The air comes in at bottom-center, goes up through the filter to the manifold, then to the carbs.


                            Originally posted by tirebiter View Post
                            Battery is too tall - mystery piece will not fit above it.
                            We are going to need a picture of this "mystery piece".


                            Originally posted by tirebiter View Post
                            Pulled off the drain plug from #4 carb float bowl. No GOO !!! Stuck a wire up and was able to determine the float moves. Put the drain plug back in. Siphoned fuel into the filter to fil lthe carb bowls. Carbs #4 and #2 immediately started ****ing fuel all over the top of the crankcase/transmission - what a surprise ... NOT ...
                            That is a nice start, but you will end up pulling the carbs and doing a full "strip and dip" rebuild, which includes replacing all the o-rings before you will bed able to truly call it "reliable".


                            Originally posted by tirebiter View Post
                            Forgot to count how many nuts on the valve cover.
                            Your bike will have the 16-bolt cover.


                            Originally posted by tirebiter View Post
                            Was checking out the silicon VC gaskets. May not buy one if I can save what's on there now and use Permatex when I put cover back on.
                            Save your money. The silicone "Real Gasket" gaskets are tempting, but very finicky to use. Some bikes can not use them because the tach drive is in the valve cover. Yours is in the head, so that is not a problem, but save your money. Your best bet for valve cover gaskets is Z1 Enterprises. The ONLY place for Permatex (actually just a dab of RTV is preferred) is on the curved portion of the half-moons. Use oil, Vaseline, grease or any other similar substance on the gasket, you will be able to re-use it several times.


                            Originally posted by tirebiter View Post
                            Still no front brake but it did grab the other day although with some pumping. No leaks at the master so I'll be checking into the caliper this afternoon also.
                            Do yourself a favor. Plan RIGHT NOW on rebuilding both master cylinders and all three calipers. There is nothing quite like the feeling of getting the engine going perfectly, then hopping on the bike for a test ride, only to find out that the brakes stick or don't even apply in the first place.


                            Originally posted by tirebiter View Post
                            I have tried uploading photos. They fail everytime. Maybe I need to reduce the file size. Will try that tomorrow.
                            The best way to post pictures is to host them at another site, like PhotoBucket, Picassa, Image Shack, etc. Each of those sites will provide an IMG link to the picture. Access that hosting site by opening another tab in your browser. Simply copy that link, then paste it in your message here. You don't need to click on the "Insert Picture" icon, just paste the link that you copied. If you are doing more than one picture, plese hit the ENTER key twice between each pasted link. That will give one line of white space between the pictures. One more tip: I don't know about the other sites, but Photo Bucket allows you to set your preferences to automatically re-size uploaded pictures. I have mine set to 800x600. Plenty large to show most detail, but not large enough to overwhelm. You can click on any of the links in my sig to see what they look like.


                            Originally posted by tirebiter View Post
                            Bled the front brakes. Front tire seems to be holding air now.
                            Again, please rebuild the brakes.

                            Chances are that the tires also need to be replaced. Read the date codes. That will be the last three or four digits of the DOT number on the sidewall.


                            Originally posted by tirebiter View Post
                            Idles at 650 smoothly, when warmed up.
                            Rather remarkable for a set of carbs that has not been cleaned or sunchronized, but the recommended idle speed is 1100 +/-100.


                            Originally posted by tirebiter View Post
                            Valve shims will hold me up but the bike will get inspected and be ready to go, by then at least.
                            Please check the valves before you go much farther. Clearances always get smaller. Valve adjustments were the first maintenance item to be ignored, due to the cost, but tight valves will soon burn, causing a LOT more damage.

                            .
                            sigpic
                            mine: 2000 Honda GoldWing GL1500SE and 1980 GS850G'K' "Junior"
                            hers: 1982 GS850GL - "Angel" and 1969 Suzuki T250 Scrambler
                            #1 son: 1986 Yamaha Venture Royale 1300 and 1982 GS650GL "Rat Bagger"
                            #2 son: 1980 GS1000G
                            Family Portrait
                            Siblings and Spouses
                            Mom's first ride
                            Want a copy of my valve adjust spreadsheet for your 2-valve per cylinder engine? Send me an e-mail request (not a PM)
                            (Click on my username in the upper-left corner for e-mail info.)

                            Comment


                              #15
                              Mystery piece turned upside down would clip onto frame rails except the battery is in the way. I'm going to edit an earlier post to include the photos.

                              Comment

                              Working...
                              X