.png "Powered by vBulletin")
 , I think he did it for a living at one time.
-
I'm sure Larry will be along with advice, he is probably more knowledgable than me, I think he did it for a living at one time.
-
Cool, I figured wet was right so good to get confirmation.
why prime the tank? I figured that was the best way to go forward for best result, but yes good silver (incorrect not 13L though) so just scuff it back then lay the black down will be ok? Cool.
i also save my used wet paper, it does get a lot of use, however the excess 400 I have is all new. I assume I missed checking my stash before buying some.Leave a comment:
-
Wet for everything.
Why you priming the new tank? It has factory paint, correct? If so scuff with 600 wet minimum, wash with water then dry and then solvent wipe and base clear.
Is the 400 used or new? I always keep used wet paper, it looses its coarseness, and becomes an in-between grit, but lasts a long long time when it is used wet.Leave a comment:
-
Actually two questions...
The grey scotchbrite pads... use them wet or dry? And I assume they're good to use until they no longer feel like they're doing the job same as sandpaper? I've never used them before...
Also, I've gotta break out that brand new fuel tank and get it prep'd for primer, reckon 400 wet sanding will be too coarse or good? For some reason I have an abundance of 400 grit paper I discovered yesterday... I've got 600 there too if the 400 will be too much.Leave a comment:
-
Nothing pic wise to update as I've spent less than 10 minutes on wet sanding the front mudguard with 180 grit so far yesterday. It's doing the job very nicely. The surface is very rough from the plastic fibres coming through, but getting very smooth where I've sanded, so I suspect I will only need primer surfacer after this, not more high build, although I'll wait and see how it turns out.Leave a comment:
-
I'll likely have to Brandon, don't want to have it knocked back due to noise when there's a simple fix...
Cheers Larry, that makes sense. I'm all keyed up now, just gotta get out and do that sanding of the guide coat and high build now.
At this stage the weather looks like it will clear up after this weekend, so I might get a lot more of my three weeks off with suitable weather to paint which would be fantastic. The sooner I can get the bodywork done the better chance I can get the crankcases painted during my time off as well.Leave a comment:
-
I saw an update from you via email Larry but don't see it here? Did you re-think it? I also have a couple of grey scotchbrite pads to scuff up the primer before laying down the black too.
I think it's only sensible to use the compressed air trick after that and before the black as well, along with some wax and grease remover.[/QUOTE]
I did reply, Pete, until I saw that you posted the 24 hr. period. What I was suggesting is basically what you've decided to do. I would spray the black, and if you do wait overnight, even if it's within the time span, I would still play it safe and scuff up the black with some 600 ( a grey SB pad would be similar grit), mask, spray the silver, wait 30 minutes or so and let the silver tack up, unmask it, and then spray your clear all in one fell swoop. It can all be done in 2 steps that way.Leave a comment:
-
I was thinking after I posted yesterday... I don't need 3 days to do the paint, two will suffice. If I do the black in the afternoon, I can do the masking then silver early the next morning followed by the clear probably an hour or so afterwards, which will keep the black well within the 24 hour period.
I saw an update from you via email Larry but don't see it here? Did you re-think it? I also have a couple of grey scotchbrite pads to scuff up the primer before laying down the black too.
I think it's only sensible to use the compressed air trick after that and before the black as well, along with some wax and grease remover.Leave a comment:
-
As always cheers for the advice guys! Will definitely give them a blast with air, I definitely want it all nice and clean before starting the next coat.
I'm using my 1.7mm gun for the primer so it should be putting down plenty of primer
Larry, all the advice I get is greatly appreciated and listened to. Despite doing this once before I still have much to learn! Especially this time around as a significant amount will be gloss black and I want to make sure I do a better surface prep job than last time. I can still see some annoying marks in the 450's front mudguard and a couple of little pin holes in the tail piece and I don't want to repeat that this time around.
The 180 makes good sense to me now, so thanks again kind sir!
While there's a bit of a time constraint in terms of my holiday time off work, I want to make it count and get the prep work right. I figure I'll only need 3 days to do the actual paint... one day for gloss black and let is set up over night. Next day is mask off and silver, then let it set up over night. Third day remove masking and do the clear coat. As long as each layer is within 24 hours of the last coat all will be fine.
I've got some 100W work lights I can set up in the shed that will warm it up in there after I finish spraying to help it cure as well, plus some tack cloths to help prep for the next layer etc.
I also had a bit of a score on eBay and found an aluminium muffler for $48 plus postage. Should scrub up ok.
 Untitled by starpoint73, on Flickr
It'll possibly be a little on the noisy side... straight through! Internal diameter is 61mm which is pretty close to the collector side of the headers I have. I may have to stick one of those cheapy eBay baffles inside when it comes to safety certificate time.
 Untitled by starpoint73, on Flickr
Leave a comment:
-
I hope the advise that I (and Fjb) give is helpful and not intrusive or eye-roll-inducing, Pete. I sometimes worry about it because you're really doing a nice job. Your patience is obvious. The 180 really is a good choice for the first block. It needs to cut quickly and cleanly at this stage because you're still basically shaping the parts. 400 will just saw away at it and drive you crazy. Once you get a nice second round on it w/o runs and brush strokes-n-stuff..the 400 will work really well at that stage. Sounds like the fender might even need a third round to bury the fibers. No biggee. Whatever it takes because you need to bury it good not to show in the final color coat. Carry on, sir..Originally posted by pete View Post
Leave a comment:
-
Make sure you hit it with high pressure air after, perpendicular to the surface close to the surface. This clears sanding partials from pin holes. More than once I have sanded and did a wipe down, light blow and sprayed Color. Then the paint draws the dust out of the hole to form a pin hole in your Color coat! A real ****er!
For high build I up the size of my spray nozzle to lay it on really wet. I have done the brush on thing before but I found it just increased the amount of sanding of high spots.
As always it's looking great!Leave a comment:
-
Cheers Larry, yeah the booth is working well, very happy with it!
I was thinking 300 to 400 for the first go but I reckon you're right, 180 will make a quicker job of it for sure without being too aggressive. The front guard's going to need some effort as I seem to have sanded back possibly a little too far into the plastic and some of the fibres have popped out. I'll need to pay extra attention there, nothing a bit of time and elbow grease can't fix.Leave a comment:
-
Always nice to check out your progress, Pete. Looks like your booth is working out just fine. I get the brush on first coat suggestion. I've actually sprayed it really thick, let it tack a bit, and used my fingers to rub it into pinholes and scratches first go around. 180 grit would be good to block sand it with the first time. Prime and then 400 for the second go 'round. Maybe a quick go-over with 600 before the base coat and it should be good to go. Nice work so far.Leave a comment:
-
It has indeed been a while! You have good timing though...
For the first time in what feels like months (only been a few weeks) I actually got to make some progress today.
My evenings have been learning new stuff for work, and the weekends have been humid and wet and no good for painting. The humidity was still a little high today but I said to hell with it and got stuck in.
All set up and plastic primer/adhesion promoter on the tail piece and front guard:
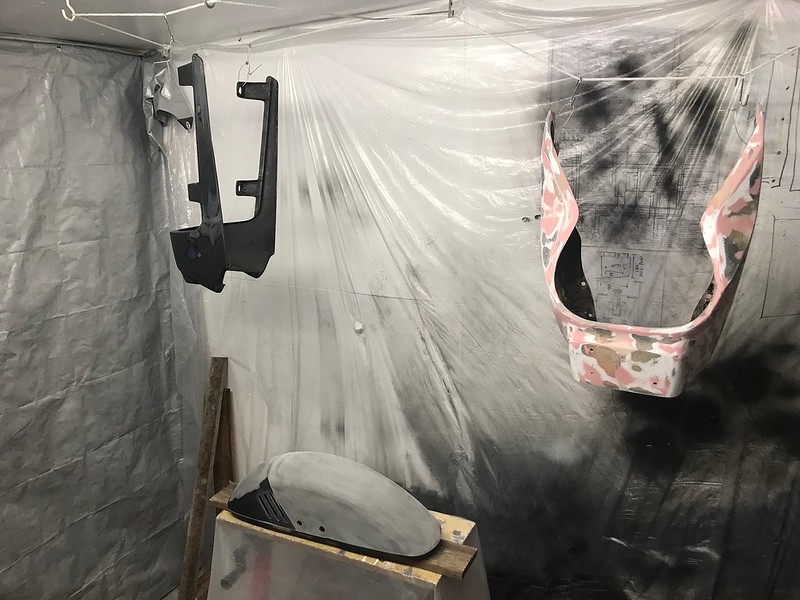 Untitled by starpoint73, on Flickr
Got the high build primer done. If you look close you'll see lots of runs and lumps and bumps, and that's due to brushing on the first coat as suggested by the mob I bought the paint from. Seems like it was a good suggestion as it definitely seemed to fill in the little pock marks and so forth in the bare fibreglass on the front cowl.
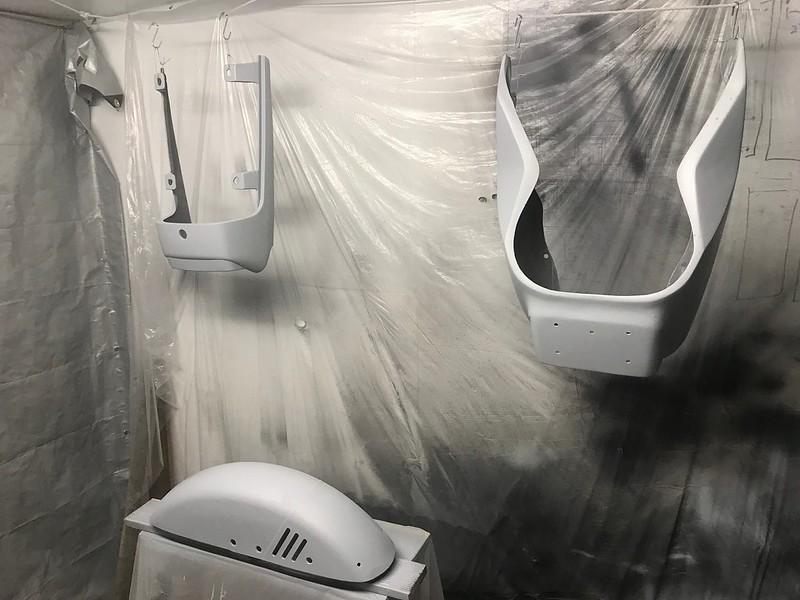 Untitled by starpoint73, on Flickr
And I got my interpretation of a guide coat on as well, some areas are probably a bit too heavy but it should still do the job.
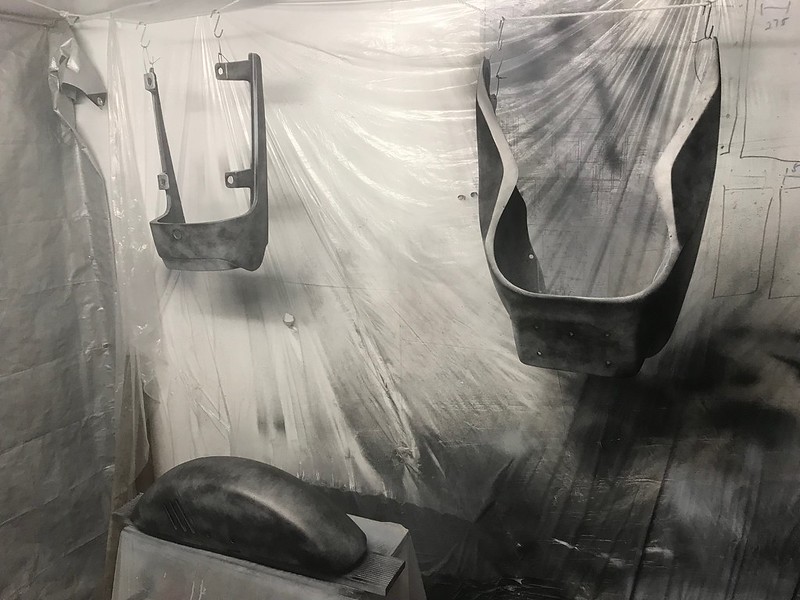 Untitled by starpoint73, on Flickr
I have three weeks leave from work after this week, so I'm hopeful I'll get sufficient time to get all the bodywork painted as well as the crankcases. I'm expecting the first week will be wet, so that'll be lost for painting but at least I'll get the guide coat sanded.
As a side note, I'm really stoked how well my shed is working. I was a bit concerned the 2K paint would be an issue compared with the aerosols, but not at all. The improvements in airflow in the filter box are probably helping, but between coats there was pretty much no smell outside the shed aside from a hint of thinners.Leave a comment:
Leave a comment: