Announcement

Collapse
No announcement yet.

81 GS750E Yard find going to need lots of TLC

Collapse
X
 
  • Filter
  • Time
  • Show
Clear All
new posts

    #31
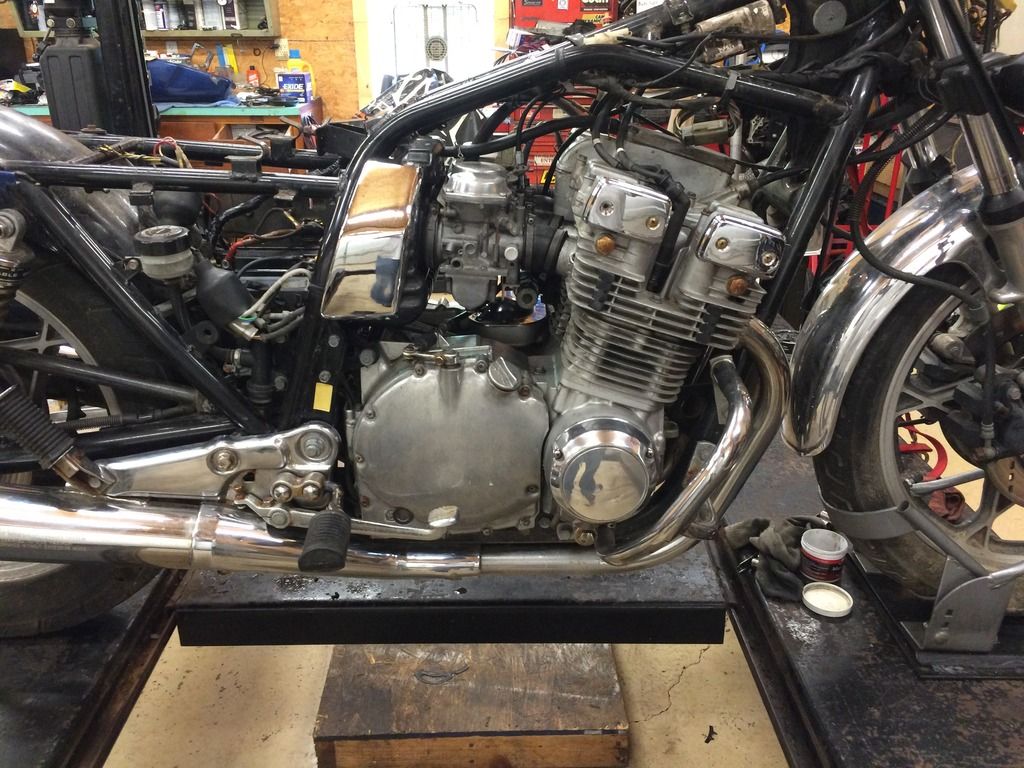
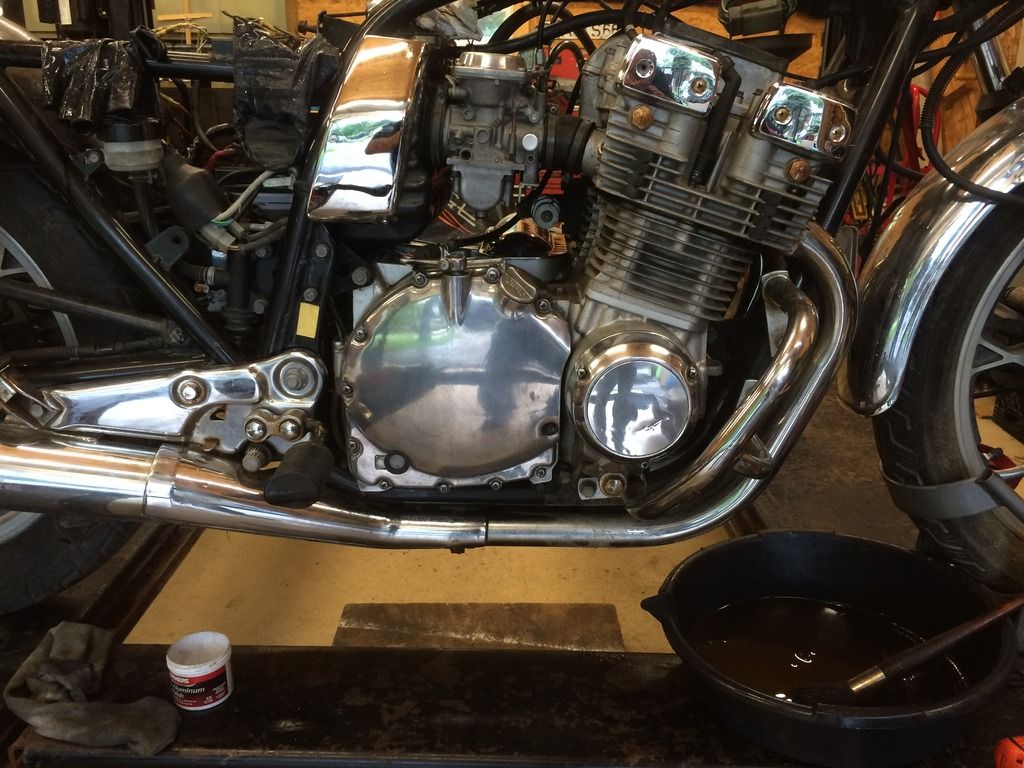
    A little cooler weather today but raining so I am working on it early before it gets Africa hot and humid here...

    Clutch cover before:


    After:


    I need to pull the oil pan off and clean it out and do the oil pressure mod.. Maybe tomorrow. After that fix the brakes and I'm ready for the first test ride!

    Comment


      #32
      Removed the oil pan this morning. I had to remove the exhaust to get the pan out. Caution! If you do this you have to soak the 8 header bolts with PB Blaster or your favorite. Then I carefully loosened all of the bolts about 1/4 to 1/2 turn. Then I squirted more PB behind the header clamps to get some PB on the threads. After a few minutes soaking I finished loosening the bolts. The all came out easily. I'll be the first to admit that I was lucky that none stuck or broke. I firmly believe that if you take your time, use plenty of penetrating oil and a light touch on the ratchet that it ups your chances of removing exhaust bolts without breaking them. If one of more did not come out easily I would have heated them, to a dull red, before trying the wrench again.

      When I go back together, with the exhaust, I'll use high temp copper anti-seize ONLY on the threads! The grey anti-seize will not survive the extreme heat of the headers. I learned that trick from working on old BMW airheads.

      The pan has an almost hidden bole right in the left center of the pan so look for it. To get the pan off I sharpened a putty knife to a chisel edge. Flat on one side and beveled on the other. Then carefully inserted it between the crank case and oil pan trying to hit the gasket itself. Light tapping with a rubber hammer on the handle of the putty knife and slow and easy going I got the pan off with no damage to either surface. Another tip. Use PB Blaster on the gasket edges. That will soften the gasket usually enough to insert the sharpened putty knife more easily.

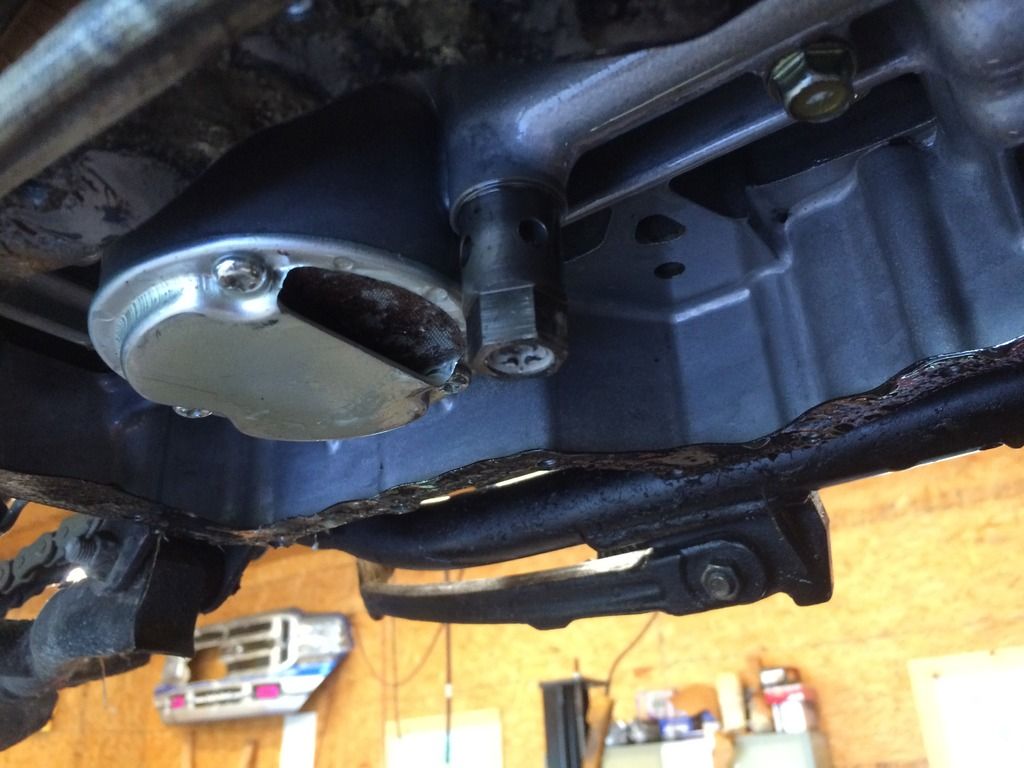
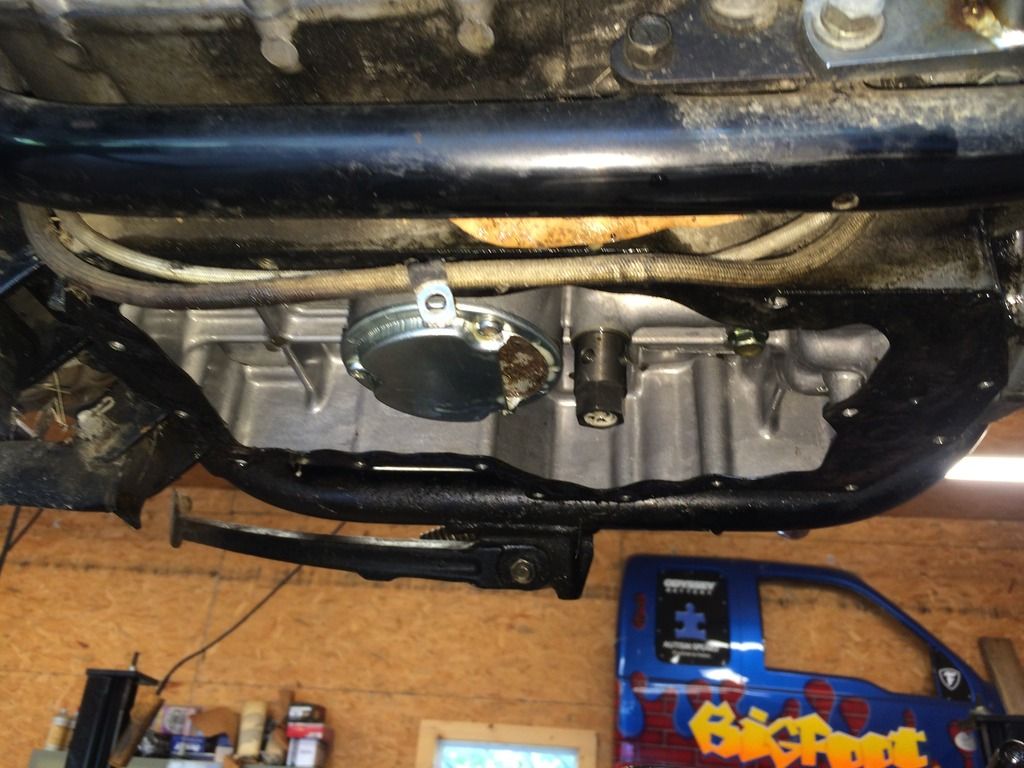
      After some clean up I found the pick up screen and the oil pressure regulator. It is to the right of the screen in the following pictures. Or just forward of the screen. Actually easy to spot. It's the only thing hanging down into the pan. I intend to remove the regulator and do the oil pressure mod by inserting 2 washers under the spring. I'll do a separate post on that process because after hearing about the mod I could find no pictures or really anything more than "insert two 6mm washers under the spring". So we'll see how that actually works.


      Note the interior was that clean when I opened it up. If you remember I drained a very large quantity of water out of the sump when I changed oil first time. Evidently water in the crank case cleans it! But it's no good for the bearings.

      Comment


        #33
        Sump screen looks full of debris. Is that the case or is the photo an optical illusion?

        Good idea about starting a new thread about the oil pressure mod.

        Keep going...
        Ed

        To measure is to know.

        Mikuni O-ring Kits For Sale...https://www.thegsresources.com/_foru...ts#post1703182

        Top Newbie Mistakes thread...http://www.thegsresources.com/_forum...d.php?t=171846

        Carb rebuild tutorial...https://gsarchive.bwringer.com/mtsac...d_Tutorial.pdf

        KZ750E Rebuild Thread...http://www.thegsresources.com/_forum...0-Resurrection

        Comment


          #34
          Screen looks rusty to me.
          1978 Gs1085 compliments of Popy Yosh, Bandit 1200 wheels and front end, VM33 Smoothbores, Yosh exhaust, braced frame, ported polished head :cool:
          1983 Gs1100ESD, rebuild finished! Body paintwork happening winter 2017:D

          I would rather trust my bike to a technician that reads the service manual than some backyardigan that THINKS HE KNOWS how to fix things.

          Comment


            #35
            No it's partially plugged up with crud. It just got too hot and humid out in the garage so I haven't done anything else. Of course I'm going remove the screen and clean it. I am still amazed at how clean this engine is. It's not really that dirty on the outside either. I used my flashlight to look up into the engine and trans as well as I could. Looks good up there too. I had the clutch cover off yesterday and it looked nice and clean as well. But I have to believe with all that water in the oil I probably have a few clutch plates rusted to the steels although I saw no trace of rust on the bolts or springs. When I'm done with the bottom of the engine I'll move to the valve cover and setting valve lash. All in all pretty normal for an old bike revive.

            Comment


              #36
              Originally posted by Fjbj40 View Post
              Screen looks rusty to me.
              Yeah now that you mention it, it does. But I think its a combination of recirculated RTV and oil crud. The PO had every crank cover and the valve cover glued on with RTV. Some of the covers, like the stator cover, had a dark colored gasket and it was broken up a little. I'm sure some got in there somewhere. That's why they put the screen on them.... If it gets by the screen the filter gets it. The old filter was pretty dirty but I did examine it closely. I knew there was going to some crud on it. I did look for metal filings and found very little if any as I remember. Also the drain plug has a magnet on it and it was free of metal. I'll know more tomorrow when I pull the screen for cleaning. If it is rust, it's the only rust I've found so far.

              Comment


                #37
                As promised I created a new post in the Performance and Mods section of the Oil Pressure Regulator mod:

                Comment


                  #38
                  Cleaning the old gasket off the bottom of the crank case was an exercise. I don't remember having one that rock hard and stubborn. I hesitate to say what I did to remove the remaining gasket material because I'm afraid someone, with less experience than I, will try it. Took me over an hour before I pulled out the big gun then another 20 minutes to get it clean enough for me. Which is pretty darn clean. I strive to have an almost "just machined" finish. Any way I put the new gasket on with high temp lithium grease on both sides of the gasket. Just in case I have to remove this again. While I was putting the grease, on the gasket, I thought to myself "the next guy that pulls this gasket will thank me". Another note. Those 18 some pan bolts should be torqued to 88 INCH pounds in a crisscross pattern per the FSM. I two stepped it. First pass at 70 inch pounds and finished with 88 inch pounds. Now that is only about 7 foot pounds. No need to get them Godzilla tight.

                  Got the exhaust installed with the help of my oldest son. He came by to see what I was doing and I put him to work.....Tip on the exhaust. The two half circle shims go on the middle two pipes. I also used high temp copper anti-seize on the exhaust bolts. Filled it with Rotella 10w40 and removed the spark plugs. That sump and pump were pretty dry by the time I finished working on the bottom end. Then I ran the starter in 10 sec bursts until the oil pressure light went out. After the light went out I ran the starter another couple of 10 second bursts to make sure I had oil everywhere it's supposed to be. Then I hung the IV fuel tank and test ran the bike. Smooth as silk and started easily with full choke. This time I confirmed that the tach was working and the generator was charging the battery and no oil light at 900 rpm idle. All good.
                  Last edited by Guest; 07-26-2016, 02:40 AM.

                  Comment


                    #39
                    Originally posted by jdvorchak View Post
                    Now that is only about 7 foot pounds. No need to get them Godzilla tight.
                    This is something a lot of home mechanics could learn. If the manual has a torque spec for a bolt, I use it, period. I always twitch torquing up brake caliper bolts and triple clamp bolts because it seems like way too little torque for the size of bolts, but that is what was designed for and that is what to use.

                    You're doing a great job on this bike, I am enjoying watching along.


                    Mark
                    1982 GS1100E
                    1998 ZX-6R
                    2005 KTM 450EXC

                    Comment


                      #40
                      Thank you Mark. I put the new clutch cable on it and re-installed the headlight. It's a little on the warm side today but I want to fix the front brakes. I'm sure that will involve removing both calipers and the MC and taking it all apart to clean. The brake fluid looks like Starbucks coffee but no solids in it. I may just get lucky. The tank has a little surface rust so I put a couple of gallons of white vinegar in it and shook it up when ever I walked by it. Hoping it will be clean by tomorrow. Oh... note to self.. move the petcock to on or res BEFORE you put vinegar in the tank.... Garage smells like a salad bar now.

                      Comment


                        #41
                        Originally posted by mmattockx View Post
                        This is something a lot of home mechanics could learn. If the manual has a torque spec for a bolt, I use it, period.
                        Unless you happen to have an early Haynes for the 850, where one of the torque figures given for 6mm bolts is in the order of 17 or 18 lb/ft. I wonder how many valve cover threads have been stripped out because of a single stupid misprint.
                        ---- Dave

                        Only a dog knows why a motorcyclist sticks his head out of a car window

                        Comment


                          #42
                          I used the Factory Service Manual and I would have guessed 10 ft lbs or less. I used my 1/4 drive HF torque wrench which puts that figure right in the middle of the torque range for that wrench. My 3/8 drive torque wrench starts at 10 ft lbs. I just did a KZ1100 valve cover and that FSM called for 87 inch lbs. So I knew I was in the ball park when the Suzuki FSM called out similar torque.

                          Bad news or good news depending. I just broke the plastic reservoir on the front MC by applying moderate finger pressure trying to remove it from the pump. I say good news is because I found an aftermarket 5/8" (16mm) MC brand new for $25 shipped on eBay. I've bought 3 or 4 MC from that seller and always pleased. It comes with a brake light switch, new polished lever, banjo bolt and crush washers and a rebuild kit!
                          One Brake Master Cylinder to fit Suzuki. One Brake Master Cylinder to fit - Large Single/Dual Brake Disc System. - Save a copy of the invoice and your MC is covered for one year. Piston Bore:16mm, 5/8.


                          It says $28 but when I checked out it gave me a $2.89 discount! eBay says it will be here Saturday.

                          In the mean time I can pull the calipers and flush the brake line and have them ready for the new MC. After I got into it, the brake fluid didn't look that bad.

                          Comment


                            #43
                            Best of luck with your Chinese master cylinder.
                            ---- Dave

                            Only a dog knows why a motorcyclist sticks his head out of a car window

                            Comment


                              #44
                              Originally posted by mmattockx View Post
                              This is something a lot of home mechanics could learn. If the manual has a torque spec for a bolt, I use it, period. I always twitch torquing up brake caliper bolts and triple clamp bolts because it seems like way too little torque for the size of bolts, but that is what was designed for and that is what to use.

                              You're doing a great job on this bike, I am enjoying watching along.


                              Mark
                              Absolutely use the specific torques listed in the manual, there is also a handy generic tq sheet and bolt head identifier for those unlisted torques. I print and laminate them and they are on the bench during any work.

                              I was told by another member hear that I was a book worm know it all because I use the manual
                              1978 Gs1085 compliments of Popy Yosh, Bandit 1200 wheels and front end, VM33 Smoothbores, Yosh exhaust, braced frame, ported polished head :cool:
                              1983 Gs1100ESD, rebuild finished! Body paintwork happening winter 2017:D

                              I would rather trust my bike to a technician that reads the service manual than some backyardigan that THINKS HE KNOWS how to fix things.

                              Comment


                                #45
                                Originally posted by Grimly View Post
                                Best of luck with your Chinese master cylinder.
                                I hope so too. I've bought 4 of these from the same vendor and all worked perfectly. I know of one that is going good 3 years now without an issue. The quality and workmanship looks no worse than OEM to me. Fit and finish is very good to excellent. First thing I found on eBay was a plastic reservoir and O-ring for $40+ that is when I looked up my records and saw what I had bought before and got complete unit for about half.

                                Comment

                                Working...
                                X