-
Really nice. And good luck with getting the electric gremlins out with a new dyna system. -
I was going to wait to post pics of the tins until after I put them on the bike but I am so excited about how these turned out that I have to show you now. The painter sent these to me earlier today. I pick them up tomorrow. I wasn't sure if I was going to like the matte finish but OMG....It looks better than I even imagined it would.


Leave a comment:
-
You'll get there. Your perseverance is inspiring. H3ll, you didn't think this was going to be an EASY journey, did you?!?Leave a comment:
-
Update to where I am right now.
1. I currently have the OEM coils and plug wires on the bike.
2. I have checked all voltages at the coils. All good.
3. I have switched the coils from right to left. Still burping and farting on 1 & 4
4. I have checked the timing dynamically and still see a skipped spark every once and awhile on 1 & 4.
I have diagnosed the bike as having atrial fibrillation. The next stop is with a cardiologist.
In all seriousness, I can only think that the problem lies with the Dyna ignition. I have ordered a new one though Z1 and will slap it on when I receive it. If it solves the problem, I will return the defective one for a refund. I have also ordered some tools to allow me to sync the carbs. I ordered a Morgan Carbtune, a pair of Motion Pro long nose snap ring pliers to allow me to raise the needle height and a carb adjustment tool for syncing the carbs(screwdriver/wrench). I also ordered an adjustable RPM signal filter from KOSO North america and some 107.5 and 110 main jets. I'm hoping the RPM signal filter will clean up the signal coming from the coils to the gauge and stop the blinking.
I'm really hoping the poltergeist in this bike is the Dyna ignition being defective. I can't move onto tuning this bike until I figure out why it's missing a spark on 1 & 4. Once that is figured out, I can move onto syncing the carbs and tweaking the jets and needle heights.
Ugh.....Leave a comment:
-
Assuming a good 12V feed to the ignitors... make sure with a meter.
To rule out a weak coil, swap the coils over.
If the fault doesn't follow the coil, suspicion falls on the ignitor. Not unknown for these Dyna ignitors to fail not long out of the box and lead to much head-scratching. Dyna are well aware of this and replace them quickly.Leave a comment:
-
I think I zero'd in on the problem. The Dyna ignition requires a spacer to be installed on the timing advance magnet. I originally had the spacer installed but noticed that I couldn't freely advance the cam(it was too tight) so I took it off. But it seemed like there was too much movement of the cam allowing it to maybe miss a spark. I ended up milling the spacer down by about 30 thousandths and now it fits nicely. The backfiring seems to be gone but I'm not sure that it is firing at all on 1 & 4. I have spark at those spark plugs but the exhaust temp on 1 & 4 was 200 while the exhaust temp at 2 & 3 was 400. Something is wrong. Timing is dead on. Bike idles nicely with no backfiring or popping but it just doesn't sound right. It idles for a little bit and then dies. And as soon as I grab the throttle, it boggs like it's only running on two cylinders.


Leave a comment:
-
Yep! I was looking at the same one. However, I spoke too soon when I said the problem was solved. I went to restart the bike and the damn thing started backfiring again. Only through carbs 1 & 4 and the exhaust. Here's what I've done to try to zero in on the problem:Originally posted by Grimly View Post
1. Removed Dyna coils and put OEM coils and wires back on. Still misfiring on 1 & 4
2. Checked connections where Dyna ignition connects to coils. Still misfiring on 1 & 4
3. Disconnected the battery and ran off of another battery. Still backfiring on 1 & 4
4. Disconnected the stator and ran off of another battery. Still backfiring on 1 & 4
5. Disconnected everything(lights, gauges, etc.) from the M-Unit except the ignition. Still backfiring on 1 & 4
Mind you, dynamic timing has been done and at idle, the light is right on the F mark on the timing advancer. It idles good minus the popping through the carbs and exhaust. I put the timing light on a black surface and just watched the light flash pattern on 1 & 4. Steady flash and then skips a flash every once awhile(hence backfire). 2 & 3 have a steady flash with no skipping.
I'm running out of things to try. Any suggestions? Anyone? I'm about to call an exorcist.Leave a comment:
-
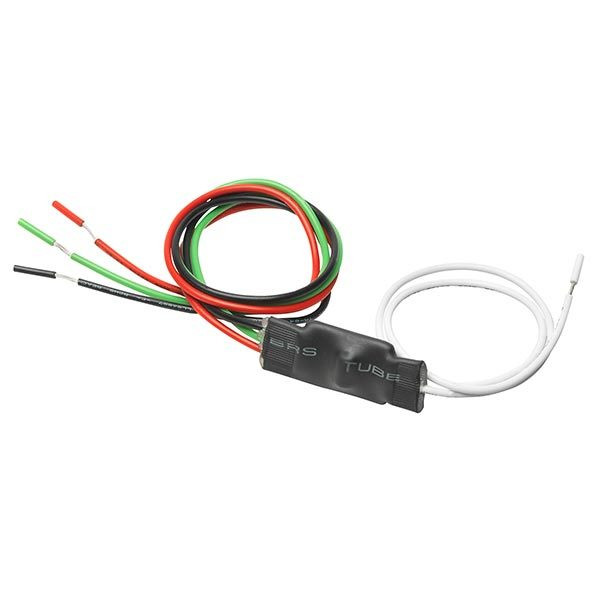
This might be all you need for the tacho signal - it's probably spiky and dirty.
Leave a comment:
-
A solid frame ground is essential to everything getting proper voltage. I can't be sure this will solve ALL of your woes, but I'll bet it will be your coil and spark issue. Either way, it is a necessity. I don't think your plug wires were an issue.
I don't think you will be too far out with the #117 jets. You will need to raise your needles, and like Steve said, start at 2.5-3 turns out on the mixture screws, and fine tune from there.Leave a comment:
-
Amazingly....the NGK BR8ES plugs smoothed out the ignition. No more backfiring through the pipe or carbs. The bike sits there and purrs like a kitten. I'm still getting some sort of feedback through the RPM signal wire though. The RPM signal wire is attached to the output side of one of the coils. This causes the LCD data on the screen to flicker/pulsate. I don't know if some sort of RPM signal filter will help with this or not. I have emailed Acewell and am waiting for a response to this issue. The good news is that the bike is idling well and now I believe I can move on to jetting the carbs.Leave a comment:
-
These are the Dyna spark plug wires I used. https://www.z1enterprises.com/dyna-i...-core-red.html They are indeed non-supression core. I ended up changing the spark plug wires to these: https://brillman.com/product/7-8mm-c...ark-plug-wire/ This didn't fix the problem. Still getting RF interference by means of mis-firing and gauge interference when the tachometer is connected. After emailing with Brian last night, we realized that the chassis doesn't have a direct ground connection to the chassis. We did put in a direct ground cable to the engine but not the frame. I don't know if this is the problem but this is the next thing I will try. I am going to make up a ground cable and connect directly from battery negative to the chassis.Originally posted by Grimly View Post
This is driving me nuts. The mis-firing seems to only be happening on cylinders 1 & 4 and not 2 & 3. I might start the bike and video the timing light in slow motion to see if there is any sort of pattern to the mis-fire. I also will probably run down to Napa and see if they have the BR8ES resistor plugs.Leave a comment:
-
I can't see clearly on that last pic of the bike in the yard, whether you have resistor plug caps or not. If you don't, you'll have to use resistor plugs, although for all I know you may already have done that.
The resistors in the HT leads (or caps, or plugs) keep the RF interference way down, compared to non-resistored leads, caps, plugs. Non-resistored HT circuits cause mayhem to onboard electronics.
You only need to put the resistance in one place - lead, cap or plug, not more than one, else all you do is rob spark energy.
I'm in the same boat - got a set of ultra-nifty plug leads with factory caps that I was loathe to chop off, so I fitted resistor plugs, namely BR8ES, which have an inbuilt 5Kohm resistor.
Actually, I regard it as a good thing, because resistor plug caps often get ignored and forgotten about for far too long, whereas now I get a new set of resistors every plug change.Leave a comment:
-
Ok. Brian just left. He brought his nifty electronic meter that also measures EMF(I think). We could probably ghost hunt with it. LOL. The bike was giving off a tremendous amount of noise(Maybe Brian can explain this better). Brian then checked my Dyna ignition wires for resistance and shielding they had none. Apparently they're supposed to have some? Anyway....the spark plug wires were giving off so much interference that they were throwing off all sorts of things. The gauge on the bike would blink and we hooked up a timing light to watch the light pattern and it was inconsistent therefore throwing off the spark. This would cause backfire in the carbs and exhaust. Crazy shyte!
I'm off to Napa now to get some new crimps for spark plug wire. I have this cool fabric spark plug wire that matches my wiring loom that we checked for shielding and it does have it. I will be trying these on the bike and see how it runs then. I might not get to it today though because the family is going to see Birds of Prey at 2:45. I'll keep you all posted. This is crazy stuff.Last edited by JohnnyL; 02-09-2020, 01:56 PM.Leave a comment:
-
Yep, your "air screw" actually controls a MIXTURE, that is the screw that Suzuki calls a "pilot" screw.
I am out of town right now, but have a few jets at home that I might be able to send you for experimentation. Should be home Monday evening, will check my inventory on Tuesday.
.Leave a comment:
-
Thank you Steve! Everything you said makes a lot of sense. Brian is coming over today with his carb sync tool and long reach snap ring pliers. We will change out the pilot jet back to stock. I only have the 92.5, 100 and 117.5 mains so I will probably put the 117.5 mains in for now and order some 110s and maybe some sizes in-between.Originally posted by Steve View Post
I'm a little confused what the "mixture" screw is. Is this what I know as the "air screw"? The little screw on the top of the carb? This one:

Leave a comment:
.png "Powered by vBulletin")
Required reading for all forum users!!!
Welcome!
Register to access the full functionality of the GSResources forum. Until you register and activate your account you will not have full forum access, nor will you be able to post or reply to messages.A note to new registrants...
All new forum registrations must be activated via email before you have full access to the forum.A Special Note about Email accounts!
DO NOT USE sbcglobal.net, att.net, bellsouth.net or email.com email addresses when registering for the forum! Email that our system sends out to these email servers is treated as SPAM and you will never receive your activation email, or any other email that our system may send out. Use an email address from gmail.com or some other email server.A note to old forum members...
I receive numerous requests from people who can no longer log in because their accounts were deleted. As mentioned in the forum FAQ, user accounts are deleted if you haven't logged in for the past 6 months. If you can't log in, then create a new forum account. If you don't get an error message, then check your email account for an activation message. If you get a message stating that the email address is already in use, then your account still exists so follow the instructions in the forum FAQ for resetting your password.Have you forgotten your password or have a new email address? Then read the forum FAQ for details on how to reset it.
Any email requests for "can't log in anymore" problems or "lost my password" problems will be deleted. Read the forum FAQ and follow the instructions there - that's what we have one for...
New users should be sure to read the FAQ as well as the posts in the Announcements forum. This will answer many of the questions you may have about how this forum works.
Before posting questions in the forums be sure to use the forum search function!!! Odds are your question has already been asked and answered before. And when posting, please make sure that you post to the correct forum.
Finally, be sure to check out BassCliff's website here. He has useful information that can't be found on this site. His welcome page containing useful GS information can be found here. Be sure to check it out!
If you are a returning visitor to the forum and can't log in using your old forum name and password, chances are your account is deleted. Just create a new forum account and you should be all set.

Leave a comment: