-
I purchased the hoop from a website called old man motors but I don’t think they’re in business anymore. -
I’m wanting to do the same on my bike, but I don’t know which size hoop to get. Do you have a link to where I can buy that same one, or one that will fit on my bike?Originally posted by JohnnyL View Post
thank youLeave a comment:
-
The bad disconnect was just par for the course. As you know firsthand Brian, this bike has had many demons. I am just hoping that I have now chased all of the demons away. The bike sure seems to be happy now. I hope to tow it down Saturday evening to meet up with you guys for a couple of hours so you all can see it in person.Originally posted by bwringer View PostLeave a comment:
-
Now THAT was an ending I totally did not expect... a whole 'nuther set of carbs? And finally a bad disconnect?
What a saga!
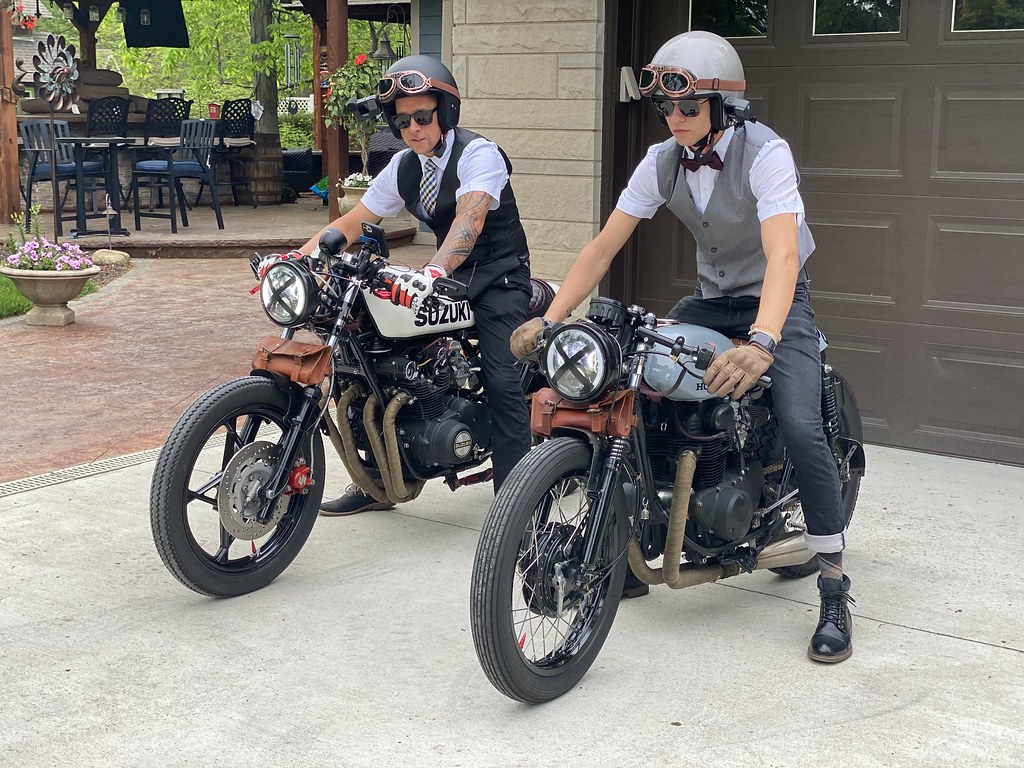
And you gentlemen did look very distinguished indeed.
Glad to see you have some air filters now, too. You deserve many, many happy miles without taking that damn engine apart again.Leave a comment:
-
VM26SS settings
Main Jet 110
Idle Jet 15
Air Screw 1.25 Turns
Float Height 24mm
Jet Needle 5DL31 4th clip down
Needle Jet 258 08Leave a comment:
-
Giddy with excitement, I ran home, went to the thing I had to do that evening and then went out to the shop late to put the carbs on. Slapped the carbs on, turned on the choke and the bike fired right up! Holy crap! Let her warm up for 30 seconds and then turned off the choke and the bike sat there and purred and 1100 RPM. Yahoo!!!! Finally, "The B i t c h" was running. By this time, it was 9:00 in the evening and I still had time to ride the bike down to the local pub for "Bike Night". The bike ran incredible. It screamed the whole way there. It ran like I have never seen it run before. Maybe it was time to rename her back to her original give name of "Suzukiki". Named after my daughter's nickname of "Kiki". Not so fast... After hanging out at the pub for about an hour talking bikes with the fellas, my son and I jumped on the bikes and raced out of there. Only to have my bike completely shut off about one mile down the road and about six miles from my house. It was like it just ran out of gas. We pulled over on the side of the road and I continuously turned the bike over to try to get it to start to no avail. My son had to ride home, get the trailer and come back and pick me up.
The next day, I called Rob to tell him what happened. He asked what are you doing tomorrow(Saturday) because I'd like to come over and see what's going on. Of course I answered I have nothing going on tomorrow. He said he would bring all his tools, jetting, new spark plugs, needles etc. to get this bike perfectly tuned in.
So Saturday comes and Rob comes over. We put in new plugs thinking the maybe the plugs were fouled. We checked spark and they had spark but maybe suspected it was weak spark. Still no fire. We removed the seat and the tank looked over the wiring to make sure nothing was amiss. We checked the fuel coming out of the tank and it was. We put an auxiliary tank on and when using the auxiliary tank, we used the quick connect fuel line that he had put on the carbs. Still no fire. Time to pull the carbs. Rob placed the carbs on the bench and removed the bowls. Every bowl was bone dry. LOL.....Omg...could it be something that stupid? The quick connect wasn't allowing fuel through. Not understanding why, we eliminated the quick connect and ran a fuel line straight from the tank to the carbs. Reassembled the bike and it fired right up and purred like a kitten. He wanted to hear the bike run so I do a speed run down the street and it screamed! We didn't feel it needed any jetting changes.
So this story finally has a happy ending. The bike runs amazing now and I made a new friend and finally met the wizard I've been looking for. Rob is an amazing guy and does extremely high quality work rebuilding carburetors. He has had people as far away as Australia send him carburetors to be rebuilt. Take a look at his webpage at http://robswheels.com/index.html. You can also contact him via email at Rob Eberle. You can also see some of his work on Instagram @robs.rebuilds.
And if you're ever looking for parts for your vintage bike, make sure to visit his store in Indianapolis or you can order off their webpage at https://newmotorcycleparts.net/.
Here are some pics of the carbs installed on the bike with Emgo filters. Two of the Emgo filters did not fit between the frame and the carbs so I had to cut them down. I did this by taking a die grinder and cutting the filter to the length that would fit. I then carefully removed the end cap, squeezed the end of the cut filter into the cap and poured fiberglass resin into the end cap from the opening.
 IMG_3930 by John Lethen, on Flickr
 IMG_3929 by John Lethen, on Flickr
 IMG_3928 by John Lethen, on Flickr
Last edited by JohnnyL; 06-09-2021, 02:30 PM.
IMG_3928 by John Lethen, on Flickr
Last edited by JohnnyL; 06-09-2021, 02:30 PM.Leave a comment:
-
Great stuff Johnny, and congrats to Tyler. Both your bikes look super. thanks for sharing.Leave a comment:
-
So the Distinguished Gentleman's Ride comes and goes. The following Wednesday, I take the carbs off the bike and run them down to Cycle Re-Cycle to have Rob rebuild my carbs. A week passes and Rob calls me to tell me that he has my carbs done and wants to meet me up the road from my house to give me the carbs. He offered to come over and put them on the bike with me but unfortunately I had something going on that evening and was unable to do that. So I jumped in my truck and met Rob up the road to pick up the carbs. Thinking I am going to be getting my carbs back fully rebuilt and ready to put on the bike, I was surprised when he opened up a box with my carbs completely in pieces. He went on to say that he could never get that passage for the air screw clearing. He didn't know if there was a piece of o-ring stuck in there or what. He said now I hope you're not upset with me but I decided to build you a new set of carbs that taken from a 1978 KZ650D SR. They certainly looked like my carbs. They were Mikuni carbs but they weren't the VM22SS carbs. They were VM24SS carbs. The big differences were obviously the size(now 24s), no mixture screw on the bottom of the bowl and no vacuum nipple for the fuel petcock. The set looked like new and Rob gave me a bunch of papers with pictures of the carbs taken apart and all the jetting and settings he had made. I was thoroughly impressed with the work he had done! He had also put a new fuel line with a quick connect to be able to disconnect the fuel tank from the carbs without having to take the fuel line off the carbs or the tank. See the pics below of the carbs broken down all clean and ready for reassembly.
 Johnscarb-CustomVM24-GS550-007 by John Lethen, on Flickr
 Johnscarb-CustomVM24-GS550-006 by John Lethen, on Flickr
 Johnscarb-CustomVM24-GS550-005 by John Lethen, on Flickr
 Johnscarb-CustomVM24-GS550-004 by John Lethen, on Flickr
 Johnscarb-CustomVM24-GS550-003 by John Lethen, on Flickr
 Johnscarb-CustomVM24-GS550-002 by John Lethen, on Flickr
 Johnscarb-CustomVM24-GS550-001 by John Lethen, on Flickr
Just wait...the saga continues....Leave a comment:
-
The next morning(Saturday. The day before the Distinguished Gentleman's Ride) I went out to start the bike. It fired right up but the high idle was back. Oh no! Time to rename this bike. "The B i t c h". I called Rob and he walked me through a couple of things. The only thing that would make a difference was if I fiddled with the #4 air screw(the screw on the side of the carb above the float bowl). I could screw this screw all the way in and it wouldn't make difference. Rob concluded that that passage must be clogged. Since we were out of time, I decided I was going to try to make my way through the Ride on Sunday with the high idle as annoying as it would be. Rob stated that in order to rebuild those carbs and do a thorough inspection, he would need them for more than one night of course. I decided that after the Ride was over, I would get the carbs back to him and have him do a thorough rebuild. This normally takes him a week to fully rebuild the carbs and he charges anywhere from $250-$350. The process involves fully disassembling the carbs, running them though a series of ultrasound baths, checking all passages are clear, replacing parts as necessary and putting in the appropriate jets for the bike's setup(exhaust, air pods, etc.).
So my son and I got up Sunday morning and dressed distinguished for our big ride. We had raised over $1100 for men's health. We were excited for our day. We hopped on our cafe bikes. Tyler on his 1969 CL350 and me on my 1980 GS550L. Both bikes started right up and we headed down to Triumph in Indianapolis for the ride. There were over 130 bikes there for the ride. Our bikes seem to catch a lot of eyes albeit there were a lot of beautiful vintage bikes there. The ride went great with a few stops for pictures, lunch and then our final destination to give out awards for Most Distinguished Bike, Most Distinguished Dressed, Most Money Raised etc. Tyler walked away with the Most Distinguished Bike out of the 130 bikes that were there! It was a great day!
 IMG_3836 by John Lethen, on Flickr
 IMG_3814 by John Lethen, on Flickr
 IMG_3857 by John Lethen, on Flickr
 IMG_3855 by John Lethen, on Flickr
 IMG_3810 by John Lethen, on Flickr
The saga continues!Leave a comment:
-
So this has been quite the process to get this bike running properly. Last year I could never really get the bike to run properly so I shelved it. The poor bike sat in the corner of my shop all last winter. But I had signed my son and myself up for the Indianapolis Distinguished Gentleman's Ride that was to take place on May 23rd. I pulled the bike out of the corner of my shop and tried to fire the bike up. The bike wouldn't even start. I decided it was time to fix this bike and fix it for good.
I performed a leak down test and found problems with 1 & 2. 3 & 4 held pressure fine. I decided to tear down the top end and see what was going on. I suspected the valves were leaking. When the bike was running, I was getting a lot of blow by. I felt either the valve stem seals were leaking or there was a more serious problem. So I decided to tear down the motor...again.
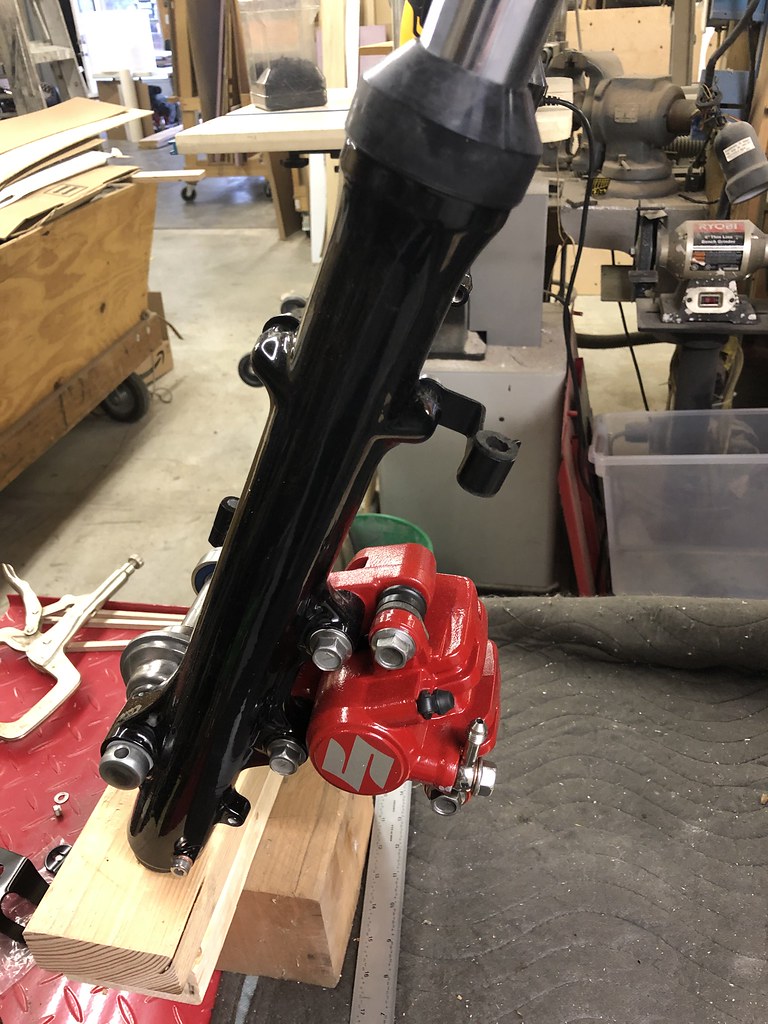
I removed the valve cover, the head and the jugs. Inspecting each part carefully, I noticed a big problem with the cylinders. #3 cylinder had a gouge in it near the bottom of the stroke. Also, all cylinders looked terrible. Stained, areas of corrosion like whoever owned the bike before had let the bike sit outside and rust began to set in in the cylinders. The gouge looked like a ring had rusted to the wall. I don't have an explanation for why I didn't see all this when I originally built the motor. I had used a straight hone to clean up the cylinders but my inexperience in building motors didn't know that these were bad cylinders. Time to call Brian Wringer over. Brian assured me that #3 was definitely bad and all the other corrosion in the other cylinders was bad and would lead to a lot of blow by. I immediately got on eBay and found a decent cylinder. I ordered the cylinder and it arrived within two days.
The new cylinder looked even better than it did on the eBay listing. I had also ordered a bottle brush hone and ran the hone through the cylinders. This worked amazing and the cylinders looked like new. I also painted the cylinder block to match the rest of the motor I had painted. While I had the motor apart I decided to also replace the valve seals with viton seals. I performed a water test on the valves and found a couple of slight leaks. I lapped the valves until all the leaks were gone and the valves sealed nice and tight.
 IMG_3690 by John Lethen, on Flickr
 IMG_3688 by John Lethen, on Flickr
 IMG_3639 by John Lethen, on Flickr
Before reassembling, I ordered a new oem base gasket and new rings and then began reassembling. I rechecked the valve lash and adjusted accordingly. The motor was now rebuilt and I felt very confident that it was a good healthy engine. I slapped the carbs on started the bike. It started right up but had a hanging idle. Time to have Brian Wringer come back over.
Brian came over and he offered to look over my carbs and do a thorough cleaning and inspection. Brian created a spreadsheet and found a few things that could be problematic. A couple of bad o-rings, some granular contamination in the carb bowls, wrongly adjusted float heights and a couple of clogged passages. I picked up the carbs from him and put them on the bike and the bike fired right up but the idle would still hang at 3000 RPM. The process pretty much went like this:
1. Start bike
2. Bike would idle at 1400 RPM perfectly
3. Crack the throttle up to about 6000 RPM
4. Idles back down to 3000 and stays
5. Adjust idle screw to get it to idle at 1400 and then it eventually goes lower than 1400 and dies
6. If I catch it before it dies with the idle screw, I can get it to idle again at 1400 perfectly
7. Crack the throttle to 6000 and the whole process starts over again idling at 3000.
8. Bike would rev out nicely, just won't return to idle
9. Spark plugs were black and sooty. Started with clean plugs before this last carb inspection
I was now one week away from the Distinguished Gentleman's Ride and beginning to panic. I needed to run to Cycle Re-Cycle in Indianapolis to get some new spark plugs and miscellaneous things. While there I asked for Rob, the owner, to discuss with him the problem I was having. Rob no longer works in his store. His wife runs the store and Rob stays at home and runs a side business rebuilding carbs for people. His wife said Rob happens to be on the phone, would you like to talk to him. Of course I said yes! I talked with Rob on the phone for about 20 minutes while in the store. I described the problem I was having and I could tell he was full of knowledge and the wizard that I have been looking for. He realized that I was to participate in the Distinguished Gentleman's Ride with my son in just six days. He said, I don't normally do this but bring your carbs back down tomorrow(Wednesday), my wife will bring them home and I will look them over and have them back at the store on Thursday. Amazing! So I went home, took the carbs off the bike, ran them back down to Cycle Re-Cycle and waited patiently for the next 24 hours. On Thursday, Rob called me and asked me to meet him at an intersection not far from my house. It turns out that he doesn't live that far from me. Like a little kid, I was so excited to get my carbs back and drove up the road to meet Rob. Rob showed up and got out of his car. He started to tell me about what he found with the carbs. The floats were slightly off of adjustment, one of the choke rubber stoppers was bad and he replaced it. He then went on to ask me if he could just follow me back to my house and personally put the carbs on the bike and make sure it is running properly. He wanted to make sure I had a good running bike for the Distinguished Gentleman's Ride. Of course I said "Absolutely! Let's go!" I wasn't about to miss out on this opportunity.
Rob followed me back to my house and we put the carbs on the bike. The bike fired right up but still had a hanging idle issue. Rob tried a bunch of things looking for air leaks etc. and we found a suspect leak in the #4 sync screw in the carb boot. We removed the washer from the sync screw and then re-inserted. After starting the bike, it seemed to run perfectly. Started right up, returned to idle and just ran good. Yeehaw! Rob hung around for about four hours and we talked bikes. I have never met someone so knowledgeable on bikes. He was rattling off different models and years of bikes. What their weaknesses were and what bikes were underrated. He talked about all the bikes he has owned and how Cycle Re-Cycle got started. His knowledge is so vast that I realized that half of the information on the internet among forums etc., is wrong. He specializes in rebuilding carbs and knows most of them inside and out. He has copious notes on what jetting to use on certain carbs with certain setups. He's a wizard I tell ya. He even told me that I could have gotten the CV carbs that originally came with the bike working with pod filters but the VM's were the way to go. Rob left that evening happy that he had helped me and I was ecstatic that I had a running bike for Ride with my son.
The sage continues.Leave a comment:
-
Thanks man. Here is a link to the DNA air filters I had on the bike. https://www.e-dnafilters.com/product...ce=w_dnafilter They're very pricey and I actually ended up removing these and installing a 1978 GS550 head and 1979 carb rack on my bike. The DNA filters do not fit on the 1979 carb rack and I ended up running velocity stacks on mine. I could not find a set of K&N's to fit on the 1980 carb set. Besides, I could never get the bike to run right with the CV carbs and pods. That's why I went with the 1979 set of carbs. They're not vacuum operated carbs. Vacuum operated carbs just don't like pods. The DNA filters were $250 for the set new. I would sell you the DNA filters if you're interested for $100. Just let me know.Originally posted by linge View PostLeave a comment:
-
Hey, nice bike. Can you drop me a link for pod filters? Do any the KNNs fit? I have exact same bikeLeave a comment:
-
I'm still experiencing a problem with the clutch. I have installed new clutch plates and springs. When I go to adjust the clutch cable, I can't get any freeplay in the cable. When riding the bike, as the bike gets warm, the clutch starts to drag. Even with the clutch fully pulled in, it doesn't seem to fully disengage the clutch. I have played with the clutch adjustment and still can't get the clutch to fully disengage. Even with the bike not running and the rear tire raised, when the bike is in gear and I pull in the clutch, you can feel the drag. I have ordered a new factory clutch cable and will be installing it to see if that is the problem. It's really annoying because pulling up to a stoplight when the bike is warm causes so much drag on the engine that it can cause it to stall.
After my ride yesterday with my son, I realized that the carbs still need some adjustment. The bike engine is slow to return to idle. It sticks at about 2500 RPMs and doesn't come back down for quite some time. From everything I have read, this is a lean condition. I don't know where to address this lean condition though. Do I up the pilot jet from 17.5 to 20? Do I turn the fuel pilot screw out from 1 turn to 1-1/2 turns? Do I mess with the air screws? I'm already at only 3/4 turns out on the air screw. Again, from what I read, turning the air screw in richen's. Will turning the pilot screw out allow me to turn the air screw out a bit to richen up without having to change the pilot jet?Leave a comment:
.png "Powered by vBulletin")
Required reading for all forum users!!!
Welcome!
Register to access the full functionality of the GSResources forum. Until you register and activate your account you will not have full forum access, nor will you be able to post or reply to messages.A note to new registrants...
All new forum registrations must be activated via email before you have full access to the forum.A Special Note about Email accounts!
DO NOT USE sbcglobal.net, att.net, bellsouth.net or email.com email addresses when registering for the forum! Email that our system sends out to these email servers is treated as SPAM and you will never receive your activation email, or any other email that our system may send out. Use an email address from gmail.com or some other email server.A note to old forum members...
I receive numerous requests from people who can no longer log in because their accounts were deleted. As mentioned in the forum FAQ, user accounts are deleted if you haven't logged in for the past 6 months. If you can't log in, then create a new forum account. If you don't get an error message, then check your email account for an activation message. If you get a message stating that the email address is already in use, then your account still exists so follow the instructions in the forum FAQ for resetting your password.Have you forgotten your password or have a new email address? Then read the forum FAQ for details on how to reset it.
Any email requests for "can't log in anymore" problems or "lost my password" problems will be deleted. Read the forum FAQ and follow the instructions there - that's what we have one for...
New users should be sure to read the FAQ as well as the posts in the Announcements forum. This will answer many of the questions you may have about how this forum works.
Before posting questions in the forums be sure to use the forum search function!!! Odds are your question has already been asked and answered before. And when posting, please make sure that you post to the correct forum.
Finally, be sure to check out BassCliff's website here. He has useful information that can't be found on this site. His welcome page containing useful GS information can be found here. Be sure to check it out!
If you are a returning visitor to the forum and can't log in using your old forum name and password, chances are your account is deleted. Just create a new forum account and you should be all set.


Leave a comment: