Announcement

Collapse
No announcement yet.

'83 GS1100E - outside my comfort zone

Collapse
X
 
  • Filter
  • Time
  • Show
Clear All
new posts

    '83 GS1100E - outside my comfort zone

    Hey all,
    I just rejoined the GS resources a couple weeks ago as I've finally decided to dust off a project that has been awaiting my attention for several years. If your curious and want a bit of more background, please find my thread in the "GS Owner" section. There have been a few hiccups to this point that I outline there and I found an issue with my starter clutch which I believe to be the source of the noise I was getting when I parked her those many years ago.

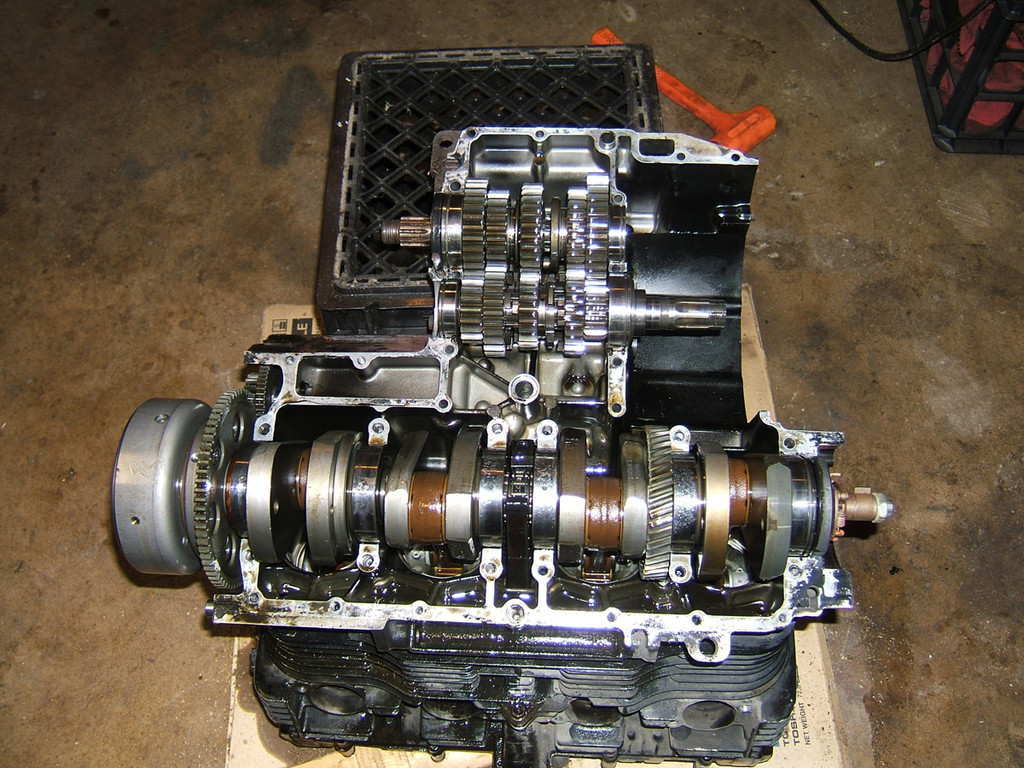
    Today I pulled the cylinders and removed the pistons.


    At this point I am trying to decide on next steps (and have few questions).

    Head: I think I'm going to remove the valves and rocker arms. I'm going to get a piece of glass to make sure it's all still flat and level. I'd like to try and lap the valves myself with some grinding paste (any advise appreciated). My assumption is that the valve guides and springs are ok (but will check them for play and length respectively). I have new oil seals so will replace those. Any thoughts on the rubber semicircles that sit below the valve cover gasket? Do I need to be considering replacing those too or should they be good to reuse? Any thoughts on best techniques to de-carbon the valves, pistons, and top of cylinder? Kerosene and a toothbrush? brass brush wheel and a dremel? other solvents?

    Cylinders: I have some of those spring loaded "t" shaped bore measuring tools so I'll use those to check bores for wear, but I'm hoping I can give them a light hone with one of those tools that you use with a drill (has three sprung arms with honing stones on each) and just re-ring the pistons. Any advise on honing appreciated too. If I find the bores are out of spec, I'll have to see what I can do about finding oversized pistons and rings and a machine shop. I thought the gudgen pins would push out either side of the piston, but when I tried to push the #1 and #2 out to the left they felt like they wouldn't go, but they all pushed out the right side by hand (just used a deep socket to push it past the con rod). The pistons are the first thing I'd like to de-carbon so I can write their numbers on them with a sharpie.

    Bottom end: Now that I have much of the weight off the motor, I'm going to pull it from the bike and am planning on splitting the cases (he said with a degree of trepidation). Many years ago, when I parked it, I thought the noise was coming from the transmission so I got a bag of all the transmission pieces from ebay. I would like to at least check the dogs for wear and see how they compare to my replacement parts. I don't think I'll have to worry about pressing anything up as I would just replace the whole shaft of gears rather than trying to do anything with the individual cogs. As far as I understand it, I think I can just leave the crankshaft nestled in the top case while I do this and not touch it, but I might have to pull it out anyway just to make it easier to clean everything.

    I picked up some permatex Ultra Slick to apply to any wearing surfaces before I put anything back together.

    So, with that, here are a few more pics from todays work and I'd love any advise you all care to send my way.


    One last thing, I'm keeping my eyes open for a few parts. starter clutch, fuel sending arm and float, & rear shocks (I've been told the Marzochis {sp?} on the bike can't be rebuilt, but maybe you know something I don't?)

    racerxnico (jason in Seattle)

    #2
    As far as I recall, the engine can be flipped over and the bottom half of the crankcase can be removed and the crank, transmission, etc, can stay put in the top half. Its been a lomg time, but if i reccall, there were a couple of hidden / unseen bolts that had to come out.
    A factory service manual is a good thing to get if you don't yet have one.
    sigpic
    When consulting the magic 8 ball for advice, one must first ask it "will your answers be accurate?"

    Glen
    -85 1150 es - Plus size supermodel.
    -Rusty old scooter.
    Other things I like to photograph.....instagram.com/gs_junkie
    https://www.instagram.com/glen_brenner/
    https://www.flickr.com/photos/152267...7713345317771/

    Comment


      #3
      That is correct. I have done it at least three times. I can replace a transmission in a weekend.
      (EDIT: I USED to be able to do it in a weekend. These days, who knows?)
      Last edited by Baatfam; 10-18-2021, 03:39 PM.
      Bob T. ~~ Play the GSR weekly photo game: Pic of Week Game
      '83 GS1100E ~ '24 Triumph Speed 400 ~ '01 TRIUMPH TT600 ~ '67 HONDA CUB

      Comment


        #4
        Originally posted by dorkburger View Post
        A factory service manual is a good thing to get if you don't yet have one.
        I have a PDF copy of the service manual that is a bit tough to read in certain places and an physical copy of an aftermarket one. I usually read them both just to make sure I think I know what I'm doing.

        Thanks for confirmation Bob T. I'm looking forward to getting to that point.

        As for my next step (de-carboning piston and head), I've found a lot of contradictory information online (big surprise right). I'm leaning towards the 50/50 mix of acetone and ATF, but might test a bit of WD-40 first and see how it works.

        Comment


          #5
          Is it improper to clean the piston tops with a wire wheel on a bench grinder? Seems to me like that would be the quickest way to de-carbon the pistons.
          Larry

          '79 GS 1000E
          '93 Honda ST 1100 SOLD-- now residing in Arizona.
          '18 Triumph Tiger 800 (gone too soon)
          '19 Triumph Tiger 800 Christmas 2018 to me from me.
          '01 BMW R1100RL project purchased from a friend, now for sale.

          Comment


            #6
            I just worked on an '83 1100E that had a SERIOUS knock in the lower end. The culprit was the starter clutch. Well, not so much the clutch itself, but the bolts that (used to) hold it to the rotor/flywheel. Two of the bolts were sheared, the third was loose, allowing a LOT of movement. Fortunately, where the two bolts sheared, the stub that was left, along with the head, were too long to escape through the gap, so they were not able to wreak any havoc.

            After pulling the rotor/flywheel and using a drill (slowly) to spin out the threaded portions of the broken bolts, it was a simple matter of replacing the bolts and installing a bit of blue Loc-tite to help keep them there.

            Comment


              #7
              Hey, I’m in Seattle area too! I have two GS1100E’s and a Gs750.

              I have some good shocks off of an 1100e
              1977 Suzuki GS750
              1983 Suzuki GS1100E

              Comment


                #8
                Originally posted by Zerospirit View Post
                Hey, I’m in Seattle area too! I have two GS1100E’s and a Gs750.

                I have some good shocks off of an 1100e
                Awesome. Would love to compare notes and have a chat about your shocks. If you have the bandwidth and we can align schedules, maybe we can get together for a beer (my treat). I skipped out on work today so I could take advantage of the nice weather and rode around Mt Rainier with a couple friends. It's been too long since I've done something like that.

                Comment


                  #9
                  Originally posted by alke46 View Post
                  Is it improper to clean the piston tops with a wire wheel on a bench grinder? Seems to me like that would be the quickest way to de-carbon the pistons.
                  As I understand it, you want to use something more gentle than that. You don't want anything that could take an edge off the piston corners or mar the concentric circles on the pistons (I believe they help with atomization of the fuel charge). I don't know how accurate that is, but I'd rather be safe than sorry.

                  Comment


                    #10
                    Originally posted by phydeauxmutt View Post
                    Two of the bolts were sheared, the third was loose, allowing a LOT of movement.
                    Eeeep. My bolts had loctite on them and were very secure.

                    Comment


                      #11
                      Piston cleaning.
                      Before


                      And after


                      Small imperfection in the edge of the #1 piston. Don't know if this was there before or I did it somehow (maybe when I was removing rings?) Small enough that I think I will still be ok.

                      Comment


                        #12
                        Those pistons came out looking like new. Was it the 50/50 mix of acetone with ATF? or was it the WD-40?
                        Larry

                        '79 GS 1000E
                        '93 Honda ST 1100 SOLD-- now residing in Arizona.
                        '18 Triumph Tiger 800 (gone too soon)
                        '19 Triumph Tiger 800 Christmas 2018 to me from me.
                        '01 BMW R1100RL project purchased from a friend, now for sale.

                        Comment


                          #13
                          I thought I had both ATF and Acetone in the garage, but was apparently out of both. I worked back and forth between carb cleaner and WD-40 for most of it with a toothbrush. There were a few stubborn spots remaining and I decided to try a degreaser I have called "oil eater". It smells a bit like easy off oven cleaner. It took the last bits off. Just to be safe, I rinsed with water after that.

                          Comment


                            #14
                            Slow progress. Trying to figure out how to get the old base gasket off the bottom of the cylinder without wrecking it. Seriously bonded. Any tips or tricks appreciated. So far, of the things I've tried, a long WD-40 soak seemed to soften things up the most, but even that doesn't seem like it's doing enough. Brake cleaner?

                            Comment


                              #15
                              Methylene chloride paint stripper, if you can get it, and be careful of the fumes.
                              Dab it on, let it work, scrape some of the lino-like gasket off and carry on.
                              Score the gasket to let the stripper penetrate the fibres.
                              Bear in mind that gasket has been subjected to heat, oil and pressure for forty years.
                              Pretty much how linoleum is made.
                              ---- Dave

                              Only a dog knows why a motorcyclist sticks his head out of a car window

                              Comment

                              Working...
                              X