Announcement

Collapse
No announcement yet.

GS1100E Cafe fairing installation

Collapse
X
 
  • Filter
  • Time
  • Show
Clear All
new posts

    GS1100E Cafe fairing installation

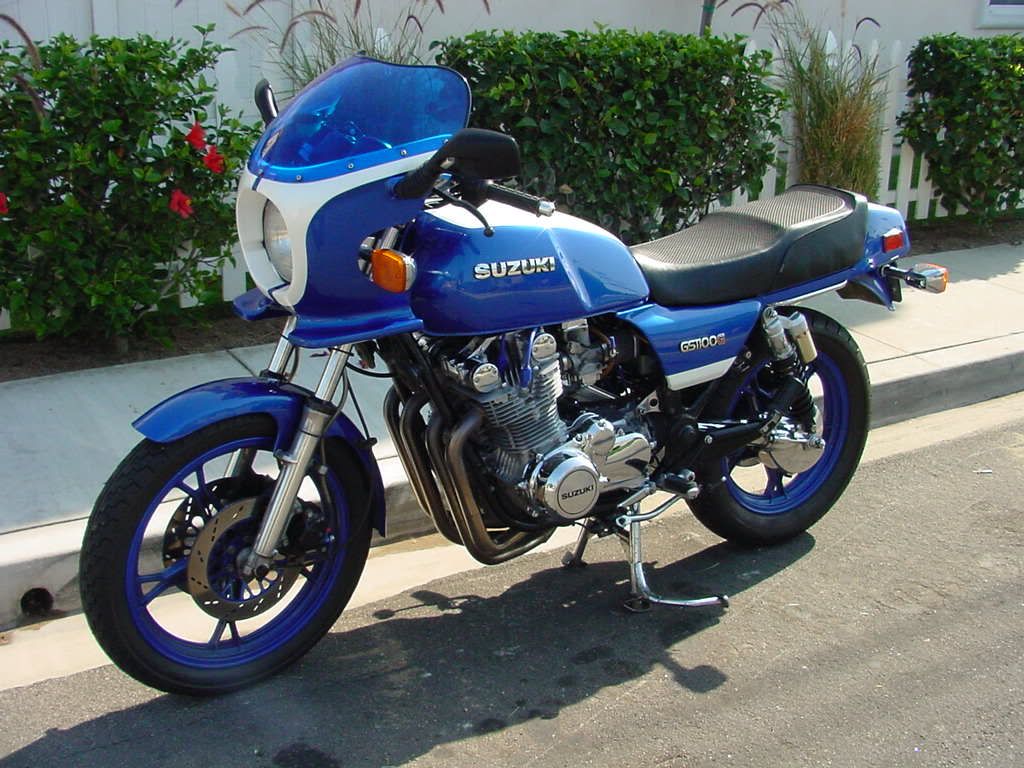
    I purchased this bike last October and decided to add a cafe fairing, I looked all over and finally found one on ebay from Nationals Fiberglass in Ohio. Really nice gentleman who calls himself “Dude” actually manufactures these fairings, excellent quality! Just remember it is the fairing only, the mounting hardware and windscreen are up to you.


    My first reaction was, what have I gotten myself into? I had never done anything like this before. I ordered the mount brackets for the Wes Cooley replica fairing that fits the 78-80 GS1000. As I said, I had never done anything like this so I asked lots of questions like how do you align something like this? How do you determine the spacing from the headlight? After getting many varied answers I finally determined that for me the best thing to do is create a standoff spacer for the headlight.


    I quickly realized that the mount brackets I ordered would not fit, so as you can tell in the above picture I had to fabricate my own mounts. The lower brackets were fabricated by using angle aluminum while the welds of the upper mount brackets were cut then the mounting pad repositioned and re-welded. The original lower brackets I ordered ended up being used as templates for the correct angles then the pieces riveted together, there might be an easier way to do it but that’s what worked for me.
    After mounting the fairing I drilled the dimples for the windscreen. I could not find rubber gasket material to put between the fairing and windscreen so I went to Lowes and found some rubberized shelf liner that I thought would work, and it did. I placed it on the fairing and trimmed it in place, leaving it taped to the fairing until I received the windscreen.
    The windscreen I ordered from Gustaffson Plastics in Florida, http://www.bikescreen.com/proddetail.asp?prod=GreerGS1000S I also ordered the plastic mounting hardware AND the PLEXIGLASS DRILL BIT, I went to numerous hardware stores looking for a drill bit to drill my holes in the fairing and windscreen but no-one had it each and everyone of them tried to tell me that you can use any drill bit for drilling plexiglass but this is not true, if you drill plexiglass with the wrong bit YOU WILL crack or splinter the glass. I received the windscreen and associated parts then began drilling the holes in the glass, I removed the fairing from the bike and after careful measurement I marked the location of the center hole and drilled it, placed the screen on the fairing installed the center screw then marked the next hole, removed the screen and drilled it I repeated these steps mounting and removing the screen until all of the holes were drilled, it fit quite well.


    Soon I will be painting the fairing to match the bike but before I do I have a couple of ideas I want to try that will make it unique. For starters I changed the handlebars and mirrors giving it more of a café style, I have a few more ideas before I am done.


    I am posting this just in case anyone else is thinking of mounting a fairing having never done it before, this is what worked for me and maybe it will be helpful to you. I have many more pictures that I took throughout the process.
    I have many more pictures that I wanted to post but unfortunately we are limited to the quantity of pictures that can be posted. I am willing to post more information or email pictures if someone is in need of info.
    7
    Yes.
    100.00%
    7
    No.
    0.00%
    0

    The poll is expired.

    Last edited by wacky941; 06-28-2009, 11:00 PM. Reason: Original pictures had not come through.
    http://www.visitedstatesmap.com/imag...TXUTWAWIsm.jpg

    "Democracy is two wolves and a lamb voting on what to have for dinner. Liberty is a well armed lamb contesting the vote." Benjamin Franklin, 1759


    #2
    Nice, Bike. I have the Maier on my ED cut to open the 7" hole to better match the 8" headlamp. It comes with a mounting kit (I'm pretty sure as the PO actually had it already installed). I think they are actually available separately.

    Anyway your pics did not come though to see what you are doing.
    TIA

    Comment


      #3
      I wasn't sure what you were saying about the pictures not coming, but just in case I do have other pictures of the brackets and how I made them along with other pictures if you feel they may be helpful to you.

      David
      http://www.visitedstatesmap.com/imag...TXUTWAWIsm.jpg

      "Democracy is two wolves and a lamb voting on what to have for dinner. Liberty is a well armed lamb contesting the vote." Benjamin Franklin, 1759

      Comment


        #4
        Welcome ! Nice 1100EZ.......I think it will look pretty sharp, once you have the fairing painted to match. Looks like the bike may have been running lean/hot, at some point, going by the looks of the header......probably best to make sure it has been correctly jetted for the 4x1 pipe, if the previous owner installed it.

        If you load pics via the photobucket picture hosting site, it's possible to post multiple pics (not sure if it's 3 or 4) in a single post, if you wish to share the other pics of the installation (though I think the write-up is pretty clear).

        Tony.
        '82 GS1100E


        Comment


          #5
          David,
          It could be that your computer has buffered the pcitures so you are seeing them, but for anybody else they are not showing up. You can use photobucket of you can even create an album here at GSR to do uploads.
          Jim

          Comment


            #6
            Very sharp ! Cant wait to see it painted. How much dinero you got into it ? Where R U gonna get the paint ? I need to repaint my tail section.

            Welcome to the GSR EZ Boyez club !
            82 1100 EZ (red)

            "You co-opting words of KV only thickens the scent of your BS. A thief and a putter-on of airs most foul. " JEEPRUSTY

            Comment


              #7
              Originally posted by bonanzadave View Post
              Very sharp ! Cant wait to see it painted. How much dinero you got into it ? Where R U gonna get the paint ? I need to repaint my tail section. !
              I used to own an '82 that I bought new that was identical to this one but unfortunately in 1987 it was stolen. I bought an '80 GS1100ET afterwards, an excellent bike, but the friend I bought it from was killed in an accident so it wasn't the same I sold it about seven years ago ever since I was looking for another '82. My wife bought this one for me for my birthday October of last year, so the initial investment was about twenty four hundred dollars, I added the crank case protectors which I found out of Canada for another $120, I bought the fairing for about $150, the mounting hardware (that didn't fit) for another $120 and the windscreen for $99. As for the paint, the only place that I have found any information at all about the paint is at bikebandit.com http://www.bikebandit.com/suzuki-mot...z-1982/o/m5998 the link should take you straight to it when there select Accessories and it will show the color chart. It's kinda hard to read but if you right click and save the picture to your computer you can print it out and actually read it. Unfortunately the day after I printed it I was on an airplane headed to California for work so I haven't had a chance to take it to my local paint supply, but I will when I get back home.
              Just as a question, I am thinking about adding a chin scoop to the bike, I have three in mind, one from a Yamaha FJ1100, another from the GS1000 Wes Cooley and the final one from JC Whitney, the question is do you think it would look good with that installed? I have never seen an '82 with a chin scoop, it could be a $150 mistake.

              David
              Last edited by wacky941; 06-28-2009, 11:42 PM.
              http://www.visitedstatesmap.com/imag...TXUTWAWIsm.jpg

              "Democracy is two wolves and a lamb voting on what to have for dinner. Liberty is a well armed lamb contesting the vote." Benjamin Franklin, 1759

              Comment


                #8
                David,
                Pics coming through fine now. I had the same thing happen to me a long while back. There was some funny issue with having to revese names in a URL for anybody else to be able to see the picture. I could see it either way, others only after the reversal. I finally got it and looks like you did as well.

                I guess I don't really see the fairing mount. I know it is mounted now, but can you still get a side pic of what you attached to? How did you bend that angle iron into such a perfect circle? Is that a small metal working shop in the background?
                On painting it is best to take a side cover down and have it color matched at a paint shop. At least the paint guy I have could not make any use of teh OEM color codes. Then have it painted or get a sprayer setup and use good paint like PPG.

                Jim

                Comment


                  #9
                  Very nice Job! In 1995 I bought my National GS 1000S fairing from the "Dude" for $90.00 and OE Suzuki brackets for $39.00. I kept it in a box until 1997 when I decided what color I was going to paint the bike. At that point I spoke with Eric Gustaffson when the opaque plastics were becoming more in use (over a decade ago) and color matched the screen to the paint as close as possible. 12 years later everything has held up nicely. My upper Wes Cooley brackets worked great and I fabbed some lower brackets similar to yours out of aluminum bar stock. You will find that fairing works well in wind and weather. Again nice work! Oh, and the special plexi-bit was definitely required to complete the job.

                  [IMG][/IMG]
                  1982 1100G - 1979 1000SN Cooley #703 - 1982 Kawasaki ELR#337 - 1982 Katana 1000SZ (X3) #769, #872, #1963 - 1983 1100E mid-night blue (X2) - Ducati 907ie - 1976 GT750 Bad Buffalo

                  Comment


                    #10
                    I have the same fairing on my ’82. I found mine in a salvage barn for $20. It was an aftermarket that had never been mounted. Bought the screen from Gustaffsen. My mounting hardware was (and still is) sloppy barstock. Bottom is mounted to the screwholes for the reflector on the side of the forks. Top is mounted to the mirror holes (I use bar-ends).

                    Nothing’s pretty on my bike, but the fairing sure works great.
                    "When I give food to the poor, they call me a saint. When I ask why they are poor, they call me a communist." Bishop Helder Camara

                    "Beware of the man with only one gun. He probably knows how to use it."

                    http://i13.photobucket.com/albums/a2...dStatesMap.jpg

                    82 GS1100E....black w/WC fairing and plenty o corrosion and low levels of attention

                    Comment


                      #11
                      Originally posted by viperg View Post
                      12 years later everything has held up nicely.
                      That also looks very nice. I especially like the mirrors attached to the fairing.
                      82 1100 EZ (red)

                      "You co-opting words of KV only thickens the scent of your BS. A thief and a putter-on of airs most foul. " JEEPRUSTY

                      Comment


                        #12
                        Originally posted by posplayr View Post
                        I guess I don't really see the fairing mount. I know it is mounted now, but can you still get a side pic of what you attached to? How did you bend that angle iron into such a perfect circle? Is that a small metal working shop in the background?
                        Actually what I did was to fabricate the lowers using angle brackets, the first pic below shows the pieces alongside the original bracket I ordered from www.babbittsonline.com , the second picture shows how I had traced the original then measured the amount I wanted to shorten the bracket and placed the pieces on the tracing. The third pic shows the bracket after cutting, shaping and riveting then mounted for a fit check, the last picture shows how the fairing was mounted to the bracket.
                        In the original posting, the ring you see mounted to the headlight using tape was cut out of a flat piece of aluminum that was about 1/8" thick, I made the ring 1/2" wide so that the fairing would have a flat surface to line up against so that hopefully it would keep the fairing symetrical, which it did. The only regret I have is, I wish I would have made the aluminum spacer 1/4" thick instead so I would have a little more room between the fairing and headlight.
                        By the way, I wish I had a workshop, that's just my garage and all the junk I have laying around (except for the MG of course).


                        Last edited by wacky941; 07-04-2009, 01:31 PM.
                        http://www.visitedstatesmap.com/imag...TXUTWAWIsm.jpg

                        "Democracy is two wolves and a lamb voting on what to have for dinner. Liberty is a well armed lamb contesting the vote." Benjamin Franklin, 1759

                        Comment


                          #13
                          Originally posted by posplayr View Post
                          I guess I don't really see the fairing mount. I know it is mounted now, but can you still get a side pic of what you attached to? How did you bend that angle iron into such a perfect circle? Is that a small metal working shop in the background?

                          As for the upper mounts again I used the original brackets I ordered from www.babbittsonline.com which also didn't work. The first picture shows the bracket after I cut the weld and removed the mount pad, the second picture shows how I held the pad in the proper position for the re-weld. The third pic shows the re-welded bracket mounted on the bike and the last pic shows how it mounts to the fairing.

                          I have more pictures loaded into my photoalbums and am trying to load more as I can http://www.thegsresources.com/_forum/album.php?u=14086 if you want to see more than what I have posted. Hopefully the link will take you there but if not just click on me and check it out.


                          Last edited by wacky941; 07-04-2009, 01:32 PM.
                          http://www.visitedstatesmap.com/imag...TXUTWAWIsm.jpg

                          "Democracy is two wolves and a lamb voting on what to have for dinner. Liberty is a well armed lamb contesting the vote." Benjamin Franklin, 1759

                          Comment


                            #14
                            Nationals Fiberglass

                            Hey all, Bad news. The "Nationals Fiberglass" may have just gone out of business. Phone is disconnected and email not answered. How do I know? "Dude" was making a mold and copies of my original Katana Fairing and Tail Section. Now I can't even get them back. Maybe someone here has them????
                            Thanks
                            GREG
                            gmansyz@earthlink.net
                            sigpic1983 1100 Katana - soon to be turbo Busa powered.
                            2007 GSXR1K-Sold-But not forgotten.
                            Have 2X ZG14 engine's for '81 GS750E project.
                            '82 GS750E frame is TITLED awaiting GSXR1127/12B engine and '81 1100E slowly being built.:eek:

                            Comment


                              #15


                              is it easily doable to open the whole to 8" from 7"

                              Comment

                              Working...
                              X