Announcement

Collapse
No announcement yet.

Broken Float Post

Collapse
X
 
  • Filter
  • Time
  • Show
Clear All
new posts

    Broken Float Post

    You'll need a file, 1/8 drill bit, 6/32 screw, hack saw, center punch, hammer, pliers with flat sides and a drill with a level bubble on the back.

    Measure the exact height of the post as it shoud be.
    File the post and the surface on the carburetor side flat enough for you to drill a 1/8" hole in the center.
    By flat enough I mean take off as little metal as you can...just get the center flatened.
    place the carburetor on a flat level surface.
    Punch a locating mark in the center of the surface where the post goes.
    Drill your hole atleast 3/16 or 1/4 " deep with the carburetor flat on the table and the drill bubble leveled.
    Just a suggestion on the depth as you don't want to drill through the base metal into the body.
    Screw in the screw and make sure you have about 3/8" or more of thread sticking up.
    Cut off the head of the screw so that it is 3/8" high or atleast no higher than the shoulder of the other post.
    Go slowly and deliberately on the cutting. Start by runing the saw backwards the entire length of the blade.
    File the threads on the end of the stud you just made to a slight taper.
    stand up the post head down on the table and punch it's center.
    lay your flat sided pliers on the table and open them up enough to drop the post head down on the table.
    Still holding the pliers flat on the table clamp down on the post and keep it that way.
    Drill a hole 1/4" deep in the post but no deeper than it's shoulder and keep the drill level.
    Screw the post down on the stud you made till it is at it's original height or as close as possible.
    you also want the float pin to go straight through.
    to accomplish this for certain put the pin in the repaired post and turn it till it points dirrectly at the other side.
    Post's may have a little less room for the float between them now so you may need to modify the float.
    If you file the float make sure you de-bur the hole so the pin rides smooth.

    Good luck, your gonna need it.

    Chris.
    Last edited by Guest; 05-21-2010, 07:33 PM.

    #2
    is this the answer to the question that no one asked?

    Comment


      #3
      Originally posted by cdnoel View Post
      You'll need a file, 1/8 drill bit, 6/32 screw, hack saw, center punch, hammer, pliers with flat sides and a drill with a level bubble on the back.

      Measure the exact height of the post as it shoud be.
      File the post and the surface on the carburetor side flat enough for you to drill a 1/8" hole in the center.
      By flat enough I mean take off as little metal as you can...just get the center flatened.
      place the carburetor on a flat level surface.
      Punch a locating mark in the center of the surface where the post goes.
      Drill your hole atleast 3/16 or 1/4 " deep with the carburetor flat on the table and the drill bubble leveled.
      Just a suggestion on the depth as you don't want to drill through the base metal into the body.
      Screw in the screw and make sure you have about 3/8" or more of thread sticking up.
      Cut off the head of the screw so that it is 3/8" high or atleast no higher than the shoulder of the other post.
      Go slowly and deliberately on the cutting. Start by runing the saw backwards the entire length of the blade.
      File the threads on the end of the stud you just made to a slight taper.
      stand up the post head down on the table and punch it's center.
      lay your flat sided pliers on the table and open them up enough to drop the post head down on the table.
      Still holding the pliers flat on the table clamp down on the post and keep it that way.
      Drill a hole 1/4" deep in the post but no deeper than it's shoulder and keep the drill level.
      Screw the post down on the stud you made till it is at it's original height or as close as possible.
      you also want the float pin to go straight through.
      to accomplish this for certain put the pin in the repaired post and turn it till it points dirrectly at the other side.
      Post's may have a little less room for the float between them now so you may need to modify the float.
      If you file the float make sure you de-bur the hole so the pin rides smooth.

      Good luck, your gonna need it.

      Chris.
      pics would help give some idea of what you are doing

      Comment


        #4
        Thought this is what tips and trick were for.

        pictures would help but I did it without taking any three times so far. I think we all know what I'm talking about though. You try to take the float pin out, it's stuck and the float post breaks off. Or you open the bowl and find them falling off because the JB weld from the previous owner failed.

        Suppose I miss understood what tips and tricks posts were for. Thought if you had one you could post it before someone needed it so they could find it in the search.

        Comment


          #5
          Originally posted by texaninseattle View Post
          is this the answer to the question that no one asked?
          Hey Texan, actually this is related to my 81 gs550 project here in Colo Springs that I posted about in Projects/Rebuilds. The previous owner really jacked up both posts in one carb and I just found tonight it looks like it started on another and I finished the job tonight. I'll talk to CD and see if we can't take pics to do this next carb instead of him just taking it back to his place. I sure would like to learn how in case I ever need it again later (HOPE NOT )
          Cowboy Up or Quit. - Run Free Lou and Rest in Peace

          1981 GS550T - My First
          1981 GS550L - My Eldest Daughter's - Now Sold
          2007 GSF1250SA Bandit - My touring bike

          Sit tall in the saddle Hold your head up high
          Keep your eyes fixed where the trail meets the sky and live like you ain't afraid to die
          and don't be scared, just enjoy your ride - Chris Ledoux, "The Ride"

          Comment


            #6
            Broken Float Post

            Great tip. Have a spare set with a broken post. Never got round to thinking about fixing it but will now. Thanks

            Ken

            Comment


              #7
              Thanks for the write up. Nobody is giving you crap for it. Some people relate to pictures more.
              That's all.
              I just did one recently but it was fugly. Someone used epoxy which did not hold up. They drilled the post and the carb off centered and then used epoxy. Didn't make sense to me. I redrilled, tapped and installed the post off centered but the float pin was long enough to make up the difference.
              1983 GS 1100E w/ 1230 kit, .340 lift Web Cams, Ape heavy duty valve springs, 83 1100 head with 1.5mm oversized SS intake valves, 1150 crank, Vance and Hines 1150 SuperHub, Star Racing high volume oil pump gears, 36mm carebs Dynojet stage 3 jet kit, Posplayr's SSPB, Progressive rear shocks and fork springs, Dyna 2000, Dynatek green coils and Vance & Hines 4-1 exhaust.
              1985 GS1150ES stock with 85 Red E bodywork.

              Comment


                #8
                Originally posted by texaninseattle View Post
                is this the answer to the question that no one asked?
                You don't need to ask questions on this forum, just follow the advice (tips) give by others and get the job in question done. Are you familiar with what the inside of a carburettor looks like?

                Comment


                  #9
                  Yes, Suzi_Don i am familiar with what the inside of a carburetor looks like.

                  It just seemed oddly worded for a first post, and thought that maybe the real 1st post had been deleted, and yours was a reply to that post.

                  The formatting just looked funny to me.

                  Comment


                    #10
                    How do most people break a post? Is it when they miss-strike, and hammer it? Or do the float pins just get stuck and break the post when one post release tension and the other doesn't? I've popped my floats on and off about a dozen times (mostly due to boredom). I use the hammer and itsy-bitsy (eyeglasses) screwdriver method. Am I just apparently good at this, or have I just been getting lucky? I only ask because I need to fix a sticking needle valve and I don't want to have to repair a float pin post this close to being done.

                    FYI, I use a relatively light weight hammer, and slowly build up tap force over about 9-10 strikes, starting from very light.

                    Comment


                      #11
                      On old carbs the float pin gets welded in there. Stainless steel in Aluminum I do believe. I use PB Blaster and let it sit on the jets and float for a little while and they do usually come out without incident. If all else fails heat works but you'll need to replace the float.
                      1983 GS 1100E w/ 1230 kit, .340 lift Web Cams, Ape heavy duty valve springs, 83 1100 head with 1.5mm oversized SS intake valves, 1150 crank, Vance and Hines 1150 SuperHub, Star Racing high volume oil pump gears, 36mm carebs Dynojet stage 3 jet kit, Posplayr's SSPB, Progressive rear shocks and fork springs, Dyna 2000, Dynatek green coils and Vance & Hines 4-1 exhaust.
                      1985 GS1150ES stock with 85 Red E bodywork.

                      Comment


                        #12
                        Hitting the pin without a proper anvil is what usually breaks them. I use a tiny socket on a 1/4 - 3/8 adapter on a 3/8 - 1/2 inch adapter as the anvil. The socket just barely fits over the head of the pin. Small hammer and a tiny pin punch does it, very light tapping.

                        The pins are slightly fatter at the shoulder under the head, so it should only be stuck on that one side. The other side should move freely, unless the pins are mushroomed.

                        Once the pins are out I put them in a drill, and using a file turn them down to a smaller diameter at the shoulder, so they just slide in and out. The interference fit is not required.
                        http://img.photobucket.com/albums/v5...tatesMap-1.jpg

                        Life is too short to ride an L.

                        Comment


                          #13
                          Originally posted by tkent02 View Post
                          Hitting the pin without a proper anvil is what usually breaks them. I use a tiny socket on a 1/4 - 3/8 adapter on a 3/8 - 1/2 inch adapter as the anvil. The socket just barely fits over the head of the pin. Small hammer and a tiny pin punch does it, very light tapping.

                          The pins are slightly fatter at the shoulder under the head, so it should only be stuck on that one side. The other side should move freely, unless the pins are mushroomed.

                          Once the pins are out I put them in a drill, and using a file turn them down to a smaller diameter at the shoulder, so they just slide in and out. The interference fit is not required.
                          That's pretty much exactly what I do, minus the turning. I like the interference fit, makes me feel warm and fuzzy. Took all of two minutes to remove the float, clean the offending needle valve and reinstall the float. Appeared to gotten cat hair in it. (walks away mutter about cats)

                          Comment


                            #14
                            Originally posted by Turtleface View Post
                            That's pretty much exactly what I do, minus the turning. I like the interference fit, makes me feel warm and fuzzy. Took all of two minutes to remove the float, clean the offending needle valve and reinstall the float. Appeared to gotten cat hair in it. (walks away mutter about cats)
                            Are you putting cats in your gas tank?
                            That's so cruel.
                            http://img.photobucket.com/albums/v5...tatesMap-1.jpg

                            Life is too short to ride an L.

                            Comment


                              #15
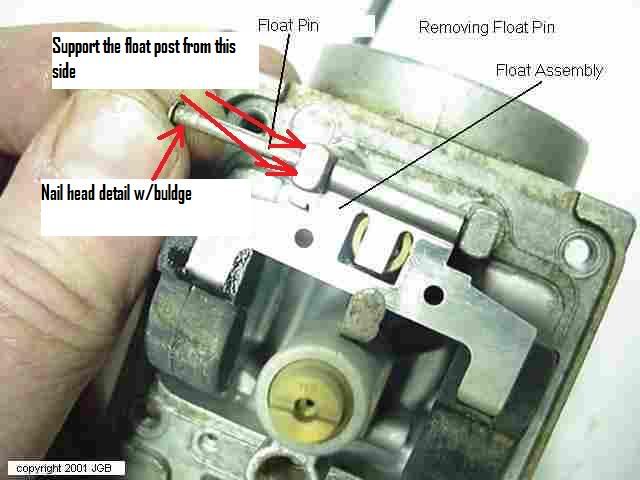
                              Broken float posts can be avoided with a little care. At Tom mentioned, it's the flare under the nail head detail that locks the pin in place so that's the post that always snaps off. If you support the post on that side before you drive the pin out the post won't snap off.

                              Ed

                              To measure is to know.

                              Mikuni O-ring Kits For Sale...https://www.thegsresources.com/_foru...ts#post1703182

                              Top Newbie Mistakes thread...http://www.thegsresources.com/_forum...d.php?t=171846

                              Carb rebuild tutorial...https://gsarchive.bwringer.com/mtsac...d_Tutorial.pdf

                              KZ750E Rebuild Thread...http://www.thegsresources.com/_forum...0-Resurrection

                              Comment

                              Working...
                              X