Announcement

Collapse
No announcement yet.

Ignition Switch Repair Guide

Collapse
X
 
  • Filter
  • Time
  • Show
Clear All
new posts

    Ignition Switch Repair Guide

    The major symptom that this tutorial will address is that of the ignition switch getting stuck in any position, usually "lock" or "park".

    The first thing to remove is the clip on the top. Be careful because this is old plastic. I took 3 small nails and I slipped the first under one of the fins then the second under the next and the third under the one following that. Once the third nail is in, you can remove the second, carry on like this until the top clicks off.

    On to the roll pins...
    The trick to getting the pins out was to find a screw small enough to JUST barely fit into the roll pin. I didn't have such a screw, so I used one that was too big. It worked on the first pin, but sustained too much damage to work on the second. The second pin I used a drill bit to widen and when I pulled the drill bit out, the pin came with. The third pin I drilled out then used a tiny screw to get the rest out.

    So now that its open, you have this...
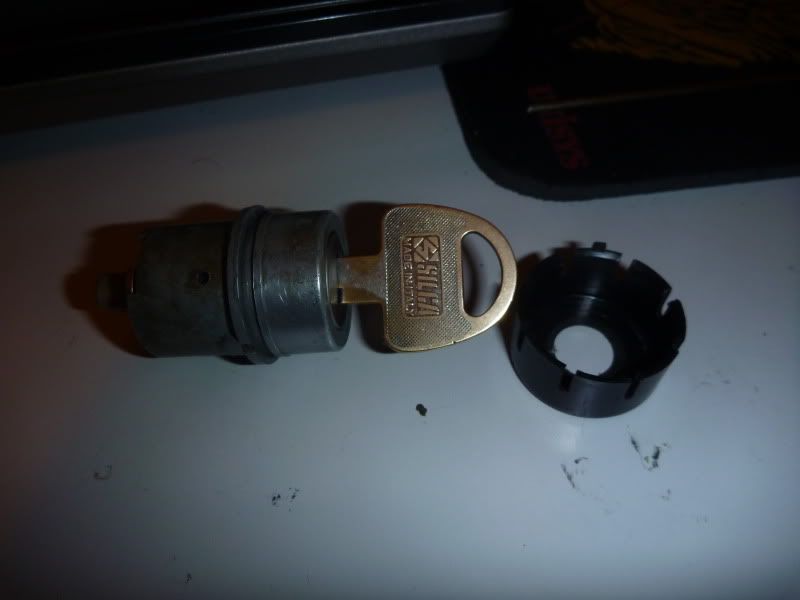


    and this...
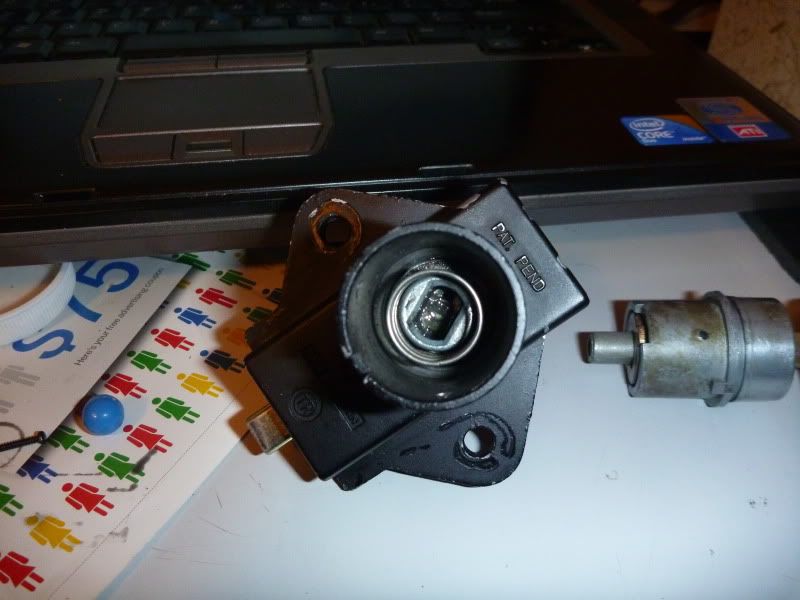


    The part that contains the steering lock is quite simple and I doubt it is damaged. You can remove the piece at the bottom of the channel in the above pic and clean and re-lube it but thats about all that comes out without ALOT more work.

    On to the important part...
    To remove the tumbler cylinder from the outer sleeve, you need to push in on the big flat tumbler on the end (on the left of the next pic). Then the whole inner piece should simply slide right out.
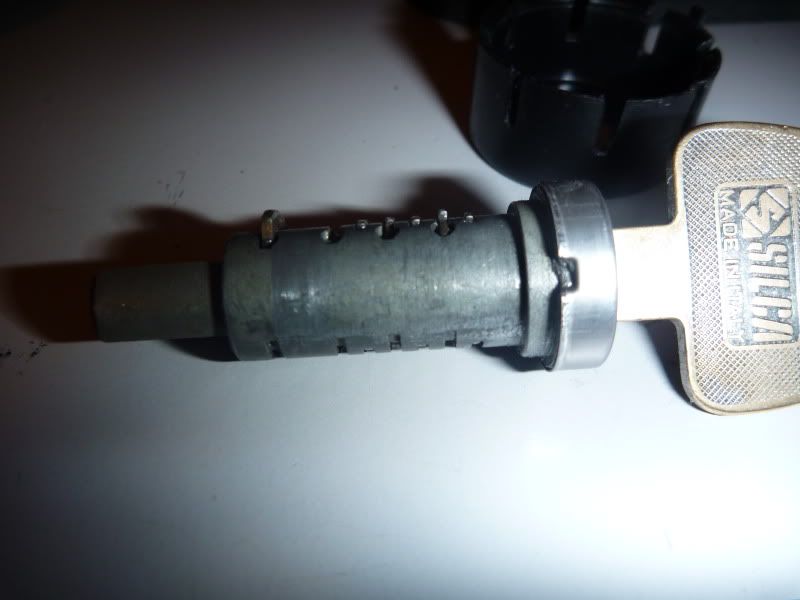

    The reason this has failed is because the tumblers have worn down over the years and no longer align perfectly with the cylinder as you can see in the picture above. This is especially true of pin number 2.

    Often this failure will only be evident when the lock is put in "Park" or "Lock". The reason for this is that the piece of the outer sleeve that blocks the lock from turning when the incorrect key is inserted wears down with the tumbler creating grooves in the wall of the outer sleeve.
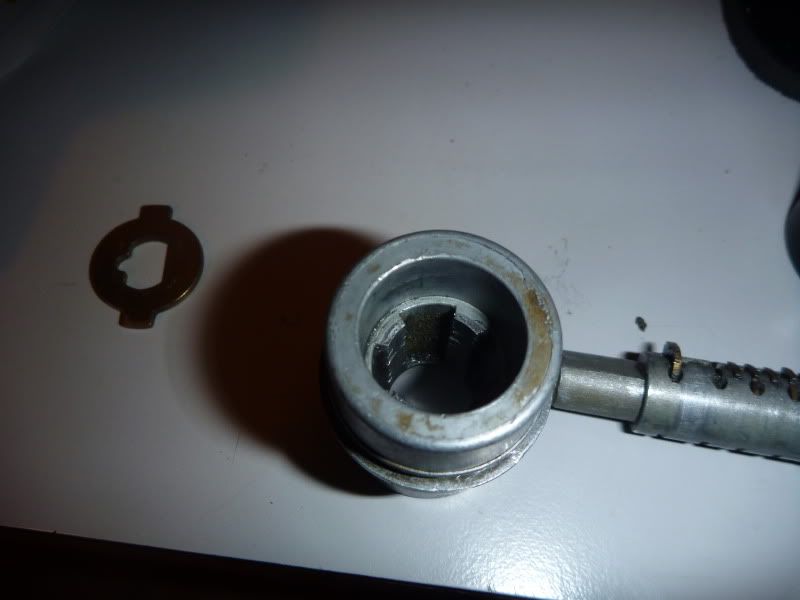
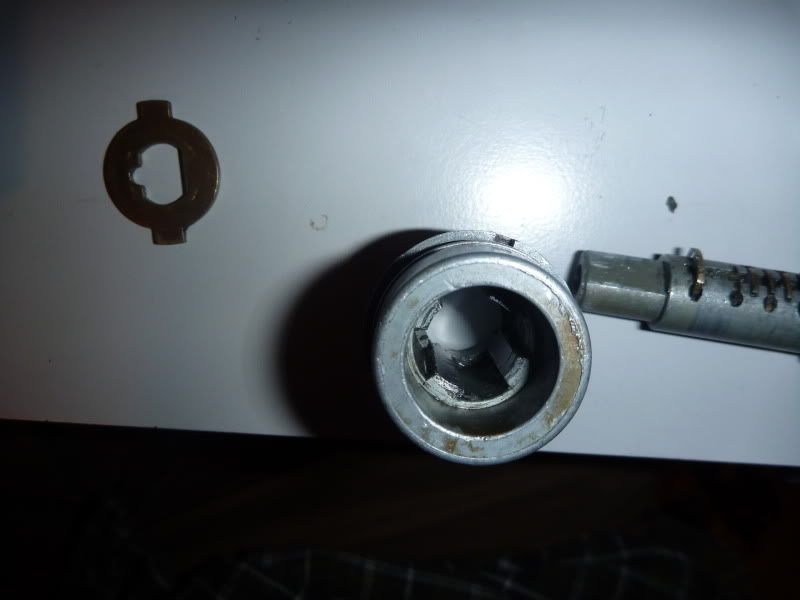


    Since the "Park" and "Lock" positions are so rarely used, they do not have the grooves and will show the condition of the lock more precisely.

    In order to fix this defect I have compiled a few solutions.
    1. Remove the tumblers (not simple) and replace them with new ones from a locksmith.
    2. Make a new key that fits the worn out tumblers.
    3. file down the offending tumblers to reduce the clearances in the lock. This will offer worse security, but honestly, who are you kidding.

    I went with solution number three. I found it helpful to hold the pin up from the bottom while I file it down from the top, otherwise the spring just compresses while you try filing and it takes forever.

    I then reassembled with the mangled roll pins I had removed. Ideally you should go to a hardware store and replace these.

    Sorry I didn't take more picture, in the heat of the moment I was too excited to remember. (I may take some more and add then if something isn't clear)
    Last edited by Guest; 05-09-2011, 10:21 AM.

    #2
    Sorry,
    Not familiar with locks and don't really getting this part.

    The reason this has failed is because the tumblers have worn down over the years and no longer align perfectly with the cylinder as you can see in the picture above. This is especially true of pin number 2.

    Sorry, not exactly sure where you are filing and what the objective is. Are you trying to square up each pin ? See attached figure

    Comment


      #3
      With the key in the lock cylinder,all the tumblers should be flush with the cylinder.
      The wear has allowed pin 2 to protrude,so you just file it until it's flush when the key is in.

      Comment


        #4
        Pos, the way a lock works is that those 'wafers' are set to different depths. The different heights on the key will raise the wafers to the correct height, supposedly aligning the edges of the wafers so the cylinder will turn freely. if you insert a wrong key, one or more wafers will either be too high or too low (meaning that it's still sticking out the other side), and the cylinder should not turn.

        .
        sigpic
        mine: 2000 Honda GoldWing GL1500SE and 1980 GS850G'K' "Junior"
        hers: 1982 GS850GL - "Angel" and 1969 Suzuki T250 Scrambler
        #1 son: 1986 Yamaha Venture Royale 1300 and 1982 GS650GL "Rat Bagger"
        #2 son: 1980 GS1000G
        Family Portrait
        Siblings and Spouses
        Mom's first ride
        Want a copy of my valve adjust spreadsheet for your 2-valve per cylinder engine? Send me an e-mail request (not a PM)
        (Click on my username in the upper-left corner for e-mail info.)

        Comment


          #5
          Originally posted by posplayr View Post
          Sorry,
          Not familiar with locks and don't really getting this part.


          Sorry, not exactly sure where you are filing and what the objective is. Are you trying to square up each pin ? See attached figure
          As the others have clarified, the wafers must line up with the plug edge so that it is smooth all around. If you google "wafer tumbler locks" there are a few good explanations with diagrams.

          All that needs to be done is to file the protruding edge of the wafer until it is flat. I apologize for not having the foresight to take a picture after I had filed it down .

          Comment


            #6
            Everything above the line in this picture should be filed away.

            Comment


              #7
              Thanks that helps, So I assume with the key in you can just file all of the wafers to the same level?

              Comment


                #8
                Originally posted by posplayr View Post
                Thanks that helps, So I assume with the key in you can just file all of the wafers to the same level?
                That's right.

                Is yours apart yet?

                Comment


                  #9
                  OH wait!!! Do NOT file the wafer farthest from the key opening!!! That one is just a clip to hold the plug (that's the thing that has the wafers) into the sleeve and to restrict its movement.

                  Comment


                    #10
                    Just wanted to chime in here to say I experienced the dreaded "locked in park" scenario this weekend and followed this guide to remedy the situation. In my case, one of the wafers had actually broken and therefore wasn't registering on the key or moving down flush with the cylinder. I just permanently removed that wafer, degreased the gunky mechanism, dabbed on a little Triflow and reassembled. Lock works very smooth now.
                    1981 GS450e

                    Comment


                      #11
                      Ok so my switch locked up and after alot of force I got it out of park(fork lock) and got the switch on to get home from work...after looking all over on how to get the little roll pins out of an extra switch I had and playing with all kinda ideas the switch barrel just fell out(never tried pulling it)...I realized the little locking wafer was froze up in the release position ... After studying it I realized the roll pin didn't need to come out and used a small nail to release it and popped out my original cylinder in about 5 minutes without ever pulling the roll pins...I'll post pictures when I get on a computer to show what I did
                      Last edited by Guest; 12-13-2016, 04:59 AM.

                      Comment


                        #12
                        Using pictures from the beginning of the thread instead of some of mine might be better haha. After my spare switch from the junk yard literally fell apart because the lock wafer was stuck in I was able to see how it all worked and used that information to disassemble the switch WITHOUT removing the roll pins. Using a trim nail I was able to reach to the bottom of the switch and disengage the locking wafer and pull the core out intact. The very last wafer holds the core in the cylinder but the key doesn't reach that far so I used the nail to move the wafer and the groves on the nail caught the shutter and pulled the core out. this CAN be done with it locked in park(forks locked) but may need a hook or something to pull the core out if it is jammed. Once the core is out the bike can be unlocked and started without the core in place with a flat screw driver. A locksmith should be able to rekey the core with new wafers if the originals are damaged or worn. since I had 2 cylinders I was able to used wafers from both to fix my lock and reuse it. in my picture you can see the last wafer was able to be pulled in with the nail and pulled out of the switch
                        IMG_20161211_101605161.jpg
                        Last edited by Guest; 12-13-2016, 04:59 AM.

                        Comment


                          #13
                          Concerning option 2:
                          2. Make a new key that fits the worn out tumblers.
                          That's not too hard. You can build up metal on the key where needed with solder until all the plates are the correct height. Now take the key to a locksmith to get a solid metal key made in the same shape.
                          Mark Fisher
                          sigpic

                          Comment


                            #14
                            I did a bit of a tutorial on re-keying locks over here:


                            Apologies for the sometimes fuzzy pics but I was forced to use an older iPad as my camera.
                            Current:
                            Z1300A5 Locomotive (swapped my Intruder for it), GS450 Cafe Project (might never finish it....), XT500 Commuter (I know - it's a Yamaha :eek:)

                            Past:
                            VL1500 Intruder (swapped for Z1300), ZX9R Streetfighter (lets face it - too fast....), 1984 GSX750EF, 1984 GSX1100EF (AKA GS1150)
                            And a bunch of other crap Yamahas....

                            Comment

                            Working...
                            X