Announcement

Collapse
No announcement yet.

Engine removal

Collapse
X
 
  • Filter
  • Time
  • Show
Clear All
new posts

    Engine removal

    I read through the old threads on engine removal and decided to try something different. Since it worked, I'd like to share it with you. I am working by myself and was trying to avoid laying the bike on its side or just trying to horse the engine out. I'm going to get the frame powdercoated and want to also be able to put the engine back in without chewing up the new powder.

    A couple of years ago, I picked up an engine stand at Harbor Freight. If memory serves, it was on sale and I had a coupon so I think it cost in the range of $50. I went to Home Depot today and bought some 3/8 steel rods and cut some threads into the ends of them to hold washers and a nut. I removed the upper engine mounts from the frame, slid the rods through and secured them with a nut.

    I had already removed the head and jugs for a top-end refresh, but it served to give me more room to work and also decreased the engine weight.
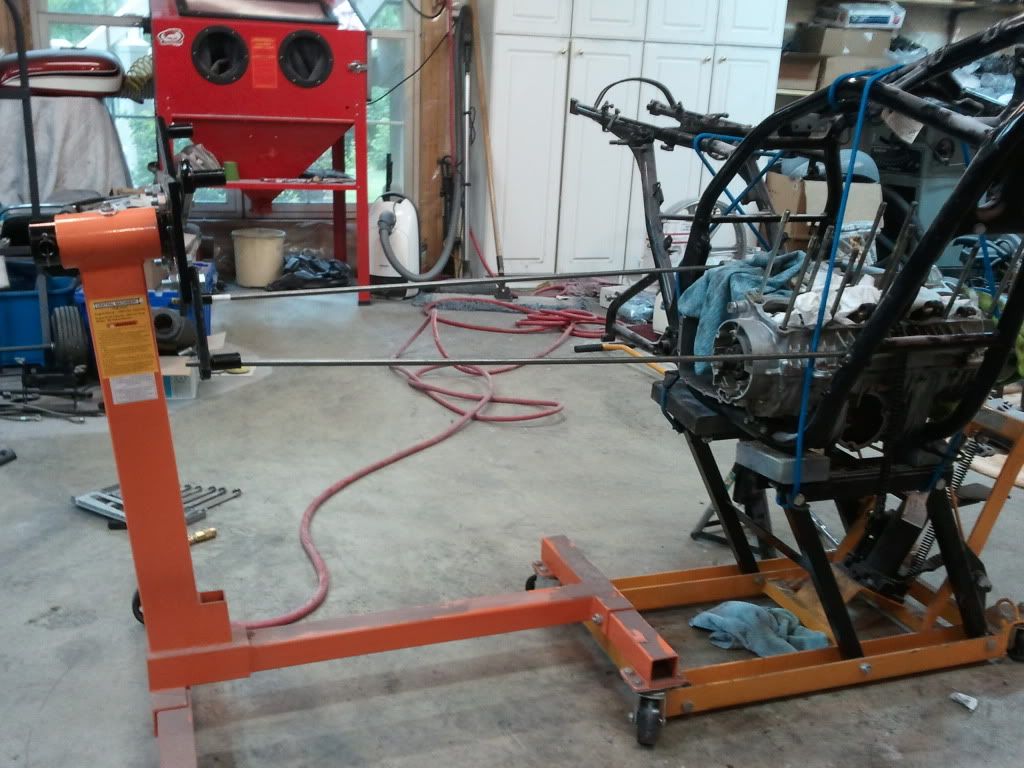
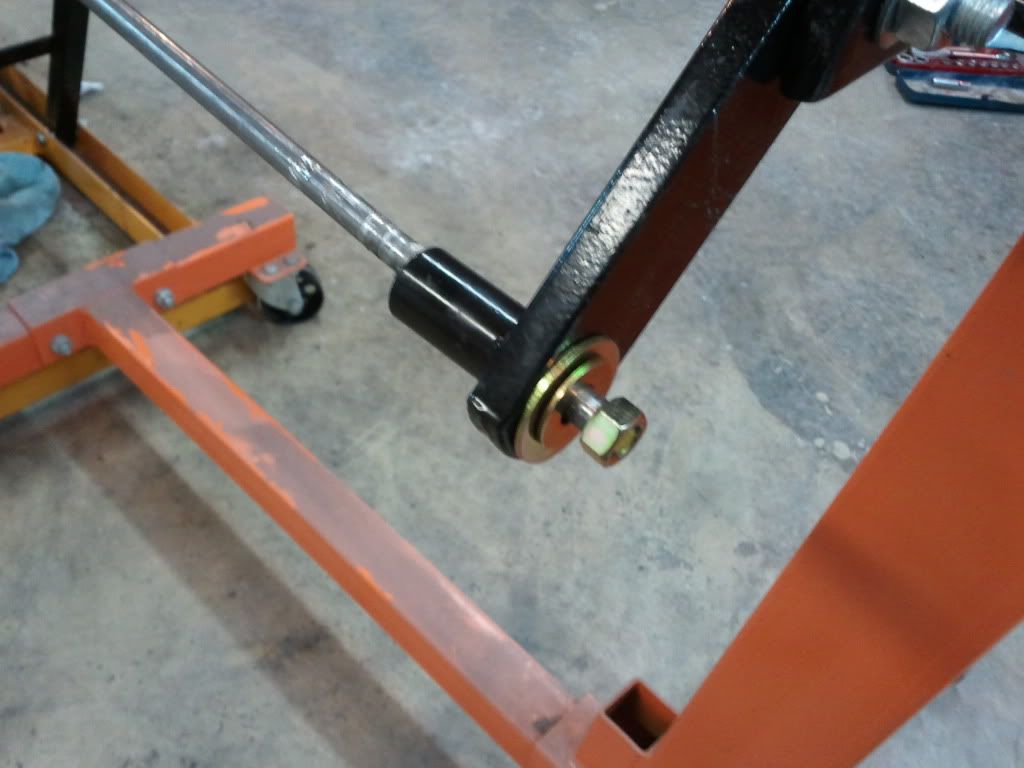


    I then put a bottle jack under the engine to help support the weight while I moved the lower mounting hardware.
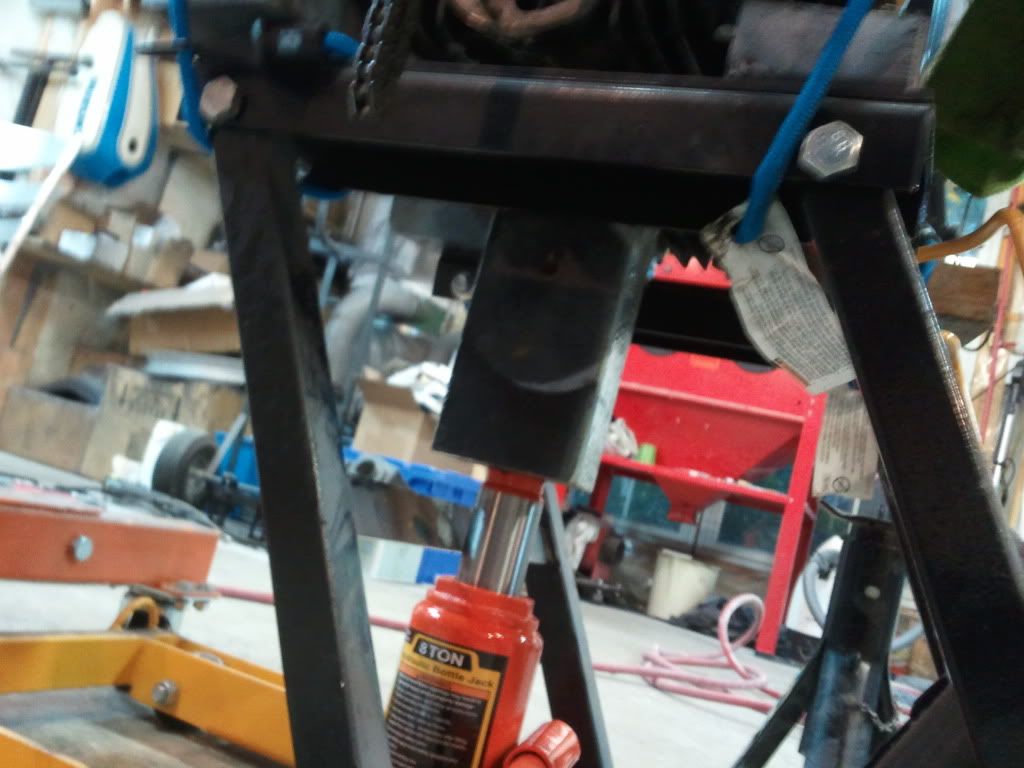
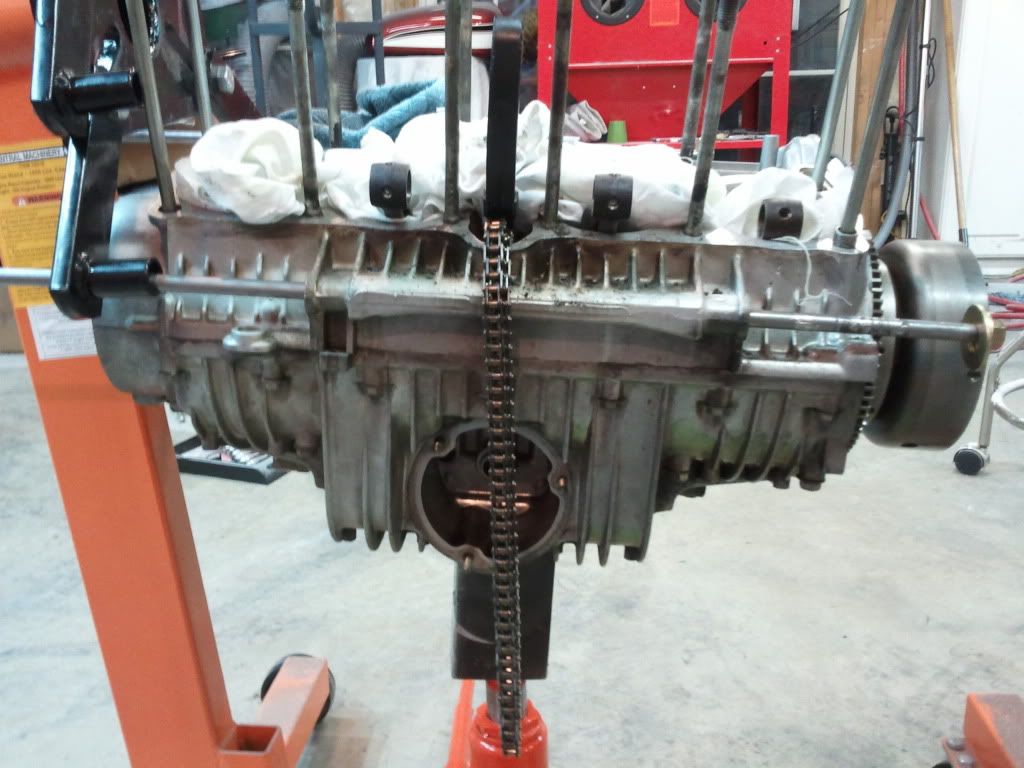


    I then lowered the jack supporting the frame enough to the engine to sit above the frame. At this point, all I had to do was to slide the engine across the rods and away from the frame. I put the bottle jack back under it because I won't get back to it until the morning, but the rods appear to be more than capable of bearing the weight. I'm thinking that this should also make it pretty easy to get the engine back into the frame when the time comes.
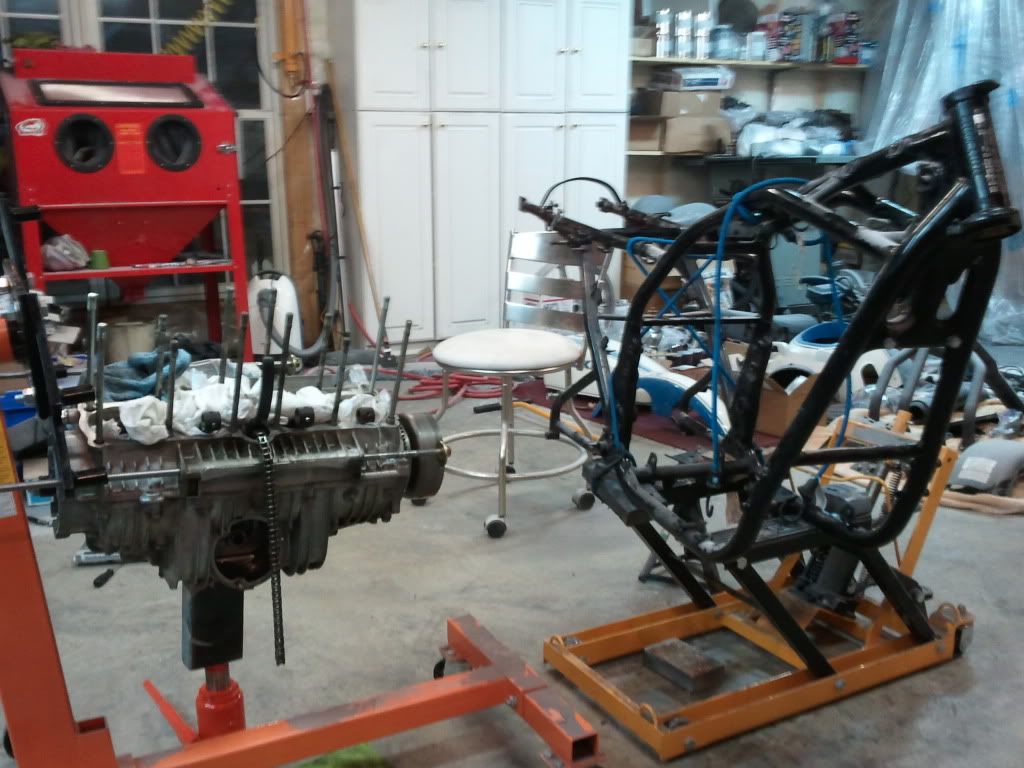


    All in, I probably spent $60 for the stand, the rods and the washers/nuts. That is about $20 less than a trip to the chiropractor. Also, I think I'll be able to just spin the engine in the stand to clean it, prep it and paint it. I thought maybe someone else might find this idea useful.
    Last edited by Guest; 05-27-2011, 09:49 PM. Reason: typo

    #2
    Lol... brilliant. Mad scientestry at it's finest.

    Comment


      #3
      Yes agree, brilliant. Those engines are heavy!!! This trick should do you well when reinstalling the engine too. It's difficult to avoid scratching the frame even with two people installing.
      Ed

      To measure is to know.

      Mikuni O-ring Kits For Sale...https://www.thegsresources.com/_foru...ts#post1703182

      Top Newbie Mistakes thread...http://www.thegsresources.com/_forum...d.php?t=171846

      Carb rebuild tutorial...https://gsarchive.bwringer.com/mtsac...d_Tutorial.pdf

      KZ750E Rebuild Thread...http://www.thegsresources.com/_forum...0-Resurrection

      Comment


        #4
        Jim and I pulled the 1230 motor yesterday with brainless brute strength.
        1983 GS 1100E w/ 1230 kit, .340 lift Web Cams, Ape heavy duty valve springs, 83 1100 head with 1.5mm oversized SS intake valves, 1150 crank, Vance and Hines 1150 SuperHub, Star Racing high volume oil pump gears, 36mm carebs Dynojet stage 3 jet kit, Posplayr's SSPB, Progressive rear shocks and fork springs, Dyna 2000, Dynatek green coils and Vance & Hines 4-1 exhaust.
        1985 GS1150ES stock with 85 Red E bodywork.

        Comment


          #5
          Originally posted by chef1366 View Post
          Jim and I pulled the 1230 motor yesterday with brainless brute strength.

          and after that did not work, floor jack, wood blocks and wood sliding protectors

          Comment


            #6
            Originally posted by posplayr View Post
            and after that did not work, floor jack, wood blocks and wood sliding protectors
            C'mon guy we both know what went down. Me sweating and swearing and you to the rescue.
            1983 GS 1100E w/ 1230 kit, .340 lift Web Cams, Ape heavy duty valve springs, 83 1100 head with 1.5mm oversized SS intake valves, 1150 crank, Vance and Hines 1150 SuperHub, Star Racing high volume oil pump gears, 36mm carebs Dynojet stage 3 jet kit, Posplayr's SSPB, Progressive rear shocks and fork springs, Dyna 2000, Dynatek green coils and Vance & Hines 4-1 exhaust.
            1985 GS1150ES stock with 85 Red E bodywork.

            Comment


              #7
              Originally posted by chef1366 View Post
              C'mon guy we both know what went down. Me sweating and swearing and you to the rescue.
              Bill, how many pounds did you lose? That's one way of making your bike faster.

              Comment


                #8
                Protect the Frame

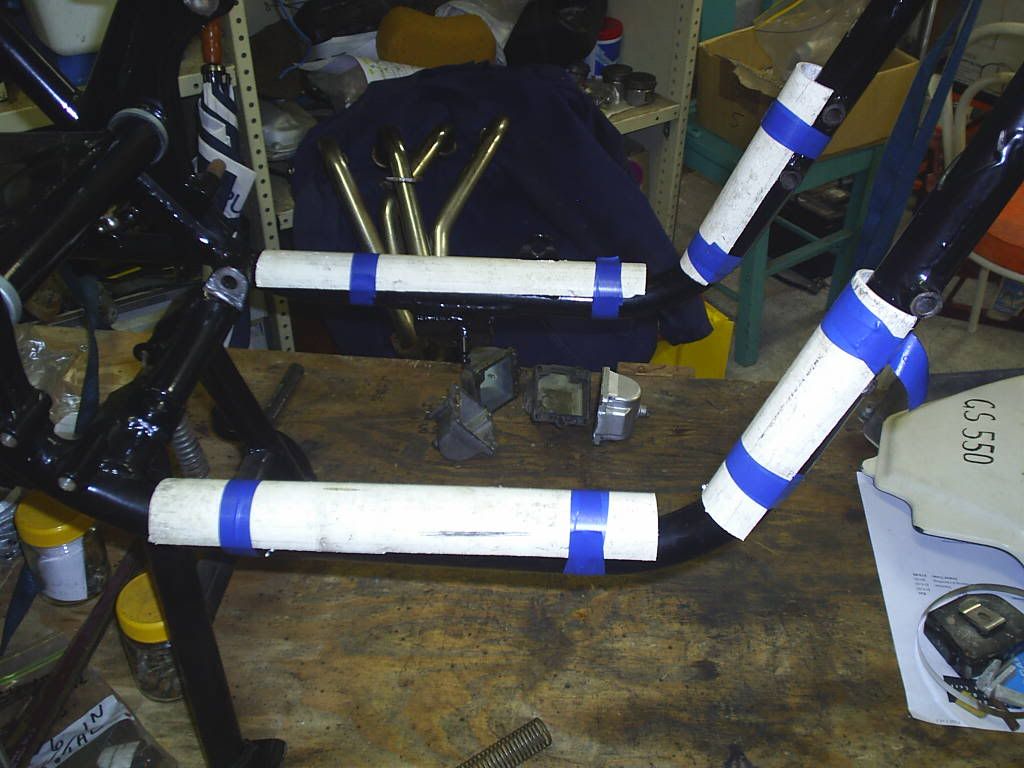
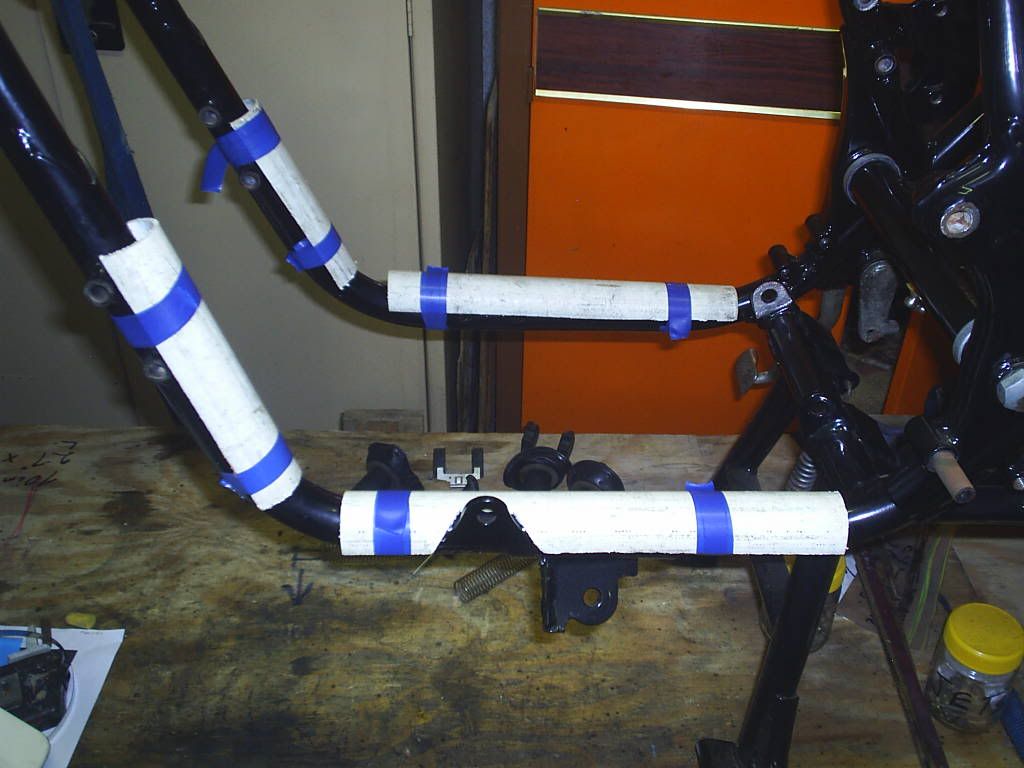
                If you want to protect the frame after it has been powder coated, just some 35mm pvc conduit cut in half lengthways and taped to the frame will do the job. Just do cutouts for any lugs as shown in the following pictures.

                After the engine is in place and you have a few bolts in place just cut the tape, rotate the split conduits and let them fall out.

                Frame as good as new.


                .

                Comment


                  #9
                  That is a great tip! Thanks. I was playing with the idea of using cardboard but this is much better. Much appreciated.

                  Comment


                    #10
                    Great idea. Might try aluminum foil on the frame also

                    Comment


                      #11
                      That is a great idea Don, we were using a peice of flat wood up near where the cam tunnel would hit the front near teh steering stem.

                      Comment


                        #12
                        Originally posted by posplayr View Post
                        That is a great idea Don, we were using a peice of flat wood up near where the cam tunnel would hit the front near the steering stem.
                        Well Jim because I was replacing only the bottom end of the engine -- no cylinders and head, I didn't need to worry about protecting the upper parts of the frame. But I'm sure a few more pieces in split conduit could be taped in place with electrical tape for added protection.

                        I used two lengths of 3/8 rod through the crankcase holes, lifted the engine in from the right hand side with my son's help. Let it rest on the conduits, slid it back, fitted the rear long through bolt and then the crankcase would pivot up on that to align all the other engine mount locations (triange plates, etc)

                        Comment


                          #13
                          Originally posted by cal_look_zero View Post
                          Lol... brilliant. Mad scientestry at it's finest.

                          +1

                          Great idea that I may have to borrow at some point.

                          Comment

                          Working...
                          X