Announcement

Collapse
No announcement yet.

Fork oil leak

Collapse
X
 
  • Filter
  • Time
  • Show
Clear All
new posts

    Fork oil leak

    Howdy folks,

    It's been a while since I logged on last. I got a new job and the 850 has been severely neglected this year. I've put a whopping 50 miles on it since January.

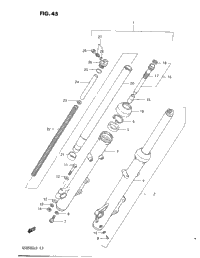
    Anyways, it's been sitting in my garage on the center stand. I left town for a week and when I got back I noticed a wet spot under the fork on the garage floor. At first I thought it was my brakes because I made new lines and rebuilt the calipers and figured I didn't get something tight. Upon closer inspection I discovered it was oil leaking from the TOP of the bottom portion of the fork, where the rubber dust cover/seal is. Is it normal for a bike to start pushing fluid from that seal? Doesn't make sense to me how it could push fluid up and out that seal? I didn't think the oil level was that high?
    - 1983 GS850L ~ 30,000 miles and going up - Finally ready for a proper road trip!
    - 1977 GS750B - Sold but not forgotten

    #2
    That is precisely where the fork seals reveal their leaks. Pop the dust cap up off the lower(outer) fork tube. There will be a puddle of fork oil on top of the seal. Or if you just hold the front brake and push the handle bars forward and let it rebound, the uppers will be wet. Time for a rebuild with new fork seals.
    see part #5.
    Shop online for OEM Front Fork (Model D) parts that fit your 1983 Suzuki GS850GL, search all our OEM Parts or call at 877-999-5686
    Last edited by Rich82GS750TZ; 07-16-2024, 06:15 PM.
    Rich
    1982 GS 750TZ
    2015 Triumph Tiger 1200

    BikeCliff's / Charging System Sorted / Posting Pics
    Destroy-Rebuild 750T/ Destroy-Rebuild part deux

    Comment


      #3
      There are some hacks you can try before you rip the fork apart and replace the seals ..... I've tried this method in the past and it has worked .... I didn't use a feeler gauge or the special cleaner device I just carved something from an old water bottle to slide up there and clean it. But the last device in the video looks like it would do a better job .....

      Old age and treachery will beat youth and skill every time1983 GS 750
      https://c1.staticflickr.com/5/4256/3...8bf549ee_t.jpghttps://c1.staticflickr.com/5/4196/3...cab9f62d_t.jpg

      Comment


        #4
        I have seen that before multiple times.

        Like you, i do not understand how it is possible.
        When in use, yes.
        But after weeks of standing still ... ????????
        Rijk

        Top 10 Newbie Mistakes thread

        CV Carb rebuild tutorial
        VM Carb rebuild tutorial
        Bikecliff's website
        The Stator Papers

        "The thing about freedom - it's never free"

        Comment


          #5
          Originally posted by 93Bandit View Post
          ............ Doesn't make sense to me how it could push fluid up and out that seal? I didn't think the oil level was that high?
          If your forks have the air valves on top for air pressure to assist damping, the air pressure is forcing the oil past the seal even when the bike is standing still. Be careful not to have too much air pressure in the forks - pressure should only be 8 to 17 psi.

          1981 GS850G "Blue Magic" (Bike Of The Month April 2009)

          1981 GS1000G "Leo" (Bike Of The Month August 2023)

          Comment


            #6
            I don't remember the thing about cleaning out the seals was done nor heard of, around here, back in the day. Great video, if it works GREAT, if it don't work you've lost appx 15 min. of your time.
            1983 GS1100E, 1983 CB1100F, 1991 GSX1100G, 1996 Kaw. ZL600 Eliminator, 1999 Bandit 1200S, 2005 Bandit 1200S, 2000 Kaw. ZRX 1100

            Comment


              #7
              I've also read or heard of using a piece of 35mm film. (Remember the stuff we used to use to record our precious memories before smartphones), cut it hook-shaped and sweep it in, around and up around between the seal and the inner tube.
              This video has the same idea using cell phone screen protector. Not my video. I've never tried this.
              Rich
              1982 GS 750TZ
              2015 Triumph Tiger 1200

              BikeCliff's / Charging System Sorted / Posting Pics
              Destroy-Rebuild 750T/ Destroy-Rebuild part deux

              Comment


                #8
                Looks like any thin smooth piece of rigid plastic, ie. 2 liter coke bottle, and the added "little hook shape" to pull the crud up and out...Pro models all over Ebay appx. $10
                1983 GS1100E, 1983 CB1100F, 1991 GSX1100G, 1996 Kaw. ZL600 Eliminator, 1999 Bandit 1200S, 2005 Bandit 1200S, 2000 Kaw. ZRX 1100

                Comment


                  #9
                  Thanks for the ideas guys. I suppose I could try cleaning the seals, but I'm sure they're shot. The bike is 41yrs old and I seriously doubt any of the previous owners rebuilt the forks. But I'll see if cleaning makes a difference. If not, the day I've been dreading has finally arrived...

                  Originally posted by 2BRacing View Post

                  If your forks have the air valves on top for air pressure to assist damping, the air pressure is forcing the oil past the seal even when the bike is standing still. Be careful not to have too much air pressure in the forks - pressure should only be 8 to 17 psi.
                  I did consider air pressure pushing it out, but I'm still not sure how that works. Air would have to get under the fluid to push it up and out, how that happens I do not know. And yes, I added air last year and only put in 8psi I believe. I remember being on the low side of the spec.
                  - 1983 GS850L ~ 30,000 miles and going up - Finally ready for a proper road trip!
                  - 1977 GS750B - Sold but not forgotten

                  Comment


                    #10
                    For those who've rebuilt their forks, what timeframe am I looking at for this job? If you had all the parts and tools needed on hand ready to go, could it be done in a day? A weekend? I'm mechanically inclined, I've rebuilt many engines, work on cars/trucks/bikes but I've never rebuilt forks before.
                    - 1983 GS850L ~ 30,000 miles and going up - Finally ready for a proper road trip!
                    - 1977 GS750B - Sold but not forgotten

                    Comment


                      #11
                      This first and only time I did it, I think it took the weekend. I'm pretty sure now, after having stripped this bike down numerous times including doing new fork seals and bushings once, I could do it in about 4 hours, from removing the axle bolt to torqueing it back down. Having the factory service manual is indispensable. Add more time if you're planning on wet-sanding and polishing the lowers. There is no better time.
                      Rich
                      1982 GS 750TZ
                      2015 Triumph Tiger 1200

                      BikeCliff's / Charging System Sorted / Posting Pics
                      Destroy-Rebuild 750T/ Destroy-Rebuild part deux

                      Comment


                        #12
                        From roll-on to roll-off, definitely under two hours. But I've done a lot of these, and have the tools on hand. Air or battery impact and M8 impact-rated bit for the damper rod bolt, a damper rod tool, seal driver.

                        If the brake pads got oily, you'll need to replace them, and clean up the calipers and rotors very thoroughly.

                        For a newbie, plan on most of the day.

                        Protip: order and replace the copper washer under the damper rod bolt, and the wire clips holding the seals in at the top. You also really ought to order up, or at least have on hand, one or two new damper rod bolts because these are a very oddball fine thread, and if they're damaged (which is common) you'll have to special-order replacements.

                        This generic fork seal driver will work just fine:
                        Shop for Tools, like Tusk Adjustable Fork Seal Driver at Rocky Mountain ATV/MC. We have the best prices on dirt bike, atv and motorcycle parts, apparel and accessories and offer excellent customer service.


                        Or, use a piece of PVC and whack it with a rubber mallet to drive in the new seals.

                        The order of operations is important, so pay attention to the manual.

                        It's also worth considering replacing the teflon-coated bushings, if you can get them. These can be expensive, so most folks re-use them for a while if they're not completely worn out.
                        1983 GS850G, Cosmos Blue.
                        2005 KLR685, Aztec Pink - Turd II.3, the ReReReTurdening
                        2015 Yamaha FJ-09, Magma Red Power Corrupts...
                        Eat more venison.

                        Please provide details. The GSR Hive Mind is nearly omniscient, but not yet clairvoyant.

                        Celeriter equita, converteque saepe.

                        SUPPORT THIS SITE! DONATE TODAY!

                        Co-host of "The Riding Obsession" sport-touring motorcycling podcast at tro.bike!

                        Comment


                          #13
                          First time doing it, figure in head scratching time, looking at manual time, looking for tools or something that will work time, and possibly asking another question, or two, here. First time, not near as quick as Rich who's done it once nor anywhere close to wringer who's done it a lot. With the good info. from above, you'll get there. If you get it buttoned back up within the same day, I'll give you a pat on the back next time I visit MI.
                          1983 GS1100E, 1983 CB1100F, 1991 GSX1100G, 1996 Kaw. ZL600 Eliminator, 1999 Bandit 1200S, 2005 Bandit 1200S, 2000 Kaw. ZRX 1100

                          Comment


                            #14
                            Agree with Brian, if you have the tools it can be done in approx. 2 hours.

                            When i do not have the right seal driver i use the old oil seal on top of the new one
                            so i can tap the oil seal in without fear of damaging the new one.

                            I usually rub the brake pads on a piece of sanding paper if there's enough meat on them.
                            Takes care of glazed surfaces and/or oil saturated top layer.
                            Last edited by Rijko; 07-19-2024, 03:23 AM.
                            Rijk

                            Top 10 Newbie Mistakes thread

                            CV Carb rebuild tutorial
                            VM Carb rebuild tutorial
                            Bikecliff's website
                            The Stator Papers

                            "The thing about freedom - it's never free"

                            Comment


                              #15
                              Cool. So I'll plan on a weekend. I will definitely order the extra parts mentioned, just in case. I'm not afraid of have spare parts on the shelf if they don't get used.

                              It'll probably take me 2hrs to take all the crap Ive mounted on the handlebars off before even getting to the good stuff

                              As always, thank you gentlemen!
                              - 1983 GS850L ~ 30,000 miles and going up - Finally ready for a proper road trip!
                              - 1977 GS750B - Sold but not forgotten

                              Comment

                              Working...
                              X