.png "Powered by vBulletin")
I need to change my fork seals on my 1979 GS 1000, and I have both a Suzuki shop manual and a Haynes manual. In the Haynes, which gives tips on how to do jobs without buying expensive specialty tools for what is a (hopefully) one-time job. Haynes recommends a bolt with two nuts jammed together on an extension to help remove the damper assembly. Does anyone know what size bolt and nuts are correct. Thanks.
-
1979 GS 1000 -
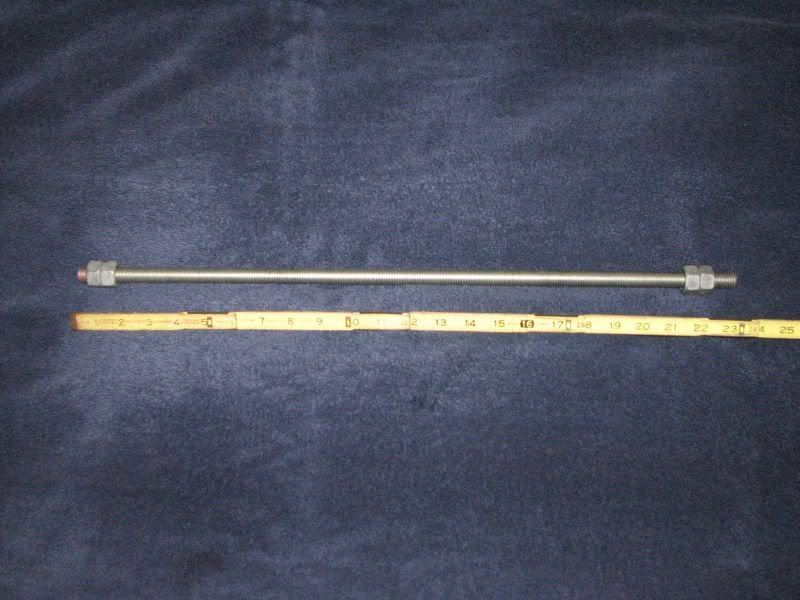
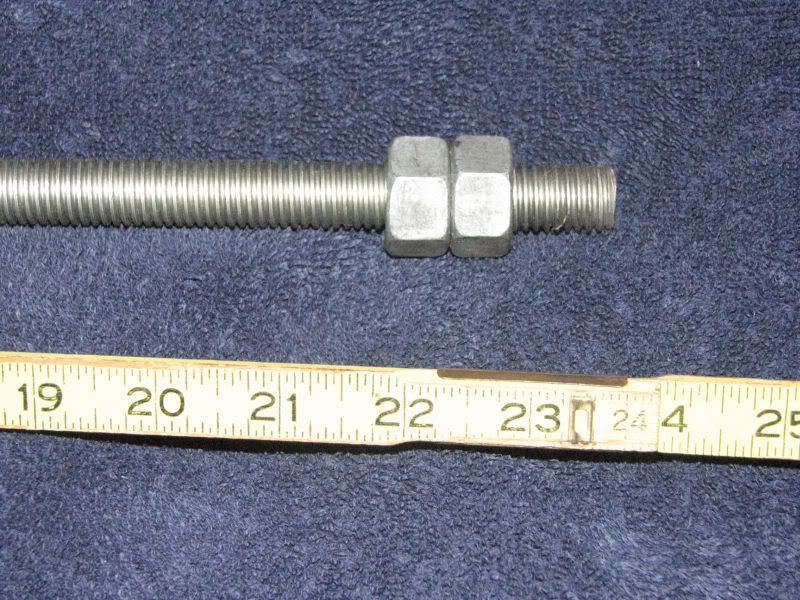
You need 1/2" threaded rod and nuts, which will end up 3/4" across the flats on the nuts. 3/4" is 19.05mm, close enough to 19mm that it doesn't matter. There's one type of 1/2" nut that is a different outside diameter, so make sure you get the right one.
Metric hardware is still stupidly hard to find in the US for some reason.
Alternatively, many people have had success with a cheapo spark plug socket (with 3/4" OD hex at the top) turned around backwards on a long extension. This has the advantage of allowing you to hold the assembly with a breaker bar.
You might have to experiment with some different brands of spark plug sockets -- you have to pull out the rubber insert, and even then, some spark plug sockets won't allow an extension to come through the "wrong" way.1983 GS850G, Cosmos Blue.
2005 KLR685, Aztec Pink - Turd II.3, the ReReReTurdening
2015 Yamaha FJ-09, Magma Red Power Corrupts...
Eat more venison.
Please provide details. The GSR Hive Mind is nearly omniscient, but not yet clairvoyant.
Celeriter equita, converteque saepe.
SUPPORT THIS SITE! DONATE TODAY!
Co-host of "The Riding Obsession" sport-touring motorcycling podcast at tro.bike! -
Yeah just use the 5/8 spark plug socket trick..Originally posted by bwringer View Post
I have 4 of them.. 2 cheep chrome vanadium and 2 craftsman..
Only one of the craftsman will mount on the 3/8 drive upside down.. None of the CV ones.. they all have a lip inside that is in the way.
Now there is another way.. the square end of a 1/2" drive extension is a nice fit in the hex end of a 5/8" spark plug socket.. slip it in there and wrap some electrical tape on so it won't fall off.. Instant tool and no hunting for the right kind of spark plug socket.Last edited by Guest; 08-25-2010, 12:43 AM.Comment
-
If you want to do the threaded rod tool, here is what it should look like:
.sigpic
mine: 2000 Honda GoldWing GL1500SE and 1980 GS850G'K' "Junior"
hers: 1982 GS850GL - "Angel" and 1969 Suzuki T250 Scrambler
#1 son: 1986 Yamaha Venture Royale 1300 and 1982 GS650GL "Rat Bagger"
#2 son: 1980 GS1000G
Family Portrait
Siblings and Spouses
Mom's first ride
Want a copy of my valve adjust spreadsheet for your 2-valve per cylinder engine? Send me an e-mail request (not a PM)
(Click on my username in the upper-left corner for e-mail info.)Comment
-
Try jamming it with a broom handle first - works most of the time.79 GS1000S
79 GS1000S (another one)
80 GSX750
80 GS550
80 CB650 cafe racer
75 PC50 - the one with OHV and pedals...
75 TS100 - being ridden (suicidally) by my fatherComment
-
Not intentionally highjacking but I still don't understand what the use of the nuts are on the threaded tool? Do they hold something in place so it doesn't move?Cowboy Up or Quit. - Run Free Lou and Rest in Peace
1981 GS550T - My First
1981 GS550L - My Eldest Daughter's - Now Sold
2007 GSF1250SA Bandit - My touring bike
Sit tall in the saddle Hold your head up high
Keep your eyes fixed where the trail meets the sky and live like you ain't afraid to die
and don't be scared, just enjoy your ride - Chris Ledoux, "The Ride"Comment
-
-
It holds the damper from turning so you can remove the bolt from the bottom of the fork leg.
Removing the bolt with an air impact with the springs still under compression in the forks works fine too.Comment
-
I have made a tool for this purpose.
Marc
.png)
 https://www.thegsresources.com/_foru...ie_twisted.gif AIR COOLED MONSTERS NEVER DIE https://www.thegsresources.com/_foru...ie_twisted.gif
1978 GS1000C X2
1978 GS1000E X2
1979 GS1000S
1979 gs1000
1983 gs400eComment
-
That works great, if you have a welder. Some of us are limited to credit cards and adjustable spanners.Originally posted by kochic View Post
.sigpic
mine: 2000 Honda GoldWing GL1500SE and 1980 GS850G'K' "Junior"
hers: 1982 GS850GL - "Angel" and 1969 Suzuki T250 Scrambler
#1 son: 1986 Yamaha Venture Royale 1300 and 1982 GS650GL "Rat Bagger"
#2 son: 1980 GS1000G
Family Portrait
Siblings and Spouses
Mom's first ride
Want a copy of my valve adjust spreadsheet for your 2-valve per cylinder engine? Send me an e-mail request (not a PM)
(Click on my username in the upper-left corner for e-mail info.)Comment
-
-
The threaded rod-steve tool is great and cheap too.You can use a 1/2 deep nut in a 19mm box with a long extension too.
Marchttps://www.thegsresources.com/_foru...ie_twisted.gif AIR COOLED MONSTERS NEVER DIE https://www.thegsresources.com/_foru...ie_twisted.gif
1978 GS1000C X2
1978 GS1000E X2
1979 GS1000S
1979 gs1000
1983 gs400eComment
-
Originally posted by Steve View Post
Rock-paper-scissors
But you can get get a welder with that credit card
I'm slowly getting better but finding all kinds of uses for this. If it is something I want pretty I talke t oa pro. But to put together a tool like this works great.
There are cheap but effective; it really is a crappy welder but if you care about beauty. Just remember to p[ick up a grinder and flap disk to clean up the splattering and slag
Comment
-
Please somebody correct me if I'm wrong, but isn't the self-made threaded tool or socket trick for the bikes with larger diameter forks (i.e., GS750+)? With 650 ccs or less the wooden broom handle is the tool of choice? I seem to remember reading that in some thread here. Used the broom handle and it worked great, btw.Comment
-
Thanks for all the advice!
I didn't mean to orphan this thread; I just got VERY busy! Thanks for all the great advice.1979 GS 1000Comment

Comment