Announcement

Collapse
No announcement yet.

Spring time, '83 850G

Collapse
X
 
  • Filter
  • Time
  • Show
Clear All
new posts

    Spring time, '83 850G

    I'm in the middle of a fork spring replacement and had a couple of unforeseen challenges. First, I'll mention that my shop manual covers most 850 models but of course, my fork detail is not in there. The '83, which I have, has an air assist design with a hose connecting the two fork legs, but all of the supplemental additions in my manual still have the single Schrader valve on top of each leg. I tried to get an '82 manual from Cliff's (or Bwringer's?) site but apparently they're not accessible anymore.

    I was unable to pull each fork leg out of the triple tree because of the air assist mechanism. If anyone has any suggestions, I'd sure appreciate them.

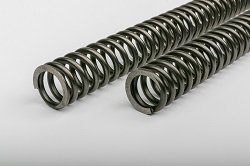
    Since my existing fork seals do not leak, I opted to pull the handle bars and remove the end cap from each leg and pull the springs out that way. Once removed, it was apparent the new springs were too large in diameter, measuring 30mm instead of 27mm. I looked for the specified length in the manual hoping to see if I could just continue running the springs in there now, but found two spec lengths and neither are close to mine. I found in the manual lengths of 416mm, 426mm and 516mm, but my existing springs measure 447mm in length. With these old springs in, the spacer sits just shy of flush with the top of the fork tube. Does anyone know if they're still in spec?

    The oil that came out was nasty, maybe original stuff. I flushed with some ATF until it came out clean. I do have some 10w fork oil to use. Maybe just an oil change would be an improvement if they're still usable.

    Here's another question. Since I ordered these springs I've been second guessing my decision and now have a second chance to get some Sonic springs. I have a new set of All Balls seals but if it's a major P.I.T.A. to remove the legs I wondered if I went ahead and got the Sonics, I can drop them in without issues, leaving the seals for another time, like maybe the next tire change.

    Here are a couple of pics of my setup, since we all like pics...

    A view of the air assist valve and hose. Ignore the ugly bundle of wires there. They are usually tucked in behind the fairing.

    I covered the rest of the bike to avoid dripping nasty old fork oil on things. Since I disconnected the bars, I hung them from the ceiling with the red straps.

    Seals are fine still.
    Roger

    Us states ridden (2024_10_06 18_48_44 UTC).png


    #2
    Maybe an '82 or '83 11E manual might help. They have a single valve with an air tube connecting the two forks.
    1982 GS1100E V&H "SS" exhaust, APE pods, 1150 oil cooler, 140 speedo, 99.3 rear wheel HP, black engine, '83 red

    2016 XL883L sigpic Two-tone blue and white. Almost 42 hp! Status: destroyed, now owned by the insurance company. The hole in my memory starts an hour before the accident and ends 24 hours after.

    Comment


      #3
      To remove the "air bridge", look for a very fine wire that goes around the tube. It will be covered by the bridge a bit, sort of like the valve spring retainer mechanism. You should be able to move the tube just enough to rotate it and find the split in the ring, then pry it out of its groove. Once you do that, the fork tube will slide on down.

      .
      sigpic
      mine: 2000 Honda GoldWing GL1500SE and 1980 GS850G'K' "Junior"
      hers: 1982 GS850GL - "Angel" and 1969 Suzuki T250 Scrambler
      #1 son: 1986 Yamaha Venture Royale 1300 and 1982 GS650GL "Rat Bagger"
      #2 son: 1980 GS1000G
      Family Portrait
      Siblings and Spouses
      Mom's first ride
      Want a copy of my valve adjust spreadsheet for your 2-valve per cylinder engine? Send me an e-mail request (not a PM)
      (Click on my username in the upper-left corner for e-mail info.)

      Comment


        #4
        Thanks for the reply, Steve. I've been looking for that wire ring and haven't been able to get the tube to slide up or down to expose it. Is it on top or on bottom of the air collar thing?

        Also, I'm finding pretty vague info on Sonic springs website. Do all 850's both G and L of various years take the same springs from Sonic? Maybe just using different spacers on top? I see my recommended rate is .95 according to their calculator.


        Roger

        Us states ridden (2024_10_06 18_48_44 UTC).png

        Comment


          #5
          I haven't seen that ring on an 850, I think it was on an 1100E. I am thinking that the ring was on top. I am thinking that the order of re-assembly would be to raise the fork tube up through the lower triple. The air bridge would be just above that. The fork tube would be raised up just a little farther than necessary through the upper triple. The ring would be installed, then the tube would be lowered to sandwich the bridge between the rings and the lower triple. Dis-assembly would involve loosening upper and lower triple clamps, sliding the fork tube up, removing the ring, then sliding it down and out.

          Before you order your springs, you might consider the 1.0 springs, instead. Not sure if your Vetter is included in the calculation. My Pacifico AERO fairing is a few pounds lighter than your Vetter, but I seem to recall that my gravitational attraction is a bit more. I got the 1.1 springs and am not disappointed at all.

          Yes, the G and GL take the same spring, only the spacers are different. As an assembly hint, assemble the fork dry. Drop the spring into place, insert the washer on the top of the spring, then extend the fork tube to its full length. Measure from the top of the spring (washer) to the top of the tube, cut your spacer to that length. When you install the cap, the amount you compress the spring will be just about perfect to give the right amount of sag, which is about 1".

          .
          sigpic
          mine: 2000 Honda GoldWing GL1500SE and 1980 GS850G'K' "Junior"
          hers: 1982 GS850GL - "Angel" and 1969 Suzuki T250 Scrambler
          #1 son: 1986 Yamaha Venture Royale 1300 and 1982 GS650GL "Rat Bagger"
          #2 son: 1980 GS1000G
          Family Portrait
          Siblings and Spouses
          Mom's first ride
          Want a copy of my valve adjust spreadsheet for your 2-valve per cylinder engine? Send me an e-mail request (not a PM)
          (Click on my username in the upper-left corner for e-mail info.)

          Comment


            #6
            Originally posted by Rob S. View Post
            Maybe an '82 or '83 11E manual might help. They have a single valve with an air tube connecting the two forks.
            Thanks for the suggestion. For some reason the first time I searched for the manual I was directed to this site. http://gsarchive.bwringer.com/bikecliff/index.html which didn't let me access the manual.

            I tried again and found this site http://members.dslextreme.com/users/bikecliff/ which let me download it. Removing the retaining clip or ring wasn't on that manual either. I see the two O-rings in the diagram, that's about it.
            Roger

            Us states ridden (2024_10_06 18_48_44 UTC).png

            Comment


              #7
              Originally posted by Steve View Post
              I haven't seen that ring on an 850, I think it was on an 1100E. I am thinking that the ring was on top. I am thinking that the order of re-assembly would be to raise the fork tube up through the lower triple. The air bridge would be just above that. The fork tube would be raised up just a little farther than necessary through the upper triple. The ring would be installed, then the tube would be lowered to sandwich the bridge between the rings and the lower triple. Dis-assembly would involve loosening upper and lower triple clamps, sliding the fork tube up, removing the ring, then sliding it down and out.

              Before you order your springs, you might consider the 1.0 springs, instead. Not sure if your Vetter is included in the calculation. My Pacifico AERO fairing is a few pounds lighter than your Vetter, but I seem to recall that my gravitational attraction is a bit more. I got the 1.1 springs and am not disappointed at all.

              Yes, the G and GL take the same spring, only the spacers are different. As an assembly hint, assemble the fork dry. Drop the spring into place, insert the washer on the top of the spring, then extend the fork tube to its full length. Measure from the top of the spring (washer) to the top of the tube, cut your spacer to that length. When you install the cap, the amount you compress the spring will be just about perfect to give the right amount of sag, which is about 1".

              .
              I neglected to consider the Vetter stuff! Thanks for mentioning it. Here's a breakdown of weight what I'm figuring.
              Bike dry 540
              Fluids and gas 51
              Fairing with bracket 26
              both side bags 25
              rider with gear 155 (or 11.0714 stone if you prefer)

              Totaling 642 lbs

              This does in fact push me up into the 1.0 spring rate. I'm sure that's a few pounds off but close enough.

              I'll look again at the air assist thing after work. I'm sure what I've been doing wrong will be apparent eventually.

              Confirmed weight with a scale at a metals recycling place. I was exactly 20lbs off. With a full tank It's actually 662lbs.
              Last edited by Burque73; 05-27-2020, 08:47 AM.
              Roger

              Us states ridden (2024_10_06 18_48_44 UTC).png

              Comment


                #8
                While I was dismantling the front end last weekend, my wife and stepson were painting a bedroom here in the house. They didn't want to bother me since I had waited for weeks to get into this suspension work. Anyhow, when I came in to see how they were doing I realized I should have dropped the wrenches a long time ago and helped them.

                A few years ago I installed cove moulding up the corners of the walls and a couple of layers of trim around the ceiling, making for a nice detail in the room. They had a hard time cutting in and didn't prep anything before going to town with rollers and brushes. Needless to say, I have been cleaning up that room all week in the evenings and finally last night got the last coat of enamel on the trim.

                Since the new Sonic springs are here I plan on getting back to this tomorrow morning.
                Roger

                Us states ridden (2024_10_06 18_48_44 UTC).png

                Comment


                  #9
                  For the life of me I can't get the fork tubes to slide up or down exposing a clip to release the air assist parts. I decided to attempt dismantling them with the upper tubes still in the triple clamp. I made the T-shaped tool with the nut welded on the end and went to loosen the allen bolt underneath, then found this. The PO had completely rounded out the allen head bolt.


                  I'm going to order two bolts to have on hand, but in the mean time drop in the new springs and button it up for now. The seals don't leak so I'll be good for a while. I'm really trying to get this thing ready for a four day trip.
                  Roger

                  Us states ridden (2024_10_06 18_48_44 UTC).png

                  Comment


                    #10
                    I think there's one point of confusion here to correct: there's nothing retaining the air hardware to the forks; the fork legs simply slide out. There are two o-rings in each "collar".

                    Yes, there's a bit of friction from the extra o-rings, and they can be a pain to reinstall, but the fork legs do come out and install pretty normally.

                    With new springs, you should not use added air pressure. However, the air system does still need to be sealed. And even if you plug up the air holes in the fork legs, you still need the collars to create the correct stack-up height.
                    1983 GS850G, Cosmos Blue.
                    2005 KLR685, Aztec Pink - Turd II.3, the ReReReTurdening
                    2015 Yamaha FJ-09, Magma Red Power Corrupts...
                    Eat more venison.

                    Please provide details. The GSR Hive Mind is nearly omniscient, but not yet clairvoyant.

                    Celeriter equita, converteque saepe.

                    SUPPORT THIS SITE! DONATE TODAY!

                    Co-host of "The Riding Obsession" sport-touring motorcycling podcast at tro.bike!

                    Comment


                      #11
                      Originally posted by bwringer View Post
                      I think there's one point of confusion here to correct: there's nothing retaining the air hardware to the forks; the fork legs simply slide out. There are two o-rings in each "collar".

                      Yes, there's a bit of friction from the extra o-rings, and they can be a pain to reinstall, but the fork legs do come out and install pretty normally.

                      With new springs, you should not use added air pressure. However, the air system does still need to be sealed. And even if you plug up the air holes in the fork legs, you still need the collars to create the correct stack-up height.
                      Thanks for confirming that. I looked at every parts drawing I could find and nowhere did I see anything more than two O-rings. Still, the things are stuck! The PO did say he changed the fork seals. I'm guessing he couldn't remove the tubes either and that's why the allen head bolt on bottom is so buggered up. The seals will just have to be done later.

                      I didn't plan on adding any air pressure, but thanks for the reminder anyway. The air assist system is still intact, but eventually I'll plug the holes where the hose connects and toss the crossover bridge thing.
                      Roger

                      Us states ridden (2024_10_06 18_48_44 UTC).png

                      Comment


                        #12
                        Originally posted by Steve View Post
                        .....................Before you order your springs, you might consider the 1.0 springs, instead. Not sure if your Vetter is included in the calculation. My Pacifico AERO fairing is a few pounds lighter than your Vetter, but I seem to recall that my gravitational attraction is a bit more. I got the 1.1 springs and am not disappointed at all............................................... .
                        .

                        Just a follow up post here.

                        At first, unless the bike was heavily loaded with gear or riding two up, the 1.0 sonic springs seemed too stiff. After a bump I could feel the forks snap back like it was over sprung. Now that I have a few thousand miles on them I've either gotten used to it or they're settling in. I may also have gained a pound or three

                        In any case, I held on to the stock springs just in case I wanted to switch back.
                        Roger

                        Us states ridden (2024_10_06 18_48_44 UTC).png

                        Comment


                          #13
                          Hey Roger,

                          I've yet to work on my forks as you are doing but I got some good info for when I do. Hope it all works out!

                          Ed
                          GS750TZ V&H/4-1, Progressive Shocks, Rebuilt MC/braided line, Tarozzi Stabilizer[Seq#2312]
                          GS750TZ Parts Bike [Seq#6036]
                          GSX-R750Y (Sold)

                          my opinion shouldn't be taken as gospel or in any way that would lead you to believe otherwise (30Sep2021)

                          Comment


                            #14
                            Originally posted by Burque73 View Post
                            After a bump I could feel the forks snap back like it was over sprung.
                            No rebound damping adjustment?
                            1982 GS1100E V&H "SS" exhaust, APE pods, 1150 oil cooler, 140 speedo, 99.3 rear wheel HP, black engine, '83 red

                            2016 XL883L sigpic Two-tone blue and white. Almost 42 hp! Status: destroyed, now owned by the insurance company. The hole in my memory starts an hour before the accident and ends 24 hours after.

                            Comment


                              #15
                              Originally posted by GSXR7ED View Post
                              Hey Roger,

                              ................................ Hope it all works out!

                              Ed
                              Thanks Ed. I'll get this sorted eventually, or just let well enough alone.

                              I'm really not sure what to expect in the feel of the suspension and handling after having the original springs for so long.

                              Originally posted by Rob S. View Post
                              No rebound damping adjustment?
                              I added some air to the forks to see if it improved the ride and felt it didn't do any good, plus it's been mentioned many times here, and I believe by the manufacturer, that it isn't necessary to add any air with these springs.
                              Roger

                              Us states ridden (2024_10_06 18_48_44 UTC).png

                              Comment

                              Working...
                              X