Announcement

Collapse
No announcement yet.

Painting gas tank with Epoxy (appliance) paint – some questions

Collapse
X
 
  • Filter
  • Time
  • Show
Clear All
new posts

    Painting gas tank with Epoxy (appliance) paint – some questions

    Painting gas tank with Epoxy (appliance) paint – some questions

    Questions at the end since y’all tend to like the story first.

    Since I am more after function and don’t have a fancy paint gun, I’m thinking of using Rustoleum Appliance Epoxy paint in a rattle can. I use it frequently on other stuff and this application may be good, especially considering epoxy’s resistance to gas. Also, it doesn’t need primer and can go on bare metal.

    Looks like I’ll have to go a solid black and not have to worry about pin striping since its not available for the 750L through www.DiabloCycle.com (formerly www.ReproductionDecals.com) and it’s not important enough for me to have it custom done.

    My thinking is that the epoxy is strong paint and if I get a less-than-perfect result I can wet-sand and polish/buff to a nice shine like this guy - http://www.thegsresources.com/_forum...ht=epoxy+paint I won’t be clear coating though.

    So far on the tank I have welded some holes and Bondo’ed the repair areas and some dents. I’ve removed the pin striping with a razor. Since it was under the clear-coat there are clear-coat ridges which I’ll have to sand (the black pint was nice and shiny under that pin striping).

    Questions –

    1 – Do I need to do more sanding than getting the tank smooth? Like are there issues with painting over sanded clear-coat or anything?

    2 – What final grit is considered fine enough so sanding marks don’t show up?

    3 – What is the preferred ?skim? coat to fill in those final minimal height differences.

    4 – What else should I be asking / thinking about / considering?

    Thanks,
    Andrew
    1981 GS750L - Owned since 1990 when graduated high school and since have been discovering all the things not disclosed by seller.
    1983 GS750E - bought in 2016 as a rough runner to use while rebuilding 81L and then to combine with ES to make one good one
    1983 GS750ES - bought in Toronto in 2015 on a lark as a non-runner, missing front cowling and exhaust - If you have a 1983 750ES front cowling let me know! Blue would be nice

    #2
    When I painted mine...with epoxy black paint, I just striped the old paint off with a wire cone wheel and an electric drill, filled in any dents with filler(small ones) sanded with 400 grit, cleaned with paint thinner, wiped with a soft clean cloth, DO NO TOUCH AND GET OILY FINGERPRINTS ANYWHERE...PAINT WILL NOT STICK. The nice thing about appliance epoxy, it is very forgiving, goes on kind of heavy and self smooths, makes you a better painter than you think you are let stand...and this is important, for a full week before touching it or wet sanding or anything, don't even peek at it, seriously though, it dries as hard as adamantium in wolverines claws, no kidding, I even painted my frame with it, and it withstands sand and rock chips like it was baked on. Here's another forgiving point, say you sprayed too long and close in one spot, wipe it off immediately with your finger, get as much as you can off, re-spay immediately, it self smooths again and fixes itself. Also, one coat will do you, if you want another coat, wait that week first, first coat goes on glossy, second will also if you wait a week, here's a neat trick, respray it 15 minutes after first coat and you now have a satin finish. Afterwards, enjoy as is, no clear, even withstood gas spills, surprise surprise, I was going to get some 2k clear for the tank, but experimented with clear on other metal over the epoxy, and kinda changes the finish, didn't like it. You can wet sand it with 2000 grit after the week if you want that silky smooth finish, or leave it for that matte finish.

    Here's my bike painted with the black appliance epoxy from Home Depot for less than $5 a can, I love this paint and use it all the time on all kind of projects, currently painting my baja fenders and parts with it.

    Rich


    Comment


      #3


      70 baja bug project also with black epoxy, more to do on it.

      Comment


        #4
        Just used the same sort of epoxy ( Rust Guard in Australia ) on my side covers for the GR650, had to do the colour matching myself to get the right shade of military green ( ex MP bike ). Preparation is as normal, the paint is high build and sprays on well with resistance to running & appears to be set very hard after a couple of weeks. I did apply it by spray gun, because I have the equipment.
        I'll be cutting it with 2000 + polish this weekend, if I'm happy I will redo the tank as well.
        There have been comments that with strong sun exposure over time the finish can develope a surface haze and loose it's gloss, but nothing a once a year wax & polish wont keep at bay.
        Used this stuff many times no problems & very scratch resistant.

        Comment


          #5
          Nice job old skool. I'll be doing mine this winter black aswell & had thought about the epoxy paint, looks good & a fun project.

          Comment


            #6
            Originally posted by old_skool View Post
            When I painted mine...with epoxy black paint, I just striped the old paint off with a wire cone wheel and an electric drill, filled in any dents with filler(small ones) sanded with 400 grit, cleaned with paint thinner, wiped with a soft clean cloth, DO NO TOUCH AND GET OILY FINGERPRINTS ANYWHERE...PAINT WILL NOT STICK. The nice thing about appliance epoxy, it is very forgiving, goes on kind of heavy and self smooths, makes you a better painter than you think you are let stand...and this is important, for a full week before touching it or wet sanding or anything, don't even peek at it, seriously though, it dries as hard as adamantium in wolverines claws, no kidding, I even painted my frame with it, and it withstands sand and rock chips like it was baked on. Here's another forgiving point, say you sprayed too long and close in one spot, wipe it off immediately with your finger, get as much as you can off, re-spay immediately, it self smooths again and fixes itself. Also, one coat will do you, if you want another coat, wait that week first, first coat goes on glossy, second will also if you wait a week, here's a neat trick, respray it 15 minutes after first coat and you now have a satin finish. Afterwards, enjoy as is, no clear, even withstood gas spills, surprise surprise, I was going to get some 2k clear for the tank, but experimented with clear on other metal over the epoxy, and kinda changes the finish, didn't like it. You can wet sand it with 2000 grit after the week if you want that silky smooth finish, or leave it for that matte finish.
            Hmmmmmm................that's why my 85 750 frame turned out satin,I recoated after 15 minutes.Was going to do another round this weekend to be sure I have a good heavy duty paint job on the frame this time.Now I have to decide if I want to try to make it glossier or stick with a more satin finish

            Comment


              #7
              The can says to immediately re-spray for glossy, but that does not work, wait for full cure time of one week before re-paint, usually one coat is enough, with this appliance paint, it's almost like giving it 2+ coats on the first spray.
              Oh, and it does not need a primer base, it specifically states on the can no need for it, you lose some cohesion by using primer, and the epoxy doesn't coat the same over other paints either, sometimes it even attacks it, but does fine on hardened painted surfaces or bare steel, if you had to do any bondo/glass work, use the epoxy like you would the primer in those places, let cure before full re-paint. Always do a good clean with some kind of thinner and a tack free or cotton cloth, will not stick to any oily surface, will produce fish eyes. But, because it's goes on so heavy, let's say you painted a large item and notice one or 2 areas that must not have been cleaned well, wait for it to cure unless you don't mind the satin look, and re-spray over those areas or the whole thing again, it will fill in those fish eye spots and self level smooth right over those areas that did not take paint earlier, because it's so heavy, if fills it in and just covers it.
              Do not try to oven bake it, but the sun does help with initial setting/drying big time, hotter the day the better, I've painted in fairly humid days too without any issuses, but try not to. I usually hang all my items to be painted, look for a hole and hang them from a bungee. Works superb on wear items like brake levers etc, does not wear off like regular paint will, also, paints over aluminum nicely, but clean it good.
              Since the new fad for appliances is that cool looking red and retro 70 appliance colors, I'm hoping those will come out in a spray can eventually.
              I fell in love with that paint so much, I keep 6-7 cans on hand
              It also adheres to plastic, but because it hardens so, it does not wear well with plastic edges like on an ATV, I painted my Grandson's little 4 wheeler, and he thrashes it in my back wooded/brush area, and aside from the very edges, holds up better than any plastic prefered paint.

              Comment


                #8
                This epoxy paint intrigues me. Does anyone else have some pics to further illustrate how it turns out?

                Comment


                  #9
                  The Ghost in the Machine(Eric no longer a member) uses it a lot since I turned it on to him with sucess, don't take my word for it, a can is only $5, buy one, follow my instructions on something small, you'll see!

                  Comment


                    #10
                    Originally posted by MisterCinders View Post
                    This epoxy paint intrigues me. Does anyone else have some pics to further illustrate how it turns out?
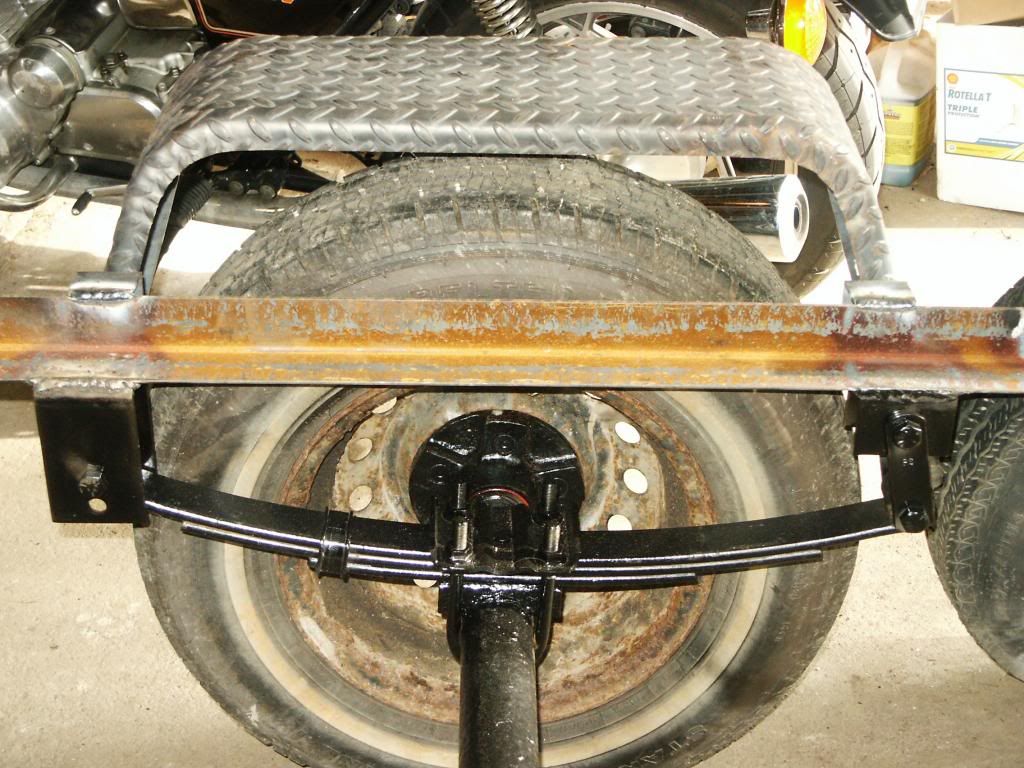
                    I touched up my trailer project with it.

                    Sprayed both leaf springs, hanger brackets and axle hubs as well.

                    Last edited by rustybronco; 09-06-2013, 01:59 PM.
                    De-stinking Penelope http://thegsresources.com/_forum/sho...d.php?t=179245

                    http://www.thegsresources.com/_forum...35#post1625535

                    Comment


                      #11
                      Perfect paint for items it needs to hold up Dale !!!

                      Comment


                        #12
                        And a painted Kawasaki frame fromn the Ghost

                        Comment


                          #13
                          Looks like I know what I'm painting my bike with now.

                          Comment


                            #14
                            Originally posted by MadCapsule View Post
                            Looks like I know what I'm painting my bike with now.

                            A bucket of house paint with a dead chicken...

                            Comment


                              #15
                              Originally posted by old_skool View Post
                              A bucket of house paint with a dead chicken...
                              You get a nice swirl pattern if you use a flailing, live chicken instead.

                              Comment

                              Working...
                              X