• Required reading for all forum users!!!

    Welcome!
    Register to access the full functionality of the GSResources forum. Until you register and activate your account you will not have full forum access, nor will you be able to post or reply to messages.

    A note to new registrants...
    All new forum registrations must be activated via email before you have full access to the forum.

    A Special Note about Email accounts!
    DO NOT SIGN UP USING hotmail, outlook, gmx, sbcglobal, att, bellsouth or email.com. They delete our forum signup emails.

    A note to old forum members...
    I receive numerous requests from people who can no longer log in because their accounts were deleted. As mentioned in the forum FAQ, user accounts are deleted if you haven't logged in for the past 6 months. If you can't log in, then create a new forum account. If you don't get an error message, then check your email account for an activation message. If you get a message stating that the email address is already in use, then your account still exists so follow the instructions in the forum FAQ for resetting your password.

    Have you forgotten your password or have a new email address? Then read the forum FAQ for details on how to reset it.

    Any email requests for "can't log in anymore" problems or "lost my password" problems will be deleted. Read the forum FAQ and follow the instructions there - that's what we have one for...

  • Returning Visitors

    If you are a returning visitor who never received your confirmation email, then odds are your email provider is blockinig emails from our server. The only thing that can be done to get around this is you will have to try creating another forum account using an email address from another domain.

    If you are a returning visitor to the forum and can't log in using your old forum name and password but used to be able to then chances are your account is deleted. Purges of the databases are done regularly. You will have to create a new forum account and you should be all set.

1982 Suzuki GS850 - Project Malice

  • Thread starter Thread starter blurred
  • Start date Start date
B

blurred

Guest
So, this build may or may not be received well here, and I completely understand. This build will follow a lot of random rabbit holes, hence the project name, Malice. Similar to Alice in Wonderland, this one will be a bit twisted and not clean and pristine. This is not a build that is intended to be something most like. It is simply a combination of style elements that I personally find exhilarating. Key features from each unique bike genre that I am infatuated with will be lumped into one platform that, hopefully, will tie in well together at the end. If a modification is deemed to not look good and function just as well, it will be scrapped and I'll be back at the drawing board.

As it currently sits, the intake filter has been pulled and will get cleaned up. I do plan to swap out the intake to pods and rework the jetting. Carbs will be coming off too to be bench synced and cleaned/adjusted. Again, with any of my builds, the function has to be there right along with the form.

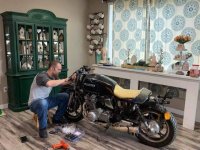
I picked up this 1982 GS850 a couple months ago for $500 with 37000 miles in it. It came with an additional (complete) engine and a few other parts. The bike ran roughly (at least did when i picked it up) and requiree some carb cleaning since it sat for a couple years. I figured I'd put the work in over the winter and get it on the road by mid next year...

I have removed all the fairings and saddle bags, taking off the parts I either don't plan to reuse or are in great shape for someone who wants to replace parts on their bike.

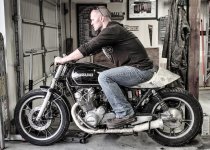
Exhaust has been modified to be over a foot shorter. As you can see in the photos, I had an expanded adapter made so that I could run the stock exhaust cap on the end for a clean look. Inside the adapter I built a "restrictor plate" to keep back pressure in there. I was terribly worried this thing would sound like garbage, but to my surprise, it's not crazy loud (not nearly as loud as most Harley's rolling around) and it's got a nice growl as it comes to an idle. The idea in my head is to build a heat shield that will run the length of the horizontal section of the exhaust, from the tip to just in front of where my feet sit, to give the exhaust the gradual expansion look. In my head it will look pretty neat.

I also have an electronic speedometer and tach that will replace the double gauges.

Anyway, I have attached a youtube video of the initial start up (and yes, my son likes it lol). Also attached most of the photos that I have taken as I have been working on it.

Day I brought it home:
72421846_10157164332753891_4961622000742170624_n by boyd smith, on Flickr

72289440_10157164332818891_4293968582959693824_n by boyd smith, on Flickr

72701670_10157164332868891_7686638231609147392_n by boyd smith, on Flickr

Started puting in work removing some weight.

72137480_10157164332928891_7364934516734951424_n by boyd smith, on Flickr

72946865_10157164333018891_7827382755120906240_n by boyd smith, on Flickr

Seat was completely rusted out on the back half, so I started chopping it up. Still undecided how the overall shape will be, but this is a rough idea. You can also see the initial cuts made for the exhaust length.

72474508_10157164333113891_2922173272910987264_n by boyd smith, on Flickr

72131370_10157164333178891_7861753570209562624_n by boyd smith, on Flickr

72388951_10157164333253891_6969434695255719936_n by boyd smith, on Flickr
 
I learned there's a limit to photos in the posts, hence the continuation here:

The brain picture of the adapter came to life:

72941415_10157164333303891_3245734526780964864_n by boyd smith, on Flickr

72193582_10157164333378891_3291041385167192064_n by boyd smith, on Flickr

72652777_10157164333563891_6664539029951741952_n by boyd smith, on Flickr

Reworked the stock levers to give them some character, installed some clip ons after I lowered the front, and wrapped my grips in leather from Trip Machine.

72140537_10157164333623891_2398332956679602176_n by boyd smith, on Flickr

Exhaust wrap is done

72670892_10157164333693891_6659511581753212928_n by boyd smith, on Flickr

72420442_10157183042058891_6946773219441377280_n by boyd smith, on Flickr

Still need to find shocks for the rear that will lower it and not be a really soft ride, along with build the seat and rear frame so the wheel has travel to it. Again, the idea I have in my head is there. Just not sure it will pan out and look the way I want.


Again, I get it if you don't like it or detest that I am taking this the direction I am going. I personally welcome all posts in my threads, so state so if it makes you feel better, it's never taken personally since you just might save my from learning my lesson later or post some awesome information that I can use to make my ideas better. Two differing opinions can make a far better outcome than one...


Also, if you have some gee-wiz ideas that might look good, throw them out there. As I somewhat stated above, there's no real intended direction with this style. Be it Brat, Cafe, Bobber, Rat; it's all potentially going to get used in some manner on this.
 
Looks like you at least have a plan, which is more than what most “Sawzall artists” have, hope it works well.

I will offer a caution on lowering the rear. One inch is a practical limit. The u-joint in the shaft is sensitive to the angle.

.
 
Looks like you at least have a plan, which is more than what most “Sawzall artists” have, hope it works well.

I will offer a caution on lowering the rear. One inch is a practical limit. The u-joint in the shaft is sensitive to the angle.

.

i sincerely appreciate that information as i had not come across it yet. I knew the shaft drive makes things interesting and different.

Also, i dont even own a sawzall. Lol.

But, i do get what youre saying and where youre coming from.
 
Those are stock shocks... run them on lowest preload & highest damping settings, they might be close to what you want. I ran some koni that were half inch shorter on a 1000G, they worked ok but I suspect you're looking for more than that. :)
 
Those are stock shocks... run them on lowest preload & highest damping settings, they might be close to what you want. I ran some koni that were half inch shorter on a 1000G, they worked ok but I suspect you're looking for more than that. :)

I shall look into those.
 
Those are stock shocks... run them on lowest preload & highest damping settings, they might be close to what you want. I ran some koni that were half inch shorter on a 1000G, they worked ok but I suspect you're looking for more than that. :)

I was looking at them and I cannot find anything to let me adjust the damping settings...
 
If there's a rubber boot at the top of the shock (beneath the top eye), lift it and you will see a click-stop plastic wheel you turn for damping settings.
About as much use as a chocolate fireguard, but perhaps they worked when new. Another delightful habit they have is to retain road salt and moisture under the boot and corrode the alloy away to dangerous uselessness.
 
I was looking at them and I cannot find anything to let me adjust the damping settings...

If there's a rubber boot at the top of the shock (beneath the top eye), lift it and you will see a click-stop plastic wheel you turn for damping settings.
Not all models had those adjustable shocks, and even the same model in different parts of the world might not have them, but this picture suggests that they might exist on this bike:

48964998063_bdc308c698_b.jpg


.
 
Not all models had those adjustable shocks, and even the same model in different parts of the world might not have them, but this picture suggests that they might exist on this bike:

48964998063_bdc308c698_b.jpg


.

If there's a rubber boot at the top of the shock (beneath the top eye), lift it and you will see a click-stop plastic wheel you turn for damping settings.
About as much use as a chocolate fireguard, but perhaps they worked when new. Another delightful habit they have is to retain road salt and moisture under the boot and corrode the alloy away to dangerous uselessness.

Well ill be danged. It is there. I wasnt expecting that. From the quick peak i took, it looked to be in decent shape so ill be checking that out a bit more when i get more time to put into this.

Right now the next phase is to reduce some unnessary wire lengths.

Appreciate that nugget of knowledge!
 
Those shocks look like Koni to me, is the logo not cast into the top collet ??
Not sure how I missed this, but I will take a look. Other than peaking on the dampers, I really haven't paid much attention to the shocks as I've been dealing with the cold weather (aka staying inside) and not really getting any work done with this other than getting it to run and idle without the choke on...

I should really pull it into the house and put it in the kitchen to work out my mess of wiring, though I don't think the wife would be too thrilled about that. Kids would love it, wife, no so much.
 
It's been too cold for me to go sit in the garage so I was able to pull the bike into the house after selling the dining room table lol. Now im digging into the wiring up front to shorten everything so I can run this without a fairing.
 

Attachments

  • FB_IMG_1585705506834.jpg
    FB_IMG_1585705506834.jpg
    97.2 KB · Views: 0
This forum has been a massive help to me on rebuilding this thing. I feel I've accomplished a lot with the warmer weather and self-induced house arrest.

As it sits now, it runs and drives on it's own and idles well. Haven't pulled the carbs off just yet or taken it on the road beyond creeping around the culdasac, but it all seems like it's working out. Obviously higher speeds and the work the engine needs to put in will dictate if there are any concerns there.

But for now, I'm continuing to work the headlights, tail, taillights and speedo. Then focus will shift more toward paint and aesthetics.

But for now, heres a photo and a link to this running. I know this is NOT everyone's style on here but it fits my personality and vehicle line up.

2iQGgoa[img]
 

Attachments

  • PSX_20200409_211140.jpg
    PSX_20200409_211140.jpg
    102.5 KB · Views: 0
Last edited:
Able to get this thing rideable. Took it for a test spin on two of the neighborhood roads to make sure its shifting through (at least three) gears and there aren't any funny vibrations or issues I can't feel when its just sitting in the garage. Anyway, heres a YouTube video of the tail and tail light I made. I have to relearn the flicker app to upload more than one photo, but I have attached a photo of what the front end looks like.

https://youtu.be/XImSbL-LPxE

IMG_20200510_101926_574.jpg
 
Thought I'd put the before and after pics next to each other. That's a very interesting look.

Able to get this thing rideable. Took it for a test spin on two of the neighborhood roads to make sure its shifting through (at least three) gears and there aren't any funny vibrations or issues I can't feel when its just sitting in the garage. Anyway, heres a YouTube video of the tail and tail light I made. I have to relearn the flicker app to upload more than one photo, but I have attached a photo of what the front end looks like.

https://youtu.be/XImSbL-LPxE

attachment.php


48965722362_4d21d57f2a_b.jpg
 
It's been too cold for me to go sit in the garage so I was able to pull the bike into the house after selling the dining room table lol..

I'm not crazy about exhaust tape, and I'd probably remove the engine guards as well, but I thoroughly approve of your workspace. Here's an idea: put the table in the garage. See how it likes the cold and dark.

asset (6).jpg

Please put the original year and model in your signature.
 
... I have to relearn the flicker app to upload more than one photo, ...
A comment and a question.
Comment: you can only upload one photo per post, but if you copy the IMG tag on Flicker and paste it here, you can LINK up to 10 per post.

Question: in your brake light video (nice-looking light, by the way :encouragement:) there is something vertical above the light that also looks like tail/brake light. Is that just a reflection or is there actually a different segment of the light?

.
 
Thought I'd put the before and after pics next to each other. That's a very interesting look.
Thanks! Haven't even looked back recently to see the big change other than what I see in my head. And it's definitely not everyone's cup of tea, and I get that. Also, can't make people drink your tea, which I learned from a fantastic youtube video. lol

I'm not crazy about exhaust tape, and I'd probably remove the engine guards as well, but I thoroughly approve of your workspace. Here's an idea: put the table in the garage. See how it likes the cold and dark.

Please put the original year and model in your signature.
Nah, we sold the table to make room for the bike... but actually because we are getting ready to move. Unfortunately had to pull the bike back out the next day because we came home and the house had a light smell of gas. Oops.

A comment and a question.
Comment: you can only upload one photo per post, but if you copy the IMG tag on Flicker and paste it here, you can LINK up to 10 per post.

Question: in your brake light video (nice-looking light, by the way :encouragement:) there is something vertical above the light that also looks like tail/brake light. Is that just a reflection or is there actually a different segment of the light?

.
Flickr changed the mobile app and won't allow you to copy the image link anymore through the phone, at least I haven't been able to find it or figure it out. So now, I am on the computer and I'll follow this post up with a big update to capture everything I can think of.

For the brake light, the undertail light is there, and designed to light up the road when I hit it. Plus side is that it is visible from behind the bike with the angle of the tail. However, I "ghosted" a light into the top tail so that it's only visible when I turn the bike on and it's really bright when I hit the brake. This way, if anyone in a car wants to say they couldn't see my brake light, well, I have this bright ass strip on the top center shining at your face...

Really, it was in the back of my mind as a secondary option. Once I got the undertail built, I didn't like how it wasn't crazy visible (was also using a sub-par power source) when standing behind the bike from 20 feet. Because function and safety are uppermost in my mind (though the bike doesn't look it) I decided to cut this strip in there.
 
Back
Top