S
seuadr
Guest
:edit: I decided to edit this first post here so people don't have to slog through to the second page to see the project.
i appoligize in advance for any spelling and grammar mistakes.
1982 GS1100G LED Fuel Gauge Project:
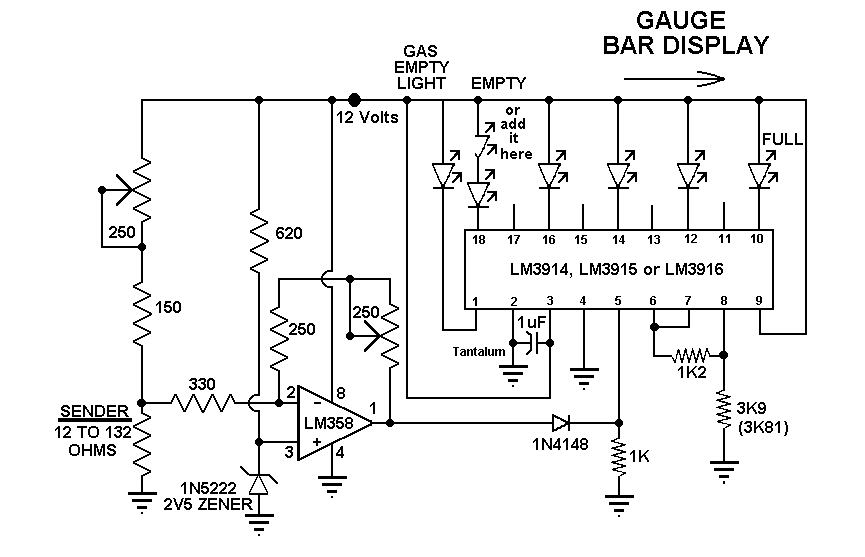
Foreward: the resistances and such represented here are specific to ranges my tank sending unit read out to, however, if you aren't looking for a very accurate fuel gauge, but rather, a tool to decide when to stop for gas, this should work for any sending unit that reads between 1-130ohms. mine read 2 at empty, but i decided to go with 12, as that would give me a little leway.
plus, there is a spot where something goes, so i figure, put something shiny in there.
Prep: I searched the internet, and stumbled on a website http://www.electro-tech-online.com .. they have TONS of schematics and people who are knowledgeable about electronics in general. they are like.. the gsresources of bread boards
having searched their site for a digital fuel gauge schematic, i came across this: http://www.electro-tech-online.com/...-me-build-gas-gauge.html?highlight=fuel+gauge
(page 5 has the schematic i am using)

hmm.. looks like what i need, it has the right resistance ranges.. it's cheap and already laid out. "I'll take it!"
(note, i am not responsible for designing this, nor am i guarenteeing it's functionality or safety. use at your own risk)
ok! off to radio shack i go!
My shopping list, at this point looks like this:
LM 3914 LED controller
LM 358 low op amp
Resistors:
1/2 watt: 380,330ohms
1/4 watt: 510,680,1.2,3.9k ohms
6-10 single bulb LEDs OR 10 LED Bar display
board to solder to
a note about resistors:
you are supposed to read the coloured bands to discern the resistance.
http://wiki.xtronics.com/index.php/Resistor_Codes
that link is an excellent resource for that purpose.
however, I am not very good at it, so i whipped out my volt meter, flipped it to the auto calculating ohms setting, and tested, then marked each set.
Next, i went looking for the controler chip and low op amp.. radio shack was clueless about them. I looked in the phone book under electronics supply, and found a company http://www.fultonradio.com/. They had what i needed, although the gentleman there ended up cross refrencing with different part number, i looked at the info dump for both chips and am satisfied they preform the exact same function.

I bought a cheap board from radio shack, they have a large selection to choose from, and as a second thought, 2 small aluminum heatsinks.. since i have no idea how hot these chips will get.
I don't currently have a soldering iron, but my buddy does, and he's much better at soldering than i am anyhow, so i'm going to have him to that work. I'll get pics of the circuit on the board before and after soldering when i get a little time to get out to his house and slap some hot metal on this thing!
i appoligize in advance for any spelling and grammar mistakes.
1982 GS1100G LED Fuel Gauge Project:
Foreward: the resistances and such represented here are specific to ranges my tank sending unit read out to, however, if you aren't looking for a very accurate fuel gauge, but rather, a tool to decide when to stop for gas, this should work for any sending unit that reads between 1-130ohms. mine read 2 at empty, but i decided to go with 12, as that would give me a little leway.
plus, there is a spot where something goes, so i figure, put something shiny in there.
Prep: I searched the internet, and stumbled on a website http://www.electro-tech-online.com .. they have TONS of schematics and people who are knowledgeable about electronics in general. they are like.. the gsresources of bread boards
having searched their site for a digital fuel gauge schematic, i came across this: http://www.electro-tech-online.com/...-me-build-gas-gauge.html?highlight=fuel+gauge
(page 5 has the schematic i am using)
hmm.. looks like what i need, it has the right resistance ranges.. it's cheap and already laid out. "I'll take it!"
(note, i am not responsible for designing this, nor am i guarenteeing it's functionality or safety. use at your own risk)
ok! off to radio shack i go!
My shopping list, at this point looks like this:
LM 3914 LED controller
LM 358 low op amp
Resistors:
1/2 watt: 380,330ohms
1/4 watt: 510,680,1.2,3.9k ohms
6-10 single bulb LEDs OR 10 LED Bar display
board to solder to
a note about resistors:
you are supposed to read the coloured bands to discern the resistance.
http://wiki.xtronics.com/index.php/Resistor_Codes
that link is an excellent resource for that purpose.
however, I am not very good at it, so i whipped out my volt meter, flipped it to the auto calculating ohms setting, and tested, then marked each set.
Next, i went looking for the controler chip and low op amp.. radio shack was clueless about them. I looked in the phone book under electronics supply, and found a company http://www.fultonradio.com/. They had what i needed, although the gentleman there ended up cross refrencing with different part number, i looked at the info dump for both chips and am satisfied they preform the exact same function.
I bought a cheap board from radio shack, they have a large selection to choose from, and as a second thought, 2 small aluminum heatsinks.. since i have no idea how hot these chips will get.
I don't currently have a soldering iron, but my buddy does, and he's much better at soldering than i am anyhow, so i'm going to have him to that work. I'll get pics of the circuit on the board before and after soldering when i get a little time to get out to his house and slap some hot metal on this thing!
Last edited:
")
 i meant the actual gauge on the cluster if it's analog looks very similar to a relay, the coils are charged based on the variable resistance of the sending unit and "attracts" the needle to one side or the other, depending on the fuel level. at least, the one i saw seemed to work that way. it was an analog gauge for a car, though, so motorcycles may be different. rather than calling it a relay, though, i guess i should have called it an electromagnetic coil.. there is no top end to distribute the power, just that, the actual switching mechanism of a relay reminded me of how that analog gauge worked.