• Required reading for all forum users!!!

    Welcome!
    Register to access the full functionality of the GSResources forum. Until you register and activate your account you will not have full forum access, nor will you be able to post or reply to messages.

    A note to new registrants...
    All new forum registrations must be activated via email before you have full access to the forum.

    A Special Note about Email accounts!
    DO NOT SIGN UP USING hotmail, outlook, gmx, sbcglobal, att, bellsouth or email.com. They delete our forum signup emails.

    A note to old forum members...
    I receive numerous requests from people who can no longer log in because their accounts were deleted. As mentioned in the forum FAQ, user accounts are deleted if you haven't logged in for the past 6 months. If you can't log in, then create a new forum account. If you don't get an error message, then check your email account for an activation message. If you get a message stating that the email address is already in use, then your account still exists so follow the instructions in the forum FAQ for resetting your password.

    Have you forgotten your password or have a new email address? Then read the forum FAQ for details on how to reset it.

    Any email requests for "can't log in anymore" problems or "lost my password" problems will be deleted. Read the forum FAQ and follow the instructions there - that's what we have one for...

  • Returning Visitors

    If you are a returning visitor who never received your confirmation email, then odds are your email provider is blockinig emails from our server. The only thing that can be done to get around this is you will have to try creating another forum account using an email address from another domain.

    If you are a returning visitor to the forum and can't log in using your old forum name and password but used to be able to then chances are your account is deleted. Purges of the databases are done regularly. You will have to create a new forum account and you should be all set.

About to clean carbs for the first time in my life

  • Thread starter Thread starter ekabil
  • Start date Start date
E

ekabil

Guest
Good morning,
well today my bike would not start (it did crank but wouldnt start) and since the only evidence that the carbs are clean is the PO's assurance, I feel like its about time to quit procrastinating and learn how to do this. The oil sometimes smells like gas, the choke seems to work better when its only half out and just acts strangely, and these things might be carb-related.

So, I have ordered a Morgan carbtune, the colour tune, and their carb tool.

In addition, I have ordered a full set of rings, intake boots, and fasteners from cycleorings.com. Also, I am planning to buy a set of four carb gaskets from Z1. I have also been advised to get the 5mm adapter from Z1 and will order it once I figure out if I need to order one of them or four of them.

Finally, I have ordered a set of #2 #1 and #0 JIS screwdrivers so I dont strip out any screws.

What other supplies will I need? I plan to get some carb dip from the local autoparts store. And hose to connect the fuel tank while it is off the bike. Anyone have any recommendations for this? Can I leave the vacuum line disconnected and set the petcock to PRIME? or will I have to get another long hose for the vacuum?

I need to make sure and cover every base here because it is my only form of transport. If anyone has done this and thinks there is anything else I need to find please tell me because once the carbs are off I am not going anywhere :)

Also, once all this stuff gets here, would someone mind sending me a PM with their number? I will be doing it on a weekend and if someone has some free time to answer any questions I might have it would be very much appreciated. I was very close to selling this bike until it started to work very well for the last two months. Luckily I have a couple weeks to work on it before I start my new job.

Thank you!
 
Give me a call as soon as you get the PM...I got a few min utes this AM..I had the same bike.
 
Hi babes.
Its really not that difficult...
If i can do it (about 20 times) you can do it...
Id recommend not splitting them as you can totally refurb them whilst still on the carb-rack.

Good luck.
Xxx
 
I use a radiator overflow tank from my local auto parts store, about $10. I use long zip ties to hang it from my handlebars to best simulate the level of the fuel tank (an important issue, as pressure on the needle and seats increases with height, it's a gravity thing). You just plug the vacuum line with a phillips screwdriver.
Walmart has the best price on the carb dip, less than $20.
You will want to replace those JIS screws with stainless steel allen screws. I do all of them, not only on the intake boots but also all of them on the carbs. JIS issue no longer an issue, and they look a lot cooler. But you will need a set of metric allen wrenches.
 
OK, let's comment on them as they happen:

Good morning,
well today my bike would not start (it did crank but wouldnt start) and since the only evidence that the carbs are clean is the PO's assurance, I feel like its about time to quit procrastinating and learn how to do this.
Very good attitude, I like it.

The oil sometimes smells like gas, the choke seems to work better when its only half out and just acts strangely, and these things might be carb-related.!
For the oil to smell gassy, you need to have problems with the petcock AND the carbs, so rebuilding the carbs might only solve half the problem.

It is quite normal for the "choke" to work best at less than FULL. Personally, it makes me cringe to hear a cold engine fire up and head to 4-5000 RPM on full "choke". I try to keep cold revs down to 2000-2500, if possible. Eventually, you will find that "sweet spot" on the "choke" lever that allows easy starts with minimal revs.

So, I have ordered a Morgan carbtune, the colour tune, and their carb tool.

In addition, I have ordered a full set of rings, intake boots, and fasteners from cycleorings.com. Also, I am planning to buy a set of four carb gaskets from Z1. I have also been advised to get the 5mm adapter from Z1 and will order it once I figure out if I need to order one of them or four of them.

Finally, I have ordered a set of #2 #1 and #0 JIS screwdrivers so I dont strip out any screws.
Wow, nothing like jumping in with both feet. :D All good choices. You will need FOUR of those brass 5mm adapters from Z1.
What other supplies will I need? I plan to get some carb dip from the local autoparts store. And hose to connect the fuel tank while it is off the bike. Anyone have any recommendations for this? Can I leave the vacuum line disconnected and set the petcock to PRIME? or will I have to get another long hose for the vacuum?
The favorite dip here is Berryman's, but if you can't find that, Gunk works just as well. One hose for the fuel will be fine. Turn the petcock to PRIme to fill the carbs, turn it to RUN to turn the gas off. Be sure to plug the hose to the vacuum port on carb #2 when you do this, or you will chase your tail trying to sync the carbs. One other suggestion: when you have the tank off the bike and feeding it with a longer hose, try to keep the tank about the same height as it would be on the bike. Not necessarily a "supply", but a tip: when you install the mixture screws, turn them out 3 turns from lightly-seated. This will act a bit as a "choke" by providing a richer mixture when you start it, and will give you a decent point from which to start your fine-tuning.

I need to make sure and cover every base here because it is my only form of transport. If anyone has done this and thinks there is anything else I need to find please tell me because once the carbs are off I am not going anywhere :)
Hopefully you can start this on Friday, the weekend of Labor Day. Depending on how nasty the carbs are (the bike is running, so they might not be too bad), we suggest dipping the carbs for up to 24 hours each. If you feel you can get by with about a 12-hour dip, you can dip one carb Friday night, another Saturday, the third on Saturday night, the fourth one on Sunday, then have the bike running Sunday evening, leaving Monday for fine-tuning and test rides. If you are able to put two carb bodies in the can of dip at the same time, it can be that much quicker, but I have never been able to fit two carbs in the can at the same time.

Also, once all this stuff gets here, would someone mind sending me a PM with their number? I will be doing it on a weekend and if someone has some free time to answer any questions I might have it would be very much appreciated.
PM will be sent in a few moments.


Id recommend not splitting them as you can totally refurb them whilst still on the carb-rack.
Yes, it is possible to "refurb" them by changing (SOME of the) o-rings and gaskets, but you really need to split the rack to change the o-rings in the fuel transfer tubes between the carbs. It is also MUCH easier to dip carbs 2 and 3 if they are not in a complete rack. The only downside to splitting the rack is the need to verify carb sync after re-assembly, but you already have the Carbtune on the way, so it doesn't matter.

.
 
soaked the final carb last night.

Each carb is connected to the next by a connector, for fuel I believe. THe passage I am talking about here is where the silver fuel tube goes, not the T-connector. Its the hole closer to the float bowl. There is a passageway in each carb, one opening is on the top (with the float bowl facing up, where the inlet / needle assembly goes), that splits into two lateral holes on either side of the carb. These holes are where the carbs connect to each other. They connect via the straight connectors, not T-connectors.

But on the fourth carb (and I'm assuming the first one as well) there isn't a "next" carb on one side, so the hole that would connect to the next carb is plugged. When I was cleaning the fourth carb I accidentally poked through this material (it was not very hard material). Then the Berryman's dissolved it anyway. long story short is that I am afraid that with this hole unplugged, fuel will gush out of the side of the carb.

It seems like I can't force air through the passageway (using my mouth) one one side of the fourth carb, while the other side can be blown through freely. But I want to be sure. Is this passageway plugged with something other than that material that dissolved away? Should I replace the material with something?
 
I didn't see any of these posts mention it quite this way, if you already know it, my apologies, but the Z1 adaptors come as a 4-piece set, #MP08-0013,, and it's also very handy advice (straight from Steve) to cut a 3/4" (or so) piece of 3/16" fuel line to use as a grip for screwing the adaptors in.
 
I do have the adapters but didn't know about the hose. Thank you.

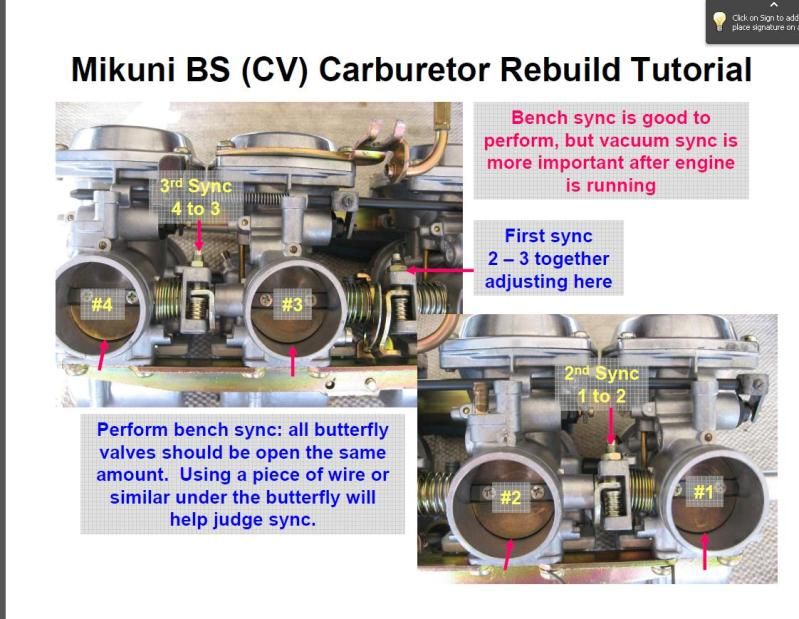
With bench sync, how close does it have to be? Just eyeballing it (ie hold the throttle open a bit and adjusting till it looks right) I have it so carbs 4 and 3 are airtight with the throttle closed. I test those by blowing into the butterfly part with them closed. But carb 1 makes a low whooshing sound and carb 2 makes a whistle when I blow into them with the throttle closed.

What does it all mean??? :) And is there a better way to bench sync?
 
get a paper clip, have them all seated to it, and your good to go
 
Can you explain? Would I use two clips, and adjust the two carbs so that both butterflies are seated on the clips?
 
each carb is individually adjusted, each butterfly is adjusted individually so that it's just sitting on the paper clip, or a small drill bit, needle etc....

if each butterfly is touching the paper clip the same amount then they will all be the same at the end

.
 
So just tO be sure, I take a paper clip and rest the butterfly on it, slightly open, on carb A. then on carb B I put another paper clip under the butterfly and adjust until it also is just resting on the clip?
 
each carb is individually adjusted, each butterfly is adjusted individually so that it's just sitting on the paper clip, or a small drill bit, needle etc....

if each butterfly is touching the paper clip the same amount then they will all be the same at the end

.
Hmm...isn't 2&3 adjusted by the same adjustment? Only 1 and 4 have individual sync adjustments.
 
Hmm...isn't 2&3 adjusted by the same adjustment? Only 1 and 4 have individual sync adjustments.

my bad sorry for that

sync.jpg
 
So just tO be sure, I take a paper clip and rest the butterfly on it, slightly open, on carb A. then on carb B I put another paper clip under the butterfly and adjust until it also is just resting on the clip?

It is rather hard to judge how hard the throttle blade is pressing on ANY object in there, whether it's a paper clip or a drill bit.
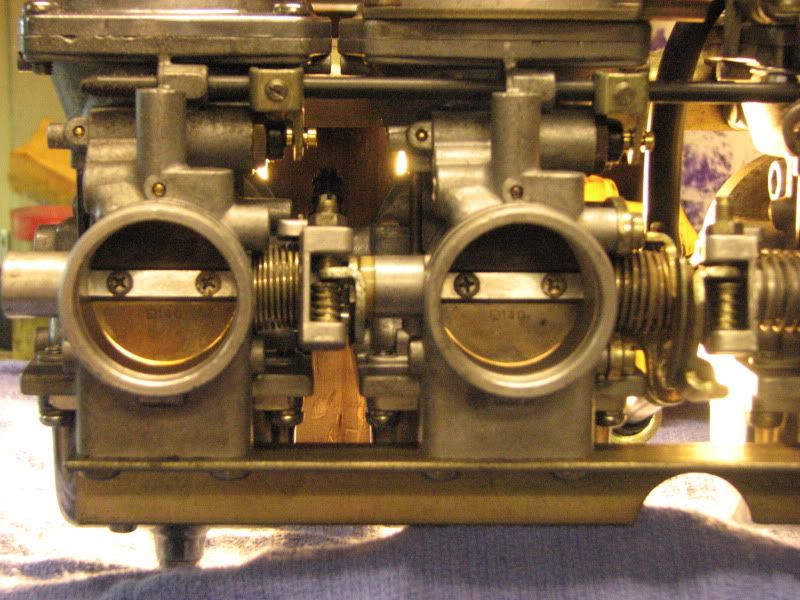
Personally, I use light shining through the carb to make my adjustments.

IMG_3451.jpg


Hmm...isn't 2&3 adjusted by the same adjustment? Only 1 and 4 have individual sync adjustments.
Actually, #3 is the "master" carb on the BS series (CV type) carbs, so the only "adjustment" you can do on it is with the idle speed control under the carbs. The sync adjustment between 2&3 will synchronize #2 to #3, but you have to be aware that #1 is slaved off the other side of #2, so any adjustment between 2&3 will also affect #1.

In case you did not know, the factory-recommended sequence is #2, #1, #4.

.
 
You don't need to spend a lot of time on the bench sync. A basic eyeball look is all you need since you will be vacuum syncing the carbs afterwards. People that don't vacuum sync are the ones that need to perform a detailed bench sync. BTW, the bike will never run up to it's proper level without a vacuum sync.

The connection passages you mention between the carbs allow fuel to move from the center on outward to the outer carbs. The outside carbs should NOT have an open passage. Maybe someone swapped out a carb and filled in the passage with glue or something. I believe you are correct that fuel is going to spill. Best to take another look at this detail.
 
I did not know that, though I haven't gone through the procedure on BassCliffs website either. I was just looking at a set of extra crabs I have and saw what you are talking about. So I more or less start with #3 and set it at its highest point on the sync tool then adjust the others as needed.

It is rather hard to judge how hard the throttle blade is pressing on ANY object in there, whether it's a paper clip or a drill bit.
Personally, I use light shining through the carb to make my adjustments.

IMG_3451.jpg


Actually, #3 is the "master" carb on the BS series (CV type) carbs, so the only "adjustment" you can do on it is with the idle speed control under the carbs. The sync adjustment between 2&3 will synchronize #2 to #3, but you have to be aware that #1 is slaved off the other side of #2, so any adjustment between 2&3 will also affect #1.

In case you did not know, the factory-recommended sequence is #2, #1, #4.

.
 
on the outside facet of carb #4 there is an opening, which was covered by some kind of sealant, that dissolved away when the carb was dipped. With the carb off the rack and dissasembled it was possible to blow air through the opening on one side (the side facing carb #3) but not the other side. Perhaps the opening is sealed on the outside facet but somewhere deeper in the tube, not on the surface or not easily visible. I will cover it with epoxy anyway. Gasoline will not dissolve epoxy, right? Or should I use something else, maybe JBweld?

I replaced every screw on the carb bodies to hex or allen head socket-type bolts. And I replaced the ones on the two gang bars as well. This is investment in the future :)

I think the throttles are bench synced fairly well. I do have a carbtune from morgan, and adaptors, but first I need to clean up the valve buckets from a previous "adventure" in motorcycle maintenance. hmm I had a carb question but I forgot it. ill add it in later
 
Question...when you take the plug out of the idle mixture screw space, is it best to pop another type of plug in there after one is done with the syncing? You know to keep curd from settle in there and freezing up the screw at some time. Maybe a rubber plug or?
 
Question...when you take the plug out of the idle mixture screw space, is it best to pop another type of plug in there after one is done with the syncing? You know to keep curd from settle in there and freezing up the screw at some time. Maybe a rubber plug or?

I suppose you could if you want to. I don't think it necessary though. I've never heard of anyone replacing it. They were there to keep people from messing with them. :)
 
Back
Top