• Required reading for all forum users!!!

    Welcome!
    Register to access the full functionality of the GSResources forum. Until you register and activate your account you will not have full forum access, nor will you be able to post or reply to messages.

    A note to new registrants...
    All new forum registrations must be activated via email before you have full access to the forum.

    A Special Note about Email accounts!
    DO NOT SIGN UP USING hotmail, outlook, gmx, sbcglobal, att, bellsouth or email.com. They delete our forum signup emails.

    A note to old forum members...
    I receive numerous requests from people who can no longer log in because their accounts were deleted. As mentioned in the forum FAQ, user accounts are deleted if you haven't logged in for the past 6 months. If you can't log in, then create a new forum account. If you don't get an error message, then check your email account for an activation message. If you get a message stating that the email address is already in use, then your account still exists so follow the instructions in the forum FAQ for resetting your password.

    Have you forgotten your password or have a new email address? Then read the forum FAQ for details on how to reset it.

    Any email requests for "can't log in anymore" problems or "lost my password" problems will be deleted. Read the forum FAQ and follow the instructions there - that's what we have one for...

  • Returning Visitors

    If you are a returning visitor who never received your confirmation email, then odds are your email provider is blockinig emails from our server. The only thing that can be done to get around this is you will have to try creating another forum account using an email address from another domain.

    If you are a returning visitor to the forum and can't log in using your old forum name and password but used to be able to then chances are your account is deleted. Purges of the databases are done regularly. You will have to create a new forum account and you should be all set.

Couple Carb Questions- GS850

  • Thread starter Thread starter nanoluxx
  • Start date Start date
N

nanoluxx

Guest
Hey guys, I'm completely new to motorbikes and I took on this GS850 as a learner project. I bought it not running... did the basic clean up maintenance and got it to run in a throttled state. (wouldn't idle without stalling) I asked around and everyone suggested I needed to rebuild my carbs. Here I am, have everything swapped out but I have a few problems / concerns.

First, while working on the carbs I found a weak part in the metal and it broke off without much effort. To the untrained eye it does not look like it will cause any kind of leak but I wanted to make sure it does not need replacing. Here is a couple photos:

IMG_7710.jpg


Note: In this second photo you can see the cap piece does not fit snug against the broken area regardless of if it was there. The pressure of the screws make the seal downward, not outward to the wall (wall that is not there anymore)
IMG_7712.jpg


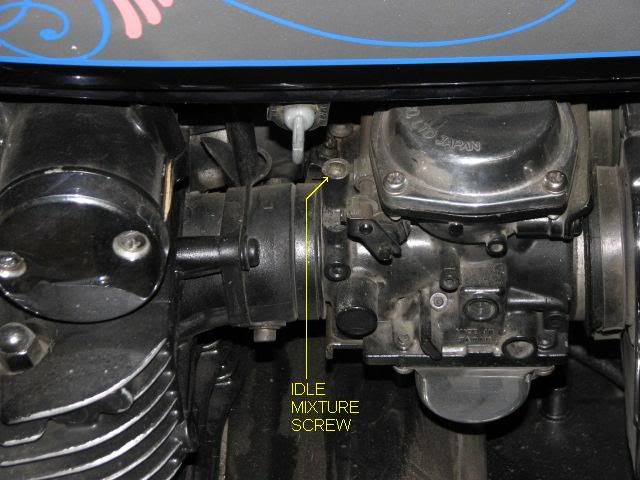
Another issue is while cleaning, I noticed a hole that when I spray carb cleaner in, it comes out of a another hole. This happened on 3 out of 4 of my carbs.. but one remains clogged. I tryed letting carb cleaner sit in the hole for a while as well as poking small objects into it to try and free whatever was causing the block. Any ideas? Here is the hole im talking about:

IMG_7709.jpg


Last, I could not find any info on how far to screw any of my jets in. Any info on this would be most apprieciated!

Thanks,
jayson-
 
Greetings and Salutations!!

Greetings and Salutations!!

Hi Mr. nanoluxx,

There's lots of GS850G lovin' on my website and here's a ton of info to get you started. It's just how I say, "HOoooooowwwDY!"

Here is your very own magical, mystical, mythical, mind-expanding "mega-welcome". Please take notice of the "Top 10 Common Issues", the Carb Rebuild Series, and the Stator Papers. Now let me roll out the welcome mat for you...

Please click here for your mega-welcome, chock full of tips, suggestions, links to vendors, and other information. Then feel free to visit my little BikeCliff website where I've been collecting the wisdom of this generous community. Don't forget, we like pictures! Not you, your bike! :D

Thanks for joining us. Keep us informed.

Thank you for your indulgence,

BassCliff
 
I'm thinking you need to look into getting a can of carb dip, instead of using spray cleaner. Just about everyone here will tell you that you can't get 'em clean enough without it. Look for Berryman's at Autozone of some such. If a night in the can doesn't clear that, then you need to start something non-chemical, like poking with a stiff wire.

About that material that broke off: I'm pretty sure the float bowl gasket will still seal with no problems.

The carb rebuild series Cliff mentioned should answer your other questions.
 
About that material that broke off: I'm pretty sure the float bowl gasket will still seal with no problems.
***edit***
My thoughts also, but is the post in the bowl broken off?
when that post broken off it can't keep the rubber plug covering the jet in place.
 
Just a tip that I learned on small orifice passages that turn.
Try using different size fishing line to clean them out. ;)

Eric
 
Its an 83' GS850G. I will try the dip cleaner and I agree with the seal of the broken part. Shouldn't be a problem. Thanks for your help guys!

I'm still not sure if I'm setting any of my jets correctly. I looked through the carb rebuild guides on BassCliffs site and my own bike guide but could not find anything to educate myself sufficiently. Some more help with this would be great.

Thanks again,
jayson-
 
Oh, I did find the specs for my year carb but I'm not sure how to interpret the numbers. Sorry for such an armature question but how do I apply these to my carb.

-- Thanks BassCliff:

[SIZE=+1]1980-83 GS850 Carburetor Specs and Float Height Illustrations[/SIZE]

Measurements = mm (in.)
Carburetor type = Mikuni BS32SS
Bore Size = 32 (1.26)
I.D. No. = 45110
Idle rpm = 1050 +/- 100rpm
Fuel Level = 5.0 +/- 0.5 (0.20 +/- 0.02)
Float Height = 22.4 +/- 1.0 (0.88 +/- 0.04)
Main Jet = #115
Main Air Jet = 1.7
Jet Needle = 5D50
Needle Jet = X-5
Pilot Jet = #40
Bypass = 1.0, 0.8, 0.8
Pilot Outlet = 0.7
Valve Seat = 2.0
Starter Jet = #32.5
Pilot Screw = Preset (actually, these can be adjusted - start with about 2 turns out from lightly seated)
Throttle cable play = 0.5-1.0 (0.02-0.04)
 
Hi,

In the above chart, American measurements in inches are in the parentheses () and the metric measurements are not - millimeters.

If all of your needles and jets are stock parts then the only number you really have to worry about is the float height. Instructions for setting the float height are on my website. This is assuming that you have also cleaned the snot out of your carbs using the proper procedure and then performed a bench sync. Instructions for those are also on my website.


Thank you for your indulgence,

BassCliff
 
They are not stock. I swapped them with a rebuild kit. All my jets are new, aftermarket.

So my Main Air Jet should be set at 1.7mm, does this mean I screw it down 1.7mm or 1.7mm up from being seated.. and how do I measure this?

-

I have read both the float height and sync guides and plan to execute both when the time comes. I have a vacuum sync'r on its way from a fellow board user.

jayson-
 
So are you suggesting that as long as all my pieces match up, the only part I have to be worried about how deep/shallow I screw it in is the Pilot Screw? ("start with about 2 turns out from lightly seated")

jayson-
 
They are not stock. I swapped them with a rebuild kit. All my jets are new, aftermarket.
Do you still have all your old jets? I hope so. You might get lucky and find that the aftermarket ones will work OK, but too many times, they are sub-standard quality and do not match the jets they are intended to replace.

As for how to set your jets? Easy. Anything that's inside the carb gets snugged up so it won't move. That includes the main jet to the emulsion tube and the pilot fuel jet that lives right next to it. By the way, how do the rubber plugs fit? They should be soft enough to seal that hole, and should definitely be installed. The pilot air jet lives in the intake of the carb, at about the 8 o'clock position, it should also be snug. The only adjustable part of the carb is the idle mixture adjustment screw, the one on top of the outlet. Start with that one between two and three turns out from lightly seated. Once the engine is running and warmed up, you can fine-tune those screws for highest engine speed, then reset your idle back to specs.

.
 
Last edited:
Do you still have all your old jets? I hope so. You might get lucky and find that the aftermarket ones will work OK, but too many times, they are sub-standard quality and do not match the jets they are intended to replace
.

I do have the ones i took out. If they compare correctly should I stick with the newer ones? Or say o well with the aftermarket kits I purchased and stay with the old ones if they seem undamaged?

The rubber plugs seem to be in good shape and fit well.

The only adjustable part of the carb is the idle mixture adjustment screw, the one on top of the outlet.

the top of the outlet? i'm not sure where this part is.

jayson-
 
nanoluxx said:
the top of the outlet? i'm not sure where this part is.

They are more accurately called "mixture screws". You may have to remove the caps to adjust them. The EPA didn't want us messing with them. But we showed 'em. ;)

007_AIR%20SCREW%20LOCATION.jpg


The above picture is from the Carb Rebuild series. Haven't you read it yet? :confused:

Thank you for your indulgence,

BassCliff
 
I do have the ones i took out. If they compare correctly should I stick with the newer ones? Or say o well with the aftermarket kits I purchased and stay with the old ones if they seem undamaged?
The rubber plugs seem to be in good shape and fit well.

the top of the outlet? i'm not sure where this part is.
Many times the holes are not the right size, so if it says "115" it might actually be the equivalent of a 113 or a 117 or ... who knows what? It's that 'who knows what' part that is scary. As a rule, brass jets don't wear out, they just need a good cleaning. go ahead and keep your new parts in there, but if it does not run right when you are done, those would be the first things to suspect. There is always the chance that you got a fluke set that are actually accurate.

Where is the "top of the outlet"? Right here:
IMG_2958.jpg


.
 
Finally have the carbs clean, rebuilt, to specs, bench sync'd, and installed. Tomorrow I'm putting the airbox back on and hopefully finishing my gas tank. So far I have the rust and old paint ground off.. a few ruff spots bondo'd and sanded. I'm hoping my order of Por-15 comes in tomorrow so I can clean out the inside. Then all I'll need is a quick primer coat to seal it and I can put the tank on to test the bike out! Later on when I can afford fancy paint I'll sand it, re-primer, and paint for real.

If I can get it to crank and stay at a consistent idle hopefully I'll be vacuum syncing by mid week.

I'm pretty excited.
 
Excited, Im sure..

Did you go with the stock jets or are ya donna do some aftermarket stuff?
What about the petcock, do anything with that?

I dont think I could wait to finish that tank to start it up.

Just curious cause Im about to go through my carbs as soon as I get all the parts, jets and gaskets. Already got the O-ring kit from Mr Bar and also did the intake o-ring.
After removing the carbs I noticed that one of the vacume line werent connected to where ever its supposed to connect. Im thinking there must be a T connector linking two lines to the airbox instead of the one that was connected. Might have been most of my problem cause the carbs sure aint dirty. The jets look pretty mared up though and dang sure cant see the size on 3 outa 4 of em. Who knows, they may not even be the same size, lol..

Keep us posted!!
 
Finally have the carbs clean, rebuilt, to specs, bench sync'd, and installed. Tomorrow I'm putting the airbox back on and hopefully finishing my gas tank. So far I have the rust and old paint ground off.. a few ruff spots bondo'd and sanded. I'm hoping my order of Por-15 comes in tomorrow so I can clean out the inside. Then all I'll need is a quick primer coat to seal it and I can put the tank on to test the bike out! Later on when I can afford fancy paint I'll sand it, re-primer, and paint for real.

If I can get it to crank and stay at a consistent idle hopefully I'll be vacuum syncing by mid week.

I'm pretty excited.

Please don't get in to big of a hurry. Follow the directions on the por-15 to the letter. Let it dry completely and throughly.
It wasn't really planned this way but, when I por-15'd my tank, it sat for about two weeks before I ever put gas in it.:)
 
Back
Top