I picked up a 1977 GS750 with 23k miles a few weeks ago. I immediately had some electrical issues so I tackled those first by rewiring the positive side, installing a new blade type fuse, and a creating a single grounding point. I plan to add some relays and create 3 separate circuits (ignition, lights, and signals) but before I spend effort on that, I wanted to take a look at the fuel system.
I quickly found my petcock was only working occasionally, and when it wasn't working, it was letting fuel run into the carbs. I've since pulled the tank and removed the petcock, and I'm currently awaiting a new one from Z1 (shipped out today!).
I glanced inside my tank and found rust. I'd say it looks like "day 3" in this pic:
http://www.mopedarmy.com/mediawiki/images/5/54/Five_day_vinegar_tank.jpg
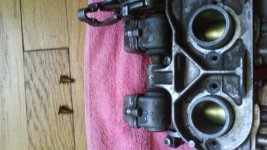
So my plan for this weekend is to try rust removal by electrolysis. I've never done anything like this before but I've read some good links on the subject. I also plan to pull the carbs off and begin cleaning them. I'll also take note of the jet sizes, as the bike came with pods and I have little confidence that it's been jetted correctly. After cleaning, I'll bench sync them. I also have a carb sync tool on the way so I can vacuum sync after reinstalling. I'll also take a look at the boots and O rings. Any other parts of the fuel system need to be looked at? Between the tank, petcock, and carbs, I think I'm covered.
My last goal for the weekend is to change the oil (assuming it's full of fuel; haven't look) and check valve clearances. Again, a very new concept for me (the Nissans I used to work on all had hydraulic adjusters) but I've read many write ups and threads on the subject. So hopefully by Monday I can order any necessary carb parts (jets, O rings, etc) and shims.
I'm taking the MSF riding course in three weeks, after which I'll be able to get a license. My goal is to have the bike up and running with all the basic maintenance items checked off by then. I know there's a lot more to be done, but I want to at least do a compression check and stator and R/R check before putting any more time and effort into this thing.
I quickly found my petcock was only working occasionally, and when it wasn't working, it was letting fuel run into the carbs. I've since pulled the tank and removed the petcock, and I'm currently awaiting a new one from Z1 (shipped out today!).
I glanced inside my tank and found rust. I'd say it looks like "day 3" in this pic:
http://www.mopedarmy.com/mediawiki/images/5/54/Five_day_vinegar_tank.jpg
So my plan for this weekend is to try rust removal by electrolysis. I've never done anything like this before but I've read some good links on the subject. I also plan to pull the carbs off and begin cleaning them. I'll also take note of the jet sizes, as the bike came with pods and I have little confidence that it's been jetted correctly. After cleaning, I'll bench sync them. I also have a carb sync tool on the way so I can vacuum sync after reinstalling. I'll also take a look at the boots and O rings. Any other parts of the fuel system need to be looked at? Between the tank, petcock, and carbs, I think I'm covered.
My last goal for the weekend is to change the oil (assuming it's full of fuel; haven't look) and check valve clearances. Again, a very new concept for me (the Nissans I used to work on all had hydraulic adjusters) but I've read many write ups and threads on the subject. So hopefully by Monday I can order any necessary carb parts (jets, O rings, etc) and shims.
I'm taking the MSF riding course in three weeks, after which I'll be able to get a license. My goal is to have the bike up and running with all the basic maintenance items checked off by then. I know there's a lot more to be done, but I want to at least do a compression check and stator and R/R check before putting any more time and effort into this thing.