• Required reading for all forum users!!!

    Welcome!
    Register to access the full functionality of the GSResources forum. Until you register and activate your account you will not have full forum access, nor will you be able to post or reply to messages.

    A note to new registrants...
    All new forum registrations must be activated via email before you have full access to the forum.

    A Special Note about Email accounts!
    DO NOT SIGN UP USING hotmail, outlook, gmx, sbcglobal, att, bellsouth or email.com. They delete our forum signup emails.

    A note to old forum members...
    I receive numerous requests from people who can no longer log in because their accounts were deleted. As mentioned in the forum FAQ, user accounts are deleted if you haven't logged in for the past 6 months. If you can't log in, then create a new forum account. If you don't get an error message, then check your email account for an activation message. If you get a message stating that the email address is already in use, then your account still exists so follow the instructions in the forum FAQ for resetting your password.

    Have you forgotten your password or have a new email address? Then read the forum FAQ for details on how to reset it.

    Any email requests for "can't log in anymore" problems or "lost my password" problems will be deleted. Read the forum FAQ and follow the instructions there - that's what we have one for...

  • Returning Visitors

    If you are a returning visitor who never received your confirmation email, then odds are your email provider is blockinig emails from our server. The only thing that can be done to get around this is you will have to try creating another forum account using an email address from another domain.

    If you are a returning visitor to the forum and can't log in using your old forum name and password but used to be able to then chances are your account is deleted. Purges of the databases are done regularly. You will have to create a new forum account and you should be all set.

Idle mixture screw problems

  • Thread starter Thread starter spwalker09
  • Start date Start date
S

spwalker09

Guest
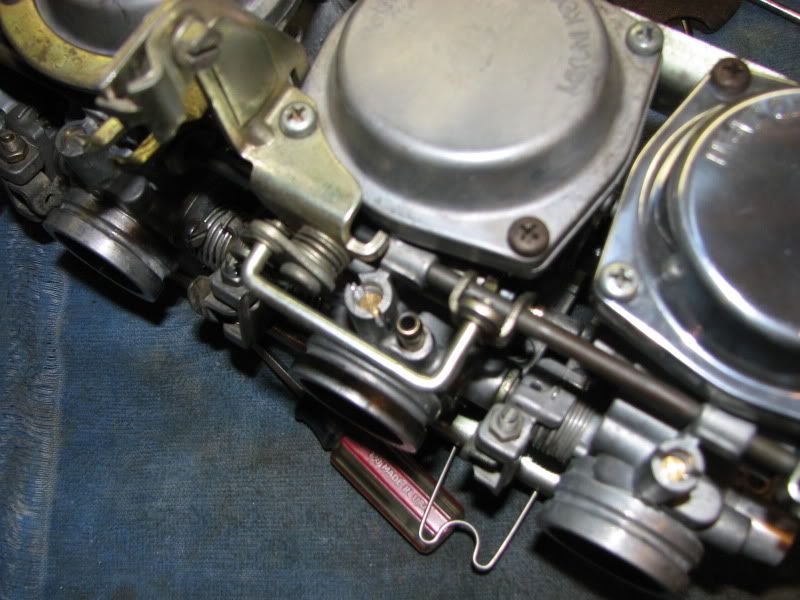
In finishing the last carb during my jet kit install, I found that the #1 idle mixture screw is stuck. Even carefully following Nessism's carb tutorial hasn't netted me any success so far. The other 3 worked fine. This was (ironically) the last thing I had to do before slapping the carbs back on the bike, and now I'm in a bind.

Once I found the idle mixture screw was stuck, I stopped, and hit the screw with some PB. When that didn't work I went to heat + PB. I tried to work it back and forth from the stock setting. I've been able to get it about 1/4-1/2 turn out from stock, but as a result of my trials, the screw is somewhat stripped, and I'm reluctant to keep going forward. FWIW, I drilled out the caps over the idle screws, so these screws were at the stock setting and haven't been messed with

-Can I drill out the idle mixture screw and replace it?

-Can I leave it as is and run the bike that way? Anyone know what the stock setting is?

I'm going to pod filters and a 4-1 exhaust with stage 3 jetting

-Any other suggestions?
 
I would keep working that screw back & forth slowly using PB & heat untill it's removed.

Might take a while, but IMO that's the best scenario. Use (procure) a screwdriver that fits the slot perfectly - bring one of the others to the hardware store & match up the perfect driver... this will mininize/eliminate stripping the head. If all else fails, those screws are still available, it's the tiny washer & o-ring that are hard to replace.

I see you're local to me, I have a tap for that thread if you need it - bring the carb body my way & we can re-tap if necessary.

Hopefully you've dipped & cleaned those carbs recently, and usd new o-rings too. I would think the stock idle settings will have to be changed with the opds & pipe set-up.

Good luck,

mike
 
I had some similar problems on mine when i first started working with them. I ended up just leaving the carbs soaking in some carb cleaner for nearly a week. When I went to take it out it came out as smooth as butter. If you don't have the time to do that then you can try putting it all back together the way it is and see how it runs, but if it doesn't work right then you'll have to pull them down again.
 
I had bought carb dip and an o-ring kit in preparation for the jet kit install because it's been echoed so many times before that they're essential to a proper running bike.

BUT

When I took the carbs apart to install the kit, it was pretty clean in there. I've been running seafoam in the tank over the past year of my ownership (maybe that helped?) and the bike has been running great over the past year - no breakdowns or erratic running. So, I second-guessed myself on doing the carb dip because I didn't want to mess with it during riding season (part of the Newbie mistakes I know...) and figured I'd save it for another teardown during the off season. I didn't see how a carb dip could loosen the the pilot screws, but this is what the forum is for right?

Mike - I appreciate the offer. I'm not too far from you (I live in Manchester) so I would gladly take you up on that offer if all doesn't pan out
 
You can always try filling just the idle-screw cavity with carb dip & see if it loosens it up. Just be aware that the dip will eat rubber, so the o-ring might be toast if you go that route... but sounds like you have a replacement.

Agreed, if the bike is running well, then perhaps the carb dip isn't needed yet.

Might as well adjust the valves while you're at it too.

If you need help with anything let me know - i have a Morgan Carb-Tune also, if you want to sync the carbs when you're finished...
 
Before you go to drilling and re-tapping, break out your Dremel tool with a large cut-off wheel. make a cut down the tower and into the top of the screw, making a nice, fresh slot for your screwdriver.

Here is what it will look like when you are done. It does not affect normal operation at all. You can see that both of these towers were slotted.
If you can turn the screw so the slot aligns with the angle of the cutting wheel, you don't have to cut quite as deep in the screw, and will have a stronger bite.

IMG_4081.jpg


Oh, yeah, you asked about "normal" settings. Most of us will start with the screws about 3 turns out from lightly seated, as a starting point, then slowly turn the screws in until the engine stumbles a bit and back the screw out about 1/4 turn. Repeat for the other carbs. You may end up between 2 and 2 1/2 turns out, but also be aware that it might be just a bit different for each carb.

.
 
Excellent suggestion, Steve...I may give that a try!

I was asking about stock settings to see if that info was available, so that I would know the approximate position of the mixture screw in the stock position - that is where my mixture screw is currently set. In hindsight, I should have counted with the other ones, but then again I didn't know I would run into this problem...lol.

If anyone knows where the factory settings for the mixture screw on these carbs are, I would appreciate it...I would just like to know where the screw currently is (since I cannot currently seat it due to it being stuck) and I would have a starting point for my "3-turns-out" setting
 
The stock settings were done at the factory, using special equipment that never left the factory and was not even available at any dealer. They were set to meet the US EPA regulations, so were rather lean. That is probably the biggest factor in all of the "cold-blooded" bikes that were so common in the era. Simply richening up the idle mixture makes them easier to start and you can actually get them off "choke" and ride sooner. Personally, I think that does more to help emissions than a lean mixture screw setting.

Because each carb was set on this special machine, then sealed, the stock settings were never published, because it might be different for each individual carb. In general, though most of them were in the 1 to 1 1/2 turn range.

You said "...I would just like to know where the screw currently is (since I cannot currently seat it due to it being stuck) and I would have a starting point for my "3-turns-out" setting". It does not matter at all where the screw is set now, because the "three turns out" is not from where the screw is now, it is from "lightly-seated", or "fully IN". When you get your carbs completely cleaned and get the new o-rings on your new mixture screws (these will be buggered enough you might not want to use them), put a drop of oil on the o-ring, turn the screw in until it very lightly bottoms out. I will back up half a turn and do it again several times, just to make sure I have not simply bound up the o-ring on a thread or something. When I am satisfied that it is indeed the bottom of the travel, back out three full turns.

.
 
So far, working it with heat and PB has netted me this. Not making any progress, so I have stopped again. I'm wondering if the worked brass has wedged itself against the wall, preventing any more turns, or if Steve's suggestion of cutting another slit will work (is there enough meat left?). Have I really buggered myself or what...

d855180b.jpg
 
Clean it out good with some solvent cleaner, blow out all the crud, and fill the hole with carb dip over night. See if in the morning it makes a difference.

I assume your applying heat to the carb body adjacent to screw, and not to the screw itself?

Make certain your screw driver head fits that slot firmly (grind the slot to make it fit if need be). It doesn't look too bad yet. Sometimes I take a hammer & firmly whack the driver head into screw head to help it loosen up.

Good luck, keep at it. I will come out eventually.
 
yessss, take your time with things like that, one thing i learned over the years with stuck bolts and such, time and patience are key,like the others said.let em soak,1-2 days is worth having to buy another carb body from someone hehe.squirt it in, let it sit,1-2 hrs, hit it with heats,spray again, as it cools it draws the juice in.let it cool refill let it sit do it again.And the dremel thing helps also if it gets that far.I like to use a 4 in 1 screwdriver, very stout bits on those.
 
and again and again, sometimes takes awhile, patience and persistence,if it doesnt screw out easy keep heating and sparaying, it will eventualy,most times.
 
I had the same problem on my #1 carb, and had to do what Steve suggested. It worked pretty well. You may not have another choice

Also, I had another one where I tried to drill it out, and used an extracting bit. I would up cracking the carb body
 
Yup I'm being patient with this thing, still not coming out. My biggest fear/concern is that I'm making it worse with every try that doesn't loosen it. Also, I mentioned it earlier (in my post w/ the pic of the screw) that I may not have enough body left to dremel another slot. IDK, maybe I'm being too cautious, but the constant heat + PB (soaked it over the weekend, didn't help), carb cleaner, pounding the driver in to break it up, etc. isn't helping much, at some point I gotta question if I'm making it better or worse...
 
Looks like you got a real stubborn one there... no fun for sure.

Here's a couple more things to try before you surrender & slice a slot like Steve suggested.
What are you using for a heat source? The object is to heat the aluminum up to "expand" the hole, thus breaking the corrosion between the screw & body (the alum & steel have different thermal expansion rates). The carb body is a pretty good heat sink, so a fair amount of heat is needed. A heat gun will not work, but a propane torch should do the trick.

I have had very good luck using a homemade brew of 50/50 acetone & Marvel Mystery Oil. Use it in place of PB Blaster. Just be careful if you use the torch with the acetone.

On the backside of the screw (inside the carb throat ID), is a very small hole - this is the fuel port that that idle screw regulates. Try and get a squirt of PB (or above homemade brew) in there & hopefully it will start working on the threads from that end as well.

I have also used the end of a small hardened file to "scrape" the screw slot deeper to get a better grip with my screwdriver. The screwdriver needs to fit that slot as tight as possible.

Good luck. As I stated before, if you need to re-tap that hole I have that tap.
 
Last edited:
Ah...I have been using a heat gun, I will try using a propane torch - thought that might be overkill, but may be the key!
 
Ah...I have been using a heat gun, I will try using a propane torch - thought that might be overkill, but may be the key!

Heat guns don't have enough oomph...

A plumbers torch is handy to have for these types of things. Just be prepared to put out any fires you may start... I keep a fire extingusher (or bucket of water) close by when I'm using mine. Course, I'm a klutz...

Put the carb in a vise & locally heat the body section up adjacent to the screw, not the screw itself. Make sure you get it good & hot - aluminum doesn't turn red as it gets hot so don't wait for that ;). Remove the heat & quickly (while it's hot) try to turn the screw head.

Be patient, it may require several rounds of PB & heat.
 
Had some time late last week to get to it...

The screw can turn clockwise w/ heat, but stops at the point it has been, and looks like the threads might be a bit boogered around there so I think that's the smoking gun.

Saying WTH...I put the carbs on the bike and she fired up and idled fine. I think I'm close enough, but once I get the brake lines hooked back up I can take it for a spin to see what tuning lies ahead. I suppose if its gonna be an issue, we can chase the threads above the screw, or wait until I tear down the carbs in the winter and give them a through once-over.

Thanks again for your help! (for now lol...)
 
As I stated before, if you need to re-tap that hole I have that tap.

HiJack:
What size is the tap? I ended up using a left-handed drill bit to get one of mine out successfully, but would like to clean up the threads before I attempt to put the new part in there.

Thanks!
 
Just for reference, hikermikem confirmed that the tap size is m6x0.5.
 
Back
Top