• Required reading for all forum users!!!

    Welcome!
    Register to access the full functionality of the GSResources forum. Until you register and activate your account you will not have full forum access, nor will you be able to post or reply to messages.

    A note to new registrants...
    All new forum registrations must be activated via email before you have full access to the forum.

    A Special Note about Email accounts!
    DO NOT SIGN UP USING hotmail, outlook, gmx, sbcglobal, att, bellsouth or email.com. They delete our forum signup emails.

    A note to old forum members...
    I receive numerous requests from people who can no longer log in because their accounts were deleted. As mentioned in the forum FAQ, user accounts are deleted if you haven't logged in for the past 6 months. If you can't log in, then create a new forum account. If you don't get an error message, then check your email account for an activation message. If you get a message stating that the email address is already in use, then your account still exists so follow the instructions in the forum FAQ for resetting your password.

    Have you forgotten your password or have a new email address? Then read the forum FAQ for details on how to reset it.

    Any email requests for "can't log in anymore" problems or "lost my password" problems will be deleted. Read the forum FAQ and follow the instructions there - that's what we have one for...

  • Returning Visitors

    If you are a returning visitor who never received your confirmation email, then odds are your email provider is blockinig emails from our server. The only thing that can be done to get around this is you will have to try creating another forum account using an email address from another domain.

    If you are a returning visitor to the forum and can't log in using your old forum name and password but used to be able to then chances are your account is deleted. Purges of the databases are done regularly. You will have to create a new forum account and you should be all set.

New GS700E owner !

  • Thread starter Thread starter Gargoyle081
  • Start date Start date
Whoa... sorry boss. I didnt intend to offend you but I have a ton of info going back and forth on here.....I did go out and take a look at the bike after reading your post earlier and then got consumed by alot of other responses and possible solutions... The only screws I saw in the location that you described are phillips head screws that screw into the motor.They have no caps on them but appear to have at one time. There is one screw per cyl. it seems. Are these the ones you meant? If so I did not move these screws at all for any reason.....Dont mistake me as ungrateful for forgetting to answer your question. Im just trying to soak up everything that everyone is saying and trying to learn
 
Last edited:
here's what the screw looks like:
2277901281_021a16bd5a.jpg

2277903877_5ee21454d9.jpg


make sure there is no cap on that. if so, drill the hole out a little bigger and screw in a screw and pull it out. lightly seat it by turning it to the right and then back it out 2 turns. get the bike running and try to let it idle. if it does, keep turning all four screws out until the RPMs stop rising, then turn it in 1/8 to a 1/4 turn.

another way to do it is to get a colortune, tune your carbs, then come over my house and tune mine.:shock::-D
 
Last edited:
There are in fact plugs in those holes on my bike.....I am gonna pull the carbs off again tomorrow after work...I'll grab the air filter on my way home as well. I have been reading and I remember putting the intake boots on with the old o-rings. I ordered the o-rings, and new bolts earlier today as suggested in the links several posts back....I didnt like those phillips heads anyways...and it will make me feel better knowing I replaced the simple inexpensive things that make a difference. I should have my parts by thurs. so just in time for a good friday night in the garage putting it all back together. Does anyone here have an easier way of getting the carbs back between the intake boots and the airbox boots?..I mean it probly took me an hour to wrestle that thing back in there last time,getting all the boots on well enough to seal everything up tight...
 
easiest way is to take the airbox off. i dont know if your airbox is like mine, not likely, but if you can loosen the bolts and tilt it back might be easier.

and if you go to pepboys for the filter, odds are they are going to have to special order it. wont take long though, couple days at most.
 
I would agree with catbed. If you can remove the airbox, that will make it real easy to remove the carbs to install your intake boots with the new o-rings, plus just giving you more room to work.

Ed
 
The only way to make these GS bikes run properly is with surgically clean carbs. The pilot jet circuit is particularly sensitive to debris because the jet orifice is killer small - did you pull them out and check to make sure they are open?

Most newbies don't go far enough in terms of carb clean up and wind up pulling the carbs multipul times until they "learn" the hard way that they should just bite the bullet and do the job properly. Key thing is to un-gang the carbs, soak in dip unless they are near perfect to begin with, and replace all the various O-rings (order a kit from cycleorings.com). There is no need to replace jets unless they are damaged in some way. Just clean everything and reassemble with new O-rings.

And in support of what others have stated, don't even attempt to tune the bike unless you have a proper air filter installed and properly sealed carb boots.

Good luck.
 
If you're still having issues then you need to clean the carbs again. Sometimes it takes 3 or even 4 cleanings to sort things out in the carbs especially if they have been sitting for any length of time.

Cheers,
Spyug

Forgive me Spyug but this comment highlighted above really caught my eye.

The reason people wind up pulling the carbs more than once is because they are afraid to pull them apart completely the first time...thus they short cut the cleaning process...which winds up being a long cut in the end.
 
Don't get the K&N filter. Different flow. The UNI filter with the 125 jets is a proven combo. Cheaper, too.
 
Ok everyone...just read up on the new posts. I was off early today and on the way home I did stop and order my filter...I did order the K&N part suggested. Perhaps I will regret that but I certainly hope not....Carbs are off with all the guts removed, but as stated above Im scared to go ahead and ungang them...So far I have been flying by the seat of my pants on this carb stuff.This is the 2nd time I have had them off, this time they looked very clean. I cleaned everything again anyways...Tomorrow or friday Im gonna have my filter and Intake boot O-rings and I will give everything a once over and put them back together. I understand that I am taking a shortcut by not unganging the carbs and doing the dip process, but to be honest right now I just lack the confidence. Aside from unganging the carbs I followed the process for cleaning the carbs listed here on the site...
 
I never dip anymore. It's generally a waste of time. You can get a set of carbs spic-n-span with spray carb cleaner and a wire for poking out the pilot holes. You do need to remove the jets and floats and such, though. Spray carb cleaner forcefully in every orifice and make sure it squirts out the other side like it should.
 
I did indeed spray the hell out of every orifice in the carbs....I followed the link on page 2 of this thread which shows all internal parts removal.I also used it to make sure I didnt miss any air or fuel passages I needed to poke or spray clean.I even made sure to make and use the "special tool" lol.Right now the carbs look nearly new inside.Once I get my intake boot o-rings I can re-install everything, seal it up, and then see where I am at with things...
 
Last edited:
I never dip anymore. It's generally a waste of time. You can get a set of carbs spic-n-span with spray carb cleaner and a wire for poking out the pilot holes. You do need to remove the jets and floats and such, though. Spray carb cleaner forcefully in every orifice and make sure it squirts out the other side like it should.

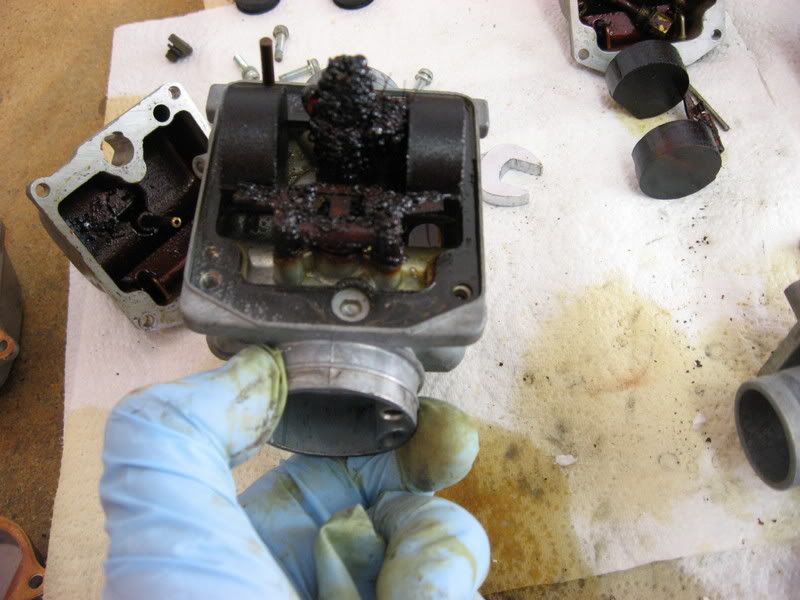
Do you think spray cleaner will get these carbs "spic-n-span"?

IMG_0107.jpg
 
I've rebuild several sets of GS carbs so far and even on the cleanest ones, when I pulled the carbs apart and un-ganged them the connection tube O-rings crumbled in my hands. Also as said before, the pilot jets and the pilot screw passages need to be spotless or the bike will not run right.
 
Disassemble the carbs THEMSELVES but do NOT separate the carbs from each other onless the o rings in the supply tubes BETWEEN them are leaking! Leave the carb rack all together if you don't have leaks there! You will only be creating WAY more work than you need otherwise. Pull out ALL of the jets in the carbs & clean them WELL with carb cleaner & a welding torch tip cleaner. Use the smallest tip cleaner that will work & don't force it in. If it won't fit, use a smaller one. Pay SPECIAL attention to the PILOT jets(the ones under the rubber plugs) as they will make it impossible to run off choke if they are clogged. Also, after you drill the plugs for the mixture screws, spray WD-40 in the tops of the screws & let it soak in overnight before EVER trying to move the screws. Those screwheads are SOOO easy to destroy if you try to rush things! After EVERYTHING is clean enough to eat off of, reassemble everything after spraying just a LITTLE WD-40 in ALL of the jet passages before you screw the jets in. Don't worry, it will all dilute when you fill the carbs with gas. If you can find a way, fill the carbs to check for leaks before you put them back on the bike as this makes it WAY easier to fix leaks without wasted effort & the nightmare of trying to get them in & out. Just so you know, the air box is almost IMPOSSIBLE to take off the bike without either destroying it or removing the engine first. I know these bikes VERY well as I have been working on GSs since they came out. PM me for my phone # if you want help while you are actually doing it. I guarantee you I can save you a LOT of time & headache! Good luck & welcome to the Resources! Ray.
 
Just so you know, the air box is almost IMPOSSIBLE to take off the bike without either destroying it or removing the engine first.

Ray.....It only took 15 minutes after I ever began working on the bike to realize this fact.The shape of the airbox and the way it fits between the carbs and the frame of the bike makes for a nearly impossible mission of taking the airbox out....its 100 percent fact that if I were to get it out, and get the carbs back on FIRST, that there is NO WAY to get the airbox back in. I guess its just going to be the PUSH/PULL/CUSS method of getting things sealed up on friday....With the exception of seperating the carbs from eachother I have these things spotless...all jets and passages are clean and clear......
 
Disassemble the carbs THEMSELVES but do NOT separate the carbs from each other onless the o rings in the supply tubes BETWEEN them are leaking! Leave the carb rack all together if you don't have leaks there! You will only be creating WAY more work than you need otherwise. Pull out ALL of the jets in the carbs & clean them WELL with carb cleaner & a welding torch tip cleaner. Use the smallest tip cleaner that will work & don't force it in. If it won't fit, use a smaller one. Pay SPECIAL attention to the PILOT jets(the ones under the rubber plugs) as they will make it impossible to run off choke if they are clogged. Also, after you drill the plugs for the mixture screws, spray WD-40 in the tops of the screws & let it soak in overnight before EVER trying to move the screws. Those screwheads are SOOO easy to destroy if you try to rush things! After EVERYTHING is clean enough to eat off of, reassemble everything after spraying just a LITTLE WD-40 in ALL of the jet passages before you screw the jets in. Don't worry, it will all dilute when you fill the carbs with gas. If you can find a way, fill the carbs to check for leaks before you put them back on the bike as this makes it WAY easier to fix leaks without wasted effort & the nightmare of trying to get them in & out. Just so you know, the air box is almost IMPOSSIBLE to take off the bike without either destroying it or removing the engine first. I know these bikes VERY well as I have been working on GSs since they came out. PM me for my phone # if you want help while you are actually doing it. I guarantee you I can save you a LOT of time & headache! Good luck & welcome to the Resources! Ray.

Ray-
I've read enough of your posts here to demonstrate to me that you are knowledgeable as well as helpful. Regarding not un-ganging the carbs though, you are dead wrong. I've rebuilt several sets of GS mikuni's and in each case the O-rings on the interconnect tubes crumbled in my hands when touching them. Not good. It's well worth the effort to pull the carbs apart and assure everything is properly sealed before moving forward.

Keep up the good work.

Ed
 
Do you think spray cleaner will get these carbs "spic-n-span"?

IMG_0107.jpg

Those carbs I would dip. But most carbs don't look anything like that.

Carburetors aren't some mystical thing. It's easy enough to determine whether you've got all the passages clean or not. Squirt in one orifice and observe it coming out the appropriate other ones properly. Repeat for all orifices.

There's no reason to disturb the mid-tube o-rings. If they're not leaking, leave 'em together and they'll probably stay not-leaking. The only time I've battled leaks in that area is when I separated them. The passages between the carbs are large and it's easy enough to make sure they're not obstructed without dismantling the rack.
 
Ray-
I've read enough of your posts here to demonstrate to me that you are knowledgeable as well as helpful. Regarding not un-ganging the carbs though, you are dead wrong. I've rebuilt several sets of GS mikuni's and in each case the O-rings on the interconnect tubes crumbled in my hands when touching them. Not good. It's well worth the effort to pull the carbs apart and assure everything is properly sealed before moving forward.

Keep up the good work.

Ed
Hey Ed, you're not too far from me. I'm 3 blocks from Disneyland. Why don't you come by some day & I'll show you some of the things I'm working on. Ray.
 
Ray-
I've read enough of your posts here to demonstrate to me that you are knowledgeable as well as helpful. Regarding not un-ganging the carbs though, you are dead wrong. I've rebuilt several sets of GS mikuni's and in each case the O-rings on the interconnect tubes crumbled in my hands when touching them. Not good. It's well worth the effort to pull the carbs apart and assure everything is properly sealed before moving forward.

Keep up the good work.

Ed
I only agree with that IF the carbs are leaking there when you test fill them BEFORE putting them on the bike. The ONLY ones I've ever had to change were on bikes that had been parked for more than 3 or 4 years & had long enough to dry out AND deteriorate. But, yes, they can be an issue. Ray.
 
Well just an update guys...I got my new intake boot o-rings and got them on.My air filter is in place, got the carbs back on, and started the bike tonight...At this point I think I have a good intake leak going on. When I started the bike the RPM's immediately go up to about 4000 and hang there. Im going to go out and go over all the boots again I guess....any other suggestions are of course welcome...thanks guys
 
Back
Top