To answer GK Dad will be using 400 for the final sanding before putting on the base. He does not sand between coats. As for orange peel he says there can be several reasons...temp, quality of paint (we are using RM) or mixed not properly...and he says a lot of people get nervous putting on clear coat and as a result don't enough on because it's hard to see.
I've never had any training--just trial and error and research. I do get nervous with clear because just when I think I have it--there appears a sag. I'm thinking about setting up a rotisserie to hold the tank!
The only way to get the finish glass smooth is by a systematic sanding process and a systematic polishing process. If you can lay down the clear coats wet enough that it flows out well, you can attain a nice enough finish for most people, but if you want zero orange peel, it has to be sanded and polished.
OK that makes me feel a little better but it never seems to get back to that really wet look from before the sanding. Is there a tutorial somewhere for the "systematic process" of getting that level of finish? (Assuming you've sanded down to 2000 grit)
") .
.


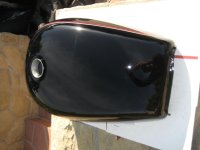
") The paint is uncannily close to the original if not a perfect match. Unfortunately Trevor's going to have to do a frame up rebuild to get the rest of the bike looking as good as the paint job! Good work 'Dad'!!
The paint is uncannily close to the original if not a perfect match. Unfortunately Trevor's going to have to do a frame up rebuild to get the rest of the bike looking as good as the paint job! Good work 'Dad'!!