• Required reading for all forum users!!!

    Welcome!
    Register to access the full functionality of the GSResources forum. Until you register and activate your account you will not have full forum access, nor will you be able to post or reply to messages.

    A note to new registrants...
    All new forum registrations must be activated via email before you have full access to the forum.

    A Special Note about Email accounts!
    DO NOT SIGN UP USING hotmail, outlook, gmx, sbcglobal, att, bellsouth or email.com. They delete our forum signup emails.

    A note to old forum members...
    I receive numerous requests from people who can no longer log in because their accounts were deleted. As mentioned in the forum FAQ, user accounts are deleted if you haven't logged in for the past 6 months. If you can't log in, then create a new forum account. If you don't get an error message, then check your email account for an activation message. If you get a message stating that the email address is already in use, then your account still exists so follow the instructions in the forum FAQ for resetting your password.

    Have you forgotten your password or have a new email address? Then read the forum FAQ for details on how to reset it.

    Any email requests for "can't log in anymore" problems or "lost my password" problems will be deleted. Read the forum FAQ and follow the instructions there - that's what we have one for...

  • Returning Visitors

    If you are a returning visitor who never received your confirmation email, then odds are your email provider is blockinig emails from our server. The only thing that can be done to get around this is you will have to try creating another forum account using an email address from another domain.

    If you are a returning visitor to the forum and can't log in using your old forum name and password but used to be able to then chances are your account is deleted. Purges of the databases are done regularly. You will have to create a new forum account and you should be all set.

Pilot Screw Removal - absolutely necessary?

  • Thread starter Thread starter WingMan71
  • Start date Start date
W

WingMan71

Guest
So,

I'm rebuilding the carbs on the '83 GS650GL that I'm restoring.

Got the carbs all separated and disassembled and ready to go into a gallon of carb cleaner and sit for a while.

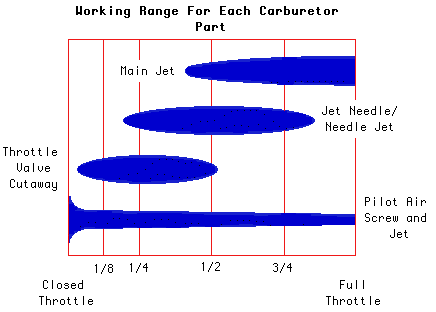
I'm wondering if it's absolutely necessary to remove the pilot screws. Seems like a real pain to do it. Can't you get that pilot passage clean with the carb dip and/or by spraying carb cleaner in the proper passageway?

If not, and they have to come out, just how the heck do you get them back into their original position so your engine runs right?

I'm keeping all the stock air intake stuff on the bike.

Thanks for any advice.
 
If your carbs aren't to dirty you may get away without removing them, however, it is recommended.
When they are reinstalled, they are tightened down snugly, there is no adjustment on the pilots. :)
 
Yes, they must come out. Follow the carb rebuild tutorial, it explains how to set the pilot screws. Or look up Koolaid Kid's tutorial on the matter.
 
Consider this: there is an o-ring around the screw. O-rings do not live long in carb cleaner. :-k

If you don't remove the o-ring before immersion in "the dip", you may have a gooey mess to try to clean out. Since the overall objective is to remove the junk that is in the passages, why introduce even more stuff that will need to be removed?

By the way, if you put the screws back to their original position, there is no guarantee that the engine will run "right". The screws were set with EPA-mandated emmisions in mind, not proper engine running. Most of us have opened up the screws to the point where the engine runs better.

.
 
... The screws were set with EPA-mandated emmisions in mind, not proper engine running. Most of us have opened up the screws to the point where the engine runs better.

Steve,

Good point about the o-ring under the pilot screw and the carb dip! DUH!

About the original position of the pilot screws...

I presume that they are not screwed in until fully seated, but somewhat backed out from the fully seated position as they come from the factory.

If I wanted to START from the factory setting, do I screw them all the way in while counting the number of turns it takes to reach the fully seated position, and then back them out the same number of turns from fully seated when reinstalling them?

Will that work to approximate the stock setting?

Thanks.
 
From my memory...

From my memory...

Steve,


If I wanted to START from the factory setting, do I screw them all the way in while counting the number of turns it takes to reach the fully seated position, and then back them out the same number of turns from fully seated when reinstalling them?

Will that work to approximate the stock setting?

Thanks.

IN theory that would work just fine. It would probably get the bike close to running again once you put them all back together. I bet you will find them at about 2-1/2 to 3 full turns out from lightly seated. That is typically the starting position many use anyway. That is not necessarily the best position for running the bike however. That can best be deciphered by actually setting them using a variety of methods...like idle drop, or by watching the vacuum when synching the carbs.

Steve would be the best one to explain the method....(He showed me this past weekend)
 
For what it's worth, you guys are talking about the air screws..or mixture screws...not the pilot screws.

Just so everyone doesn't think I'm an idiot......again....LOL !!!:)
 
For what it's worth, you guys are talking about the air screws..or mixture screws...not the pilot screws.

Just so everyone doesn't think I'm an idiot......again....LOL !!!:)

Larry,

All of the carb rebuild documents on the site refer to them as pilot screws, but I guess that the proper term would be pilot "air" screws.

These are the ones you have to pull out a factory metal plug from on top of in order to even get at them.

This as opposed to the pilot "jet" in the fuel bowl which of course flows fuel.
 
By the way, if you put the screws back to their original position, there is no guarantee that the engine will run "right". The screws were set with EPA-mandated emmisions in mind, not proper engine running. Most of us have opened up the screws to the point where the engine runs better.

Steve,

These screws only affect the engine when running at idle, correct?

As soon as you're off idle and the butterfly valves open up a bit, they no longer have any affect on engine running, right?

(At least that's the way the idle air system works on carbs on cars.)
 
The factory service manuals call them "pilot screws". They meter the amount of fuel-air emulsion that enters the carbs at idle and low speed. As set from the factory they were lean for emissions reasons. It's pretty much a waste of time worrying where they were set previously. Set them at 2.5 turns open, then tune them for best running conditions on the bike when performing the vacuum sync.
 
Last edited:
effects3.gif
 
As Wingsconsin eluded to in the diagram above... The pilot screws are critical across a wide range of throttle openings. Take them out and do it right.

Yes, they can be a pain to get out. Yes, you have to reset them to a good tune.

If you don't do it now you may have to pull them and do it anyway. You may be wasting a ton of time trying to trace down a rideablity issue.

Just take your time and do it right. First take the metal plug out as per the rebuild instructions. Then be prepared to use a lot of heat around the screw and stem BEFORE you try to get them out. I think the factory used some type of thread sealant when installing those screws. I usually top up with some PB Blaster in the screw hole and then heat till it's pretty much gone and then add some more and reheat. Do this several times. Don't be worried about using too much heat when using a propane torch. Make sure you have a screwdriver that FITS the screw slot snugly. Did I mention that you need to heat everything up first?;) Work the screw in and out. 1/2 turn out and a 1/4 turn back in. Continue until the screw feels like it will just screw out with little resistance. If it starts to jam up then go back to heat with PB Blaster.

I haven't done as many as others on here, but so far it's worked well as long as I do as I just described. Seems like I have the most problems if I try to unscrew the screw before I add heat.

Once you have it all out and clean, then lightly seat each screw and then turn it back out about 2 1/2 turns. Don't bother counting the number of turns the factory set them to originally. You're going to be shooting for a better adjustment in the end then what was done at the factory.

I hope you have the tools to sync the carbs as well. A good bench sync will get her started but you'll have to sync them with gauges in order to get it to run right.
 
Pilot screws

Pilot screws

Two of mine came right out. The other two, not so much. One of the remaining was freed with some good oil and the screw in, screw out, and repeat method. Liked previously mentioned make sure you have a proper fit screw driver. On the worst of the 4 I tried this method until I mucked the screw head. Took it to my friend and long time A&P mechanic. He filed a screw driver to fit good enough to screw back in. Drilled the screw(reverse bit loosened again) and used an easy out. Small easy outs are pretty brittle so even with the easy out we had to work in and out a few times to get it. No heat was used. This was just my experience with these things because they have to come out.
 
For what it's worth, you guys are talking about the air screws..or mixture screws...not the pilot screws.

Larry,

All of the carb rebuild documents on the site refer to them as pilot screws, but I guess that the proper term would be pilot "air" screws.
The manual calls them "pilot screws". Since they actually control a mixture, some of us will use the term "mixture screw". VM carbs have separate fuel and air screws, but not yours.


Nice diagram, but the use of the term "throttle cut-away" tells me that it is geared toward VM carbs.

.
 
Larry,

All of the carb rebuild documents on the site refer to them as pilot screws, but I guess that the proper term would be pilot "air" screws.

These are the ones you have to pull out a factory metal plug from on top of in order to even get at them.

This as opposed to the pilot "jet" in the fuel bowl which of course flows fuel.

No, on the CV carburetors they are mixture or sometmes pilot screws. The older VM carburetors have both pilot fuel screws and pilot air screws. They are completely different in function.
 
Thanks everyone for your replies and experience.

This has actually turned into a very educational thread.

I WILL do it right and remove the pilot screws!

***
 
Stripped Pilot Screws

Stripped Pilot Screws

This has been a very informative thread. I wish I'd read it before I got started this morning. Now I have three pilot screws with virtually no head left. One of them managed to come out easily, but the other three, not so much. I was smart enough to use compressed air to blow out shavings from drilling the plugs, and I used penetrating fluid to loosen them up, but I didn't consider heat until I read this tread. Now I need some other more invasive procedure. Some kind of EZ-out or a machine shop or something. A screwdriver's not going to cut it anymore. Any suggestions?
Thanks,
81 GS1100E - BS34SS,
needs everything
 
Back
Top