• Required reading for all forum users!!!

    Welcome!
    Register to access the full functionality of the GSResources forum. Until you register and activate your account you will not have full forum access, nor will you be able to post or reply to messages.

    A note to new registrants...
    All new forum registrations must be activated via email before you have full access to the forum.

    A Special Note about Email accounts!
    DO NOT SIGN UP USING hotmail, outlook, gmx, sbcglobal, att, bellsouth or email.com. They delete our forum signup emails.

    A note to old forum members...
    I receive numerous requests from people who can no longer log in because their accounts were deleted. As mentioned in the forum FAQ, user accounts are deleted if you haven't logged in for the past 6 months. If you can't log in, then create a new forum account. If you don't get an error message, then check your email account for an activation message. If you get a message stating that the email address is already in use, then your account still exists so follow the instructions in the forum FAQ for resetting your password.

    Have you forgotten your password or have a new email address? Then read the forum FAQ for details on how to reset it.

    Any email requests for "can't log in anymore" problems or "lost my password" problems will be deleted. Read the forum FAQ and follow the instructions there - that's what we have one for...

  • Returning Visitors

    If you are a returning visitor who never received your confirmation email, then odds are your email provider is blockinig emails from our server. The only thing that can be done to get around this is you will have to try creating another forum account using an email address from another domain.

    If you are a returning visitor to the forum and can't log in using your old forum name and password but used to be able to then chances are your account is deleted. Purges of the databases are done regularly. You will have to create a new forum account and you should be all set.

Rejetting experiments begin

  • Thread starter Thread starter jave101
  • Start date Start date
J

jave101

Guest
Got some new jets in the mail today for my gs400.
Until the k&n pods come I've just got some cheap eBay pods on there with straight through exhaust.
My stock jets were pilot 20 and main 110, I've gone to 40 and 130. Which is much better but something's still not right. Right hand cylinder doesn't like firing with the pods on so I removed them for the time being.
There is some backfiring through the carbs every now and then but I think that might be a vacuum leak, can't get those stock carb boot clamps to clamp down hard enough I don't think and when ever it backfires (only left hand side does) the petcock blows out. How is this secured normally, I know backfiring through the carb isn't normal but there is nothing holding it in there at all. Do people use sealant to hold it in place?

Anyway when the k&n pods get there the real work will begin.
 
Did you replace the o-rings at cylinder head/ carb boot interface? good place for air leaks ! And sometimes old boots are so stiff, they don't seal well- might try hose clamps to see if anything changes.


"Anyway when the k&n pods get there the real work will begin" - get rid of backfiring first!
 
Yeah new gaskets and o-rings, boots are nice and soft. Ill be trying hose clamps soon.
Been over the timing too. I've been using my multimeter to test continuity over the points with the F mark lined up for each cylinder. I assume you need to disconnect the wire going to the point in order to do the test otherwise you just get a completed circuit all the time regardless of the point being open or not.
 
James, good luck! I need to revisit this topic on my 450 but so far I've just been having too much fun riding it...

Anyway, you need to make sure your carb's are in sync before playing too much with the jetting, especially when it comes to the pilot circuits.

With your carb boots, they sound like my old ones. I needed rubber grease to get the carbs in and then the clamps wouldn't tighten down. Turns out the rubber had not only hardened but shrunk with age, meaning both the inside and outside diameters are smaller and therefore not only are the carbs hard to get in, but the clamps were not able to clamp. Get some new supple rubber boots on there and you won't believe the difference!

When you say the petcock blows out, are you referring to the vacuum port on the left carb that opens the fuel tap? The petcock is actually the fuel tap so if it's blowing out you should have fuel pouring everywhere... :eek:

If you are referring to the vacuum port, then pop some blue loctite on it and you'll be all sorted. I had that same problem the other week and it popped out after filling up at a servo and caught me out on the side of the road on the way home. Took about two minutes of head scratching before I noticed it... funny how I just filled up but ran out of fuel...

With your backfiring through the carbs, I get that when idling at traffic lights occasionally, and my jetting is actually too rich. I suspect when you get the K&N's you may find your jetting's not too bad as it sounds to me like those cheapy carbs might be just a tad too restrictive.

I've got a professionally made custom 2 into 1 on mine and it has a baffle etc. but even with the K&N's on there I'm still running the stock pilot jets.

Keep us up to date with how you go!
 
Yeah new gaskets and o-rings, boots are nice and soft. Ill be trying hose clamps soon.
Been over the timing too. I've been using my multimeter to test continuity over the points with the F mark lined up for each cylinder. I assume you need to disconnect the wire going to the point in order to do the test otherwise you just get a completed circuit all the time regardless of the point being open or not.

Guess I was typing while you were replying ;)

My boots appeared to be soft to my hands... until I got new boots, then I realised what soft boots were supposed to feel like!

To be sure your timing is right, get an inductive timing light on there so you can also be sure it's advancing properly.

Might be different with points though, haven't played with one of those before...
 
Yes I meant the vacuum port, still figuring out the terminology of everything haha.
This might be the case with mine also ill get some hose clamps give them a go with spraying the old carby cleaner around it and if the revs stay steady ill look into getting some new boots.

Timing light could be the way to go, I'll look around for a cheapish one maybe off eBay.
 
Jumping up EIGHT sizes in your pilot jet is not helping you at all. If you have done some really radical stuff, like overbore, cams, etc., you might have to go up ONE size, but certainly not eight.

If your hoses are blowing off, you need new hoses. They might sound a bit expensive, but you get several feet of hose, usually enough for several bikes.

Using the proper hoses, you will likely not even need clamps. Yes, that's even true for the fuel line, breather line and vent lines.

.
 
Yes I meant the vacuum port, still figuring out the terminology of everything haha.
This might be the case with mine also ill get some hose clamps give them a go with spraying the old carby cleaner around it and if the revs stay steady ill look into getting some new boots.

Timing light could be the way to go, I'll look around for a cheapish one maybe off eBay.

Cool, just making sure ;)

I'd just go to Supercheap or whatever, they're cheap enough not to have to wait or pay for postage...

Jumping up EIGHT sizes in your pilot jet is not helping you at all. If you have done some really radical stuff, like overbore, cams, etc., you might have to go up ONE size, but certainly not eight.

If your hoses are blowing off, you need new hoses. They might sound a bit expensive, but you get several feet of hose, usually enough for several bikes.

Using the proper hoses, you will likely not even need clamps. Yes, that's even true for the fuel line, breather line and vent lines.

.

It's not the hose popping off the vacuum port, it's the vacuum port itself popping out of the carb body. Not sure how it is on the bigger bikes, but on the twins the port is a tapered fit into the carb body and they appear to come loose with age.

Have a look at the pic below, and the bit we're talking about is the round part where the vacuum hose attaches:

IMG_4166.jpg


That whole bit pops out of the carb, blue loctite is the answer ;)
 
Here is something you can try, find an old marker light socket from a car that has a 12 volt bulb in it, make sure the wires are long enough to reach from the points to the fins on the engine, put some alligator clips on the ends. Leave the wiring attached to the points, attach one side to the little bolt that holds the point wire on, the other to the engine fins for a ground. roll the engine over to the F mark and turn on the ignition switch. If the points are closed, the light will be on, when the points are open, it will go off. Now roll the engine and see when the light changes. That will tell you exactly when the points open. I hope this helps, Mark
 
set timing the easy way

set timing the easy way

For static timing with battery/points ignition here's a BIG SECRET:


take a small transistor radio and set it on AM on the lower end of the scale (600) and get it near the points or better yet the coils............


turn it on and set the volume up.

while turning the crank , precisely when the points OPEN you will hear a loud pop in the radio and that is how I have set timing for a long time since the 70s
 
Jumping up EIGHT sizes in your pilot jet is not helping you at all. If you have done some really radical stuff, like overbore, cams, etc., you might have to go up ONE size, but certainly not eight.
Steve, my bike is as radical as I could build it. Big bore kit, milled head, degreed cams, header, pods, Stage 3 DynoJet kit, different advance igniter. I tried one size over and it was still too large. going back to stock pilot now; currently installing repaired starter. Carbs going back on as soon as that is finished and tuning idle circuit per my procedure when that happens.
 
Ok so went back to stock pilot jet which is 20 and replaced the hose clamps with better ones so there is no vacuum leaks.
Runs really well on idle but at around 1/4 throttle and upwards it surges and has a bad time.
Is this needle jet territory? It's set to the middle at the moment.
I did a plug chop at the point when it was surging and it had a nice brown colour not wet with fuel.

I'm waiting on a tacho cable so I'm having some troubles setting the air mixture screws properly as well.
 
Left hand cylinder seems to run fine it's just right hand that is bogging down.
Could this be a sync issue?
 
Left hand cylinder seems to run fine it's just right hand that is bogging down.
Could this be a sync issue?
Sync issues will be most evident at IDLE.

Think of it this way: let's assume for a few moments that the carbs need to be open 4% to run at idle. If one is closed down to 2%, the other will have to be opened (with the idle speed control) to about 6% to compensate.

Now run at half throttle. One carb will be about 48%, the other at 52%. Still a 4% difference, but it doesn't matter as much.

Now let's go to full throttle. One carb will be open 100%, but the other is only open 96%. Still that 4% difference, but it matters even less.

Back to idle, since that one carb is less than 4% open, the bike is really only running on one cylinder. As you start to open the throttle, it will cross that 4% threshhold and start firing. That will ALL OF A SUDDEN give you about twice the power you had just moments ago, making for a very erratic getaway.

To troubleshoot jetting problems, you have to start with the basics and eliminate as many variables as you can. Start by setting the proper fuel level. Measuring the float height is a start, but you need to VERIFY the level with a tube connected to the drain screw and brought up to the side of the carb to see the ACTUAL level. After verifying your fuel level, you can start by chaning jets and adjusting screws, but do them in the proper order and ONLY CHANGE ONE THING AT A TIME. It also helps to record your findings, so you can refer back to your notes to see what really worked.

.
 
Yeah makes sense thanks for that.
I'll have to find a plug that fits the drain plug to do the fuel level measurement.
Today I bench synced them with a piece of paper in the butterflies so they can't be too far off.

Perhaps the main jet is too large I jumped up from 110 to 130. I'm not going to buy anymore jets until the k&n pods get here, no point wasting anymore money just yet.

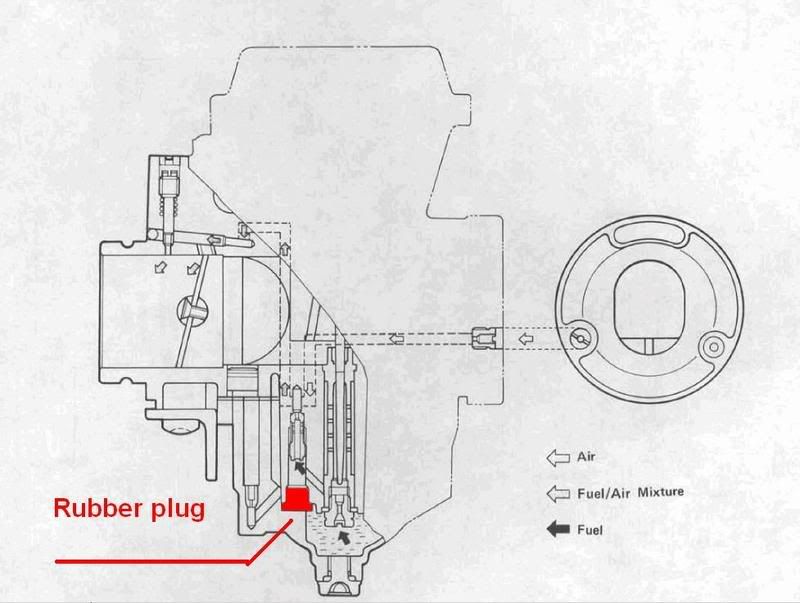
Also the previous owner damaged the heads of both the pilot jets when he removed them. I've read there is supposed to be a rubber plug or some thing that goes over the pilot jet? I don't have anything that goes into the pilot jet hole except the jet itself. Am I getting confused between carbs or just totally way off?
 
Last edited:
Not sure on the pilot jet rubber plugs, you'd need to check the parts fiche. Given the sizes for your jets they're not the same as my carbs and they're the only ones I've seen in person to date (except the little Ducati's Weber but that don't count).

I've seen people take a spare drain plug, drill the centre out, and braise/weld in a nipple to attach some clear fuel hose. For the short amount of time it would get used, I imagine JB Weld would do the job. Actually I just gave myself an idea... although I just used a piece of cardboard, marked the measurements, sat it on the gasket surface and checked the float heights that way.

I'd highly recommend some carb sync gauges though. They can be had for a reasonable price too. I ended up with the Morgan Carbtune from the UK courtesy of a Chrissy present last year.
 
Also the previous owner damaged the heads of both the pilot jets when he removed them. I've read there is supposed to be a rubber plug or some thing that goes over the pilot jet? I don't have anything that goes into the pilot jet hole except the jet itself. Am I getting confused between carbs or just totally way off?
Yep, there should be a rubber plug.

CarbRubberplug.jpg


If you look just above the rubber plug, just before you get to the pilot jet, you will see an angled passage that goes down to just above the main jet. THAT is where the pilot jet is supposed to get it's fuel. Without the rubber plug, the pilot jet will also be able to suck fuel from the area where the plug is supposed to be. That really isn't a problem, though. Where the problem lies, is when you get above the pilot circuit and get into the needle and main circuits. The main jet will limit the flow of gas into the needle circuit once the needle is pretty much up all the way and not doing any metering of its own. Without the rubber plug, gas will also be able to go up that hole, then down the angled passage, bypassing the main jet, and have you chasing your tail trying to get the jetting right. :o

.
 
Ok well look like ill be taking the carbs off again haha. Will the damaged slots on the top of the pilot jets cause any problems? I don't think they would as the jet hole itself is perfectly fine but I've heard people say replace any damaged jets.

Also there is another jet in that diagram of yours that looks like its for the idle circuit if I'm not mistaken, on the intake side of the carb on the left hand side. I'm quite sure my carbs don't have anything in there.

Looking at different carb stripping tutorials I think I have BS34ss carbs. Is this diagram for my specific carbs? I have seen many different internally structured carbs that are all called BS34's.

Thanks for the help.
 
Also there is another jet in that diagram of yours that looks like its for the idle circuit if I'm not mistaken, on the intake side of the carb on the left hand side. I'm quite sure my carbs don't have anything in there.
If you are talking about the jet in the intake throat at about the 8 o'clock position, and is connected with dashed lines to the side view of the carb, yes, you should have jets in there, they are the pilot AIR jets that work with the pilot FUEL jets that are just above the rubber plugs. Together, they make the pilot MIXTURE which is then regulated by the idle MIXTURE screws that are shown on top of the outlet of the carb.

I can't say for sure what is supposed to be in there, though. My only information says that they are supposed to be "1.4-1.5". The rest of my list shows that carbs with similar numbers are all VM carbs. All the BS carbs have numbers like 150, 160, 170, etc., so I don't know if yours are supposed to be "140-150". Later 450s had 135 and 145 jets, so I would think that's about right.
.
 
Back
Top