• Required reading for all forum users!!!

    Welcome!
    Register to access the full functionality of the GSResources forum. Until you register and activate your account you will not have full forum access, nor will you be able to post or reply to messages.

    A note to new registrants...
    All new forum registrations must be activated via email before you have full access to the forum.

    A Special Note about Email accounts!
    DO NOT SIGN UP USING hotmail, outlook, gmx, sbcglobal, att, bellsouth or email.com. They delete our forum signup emails.

    A note to old forum members...
    I receive numerous requests from people who can no longer log in because their accounts were deleted. As mentioned in the forum FAQ, user accounts are deleted if you haven't logged in for the past 6 months. If you can't log in, then create a new forum account. If you don't get an error message, then check your email account for an activation message. If you get a message stating that the email address is already in use, then your account still exists so follow the instructions in the forum FAQ for resetting your password.

    Have you forgotten your password or have a new email address? Then read the forum FAQ for details on how to reset it.

    Any email requests for "can't log in anymore" problems or "lost my password" problems will be deleted. Read the forum FAQ and follow the instructions there - that's what we have one for...

  • Returning Visitors

    If you are a returning visitor who never received your confirmation email, then odds are your email provider is blockinig emails from our server. The only thing that can be done to get around this is you will have to try creating another forum account using an email address from another domain.

    If you are a returning visitor to the forum and can't log in using your old forum name and password but used to be able to then chances are your account is deleted. Purges of the databases are done regularly. You will have to create a new forum account and you should be all set.

Tire changing

  • Thread starter Thread starter lurch12_2000
  • Start date Start date
L

lurch12_2000

Guest
I know this has been covered many times, but I thought it would be useful to post a pic and list of a do it yourself process.
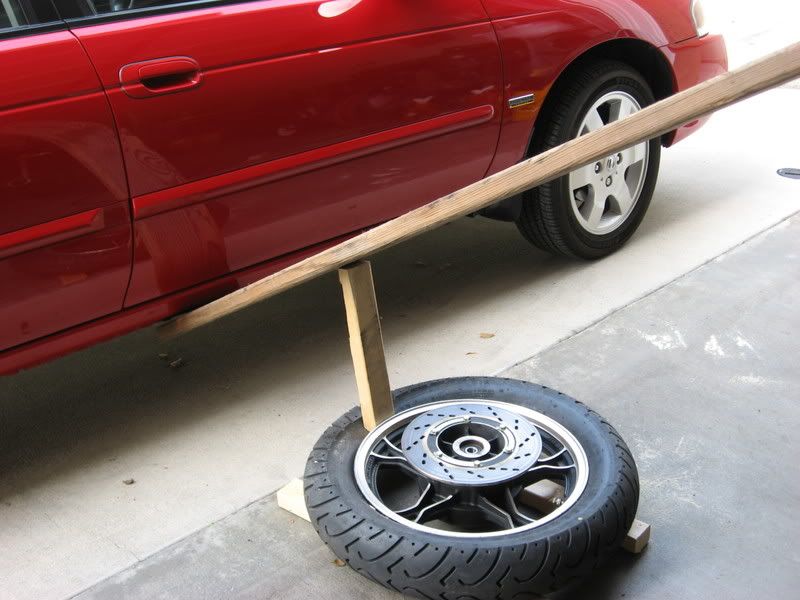
Here's the list of items, laying around the garage and kitchen, included in the picture. Nothing to assemble and much quicker, very little effort other than holding the block in place while positioning your 2x4", and a lot easier than using clamps for breaking the beads:

- 3 gallon chlorine bucket saved from pool supplies (5 gal buckets are too tall and tip easier), has to be a sturdy bucket not a flimsy cleaning bucket)
- two 6" bicycle tire irons and a flat spanner wrench (if a third pry bar or holder bar needed ....no sharp edges, valve stem tool for removal of tire valve
-1 foot sturdy metal tube for leverage on the tire iron, mine was from an old bicycle seat neck
-5 foot length of 2x4", 2 pieces of 6 or 9" length 2x3" for breaking the bead, leveraged against the frame of the underside of a vehicle and pressing down, make sure it's on the frame and not the body panel otherwise your effort to save $20-30 for tire changes goes into body work!!! NOTE: when breaking the bead, rotate the tire and press down at 12 , 3, 6, and 9 o'clock positions
-two approx 1 foot sections of 4x4" for when flipping the tire onto so you don't damage the brake disc, small piece of 1/4 or 1/8" plywood to keep the rim off the pavement and marring it up too
-Murphy's oil soap from the kitchen, 1 or 2" foam brush for applicator, old yogurt or cheese container from the recycle bin, a capful of soap to a quart of warm water is sufficient
-very fine sandpaper to clean off the bead surface of the rim before mounting the new tire, small 1" square peice of sturdier flexible plastic as a rim protector when positioning the tire iron, mine was a scrap piece of socket packaging

Everything is in the pic...hope this helps someone in their backyard remedies!!!...see bwringer's post for a homemade tire balancing setup. All this is gleaned from other posts with a little fine tuning.
100_1506.jpg
 
Last edited:
Another tip

Another tip

Another tip. I was force to do my last tire change prematurely because of bead oxidation. Santa Barbara weather is usually 60% humid at the lowest. The rim was oxidizing inside of the wheel and caused slow leaks to turn into fast leaks in a matter of weeks.

Not much to do but, clean change the tires and clean the beads.

After using a SS brush and 800 grit sandpaper (if required), I hit the bead area with some mothers or other silicon based aluminum prep. Keeps the oxidation from coming back inside of the tire.

Cheers

Pos
 
One of the easiest ways I've found for changing my own tires was to make a framed box (larger diameter than the mounted tire) out of 2x4's stood up on their 2" sides, sheeted with 3/4" plywood and a hole cut in the center to let the hub or brake rotors fit through. It works great. Changing a tire right after riding it also helps once the rubber is good and warmed up, plus having at least three tire irons.
 
Last edited:
Ive had an idea for a simple and inexpensive means to break beads as well as aid in changing bike tires. Ill have to draw something up until I get back to working. But Im thinking you local Harry Homeowner store should have most if not all of it.
 
About balancing... I know some people don't trust 'em, but I just tested Dyna Beads tonight. They we so smooth I forgot all about them until I hit the ramp for I75. Well, by then I was committed, so I decided to finish testing the the new clutch plates. Both are working quite nicely.
 
Don't laugh too hard but this is how I break tubless tire beeds...

Picture146.jpg
 
Don't laugh too hard but this is how I break tubless tire beeds...

Picture146.jpg

Same procedure as mine with a slight variation on 2x3 block length, but I use the frame. I'm afraid I'll bugger up the car's rocker panel where you have it postioned in your photo. BTW, that tire looks like it has plenty of life left....why are you removing?
 
Harbor Freight tire machine with motorcycle adaptor for about $125 will make life a ton easier changing bike tires. I just did 8 with mine and dealers wanted $60 each here. Cut up some plastic bottle pieces for rim guards. I bolted mine to the floor and it takes about 1 minute to install or remove it. It has a built in bead breaker too & clamps the rim in place. As far as laughing I used to use a High Lift jack on my truck bumper to break beads. No laughs here
 
This brought back a memory of when I was about 16. I changed my own tires on my 62 Fairlane. I came with a bumper jack which had a stamped steel plate as a foot for the jack. I just put the tire under the bumper, put the jack foot on the tire bead area and started jacking up the car. Pop went the bead. Gee, I wish cars still had bumpers.
 
These are all good tips, I'm going to be installing some tires on my GS in the next week or so.
 
Hey Cliff,
Do you have a tutorial for removing the rear wheel on a chain drive bike? Some of us don't have shaft drive.
 
Hey Cliff,
Do you have a tutorial for removing the rear wheel on a chain drive bike? Some of us don't have shaft drive.

As I recall, loosen the rear axle, slide the rear wheel forward a little, take the (now loose) chain off the sprocket, remove the rear wheel. Pretty simple. Oh, I guess you have to remove the rear adjusters too (What do you call those thingys?). Does your rear axle have a pinch bolt?

How about these?
http://www.dansmc.com/rear_wheels.htm
http://www.expertvillage.com/video/27261_motorcycle-brakes-wheel.htm
http://www.youtube.com/watch?v=F4ns9u_JRJ0
http://www.videojug.com/webvideo/how-to-remove-your-rear-wheel-from-a-honda-motorcycle


I can only document what I have, and what I have done. Would you like to become a contributor? :)


Thank you for your indulgence,

BassCliff
 
Last edited:
I just use two large flat head screw drivers and some Dawn dish soap.
Thats for removing and installing new tires, I always do my own.
I have never really had a problem breaking the bead off.
Are you guys removing the schrader valve?
 
I just use two large flat head screw drivers and some Dawn dish soap.
Thats for removing and installing new tires, I always do my own.
I have never really had a problem breaking the bead off.
Are you guys removing the schrader valve?

Yes, that's mentioned in my first post, using the valve removal tool to remove the valve stem first.
I never use the flat head screw drivers due to the good chance of buggering up the bead when mounting the new tire with the sharp edges.
Dish soap has been mentioned before, but some believe it is a little harsh and may affect the rubber over time.
Most people have difficulty breaking the bead of the old tire and using the 2x4's makes it quick without marring your rim. I don't trust anyone pounding on the bead to break it or using clamps as they sometimes don't pop the bead and you have to keep repeating the process.
...but whatever works for you without damaging the rim or tire.....:)
 
Something that made my last tire change easier was holding the bead over the groove in the rim with a "filler" made of a 3' piece of 1/2" cable. Then, when you are levering the bead over the rim, the far side will more easily slip into the groove.
 
As I recall, loosen the rear axle, slide the rear wheel forward a little, take the (now loose) chain off the sprocket, remove the rear wheel. Pretty simple. Oh, I guess you have to remove the rear adjusters too (What do you call those thingys?). Does your rear axle have a pinch bolt?

How about these?
http://www.dansmc.com/rear_wheels.htm
http://www.expertvillage.com/video/27261_motorcycle-brakes-wheel.htm
http://www.youtube.com/watch?v=F4ns9u_JRJ0
http://www.videojug.com/webvideo/how-to-remove-your-rear-wheel-from-a-honda-motorcycle


I can only document what I have, and what I have done. Would you like to become a contributor? :)


Thank you for your indulgence,

BassCliff

I've done both of my GS1100s (chain and shaft). Remove the 2 bolts holding the chain guard and remove...makes the process easier and let's you see to line up the chain on reinstallation and adjustment.
The chain adjusters and spacers will fall off as you slide the rear axle out. Remember which way they all go...the adjustment markers(lines)face outward and the rear caliper arm only goes on one way....:mad:
NOTE: jack the rear end up an extra 2-3 inches to allow the rear wheel to tilt and slide out and clear the fender much easier, too.
Maybe I should have taken pics on my last change of the E's rear tire?
 
I successfully removed the front tire on my bike this afternoon. After I let the air out, I was able to break the bead with my hands. Used two motion pro tires irons to remove one side of the tire. Pulled out the tube and then removed the tire from the rim. I would have thought it would have required a lot more effort. I'm sure the rear one will be a #$&*^ to remove. I usually don't complete a repair job without some problem arising. Nothing ever seems to go as planned.

I have been putting off changing the tires but I got a flat on the way home from work yesterday. Looks like a roofing nail got stuck in my rear tire. Now that the bike is down for tires, I am going to replace the front fork springs and rear shocks with progressives. My fork seals are not leaking but I may replace them while I've got the front end apart.
 
Harbor Freight machine for 80 dollars, on sale. Best investment ever.

I wasn't able to get the tire bead breaker to work with motorcycle tires. I have to break some down this week so I'll have another look at it.

Here is a good site with step by step instructions for doing it yourself.

http://www.clarity.net/~adam/tire-changing.html
 
A big arse "C" clamp is what i was taught to use for a bead breaker. MOST times it works, though ive had a couple of "baked on" beads that simply refused to break with a clamp, and deadly force was required. If you're not worried bout the old tire, and cant break the bead, a hack saw is a pretty good buddy... :D
 
Back
Top