• Required reading for all forum users!!!

    Welcome!
    Register to access the full functionality of the GSResources forum. Until you register and activate your account you will not have full forum access, nor will you be able to post or reply to messages.

    A note to new registrants...
    All new forum registrations must be activated via email before you have full access to the forum.

    A Special Note about Email accounts!
    DO NOT SIGN UP USING hotmail, outlook, gmx, sbcglobal, att, bellsouth or email.com. They delete our forum signup emails.

    A note to old forum members...
    I receive numerous requests from people who can no longer log in because their accounts were deleted. As mentioned in the forum FAQ, user accounts are deleted if you haven't logged in for the past 6 months. If you can't log in, then create a new forum account. If you don't get an error message, then check your email account for an activation message. If you get a message stating that the email address is already in use, then your account still exists so follow the instructions in the forum FAQ for resetting your password.

    Have you forgotten your password or have a new email address? Then read the forum FAQ for details on how to reset it.

    Any email requests for "can't log in anymore" problems or "lost my password" problems will be deleted. Read the forum FAQ and follow the instructions there - that's what we have one for...

  • Returning Visitors

    If you are a returning visitor who never received your confirmation email, then odds are your email provider is blockinig emails from our server. The only thing that can be done to get around this is you will have to try creating another forum account using an email address from another domain.

    If you are a returning visitor to the forum and can't log in using your old forum name and password but used to be able to then chances are your account is deleted. Purges of the databases are done regularly. You will have to create a new forum account and you should be all set.

We have the technology, we can rebuild it. Gauge update Pt.1

  • Thread starter Thread starter Hammered
  • Start date Start date
H

Hammered

Guest
It will take a few 9days, weeks who knows) to finish this project up. I still nee to pull the broken cluster off the bike. What I have done is picked up some of the need materials for the job.

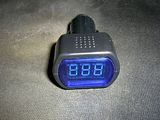
As we all know, Zukis and their charging systems... So Ill be adding a voltmeter. Picked this one up on Ebay for a penny plus $1.99 shipping.


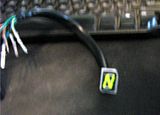
Next, is a handy dandy gear indicator with neutral N. This will remove 6 different incandescent bulbs that pull 3 watts each. I think I found this on the Bay for under $20 And its pretty bright, even on just a 9volt battery. (Which is why the pic of the N is blurry. Trying to hold it to the battery)


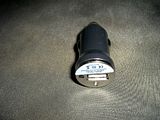
We all have modern gadgets and such we just cant live without. Be it GPS, Cell Phone or what have ya. Well that stuff needs power and power it shall have. I found this on Amazon for $3 and free shipping.
 
Ill be starting with a jacked up gauge cluster due to a little run in with a few deer. They are NOT nice and fluffy. It looked like this.


And now looks like this...


I have an LCD clock and a couple prewired Superflux LEDs in different colors to play with for back lighting the clock. Ill also be removing all the other incandescent bulbs from the rest of the cluster to be replaced by LEDS as well. All and all, I should be removing somewhere in the neighborhood of 30ish watts off the system. With the standard bulbs pulling 3 watts and the leds only using 1/3 watt...
 
Last edited:
And how does one stuff this much...well stuff in out modest clusters? Well for one, Ill be replacing the tach with one from a different model. It will/does house the fuel gauge as well so that will clear up some space and the entire top where the gear indicator resides will be replaced with a 1"x 3/4" indicator. Ill also re replacing all the idiot lights with colored LEDS. Im still looking into tinting Lexan and just how Ill be making the isolator plate so the light from one idiot light doesnt bleed over to another. All in time I guess
.
 
This could be a stupid question, and if it is, please correct me...

It was my understanding that, at it's most basic level, the charging / stator issue was caused by an inability to bleed off excess electrical load. Wouldn't removing load from the charging system actually exacerbate the problem? Granted, I don't think the mods you are doing would make any sort of noticeable difference...but, conceptually-speaking, am I misunderstanding the issue?

That being said, I'm digging it! Nice mod...
 
With a good R/R, my reducing the load on the system shouldnt be an issue. And with the lessened load, Ill be able to add a Driving light of about 35 watts or more. Since Ill be removing all the incandescent turn signals and brake/tail light as well.
 
This could be a stupid question, and if it is, please correct me...

It was my understanding that, at it's most basic level, the charging / stator issue was caused by an inability to bleed off excess electrical load. Wouldn't removing load from the charging system actually exacerbate the problem? Granted, I don't think the mods you are doing would make any sort of noticeable difference...but, conceptually-speaking, am I misunderstanding the issue?

That being said, I'm digging it! Nice mod...

I think that's is on of a couple of different issues with the charging systems. I'm no electrical wwwwizzzzarrrdddd but I think the original charging issues stemmed more from shoddy/corroded connectors building resistance which in turn built heat in the R/R (which prior to this seemed capable of handling the load. Simon Kuethers 77-78 750 still has the original split Reg/REC units in it, and with clean shiny new connectors is charging quite perfectly as of yet) which in turn fried the R/R and left unchecked fried other components as well as the stator was left to deliver full load to whatever system it wanted.
Later some of us jumped on the mosFET regulators which while still a shunt type device seemed to do the job more adequately as it did it much quicker thus eliminating some of the heat build up. But as Posplayr has discovered this mod seemingly left the stator victim to the heat rather than the R/R which is also not good (though I will say for the record my EX GS1100ES was fitted with a FET type r/r and still had the factory installed stator in it and charged away at 14.3 all day long for what it's worth). The newest mod to eliminate the issues is to switch to a Compufire or other type series regulator which instead of shunting the overvoltage to ground, to put it simply so I could understand it, never allows the charge to leave the stator. That's probably way over simpified and I couldn't exactly wrap my head around how a system that's constantly making a charge doesn't result in heat but again I'm no genius so I leave that to the gurus to tell me how it does what it's supposed to.
N E wayyyy..most suggest that a thorough cleaning and upkeep of the connectors, and not just the ones in the charging system but anywhere, and elimination of the silly headlamp loop from the stator path combined with a shindingen 6 wire r/r will do an adequate job without compromising durability for the most part.

Sorry for the lengthy Jack Hammered. Looking forward to warding this mod progress.

Tck

Thanks! That definitely cleared up my misunderstanding...I hadn't realized the significance the connectors played in initiating the chain-reaction.
 
New shineys arrived today. Still dont have everything but my SuperFlux LED came in. Damn its small and bright. The LED itself is less than 1/4" across and about 5/16" at the 3M dual sided tape base. Yeah, these things came with peel and stick tape preattached and for $6 or so shipped. AND the dude got them to me in 2 days!?! I dont usually promote a company without some big service on their side but damn these guys at Oznium.com really did me good. I talked to a tech about what I was doing on their forum and he pointed me to these.


And I brought home a few pieces of 1/8" Lexan to play with to see which tinting method will work best to which will cost the least. The Lexan is free since I have the drops of past projects at work and the small amount I need wont be missed.


Still waiting on the LCD clock I bought. Ill have to mount the blue LED in it somehow for back lighting, but It was much cheaper and adds a liitle more "I built that" to the project.
 
Last edited:
Not much, its raining on and off today. And to be honest, Ive been playing with my new Droid I got for my birthday so...
What I did do is clean up a couple scrap pieces of Lexan and picked up a can of Lens tint. It runs about $12 at the AutoZone here. I taped off half of the piece to get a contrast check to see just how dark. I painted 3 pieces but I think a single coat will do just fine. I will hit one of the pieces with a second just to say I did. I used the dimmest LED add-on Ill be using for the test lighting.


Im thinking with the single coat and a separator plate behind the tinted lens, this shoulf be light enough to see in good bright light, but not see all the wiring, hot glued hodge podge thats behind it. There is a big difference in having the tinted side out then in. Its a cleaner look to have the untreated side facing out. Only problem I see is maybe glare, so Ill be looking into an anti-glare coating.
 
Ill be making the isolator plate so the light from one idiot light doesnt bleed over to another. All in time I guess
.


If you have individual pieces line the edges with white paint. It will focus the light out at you not to the sides. This is what we did when I was in interior prototyping and works great. Paint has to be thick like white out.
 
Coming along for the ride on this one, will be interesting to see how it turns out :)

Also, thanks for the Oznium tip off, they've got some stuff on there I've been thinking about for down the track which will save me some headaches making them myself...
 
Jason, will do. Wasnt sure how to go about it so the info will be put to use. No worries Pete. They did me good and took all the thinking out of using LEDS.
 
Well, I didnt get much done this weekend. Celebrated getting old (turned 45). But I did pull the old/wrecked instrument cluster off. The black outer casing is done for and the white inner isnt looking a lot better. BUT, this gives me a chance to play around. I mean what is the worst that could happen, I gotta buy a new speedo?!? The center idiot light panel is scarred and marred but nothing I cant fix with some plastic specific epoxy and time. Plus I picked a can of plactic trim and molding paint to make everything look new. And Ill have to straighten the gauge bracket. I know you guys and gals love a picture or two soooo....


I think the first order of business will be cleaning, repairing and retrofitting all the new stuff in the center section. Ill run through the wiring of the stock gear indicator to see what goes where on the new digital one. And Ill figure out the best way to route wiring for the USB and Volt meter. Cause Lord knows theres enough crap crammed in that little light housing already. Ill try to use as much of the stock harness with new plugs and sockets or spray the old ones to hell and back with my contact cleaner (plastic friendly of course)
 
Clock arrived today. Its a little smaller than expected (damn the metric system and all its confusion :o) But it may still be just the thing. Ill try doing some cutting and such this weekend since it is supposed to rain and see what can be done with this mess of parts.

 
I know it been a few, but I have not abandoned this project. Doctors, arguing with insurance companies and a new Kitten, well you get the picture. I broke out (no pun intended) all the pieces parts left of the speedometer and center cluster, along with the "repair kit".

I have to play outside cause the girlfriend just knows Im gonna make a mess, whatever. :rolleyes: There was good bit of roadrash on the plastic of the center cluster for the idiot lights, so I figured Id fix that before starting on fitting all the new digital goodies inside.


And that nasty crack had to be fixed as well. A little plastic specific epoxy should do the trick. First the crack then a little build up of the roadrash grinding damage.
 
The Speedo was a different matter.
Many pieces missing and the bezel was torn up a bit as well.

Thats my glue clamp while the 5 min. epoxy dries.:p
I have some polystyrene I can cut and shape to fill the missing plastic so Ill let this dry atleast 24 hours before moving on.
 
Good to see you're getting somewhere, repairing that plastic's gonna be PITA but should be worth it when done.

I like the new kitten idea too :)
 
Back
Top