• Required reading for all forum users!!!

    Welcome!
    Register to access the full functionality of the GSResources forum. Until you register and activate your account you will not have full forum access, nor will you be able to post or reply to messages.

    A note to new registrants...
    All new forum registrations must be activated via email before you have full access to the forum.

    A Special Note about Email accounts!
    DO NOT SIGN UP USING hotmail, outlook, gmx, sbcglobal, att, bellsouth or email.com. They delete our forum signup emails.

    A note to old forum members...
    I receive numerous requests from people who can no longer log in because their accounts were deleted. As mentioned in the forum FAQ, user accounts are deleted if you haven't logged in for the past 6 months. If you can't log in, then create a new forum account. If you don't get an error message, then check your email account for an activation message. If you get a message stating that the email address is already in use, then your account still exists so follow the instructions in the forum FAQ for resetting your password.

    Have you forgotten your password or have a new email address? Then read the forum FAQ for details on how to reset it.

    Any email requests for "can't log in anymore" problems or "lost my password" problems will be deleted. Read the forum FAQ and follow the instructions there - that's what we have one for...

  • Returning Visitors

    If you are a returning visitor who never received your confirmation email, then odds are your email provider is blockinig emails from our server. The only thing that can be done to get around this is you will have to try creating another forum account using an email address from another domain.

    If you are a returning visitor to the forum and can't log in using your old forum name and password but used to be able to then chances are your account is deleted. Purges of the databases are done regularly. You will have to create a new forum account and you should be all set.

Welding plastic side covers, fenders, etc.

tkent02

Forum LongTimer
Past Site Supporter
Here's how I do it.

P1000553.jpg


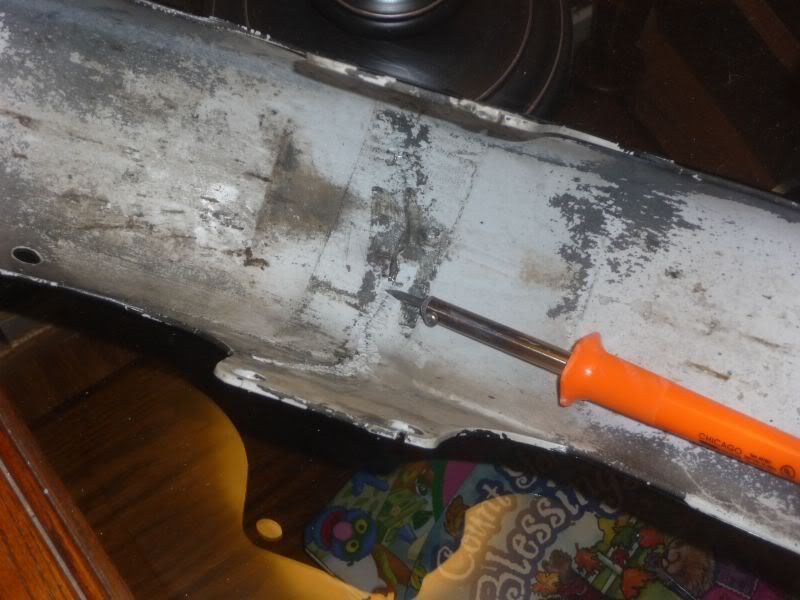
Skinny little low power round tip soldering iron, medium hot. Enough to melt the stuff easily, not so hot it instantly smokes and burns through. Might have to unplug it momentarily to keep the temp right. I just make little stitches across the crack. Try to get them to melt deep, maybe halfway to 2/3 of the way through, or as deep as you can without going all the way through the plastic.

Closein.jpg


Probably should have cleaned up the surface better first, but it came out OK anyway.

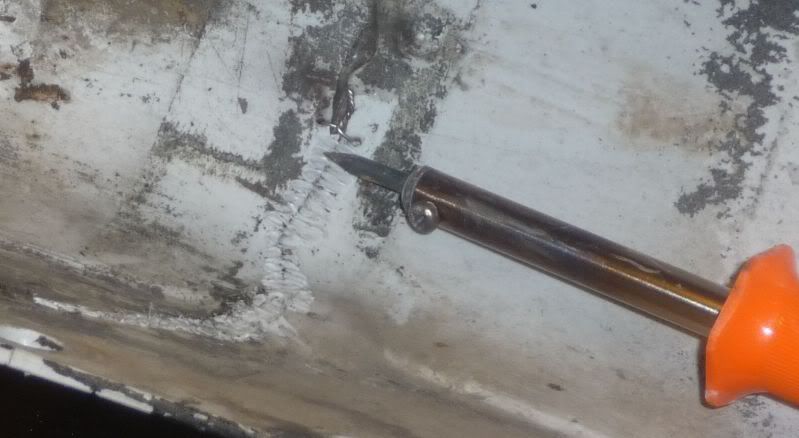
If strength is more important than looks, I do the stitches at an angle, like this:

///////////////////

Then flip it over and do this on the other side:

\\\\\\\\\\\\\\\\\\

Sometimes I do this on one side:

XXXXXXXXXXXXXXX

I think the little ridges left in the plastic makes it a little more rigid than a flat surface, like the little fins cast into something mechanical part when they want to make it stiffer.

I have fixed a lot of side covers, a few plastic fenders, the side bags and top box on the BMW that I flipped over in Ireland. They end up strong enough, maybe not as strong as new but pretty good. Better than any glue or anything that I've tried. It's really easy, the temperature is not that critical, doesn't really seem to matter exactly which technique, it just works.

If you guys have other methods you use, post them up.
 
Nice to see that trick. While there are other ways to do this the key is that you can not try and attached the two sides of the crack with a butt joint. Somehow you have to break up the two cracked area between the twos sides.

By melting through the fender you have done that. On side covers I have ground through to feather out the crack and used fiberglass reinforced bondo filler (waterproof type).

I did a variation of this a while back with a mounting nut that popped out of a plastic housing. Used the soldering iron to hold the nut back in the housing.

I did buy a HF plastic welder but had issues finding the correct filler rod on Suzuki side covers and tail piece. Also melted alot of the plastic so I just went with Bondo filler as described above.
 
guys that plastic welding is out dated and a pain in the ass use 2 part epoxy i know its a little pricy but it does wonders and holds forever
 
guys that plastic welding is out dated and a pain in the ass use 2 part epoxy i know its a little pricy but it does wonders and holds forever

Well, no it doesn't. Look at the epoxy that failed in the picture. There are several cracked and epoxy repaired side covers in the box out there, most of them have failed. I think the ABS plastic of these pieces is not really compatible with epoxy. This is a lot easier and quicker anyway.
 
Last edited:
I, too, have had great success with two part epoxy (usually a fast cure, five minute type). If the prep is done properly, and a "plastic compatible" epoxy is used, the results are usually a lot stronger than a plastic weld, which can be difficult to master. At least this has been my experience over twenty plus years...

What I generally do for post repairs is to drill holes right through the posts in various places, and rough up the surrounding surfaces to give the epoxy more area to bond to. Then, when I've applied the epoxy it flows through the holes I've drilled and permanently anchors the posts to the roughed up base. By creating a wide base with the epoxy and allowing it to create a conical shape as it cures I wind up with a VERY strong post repair that rarely ever fails again.

For even greater strength I have occasionally used fiberglass mat to really bind everything together, but most of the time I haven't bothered. I think the fiberglass mat can be especially useful in situations where two flat pieces of plastic are being rejoined, but for even more structural strength the addition of a flat piece of plastic bridging the gap (on the inside, of course) and drilled like a performance brake rotor will really help create a permanent, successful, repair, as the epoxy will again flow through the holes and lock the reinforcement into the repair.

Hope this is helpful!

Regards,
 
Last edited:
I like the idea of melting the pieces together but haven't tried that technique yet. Have fixed several pieces using slow dry epoxy and fiberglass cloth though. Spread the crack so the glue gets inside and then reinforce the backside with fiberglass cloth (cut a patch that extends about 3/4" on each side of the crack). Works well; plastic part is stiffer after the repair is performed than before. Fingers crossed that it will hold up.
 
Last edited:
ok should have specified u cant use the stuff from a auto parts store not quite the same its cheap stuff. u gotta use quality stuff and u have to use a adhesion promotor two that are the best hands down are made by fuzor and plio-grip. i perfer plio-grip. and it dose blow the plastic welding out of the water by far. just my .02
 
the stuff is incredible works on plastic and metal I have used it to fill voids if there is a hole in a fearing all you do is put a piece of tape over the hole fill the hole with the powder and put the activator liquid and less then ten seconds void filled, it is sand-able and paint-able. I had a front fender off a wrecked gsxr 1100 it had a rip in the fender the rip was also split i used a pair of vise grips to hold the split together i lightly sanded the back side and applied the powder and activator ten seconds it was held together it is worth spending the time and money. and yes it does stick to it self
 
Last edited:
the stuff is incredible works on plastic and metal I have used it to fill voids if there is a hole in a fearing all you do is put a piece of tape over the hole fill the hole with the powder and put the activator liquid and less then ten seconds void filled, it is sand-able and paint-able. I had a front fender off a wrecked gsxr 1100 it had a rip in the fender the rip was also split i used a pair of vise grips to hold the split together i lightly sanded the back side and applied the powder and activator ten seconds it was held together it is worth spending the time and money. and yes it does stick to it self
Sounds exactly like "Insta-Fix," which I've used and like. I still prefer two part epoxy for more solid repairs, as I've found the "Insta Fix" can be brittle in certain situations. Also, Two part epoxy is MUCH less expensive so I save the "Insta-Fix" for situations where it can do the job other adhesives aren't as well suited for. Good stuff, though!

Regards,
 
In less time than it takes to mix a batch of epoxy, much less clean up the mess, I welded five cracks on a fender. It can't be seen from the outside, and judging buy the "Flex-Test", it's pretty darned strong. You guys can buy all the magic potions you want, I like this method. Been doing it for years, I'll stick with it.
 
Tom..Devcon, the makers of epoxy also make a product called plastic welder used same as epoxy but a bit touigher.
 
In less time than it takes to mix a batch of epoxy, much less clean up the mess, I welded five cracks on a fender. It can't be seen from the outside, and judging buy the "Flex-Test", it's pretty darned strong. You guys can buy all the magic potions you want, I like this method. Been doing it for years, I'll stick with it.

In the time it takes you to wait for the iron to heat up I'll generally have my five minute epoxy mixed, applied, and hardened with no mess and a strong, permanent repair. You can stitch your fender any direction you like, but I prefer not only being able to repair the damage, but also to build up additional strength so that it never happens again. I like this method. Been doing it for years, I'll stick with it. :D;)

Regards,
 
Back
Top