• Required reading for all forum users!!!

    Welcome!
    Register to access the full functionality of the GSResources forum. Until you register and activate your account you will not have full forum access, nor will you be able to post or reply to messages.

    A note to new registrants...
    All new forum registrations must be activated via email before you have full access to the forum.

    A Special Note about Email accounts!
    DO NOT SIGN UP USING hotmail, outlook, gmx, sbcglobal, att, bellsouth or email.com. They delete our forum signup emails.

    A note to old forum members...
    I receive numerous requests from people who can no longer log in because their accounts were deleted. As mentioned in the forum FAQ, user accounts are deleted if you haven't logged in for the past 6 months. If you can't log in, then create a new forum account. If you don't get an error message, then check your email account for an activation message. If you get a message stating that the email address is already in use, then your account still exists so follow the instructions in the forum FAQ for resetting your password.

    Have you forgotten your password or have a new email address? Then read the forum FAQ for details on how to reset it.

    Any email requests for "can't log in anymore" problems or "lost my password" problems will be deleted. Read the forum FAQ and follow the instructions there - that's what we have one for...

  • Returning Visitors

    If you are a returning visitor who never received your confirmation email, then odds are your email provider is blockinig emails from our server. The only thing that can be done to get around this is you will have to try creating another forum account using an email address from another domain.

    If you are a returning visitor to the forum and can't log in using your old forum name and password but used to be able to then chances are your account is deleted. Purges of the databases are done regularly. You will have to create a new forum account and you should be all set.

Wrong Kind of Stripping

  • Thread starter Thread starter wedoo2
  • Start date Start date
W

wedoo2

Guest
The air mixture screws on my carbs are about ready to strip completely. Does anyone have a suggestion of how to get these out? Are they going to have to be drilled?
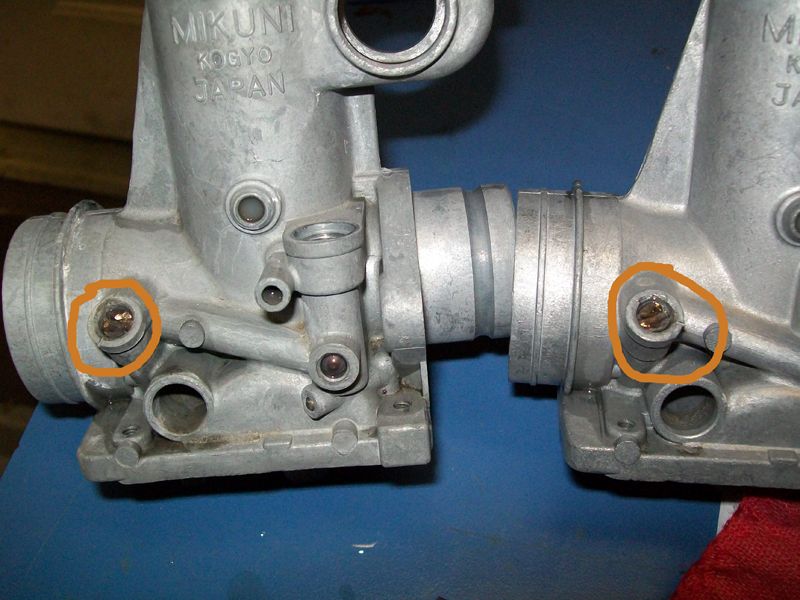

100_1120.jpg
 
Not all that much different than what we encounter on the BS-series carbs mixture screws. :-\\\

Just use a Dremel tool with a large cut-off wheel to cut a new slot in the top of the screw. You will cut into the carb body a bit, but it won't matter if you just go deep enough to enhance the slot in the screw.

We have to cut much deeper slots in the BS carbs to do this:
IMG_4081.jpg


.
 
Heat the bodies up with a propane torch and get the orings softened up from the heat and the immediately hit them with some WD40. I WOULD NOT cut into the bodies like the one pic showed..I would put a thin tip on a dremel and just cut the slot in the screw. Once you have the screws out, you will see theres PLENTY of meat at the top, so just file or grind them smooth and take your dremel or a hacksaw blade and recut nice new fresh slots.
 
Sorry to step on your toes Steve with my comment about cutting into the bodies, but there are tiny dremel bits that will allow JUST the screw to be cut well enough to get the screws out. That, coupled with softening the orings with the heat and some lube and they come out effortlessly and leave the bodies looking right. Last thingI would want on VMs is that ugly slot staring back at me everytime I look at the carbs.


And to the original poster...when you reinstall the new orings, be sure to run a Qtip well in the hole to clean that up and apply a little smear of grease to the orings so they slide down the holes and dont grab on the sides of the hole and roll themselves out of the groove on the needles. If they hang up and roll out of the grooves, the threads will then cut and chew them up..which requires another new oring at that point.
 
I was able to get one of the screws out with the dremel method, although it did kind of end up like Steve's picture. I don't think I'll be able to do it the same way pn the other one. I have a groove cut into it now, heated it up, lots of PB and WD, but it won't budge. I see why they were stripped in the first place. I may have to tap it out somehow. I have it soaked with PB and will try again tomorrow. May need another carb body before this is over. That ought to be easy?????
 
They are soft brass screws on the VMs, they strip out easily. Have you got any left handed drill bits?
 
Just drill it carefully with a reverse twist drill, it's brass and the bit will go right thru it

Use another needle to make a depth gauge for the head. Drill out the head and the rest should fall out, no damage to the carb body
 
There are threads near the top of the hole that I am afraid of stripping as well. Will get a left handed bit later today and try that.
 
Got both of those screws out. :-\\\

Put in all of the new parts and now all I have to do is set the screws and floats. I plan on using the stock set up unless there is conventional wisdom against that. I have not read it here, but I do not catch everything.

They look great, I'll post pics on my build thread after they are completely back together. Thanks for the help guys.
 
I cut a groove into each screw after filing the lip down some with the dremel. Heated things up after soaking in PB Blaster, then a shot of WD. I was afraid at first that I cut too much but there is plenty of metal still there. It's funny, on the second one I was working it pretty hard and thought that I had stripped it more, and I looked down and it had moved.

It was quite a moment.

Is 1 1/4 turns on the fuel mixture screw enough?
 
Pilots ( bottom) at 3/4 to 1 out and mixture ( side ) at double the pilot..or about 1 3/4 to 2 out is about the stock default settings. But remember this just a starting point...youll do the fine tuning later. This will get it running and be real close though.

Before you waste a lot of time and have to back track, get it to run and drive. Once that accomplished, do the valve adjustments, sync the carbs again so they now match the properly adjusted valves, and then do the fine tuning to get it set up to the best requirements of your particular engine.
 
Before you waste a lot of time and have to back track, get it to run and drive. Once that accomplished, do the valve adjustments, sync the carbs again so they now match the properly adjusted valves, and then do the fine tuning to get it set up to the best requirements of your particular engine.

That has been the plan. It's interesting about these settings as I went through the service manual and could not find the fuel mixture settings, but did see the air pilot. It said 1 1/4. Of course that is just a start but I'll go a little more. The article by Paul Musser suggested the fuel pilot to start at the same point as what you suggested.

You do good work here Chuck. I've read a good number of your posts and you are usually spot on.

When it is running again I will sync them and get the valve clearance looked at. I don't do that. It's not that the procedure is that hard, I just don't trust my touch with the feeler gauge. The last two bikes I did I had taken to a guy that does it all the time and he let me help. I just never felt comfortable with my measurements and he kept changing what I did. Good skill to have but as infrequently as I need the skill it is worth it to me to have it done.

Oh, do you agree with 25-27 mm float setting? I can measure.
 
I don't do that. It's not that the procedure is that hard, I just don't trust my touch with the feeler gauge. The last two bikes I did I had taken to a guy that does it all the time and he let me help. I just never felt comfortable with my measurements and he kept changing what I did. Good skill to have but as infrequently as I need the skill it is worth it to me to have it done.

The engines like yours with shims, it takes no skill with the feelers. It's more of a go - no go thing. Very very easy to tell the difference between smaller than .03mm and larger than .08mm. If the clearance is smaller than .03mm ( or maybe .05mm or so) you put in a smaller shim. If it's bigger than .08 you put in a bigger one. (this doesn't happen often) Easy stuff.
 
Back
Top